The ConfigurationSettings folder in the Settings tree is used to set the configuration information of objects to be managed.
Be sure to make the following settings.
Make the following settings if necessary.
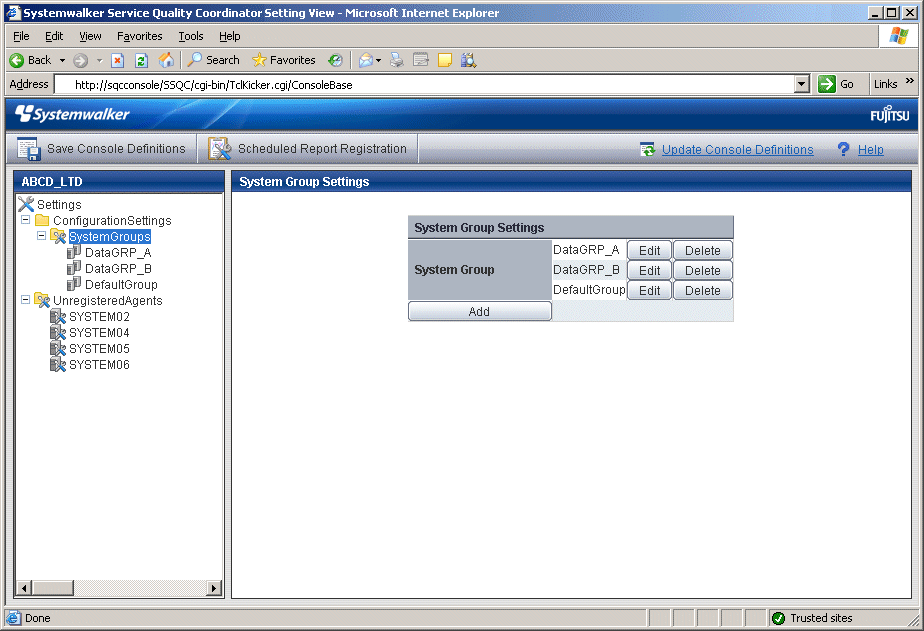
This node registers system groups.
System groups are for organizing the multiple servers that make up the system being managed.
System groups are specified as display units in the summary, analysis, and scheduled report views.
Managed host must belong to a group.
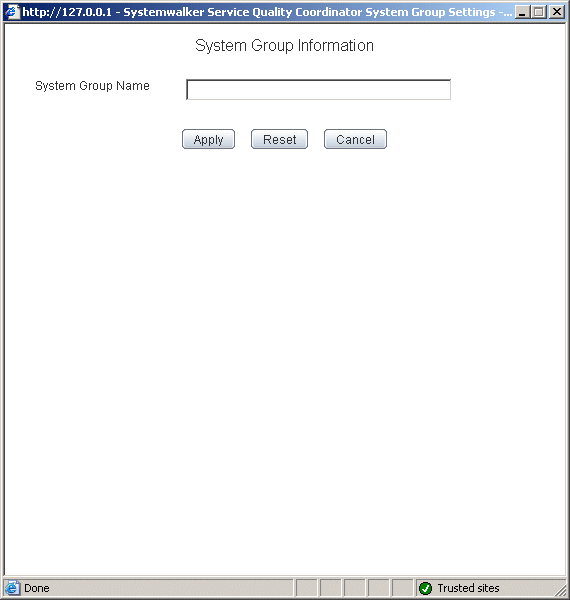
The System Group Settings window is shown below.
Procedure
Click the Add button to display the System Group Information window, and then set a system group name.
Node name | Setting item name | Description |
|---|---|---|
SystemGroups | System Group Name | Set a display name that will be used to identify the system group. Set a name that is unique within the management configuration. Note, however, that it does not matter if the same name is also used as an Agent name or a Proxy Manager name. The following characters can be used for system group names: - Alphanumeric characters - Symbols (except for \ : , < > $ " ' [ ] = &) Platform dependent characters can not be used. The system group name can be no longer than 64 characters. |
When the systems group is registered, the ProxyManagers and Agents folders are created under the system group folder.
Point
It takes longer time to display graphs including system group information like Summary view, according to the number of Agents registered to the system group.
It takes about 60 seconds when it manages 50 Agents, in case of that CPU of the Operation Management Client is Xeon 3.3 GHz only as a guide (It depends on the kind of monitor, period of data to be displayed, CPU performance of the Operation Management Client, and other conditions).
To shorten the time to display, create multiple system groups and divide the Agents to register.
The registers systems group can be done by the command. Refer to "sqcSetupConsoleDefine (Console Definition Configuration Command)" in the Reference Guide.
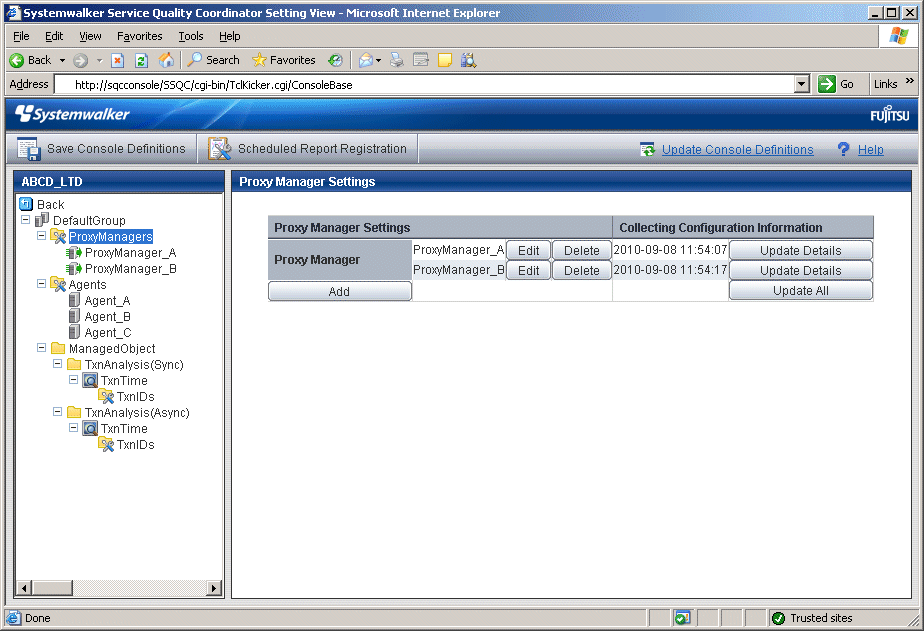
This node registers Proxy Managers that will be managed.
If end user response information and server operational information is not to be collected, there is no need to set up this folder.
Point
To collect information with a Manager and not a Proxy Manager, register the Manager as a Proxy Manager.
Proxy Manager registration can also be performed easily with the Register Agent with System Group window. Refer to "1.2.3 Unregistered Agents Information (UnregisteredAgents)" for details. Note that the Register Agent with System Group window cannot be used when "pull" operations are being performed. In such cases, use the Proxy Manager Settings window (shown below) instead.
Procedure
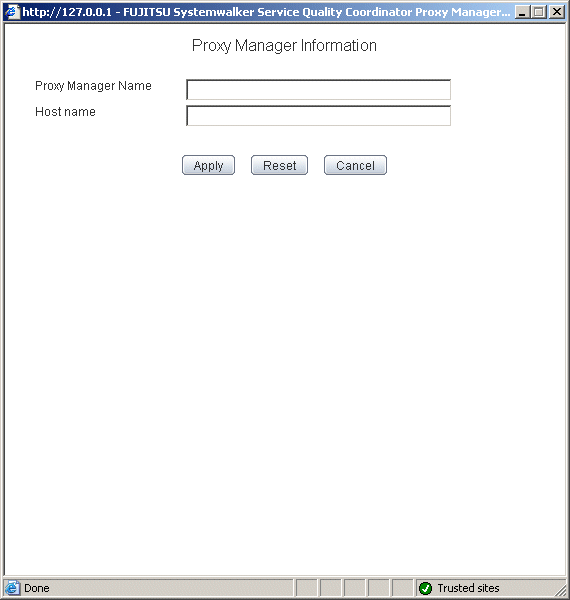
Click the Add button to display the Proxy Manager Information window, and then set information relating to the Proxy Manager.
Node name | Setting item name | Description |
|---|---|---|
ProxyManagers | Proxy Manager Name | Specify the display name for identifying the Proxy Manager. Set a name that is unique within the management configuration. Note, however, that it does not matter if the same name is also used as a system group name or an Agent name. The following characters can be used for Proxy Manager names: - Alphanumeric characters - Symbols (except for \ : , < > $ " ' [ ] = &) Platform dependent characters can not be used. The Proxy Manager name can be no longer than 64 characters. |
Host Name | Specify the identifier for the Proxy Manager. The same system name cannot be registered more than once within a single group, but identical host names can be registered in different groups. Point If a single Proxy Manager is used in multiple businesses, it is possible to create a system group for each business and to register the same Proxy Manager with each one. However, a different character string should be used in the ProxyManager name (display name). The identifier is a name that is displayed by the Policy Application Command. Refer to "A.3 sqcSetPolicy (Policy Application Command)" for details on the Policy Application Command. |
Next, click either the Update All or the Update Details button to collect configuration information from the Proxy Managers. This configuration information is used for management purposes. If this operation is successful, the date and time that the configuration information was collected will be displayed to the left of the button.
Note
If the collection of configuration information fails, the collection date will not be updated. Check that the host name is correct, and that the Proxy Manager collection policy has been correctly created and applied.
If the following message appears in the Collecting Configuration Information window, the problems listed below may be the cause.
couldn't open socket: connection timed out |
The IP address of the Manager that was specified at installation time is incorrect.
The Manager (its resident processes) is not running.
When configuration information is collected, a folder named ManagedObject is created in the Proxy Manager that performed the collection.
The ManagedObject folder displays the following information targeted for collection by the Proxy Manager:
End user response information
Service operational information
Point
The configuration information that is collected here refers to the managed object configuration information (response and configuration information for managed objects) explained in "A.2 Response/Operation Information Collection Policy Setup Command" Therefore, collection policies described in "A.2 Response/Operation Information Collection Policy Setup Command" must be created and applied on either the Manager or the Proxy Manager in advance.
Also, the configuration information collection explained here must be performed each time collection policies are created and applied.
[For "Pull" communications]
For "pull" operations, another preliminary task must be performed before the settings in this window can be used to collect the configuration information. Perform the following procedure, and then click either the Update All or the Update Details button in the Setting View.
Copy the managed object configuration information file from the managed server to the operation management client.
The location of the file on the managed server is as follows:
[Windows]
Variable file directory\control\ManagedConf_XXXX.xml |
[UNIX]
/etc/opt/FJSVssqc/ManagedConf_XXXX.xml |
"XXXX" refers to the name that was specified with the -h option when the "A.3 sqcSetPolicy (Policy Application Command)" was executed. If the -h option was omitted, then this will be the host name of the system where this command was executed.
Copy this file to the following location on the operation management client.
Installation directory\www\managedconf\ManagedConf_XXXX.xm |
Point
The registers Proxy Manager and configuration information is collected can be done by the command. Refer to "sqcSetupConsoleDefine (Console Definition Configuration Command)" and "sqcGetXMLConfig (Configuration Information Collection Command)" in the Reference Guide.
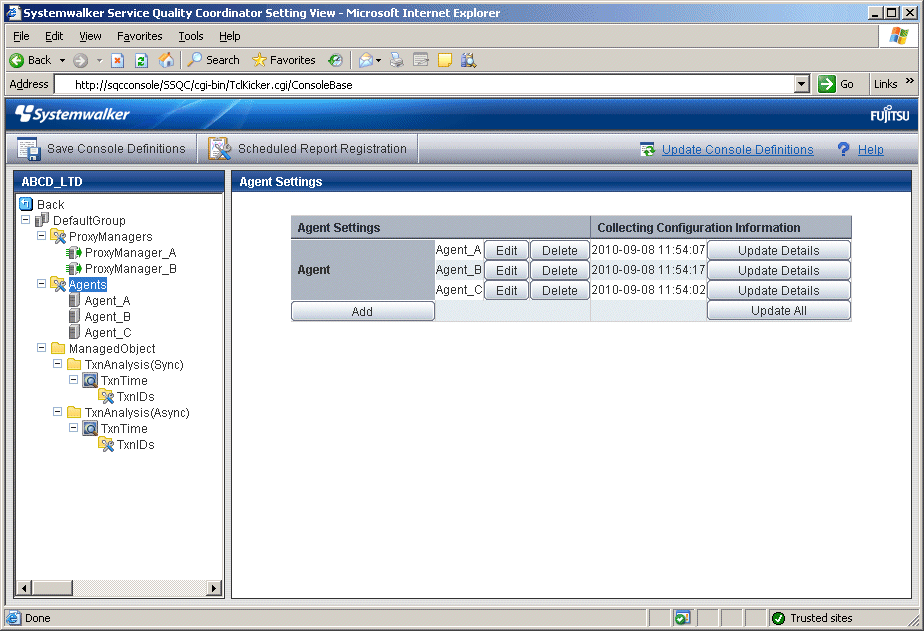
This node registers Agents that will be managed.
Point
Agent registration can also be performed easily with the Register Agent with System Group window. Refer to "1.2.3 Unregistered Agents Information (UnregisteredAgents)" for details. Note that the Register Agent with System Group window cannot be used when "pull" operations are being performed. In such cases, use the Agent Settings window (shown below) instead.
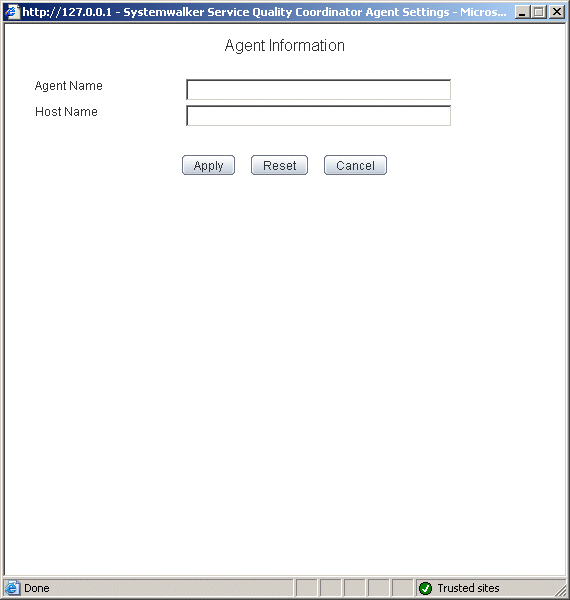
The Agent Settings window is shown below.
Procedure
Click the Add button to display the Agent Information window, and then set information relating to the Agent.
Node name | Setting item name | Description |
|---|---|---|
Agents | Agent Name | Specify the display name for identifying the Agent. Set a name that is unique within the management configuration. Note, however, that it does not matter if the same name is also used as a system group name or a ProxyManger name. The following characters can be used for Agent names:
Platform dependent characters can not be used. The Agent name can be no longer than 64 characters. |
Host Name | Specify the identifier for the Agent. The same host name cannot be registered more than once within a single group, but identical system names can be registered in different groups. If a single Agent is used in multiple businesses, it is possible to create a system group for each business and to register the same Agent with each one. However, a different character string should be used in the Agent name (display name). The identifier is a name that is displayed by the Policy Application Command. Refer to "A.3 sqcSetPolicy (Policy Application Command)" for details on the Policy Application Command. Point For clustered Agent operations, specify either a physical host name or a physical IP address. |
Next, click either the Update Details or the Update All button to collect the configuration information from the Agents on the managed server. This configuration information is used for management purposes. If this operation is successful, the date and time that the configuration information was collected will be displayed to the left of the button.
Point
If the collection of configuration information fails, the collection date will not be updated. Check that the host name is correct, and that the Agent collection policy has been correctly created and applied.
If the following message appears in the Collecting Configuration Information window, the problems listed below may be the cause.
couldn't open socket: connection timed out |
The IP address of the Manager that was specified at installation time is incorrect.
The Manager (its resident processes) is not running.
When configuration information is collected, a folder named ManagedObject is created in the Agent that performed the collection.
The configuration information targeted for collection by the Agent will be displayed within the ManagedObject folder.
Point
The configuration information that is collected here refers to the managed object configuration information (resource configuration information) explained in "A.1 Server Resource Information Collection Policy Setup Command". Therefore, collection policies described in "A.1 Server Resource Information Collection Policy Setup Command" must be created and applied on the Agent in advance.
Also, the configuration information collection explained here must be performed each time collection policies are created and applied.
[For "Pull" communications]
For "pull" operations, another preliminary task must be performed before the settings in this window can be used to collect the configuration information. Perform the following procedure, and then click either the Update All or the Update Details button in the Setting View.
Copy the managed object configuration information file from the managed server to the operation management client.
The location of the file on the managed server is as follows:
[Windows]
Variable file directory\control\ManagedConf_XXXX.xml |
[UNIX]
/etc/opt/FJSVssqc/ManagedConf_XXXX.xml |
"XXXX" refers to the name that was specified with the -h option when the "A.3 sqcSetPolicy (Policy Application Command)" was executed. If the -h option was omitted, then this will be the host name of the system where this command was executed.
Copy this file to the following location on the operation management client.
Installation directory\www\managedconf\ManagedConf_XXXX.xml |
Point
The registers Agent and configuration information is collected can be done by the command. Refer to "sqcSetupConsoleDefine (Console Definition Configuration Command)" and "sqcGetXMLConfig (Configuration Information Collection Command)" in the Reference Guide.
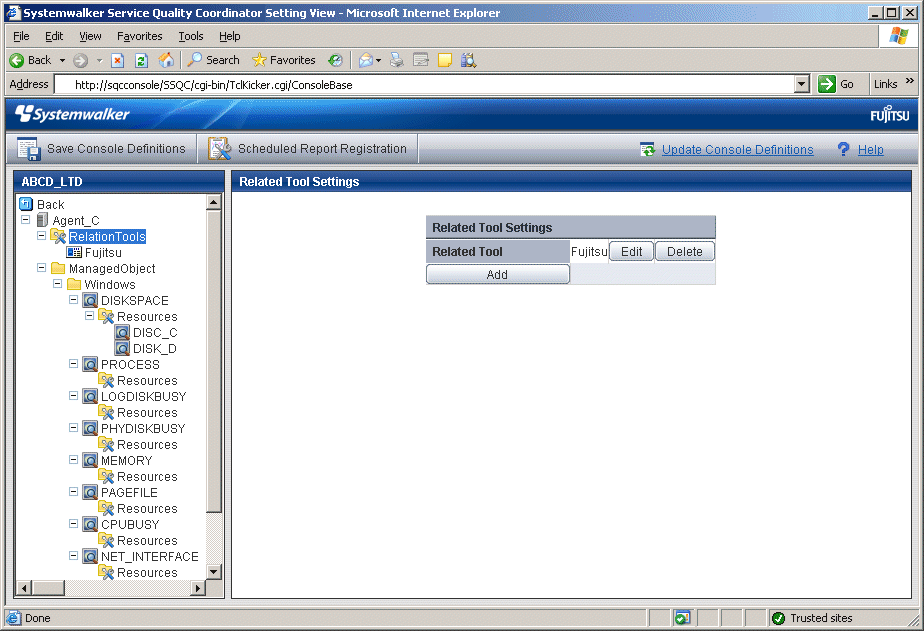
When Proxy Managers and Agents are registered, a folder named "RelationTools" will be created.
To call the related tools (that can be called from URLs) from this product's Drilled-Down display, set up this folder as well.
The Related Tool Settings window is shown below.
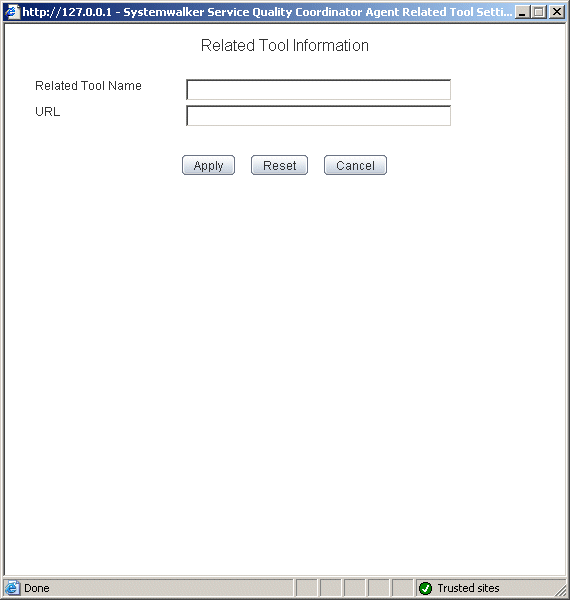
Procedure
Click the Add button to display the Related Tool Information window, and then set information relating to the related tool.
Node name | Setting item name | Description |
|---|---|---|
RelationTools | Related Tool Name | Specify the display name for identifying the tool. The following characters can be used for related tool names:
Platform dependent characters can not be used. The related tool name can be no longer than 64 characters. Existing related tool name cannot be used. |
URL | Specify the URL to call. |
This node is defined when it is necessary to display more specific resource content than the standard display unit in the Drilled-Down display of this product.
Refer to "3.2.3.3 Displaying resources" for details on displaying resources with the Drilled-Down display function.
The Resource Settings window is shown below.
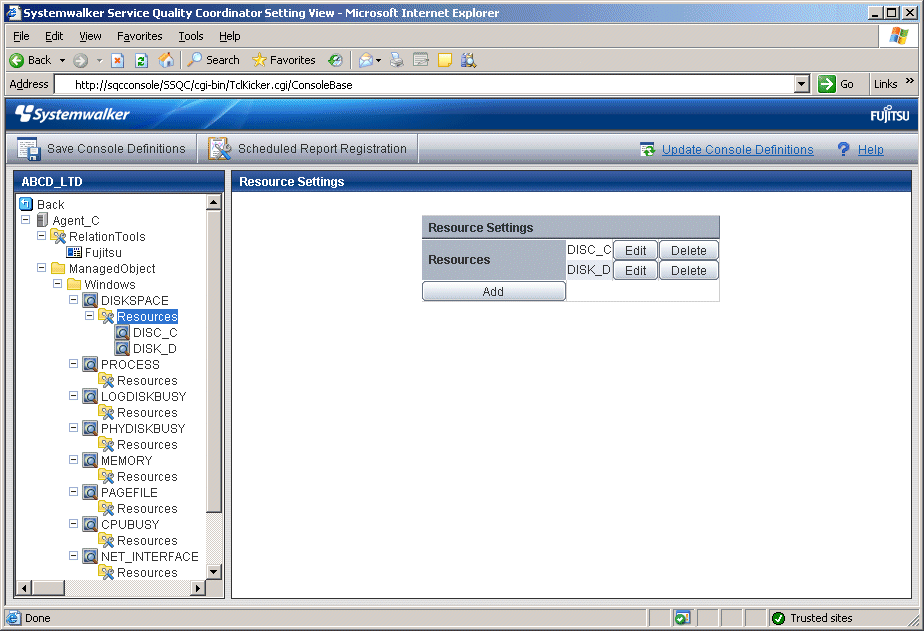
Procedure
Click the Add button to display the Resource Information window, and then set information relating to the resource.
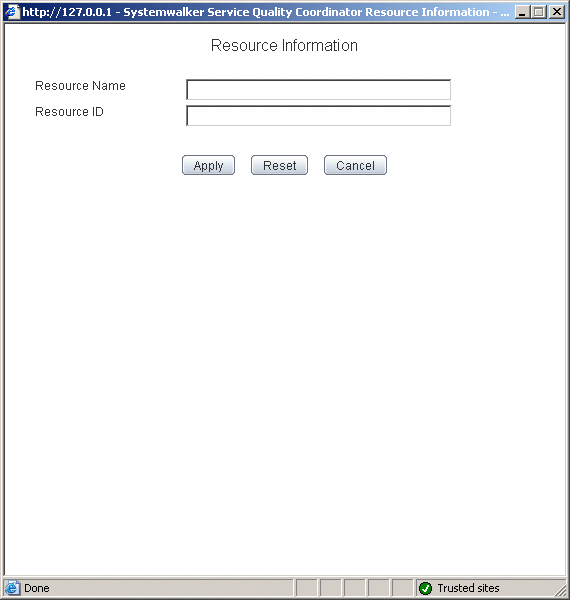
Node name | Setting item name | Description |
|---|---|---|
Resources | Resource Name | Specify the display name for identifying the resource. Set a name that is unique within the target Resources folder The following characters can be used for resource names:
Platform dependent characters can not be used. The resource name can be no longer than 64 characters. |
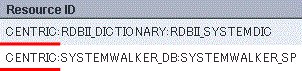
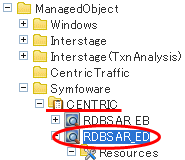
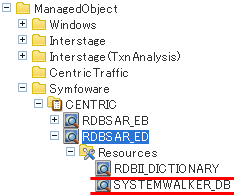
Resource ID | This is a character string displayed in the Resource ID column of the Drilled-Down display content that is used to filter display items by the resource. If the resource ID consists of multiple strings separated by colons (":") and the separated strings appear in the Drilled-Down tree between the ManagedObject node and the target node as nodes that represent instances, specify the strings below the instance node. Example: When "RDBSAR_ED" is selected, the following strings are displayed in the Resource ID column of the Drilled-Down display content:
In addition, "CENTRIC" appears in the tree as a node that represents an instance.
In this case, specify "RDBII_DICTIONARY" and "SYSTEMWALKER_DB" that appear below "CENTRIC".
Resource IDs can be filtered using a prefix. Instead of specifying the entire resource ID, it is possible to specify only the initial portion that needs to be matched. Specify a resource ID name that is unique within the Resources folder. Up to 64 characters (alphanumeric characters and symbols) can be used for the resource ID except for the following: |
By obtaining the configuration information, it becomes possible to check the configuration information relating to end user response management that was obtained from a Proxy Manager.
Precondition of function
This node is displayed only if "Managed object configuration information (response and managed object configuration information)" explained in "A.2 Response/Operation Information Collection Policy Setup Command" has been defined.
The Web site operation status window is shown below.
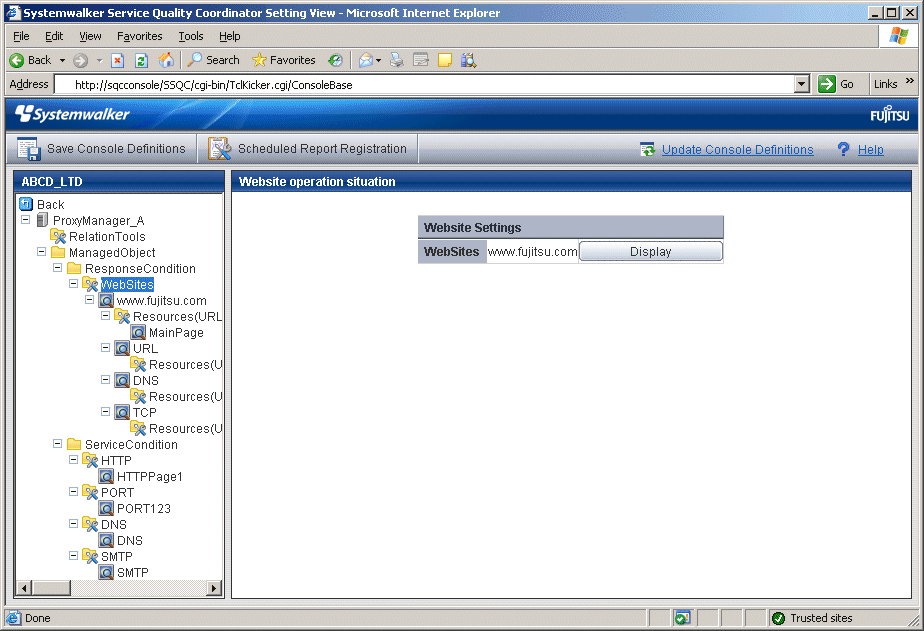
Procedure
Click the View button to display a Web site information window.

Node name | Display item name | Displayed content |
|---|---|---|
WebSites | Site Name | Displays the site name defined by end user response management on a Manager or Proxy Manager. |
This node is defined when it is necessary to display more specific resource content than the standard display unit in the Drilled-Down display of this product.
The URL of a Web page that has been fully downloaded (i.e., no error occurs when the Web page is displayed and the display is not interrupted) is set as a specific resource.
Refer to "3.2.3.3 Displaying resources" for details on displaying resources with the Drilled-Down display function.
The Resource(URL) Settings window is shown below.
Procedure
Click the Add button to display the Resource(URL) Information window, and then set information relating to the resource.
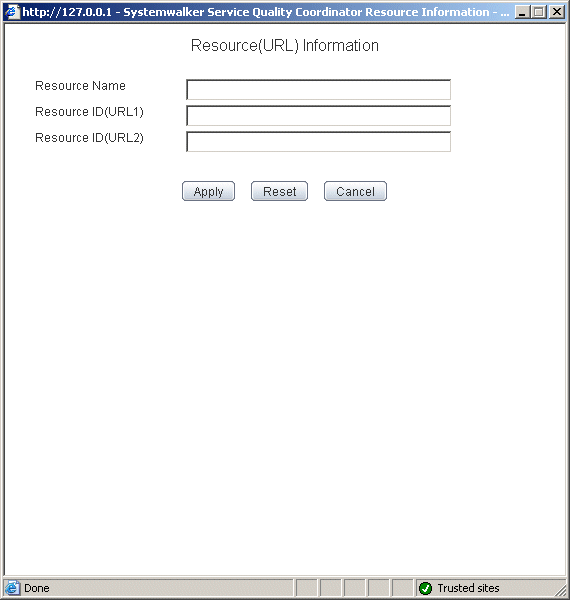
Node name | Setting item name | Description |
|---|---|---|
Resources(URL) | Resource Name | Specify the display name for identifying the resource. Set a name that is unique within the target Resources folder The following characters can be used for resource names:
Platform dependent characters can not be used. The resource name can be no longer than 64 characters. |
Resource ID (URL1) | Normally, set URL1 only. Note, however, that different URLs can point to the same Web page, as shown in the following example: http://www.fujitsu.com/SQC/ http://www.fujitsu.com/SQC/index.html To view these two URLs together as a single Web page, use URL2 in combination with URL1 and set as follows: URL1: /SQC/ URL2: /SQC/index.html Up to 64 characters (alphanumeric characters and symbols) can be used for the resource ID except for the following: $ \ " ' [ ] < > = & ^ | { } ( ) # * ; ? , | |
Resource ID (URL2) |
These nodes can be used to verify the configuration information of service operation management that is collected from a Proxy Manager.
Precondition of function
These nodes are displayed only if "Managed object configuration information (response and managed object configuration information)" explained in "A.2 Response/Operation Information Collection Policy Setup Command" has been defined.
The Service Operation Status window is shown below.

Procedure
Click the View button to display a service information window.
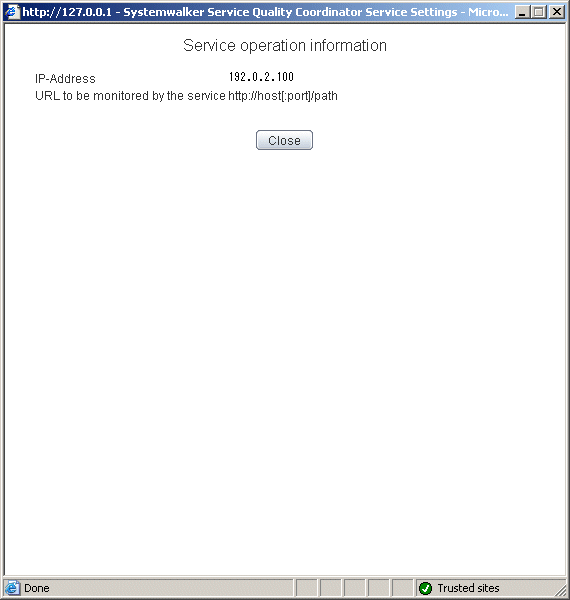
Node name | Display item name | Displayed content |
|---|---|---|
HTTP | IP-Address | Displays the IP address defined by HTTP service operation management on a Manager or Proxy Manager. |
URL to be monitored by the service | Displays the URL to be subject to service monitoring defined by HTTP service operation management on a Manager or Proxy Manager. | |
PORT | IP-Address | Displays the IP address defined by port service operation management on a Manager or Proxy Manager. |
Port | Displays the port defined by port service operation management on a Manager or Proxy Manager. | |
DNS | IP-Address | Displays the IP address defined by DNS service operation management on a Manager or Proxy Manager. |
Port | Displays the port defined by DNS service operation management on a Manager or Proxy Manager. | |
Resolved DNS host name | Displays the host name resolved by DNS that is defined by DNS service operation management on a Manager or Proxy Manager. | |
SMTP | IP-Address | Displays the IP address defined by SMTP service operation management on a Manager or Proxy Manager. |
Port | Displays the IP address defined by SMTP service operation management on a Manager or Proxy Manager. |
This node is defined when it is necessary to display content that focuses on specific transaction IDs when displaying transaction breakdown analysis from the Interstage(TxnAnalysis)JavaEE/Interstage(TxnAnalysis) node in the Drilled-Down display of this product.
For an overview of transaction breakdown analysis, refer to "Transaction breakdown analysis" in the User's Guide and "3.2.4.3 Interstage(TxnAnalysis)JavaEE/Interstage(TxnAnalysis) tree" of this manual.
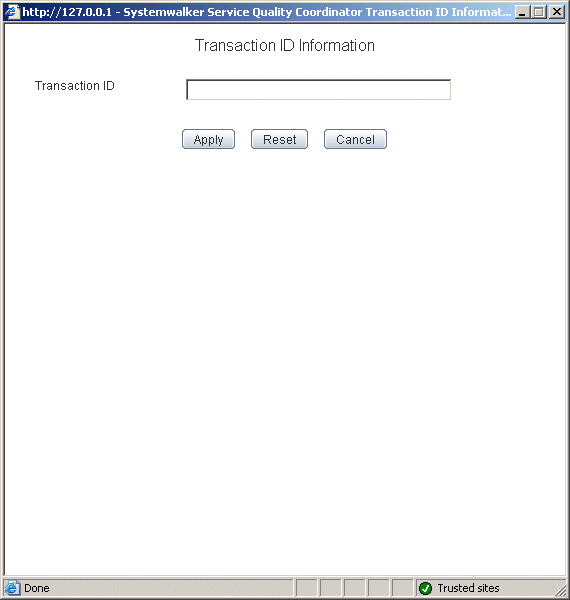
The Transaction ID Settings window is shown below.

Procedure
Click the Add button to display the Transaction ID Information window, and then set a transaction ID.
Node name | Setting item name | Description |
|---|---|---|
TxnIDs | Transaction ID | Confirm the multiple transaction IDs that are displayed when an upper level Server Instance node or Work Unit node is selected, and then set the transaction ID to be viewed. Extract and specify the transaction ID part from the resource IDs displayed in the Resource ID column of the content displayed by selecting the Server Instance node or the Work Unit node. Resource ID
Point The transaction number is a serial number within the process. If Work Unit process concurrency is set to a value of 2 or more, there is a chance that the transaction number will be duplicated. For this reason, the process ID should be specified as well. The transaction ID and subsequent resource IDs are filtered using their prefix. It is possible to specify the component type after the transaction ID. Set a transaction ID that is unique within the target TxnIDs folder. Up to 64 characters (alphanumeric characters and symbols) can be used for the transaction ID except for the following: |
This node is defined when it is necessary to display content that focuses on specific transaction IDs when displaying transaction breakdown analysis from the Interstage (Sync) Interstage (Async) or TxnAnalysis(OssJava) node in the Drilled-Down display of this product.
For an overview of transaction breakdown analysis, refer to "3.2.4.3 Interstage(TxnAnalysis)JavaEE/Interstage(TxnAnalysis) tree" of this manual.
The Transaction ID Settings window is shown below.
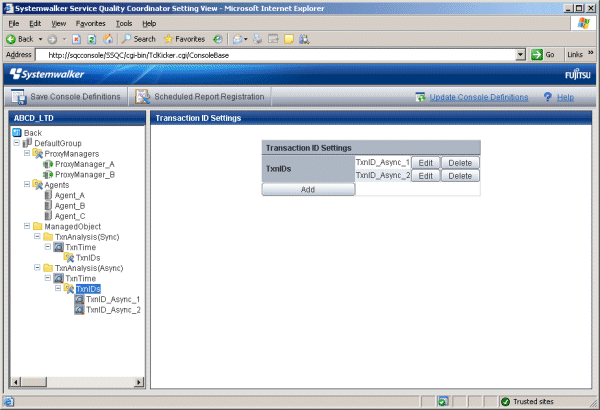
Procedure
Click the Add button to display the Transaction ID Information window, and then set a transaction ID.
Node name | Setting item name | Description |
|---|---|---|
TxnIDs | Transaction ID | Set the transaction ID by referring to the TransactionID_map in the Drilled-Down display window, which shows the correspondences between transaction IDs and the context IDs for transactions. |