Jobs can be changed (added, duplicated, cut, pasted, deleted, removed, interrupted, overwritten, replaced or reconnected) as necessary. The following describes procedure and cautions for changing a job.
Adding a job
The following describes how to add a job. When adding a job, see cautions on "4.1 Job Scheduling Essentials" "4.2.3 Registering Job Nets" and "4.2.4 Registering Jobs".
Procedure
Displaying the Change Job Net window
Display the Change Job Net window appears by performing one of the following operations.
Select the desired job net from the Job Selection window of the Systemwalker Operation Manager window. Then, select Change from the File menu (or select Change from the pop-up menu displayed by right-clicking).
Select Job Net Management from the Tools menu of the Systemwalker Operation Manager window. Select the desired job net from the Job Net Management window. Then, select Change from the File menu (or select Change from the pop-up menu displayed by right-clicking).
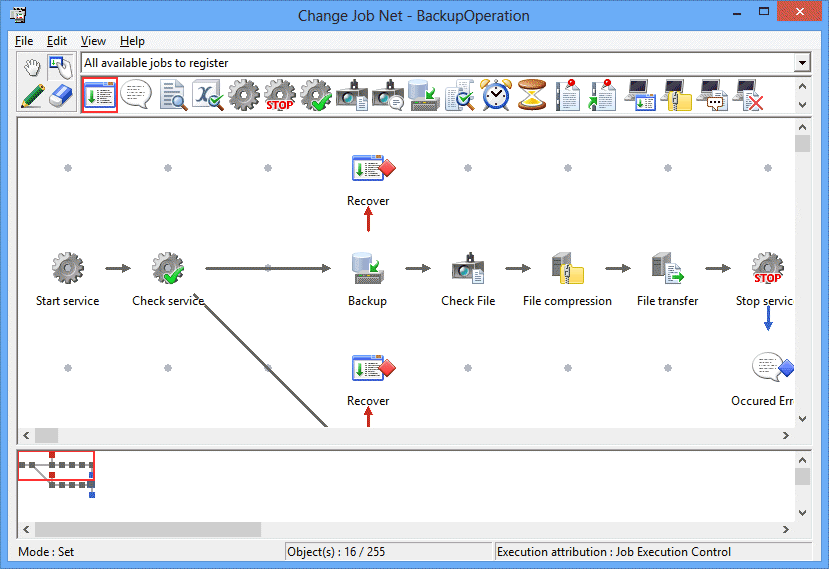
Figure 4.58 Change Job Net window
Adding a job to the job net
In the Change Job Net window, click the Set Mode button to switch to the set mode. (The set mode is automatically applied by selecting an icon you want to allocate.)
In the set mode, select the jobs to be registered in the job net in the icon selection area. You can also register as a child job net by selecting the job net icon.
Then, allocate the job in the job flow display area using the mouse. Placing the job displays the Add/Change-Job window.
Setting the job information
Specify the job information using the Standard information, Control information and Detail information sheets of the All/Change-Job window. Use the Control Information sheet if you want to register your job as a recovery job or to allocate startup of the succeeding job/job net with the completion code of preceding job/job net.
Registering multiple jobs to the job net
Repeat Steps 2 and 3 for the number of jobs you want to add to the job net.
Setting the job execution order
After placing jobs in the Job Flow display area, click the Connect Mode button to switch to the Connect mode. While in the Connect mode, draw a connection line (arrow) from the preceding job to the succeeding job to specify the job execution order.
Saving to the project
Select Save from the File menu. The job net will be saved in the project.
Note
A job with Execution condition specification cannot connect to a preceding job (or child or linked job net) for which Valid only on startup days has been specified in the Control information sheet of the Add/Change - Job window.
Copying, cutting, pasting or deleting a job
The following describes how to copy, cut, paste or delete a job.
When the job is cut or deleted, the connection lines before and after the job will be deleted. For example, if the job B is cut/delete from the jobs which are in the order of A, B and C, a connection line must be newly drawn between the jobs A and C since the connection lines before and after the job B is also deleted.
Procedure
Display the Change Job Net window.
In the Change Job Net window, click the Modify Mode button to switch to the modify mode.
Select the job to be copied, cut or deleted in the Job Flow display area, then select the desired operation from the Edit menu (or select the desired operation from the pop-up menu displayed by right-clicking).
When pasting, specify a location on the flow and select Paste from the Edit menu (or select Paste from the pop-up menu displayed by right-clicking on the desired location.
Select Save from the File menu. The job net will be saved in the project.
Note
The job nets (child job nets) registered as jobs cannot be copied, cut or pasted. They can only be deleted. Refer to "Deletion of layered job nets" and "Deleting linked job nets" for details on deleting job nets.
Removing a job
The following describes how to remove a job.
When the job is removed, the connection lines before and after the job will remain. For example, if the job B is removed from the jobs which are in the order of A, B and C, the connection line between the jobs A and C will remain.
Procedure
Displaying the Change Job Net window
Display the Change Job Net window.
Removing a job
In the Change Job Net window, click the Modify Mode button to switch to the modify mode.
To delete the removed icon, select Remove from the pop-up menu displayed by right-clicking on the icon to be removed. To keep the removed icon without deleting, select Remove to from the pop-up menu displayed by right-dragging the removed job to the desired location.
Saving to the project
Select Save from the File menu. The job net will be saved in the project.
Interrupting a job
This section describes how to interrupt an allocated job with another job.
After the interruption, the connection lines before and after the job will be automatically drawn again to suit the new connection order. For example, if a job called X is placed before the job B in the job which are in the order of A, B and C, the connection lines will be drawn again to the order of A, X, B and C. If placed after B, the order will be A, B, X and C.
Procedure
Displaying the Change Job Net window
Display the Change Job Net window.
Interrupting a job
In the Change Job Net window, click the Modify Mode button to switch to the modify mode.
In the Job Flow display area, drag the icon to interrupt it onto the destination icon with the mouse. Select Interrupt Before or Interrupt After from the pop-up menu displayed.
At this time, the control information set for the interrupting and interrupted jobs in the Control information sheet of the Add/Change - Job window is deleted.
Saving to the project
Select Save from the File menu. The job net will be saved in the project.
Note
For the job interruption, enough space for allocation is needed on the grid around the destination icon. If the grid space is not enough, the interruption operation cannot be executed.
Replacing/overwriting a job
The following describes about replacing a job with another job and overwriting a job with a new job.
Procedure
Displaying the Change Job Net window
Display the Change Job Net window.
Replacing/overwriting the job
For replacing, click the Modify Mode button in the Change Job Net window to switch to the modify mode. For overwriting, click the Set Mode button to switch to the set mode.
To replace a job, drag a new icon onto the old icon in the Job Flow display area. To overwrite a job, place a new icon onto the old icon. Select Replace object or Overwrite object from the pop-up menu displayed.
Saving to the project
Select Save from the File menu. The job net will be saved in the project.
Note
A job with the Restart point/Recovery/Execution condition specification in the Control information sheet of the Add/Change - Job window cannot be replaced with a job (child job net or linked job net) with the Valid only on startup days specification.
Reconnecting a job
The following describes how to reconnect a job.
Procedure
Displaying the Change Job Net window
Display the Change Job Net window.
Setting the job execution order again
For disconnection, click the Disconnect Mode button in the Change Job Net window to switch to the Disconnect mode. Drag over the connection line to be disconnected in the Job Flow display area.
To reconnect, click the Connect Mode button to switch to the Connect mode. Draw a connection line (arrow) from the preceding job to the succeeding job in the Job Flow display area to specify the job execution order.
Saving to the project
Select Save from the File menu. The job net will be saved in the project.