This section explains the job registration procedure and provides other related information.
Refer to "Designing Executable Files" and "Execution Attributes and Executable Jobs for Job Nets" in the Systemwalker Operation Manager Design Guide for information on files that can be registered as jobs and the differences between jobs that can be registered using the execution attribute.
Procedure
Display the Add/Change - Job window.
Open the New Job Net window and then use the mouse to drag the icon of the job to be registered with a job net from the icon selection area to the job flow display area.
The Add/Change - Job window will appear.
Use the Standard information, Control information and Detail information sheets of the Add/Change - Job window to set the job information and register the job.
Use the Control information sheet to register a recovery job or to use the completion code of a preceding job to determine the execution of a succeeding job. Refer to "Registering control information" for details.
Jobs with the "Job Execution Control" execution attribute
If the Command Wizard is not used, the following sheet will be displayed.
If the Command Wizard is used, the following sheet will be displayed only when the icon type is "Command execution". For all other icon types, the relevant Standard information sheet will appear. The Command Wizard item in the View menu of the New Job Net, Change Job Net, Recovery Change Job Net or Monitor Job Net window can be used to determine whether Command Wizard is to be used. Refer to the Systemwalker Operation Manager Online Help for details on the use of the Command Wizard.
Note that the Command Wizard cannot be used when the connection destination server is running Systemwalker OperationMGR V10.0L21/V10.1 or earlier.
Figure 4.7 Standard information sheet of the Add/Change - Job window
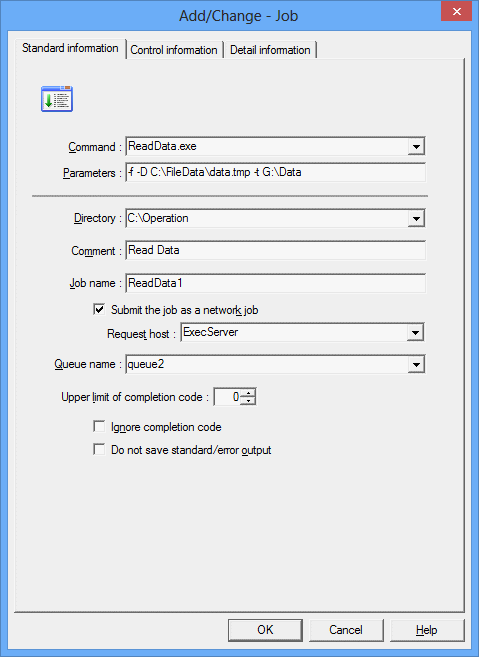
Specifies the batch file, shell script, command, executable program, Systemwalker script or JCL to be run as a job.
Specifies a character string to be passed to the command specified in Command as command arguments. Up to 29 parameters can be specified.
Specifies the directory that will be used as the current directory when running a job.
Specifies a comment.
Specifies the name of the job. The job specified here will be handled as a Job Execution Control job.
Select this check box to submit the job as a network job. If this check box is not selected, the job will be run as a local job.
Specifies the host name of the server that will run the network job. This field can be specified only when the Submit the job as a network job check box is selected.
Specifies the queue where the job will be submitted.
Specifies the value to be used to determine whether the job terminated normally or abnormally.
If this check box is selected, the job will be deemed to have completed normally regardless of the completion code. Note, however, that the job will still terminate abnormally if it is closed before it completes.
If this check box is selected, the standard output (stdout) and standard error output (stderr) of the job will not be saved.
Figure 4.8 Detail information sheet of the Add/Change - Job window
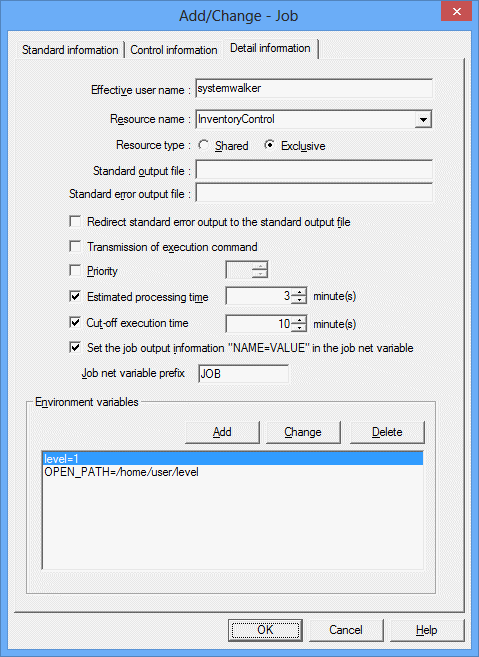
Specifies the name of the user who will execute the job. An Operation Manager user cannot be specified.
If an execution user name is specified, the following settings must also be specified: [Windows]
Open the Define Job Owner's Information window from the Systemwalker Operation Manager Environment Setup window, and define a user ID and password.
Access Local Security Policy from the Administrative Tools dialog box through the Control Panel and assign Log on as a batch job rights to the user specified here.
When specifying a domain user name, the above steps need to be performed on both the job submission destination server and the execution server.
Specifies the name of the resource to be used. The resource name can be up to 64 bytes long and may contain alphanumeric characters, underscores ("_") and hyphens ("-").
Select the resource allocation method (Shared or Exclusive).
Specifies the name of the file where standard output generated by the execution of the job will be sent.
Specifies the name of the file where standard error output generated by the execution of the job will be sent.
Select this check box to redirect standard error output generated by the execution of the job to the default log file. When this check box is selected, the Default error log file check box will be disabled.
Select this check box to send the executable file specified in the Command field of the Standard information sheet to the server specified in the Request host field of the Standard information sheet.
Specifies the job execution priority. If the connection destination server is running Windows, select a value between 0 and 4, and if the connection destination server is running UNIX, select a value between 0 and 39. The higher the number, the greater the priority.
Select this check box to set an expected execution time for the job.
Specifies the job execution time limit in minutes. Any value between 1 and 1666666 can be specified. Job execution will be cut off at the specified time. In this case, the completion code for the job will be 0x40000322.
Select this check box to automatically set the "NAME=VALUE" line (which is output to job output information) in the job net variable.
Specify this string to prevent duplication of the job net variable name.
If a job net contains multiple jobs that output with the same variable name, you can prevent name duplication by specifying a prefix.
Displays a list of the environment variables that the job will use when it runs.
Click the Add button to create a new environment variable. To modify an environment variable that has already been set, select the environment variable in the list and click the Change button. Similarly, to delete an environment variable from the list, click the environment variable concerned and click the Delete button. If the Add or Change button is clicked, the Set Environment Variables window will be displayed. Use this window to enter or change environment variables.
Up to 32 environment variables can be specified.
Figure 4.9 Set Environment Variables window
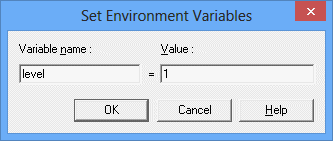
Specifies the name of the environment variable that will be used in a job. Do not set an environment variable with the same name as an operating system environment variable.
Specifies the value of the environment variable that will be used in a job. This field cannot be left blank.
Child job nets (Only when execution attribute is "Job Execution Control")
Figure 4.10 Standard information sheet of the Add/Change - Job window
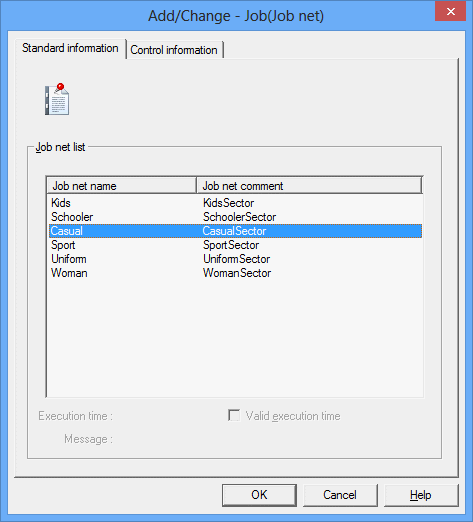
Displays a list of job nets that exist within the same project and can be registered as child job nets. Select the job nets to be registered as child job nets from this list.
Linked job nets (Only when execution attribute is "Job Execution Control")
Figure 4.11 Standard information sheet of the Add/Change - Job window
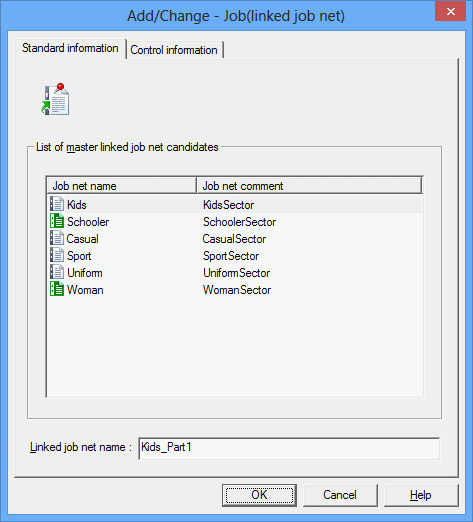
This area displays a list of job net names and job net comments for the job nets that can be registered as the master linked job net.
Specify the name of the linked job net using no more than 50 bytes.
When a job net is selected in the List of master linked job net candidates, the name of the selected job net will be inserted automatically, followed by an underscore ("_"). However, an underscore will not be added if adding it would cause the name of the linked job net to exceed 50 bytes.
The following message will be displayed if a job net that has not yet become a master linked job net is selected from the List of master linked job net candidates. Check the message, and click the OK button if it is OK to register the job net as a master linked job net.
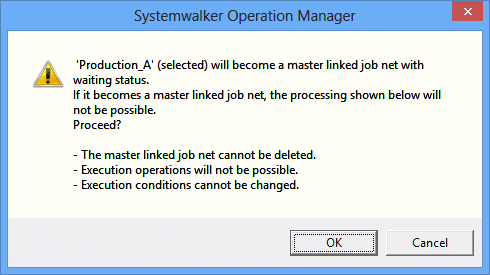
Information
Child job net names for linked job nets
If a master linked job net contains multiple layers, the child job nets for the linked job nets that refer to that master linked job net will be registered in the project using the following name: <name of the child job net in the master linked job net> + "_" + <name of the linked job net>.
Note
Registering linked job nets
When registering a linked job net, make sure that the name of the linked job net does not coincide with the name of another job net or linked job net. If the master linked job net contains multiple layers, also make sure that the names of its child job nets do not coincide with the names of other job nets or linked job nets.
When the execution attribute is "Interstage"
Use the following window when submitting Interstage WorkUnits.
Figure 4.12 Standard information sheet of the Add/Change - Job window
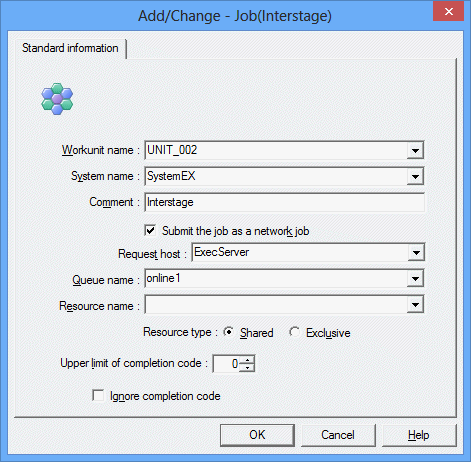
Specifies the name of the job (WorkUnit) to be requested from Interstage.
Specifies the system name of the WorkUnit.
Specifies a comment.
Select this check box to submit the job as a network job. If this check box is not selected, the job will be run as a local job.
Specifies the host name of the server that will run the network job. This field can be specified only when the Submit the job as a network job check box is selected.
Specifies the job submission destination as a queue dedicated to online business.
Specifies the name of the resource to be used. The resource name can be up to 64 bytes long and may contain alphanumeric characters, underscores ("_") and hyphens ("-").
Select the resource allocation method (Shared or Exclusive).
Specifies the value to be used to determine whether the job terminated normally or abnormally.
If this check box is selected, the job will be deemed to have completed normally regardless of the completion code. Note, however, that the job will still terminate abnormally if it is closed before it completes.
Note
Registering jobs that have the "Interstage" attribute
Only jobs with the Interstage icon can be registered with job nets that have the Interstage attribute. Jobs with other icons cannot be registered.
Only one job can be registered with a job net with the Interstage attribute.
Jobs with the Interstage icon cannot be registered with job nets that do not have the Interstage attribute.
When the execution attribute is "Normal" [UNIX version]
Figure 4.13 Standard information sheet of the Add/Change - Job window
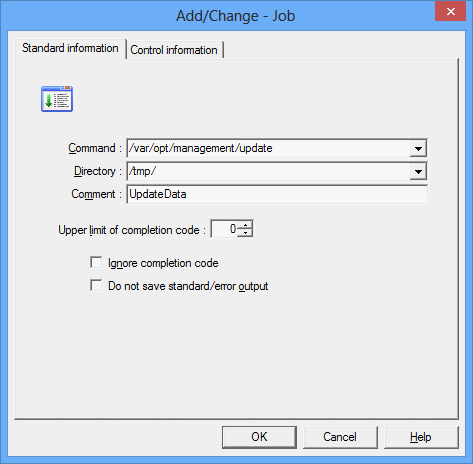
Specifies the shell script, command or executable program to be run as a job.
Specifies the directory that will be used as the current directory when running a job.
Specifies a comment.
Specifies the value to be used to determine whether the job terminated normally or abnormally.
If this check box is selected, the job will be deemed to have completed normally regardless of the completion code. Note, however, that the job will still terminate abnormally if it is closed before it completes.
If this check box is selected, the standard output (stdout) and standard error output (stderr) of the job will not be saved.
Note
Add/Change - Job window
How to specify the Command field
Jobs that have the "Job Execution Control" attribute and are registered with Jobscheduler are submitted to Job Execution Control using qsub command format. For this reason, the executable file name of a job registered in the Add/Change - Job window must contain the executable file name of the job to be run and qsub command options for Job Execution Control. Note that because Jobscheduler sets the "-x", "-nr", "-j", "-cu", "-rh", "-jft", "-q", "-R", "-e", "-o", "-eo", "-lt" and "-dp" qsub command options automatically, do not specify them in the Command field.
[qsub command options] Executable file name |
Job search conditions
Executable file storage locations are searched in the following order:
Command field > Directory field > Job folder
If the full pathname of an executable file is specified in the Command field, any storage location specified in the Directory field will not be searched.
Completion codes
The completion code of a job is the value returned by the executable file (for example, if the executable file is written in C, the value specified by the exit function will be returned). In the case of a batch file in Windows, the completion code is the return value of the final command executed within the batch file. (The setecode command can be specified within batch files to control the return value. Refer to "A.6.2 Using Batch Files as Jobs [Windows version]" for details on the setecode command.) Jobscheduler can handle completion codes up to 256. Note, however, that because completion codes 201 to 256 are used by Jobscheduler itself, ensure that the completion codes of jobs are no greater than 200.
If a value within the range of 201 to 256 is used as the return value for the executable file, it will be difficult to distinguish whether the completion code was configured by the executable file or by the Jobscheduler. Note that if the return value of the executable file is 255 or greater, it will be handled as 255.
Standard output files and standard error output files
Do not specify the same standard output file and standard error output file for more than one job or the previous log may not be displayed correctly.
Commands registered with the Command field [Windows version]
If a process that halts both the system and Jobscheduler is registered and executed, the status of jobs and job nets may become "Closed" (completion code 239) the next time that Jobscheduler runs.
When shutting down the system, use a shutdown job net and run it from a shutdown exit. Refer to "A.6.1 Shutting Down the System at Optional Times [Windows version]" for details on shutdown job nets.
Job Execution Control command "qsub"
Do not specify the Job Execution Control command qsub or a batch file or shell script that invokes the qsub command in the Command field.
Registering control information
Use the Control information sheet to register a recovery job or to use the completion code of a preceding job to determine the execution of a succeeding job.
Figure 4.14 Control information sheet of Add/Change - Job window
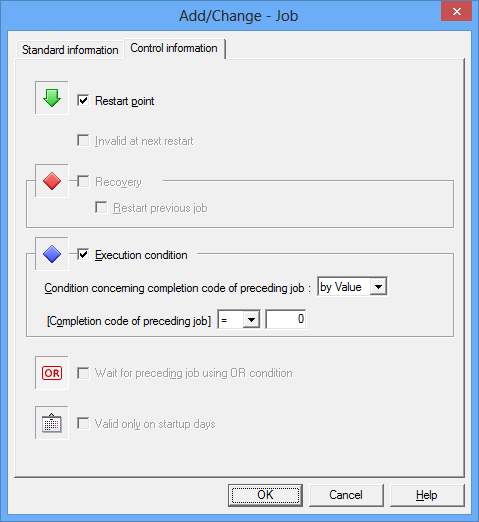
Select this check box to start execution from this job when the job net restarts.
Select this check box to disable the job when the job net restarts.
Specifies that the job is a recovery job to be started if the preceding job abends. This check box can also be selected when the preceding job is a job net.
Select this check box to restart the original job (that abended) only once after the recovery job completes normally.
Select this check box to determine whether to use the job completion code to determine whether a job should be started when the preceding job terminates normally or pseudo-normally. This check box can be selected only when there is just one preceding job.
When Execution condition is selected, select either by Value or by Range from the Condition concerning completion code of preceding job combo box.
Select the operator that will be used as an execution condition from the combo box. Enter a value that will be used in the comparison.
Select the operator that will be used as an execution condition from the combo box. Enter a range of completion codes for the preceding job that will be used as an execution condition.
Specify this item to make multiple preceding jobs wait with the OR condition. You can specify this item if the preceding jobs are any of the following event wait jobs:
Wait for file
Wait for Message Event
Wait for time
Wait until Specified Time
If you specify this item, you cannot draw a connection line from the event wait jobs listed above to multiple succeeding jobs.
When specifying startup days for child or linked job nets, select this checkbox to enable the specified startup days and update the configuration of the job net for each operation day. This checkbox is only displayed for jobs with the job net or linked job net icons.
It is not possible to select the Restart point, Recovery or Execution condition check box at the same time as the Valid only on startup days check box.
If the Valid only on startup days check box is selected, the Execution condition check box cannot be selected for the succeeding job. Similarly, if the Execution condition check box is selected, the Valid only on startup days check box cannot be selected for the preceding job.
If the Execution condition checkbox is selected when the preceding job is a child or linked job net, the completion code of the child or linked job net will be treated as the completion code of the preceding job.