A job net is a collection of jobs for which an execution sequence is specified. The following describes procedures and precautions to register a job net.
Procedure
Displaying the New Job Net window
Call the New Job Net window by performing one of the following operations.
Select the desired project from the Job Selection window of the Systemwalker Operation Manager window. Then, select the execution attribute of the job net from Job Net in New of File menu (or right click to show the pop-up menu and select the execution attribute of the job net from Job Net in New.
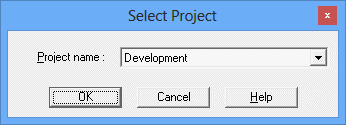
Select Job Net Management from the Tools menu of the Systemwalker Operation Manager window. Then, select the execution attribute of the job net from New in the File menu of the Systemwalker Operation Manager window. When the Select Project window appears, specify a Project name to create a job net.
Figure 4.3 Select Project window

Specifies a Project name to create a job net.
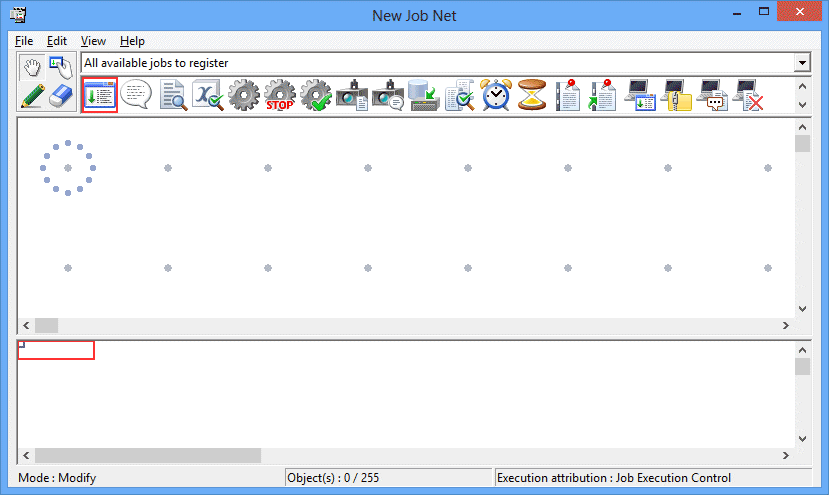
Figure 4.4 New Job Net window

Placing a job in the job net
Select a category from the select category combo box in the New Job Net window. The icons displayed in the icon selection area vary depending on the category selected.
Then, click the Set Mode button to switch to the Set mode (the mode in which the icons can be laid out in the job flow display area). (The Set mode is automatically applied when an icon is selected in the icon selection area.)
In set mode, select a job icon to be registered in the job net from the icon selection area. Then, use the mouse to click and drag an allocated job icon on the job flow display area. Child or linked job nets can also be registered by selecting the job net or linked job net icons.
Placing the job displays the Add/Change-Job window.
Note
Notes on registering linked job nets
Every time a linked job net is registered, the number of job nets in the project increases (the linked job net plus any child job nets that the linked job net may have). This may cause scheduling performance to deteriorate. Design the job net configuration, taking the number of job nets into consideration, before registering the job net.
Registering the job
Use the Standard information, Control information and Detail information sheets of the Add/Change - Job window to set the job information and register the job. Refer to "4.2.4 Registering Jobs" for details on job registration.
Registering multiple jobs to the job net
Repeat Steps 2 and 3 for the number of jobs you want to register in the job net.
Setting the job execution order
After jobs are assigned in the Job Flow display area, click the Connect Mode button to switch to the connect mode. While in the connect mode, draw a connection line (arrow) from the preceding job to the succeeding job to specify the job execution order.
A line (arrow) connecting one normal job to another normal job is indicated in black. Lines connected to a recovery job (indicated by a red diamond-shaped symbol) are shown in red. Lines connected to a job in which its execution condition depends on a specified completion code (indicated by a blue diamond-shaped symbol) are shown in blue. Lines connected to a job with "wait with OR" condition are shown in orange.
Note
Connection of child job nets and linked job nets with startup day schedules
A job where an Execution condition has been specified cannot connect to a preceding job (a child or linked job net) for which Valid only on startup days has been specified in the Control information sheet of the Add/Change - Job window).
For modification (addition, copy, cutting, pasting, deletion, removal, interruption, overwriting, replacement or reconnection) of jobs, see "4.4.6 Changing the Jobs".
Saving to the project
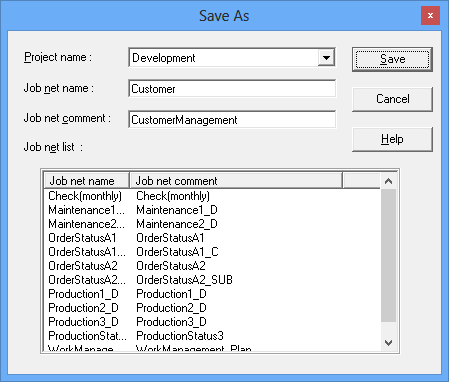
Select Save As from the File menu. The Save As window will appear. Specify the job net name and any job net comments, then click Save. The job net will be saved in the project.
Figure 4.5 Save As window

Specifies a Project to which the job net will be saved.
If the job net is registered as a job, it cannot be selected.
Specifies a job net name.
Specifies a job net comment.
Displays a list of job net names registered in the project selected in Project name.
Note
Add/Change-Job window
How to set the command field
Jobs with the Job Execution Control attribute registered in the Jobscheduler are submitted to Job Execution Control as a qsub command. Therefore, for a file name registered in the Add/Change-Jobs window to be executed, the qsub command options for Job Execution Control must be included. Since the Jobscheduler automatically sets "qsub" options "-x", "-nr", "-j", "-cu", "-rh", "-jft", "-q", "-R", "-e", "-o", "-eo", "-lt" and "-dp", do not set them in the Command field.
[qsub-command-option] executable-filename |
Search conditions of jobs
The storage destination of an executable file is searched in the following order:
Command field >> Directory field >> job folders
If the file name to be executed is specified with the full path name in the Command field, the Directory field is not searched even if the storage destination directory is specified in the Directory field.
Completion code
The job completion code is the return value of the executable file (for example the value specified by the exit function if written in the C language). For a Windows batch file, it will be the return value of the last command in the batch file (the setecode command can be written in the batch file to control the return values. For details on the setecode command, see "A.6.2 Using Batch Files as Jobs [Windows version]"). The maximum value for the completion code that can be accepted by the Jobscheduler is 256. However, since the Jobscheduler uses completion code values from 201 to 256, the job completion code should be 200 or less. A return value larger than 256 is treated as 255.
Standard output file and standard error output file
Do not specify the same name of standard output file or standard error output file for multiple jobs simultaneously. If specified, the previous log may be displayed incorrectly.
Commands to be registered in the command field [Windows version]
If the Jobscheduler shutdown process is registered and executed, the job or job net execution may be "closed" (with completion code 239) when the Jobscheduler is started in the next time.
Shutdown the system from the shutdown exit by using the termination process job net. For details of termination process job net, see "A.6.1 Shutting Down the System at Optional Times [Windows version]."
qsub command of Job Execution Control
In the Command field, do not specify the qsub command of Job Execution Control or batch files/shell scripts calling the qsub command.
Note
Notes for registering large numbers of job nets
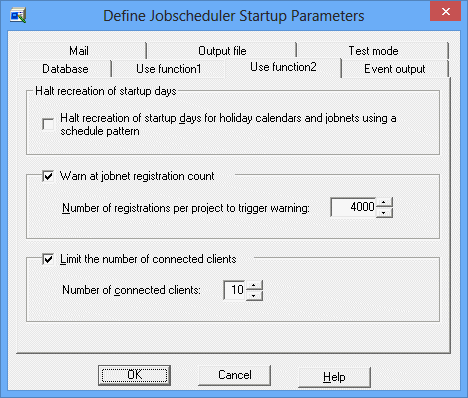
For notes on registering a large number of job nets, see "Reference Information (Expert Information, etc.)" in the Systemwalker Operation Manager Technical Guide. A Caution message appears when so specified, warning that the number of job nets for a given Project exceeds the maximum value specified Project. The content of the warning message can be specified using the Use function2 settings in the Define Jobscheduler Startup Parameters window.
Figure 4.6 Define Jobscheduler Startup Parameters window - Use function2 Sheet
