Perform the following setup tasks after installing the Systemwalker Single Sign-On Server but before setting up Systemwalker Centric Manager.
![]()
![]()
![]()
![]()
![]()
![]()
![]()
Creating an environment for the Systemwalker authentication repository |
![]()
Creating an environment for the Web server used for the authentication server |
![]()
![]()
Each step of the procedure is explained below.
Installing the Systemwalker Single Sign-On Server
Install the Systemwalker Single Sign-On Server on both the active node and the standby node by referring to "Installing the Systemwalker Single Sign-On Server".
Note
Install the Systemwalker Single Sign-On Server to the same path on both nodes in the cluster configuration, so that both nodes have the same resource configuration.
Disabling automatic startup settings
Immediately after the Systemwalker Single Sign-On Server is installed, it is set up so that the services or daemons that comprise the Systemwalker User Management function and the Systemwalker Single Sign-On function start automatically when the machine starts.
For machines in cluster environments, decisions about whether to start the necessary services or daemons are made by each individual cluster product, so the automatic startup settings that were entered when the Systemwalker Single Sign-On Server was installed need to be disabled.
This section explains the procedure for disabling the automatic startup settings.
Use the following procedure to disable the Interstage automatic startup settings.
Check the Startup type for the following services, and change the startup type to "Manual" if it has been set to "Automatic".
OD_start
ObjectTransactionService
FJapache
INTERSTAGE
Check the status of these services, and stop any services that are "Started".
When the Systemwalker Single Sign-On Server package is installed, the following shells are stored as symbolic links.
The start shell that is called when the server starts
The stop shell that is called when the server stops
For cluster environments, move these shells to a different directory so that they are not called.
The following files need to be moved.
Storage directory | Files to be moved (start shell and stop shell) |
|---|---|
/etc/rc0.d | K00stopis K00stopod K00FJSVirep K17FJapache |
/etc/rc1.d | K17FJapache |
/etc/rc2.d | S99startis S99startod S99FJSVirep K17FJapache |
/etc/rc3.d | S51FJapache |
/etc/rcS.d | K17FJapache |
Storage directory | Files to be moved (start shell and stop shell) |
|---|---|
/etc/rc0.d | K18FJSVirep K14FJapache |
/etc/rc1.d | K18FJSVirep K14FJapache |
/etc/rc2.d | S99startis S82FJSVirep S99startod S86FJapache |
/etc/rc3.d | S99startis S82FJSVirep S99startod S86FJapache |
/etc/rc4.d | S99startis S82FJSVirep S99startod S86FJapache |
/etc/rc5.d | S99startis S82FJSVirep S99startod S86FJapache |
/etc/rc6.d | K18FJSVirep K14FJapache |
Note
No action is required for any of the services above that has not been installed.
Pre-setup for cluster systems
Perform the following steps as a pre-setup for the cluster system.
Install the cluster system.
Set up the cluster initialization configuration.
Refer to the manual for the cluster product for details on how to install the cluster system and how to set up the cluster initialization configuration.
This section explains the following notes for when the pre-setup for the cluster system is performed.
Settings for the shared disk device
Network settings (IP addresses)
Notes relating to node names [UNIX]
Enable the shared disk device to be used as a file system.
The shared disk device will be required in subsequent steps. Register the shared disk device with the cluster service (for PRIMECLUSTER, this means registering it with "userApplication") so that it can be used.
The Systemwalker Single Sign-On function assumes that IP addresses will be inherited, so specify takeover network settings as well.
The IP addresses will be required in subsequent steps. Register the takeover IP addresses with the cluster service (for PRIMECLUSTER, this means registering them with "userApplication") so that they can be used.
PRIMECLUSTER supports a node name takeover function, but this function cannot be used with Interstage.
Do not specify the same node name for the active node and the standby node. Check the node names using the following method.
[Solaris]
Check the content of the /etc/nodename file.
[Linux]
Check the "HOSTNAME" settings in /etc/sysconfig/network.
The state transition procedure provided by Interstage is for hot standby configurations, and does not run correctly in node name takeover environments.
Starting the cluster service (userApplication)
Use the following procedure to start the cluster service (userApplication).
Point
Before starting the cluster service (userApplication), make sure that both the shared disk and takeover IP address can be used. Refer to "Pre-setup for cluster systems" for details on the shared disk and takeover IP address.
Create the cluster service (for PRIMECLUSTER, this is a "userApplication") for Interstage.
Register the takeover IP address and shared disk with the cluster service.
Start the cluster service.
Pre-processing
On both the active node and the standby node, use the OD_set_env command to specify the host name that will be embedded when object references are generated.
At this point, the IP address that is inherited by the cluster service must be specified for the host name.
The OD_set_env command is stored in the following location.
[Command location]
OS | Location |
|---|---|
Windows | <Interstage installation directory>ODWIN\bin |
Solaris | /opt/FSUNod/bin |
Linux | /opt/FJSVod/bin |
Refer to the Interstage Application Server Reference Manual (Command Edition) for details on the OD_set_env command.
Example:
When the IP address inherited by the cluster service is 100.100.100.100
OD_set_env -n 100.100.100.100 |
Initializing Interstage
Use the following procedure to initialize Interstage.
Stop Interstage
If Interstage is running, stop it.
Example:
isstop -f |
The Interstage stop command (isstop) is stored in the following location.
[Command location]
OS | Location |
|---|---|
Windows | <Interstage installation directory>\bin |
Solaris | /opt/FSUNtd/bin |
Linux | /opt/FJSVtd/bin |
Refer to the Interstage Application Server Reference Manual (Command Edition) for details on the Interstage stop command (isstop).
Generate an Interstage system definition file
Execute the isgendef command to generate Interstage system definition files on both the active node and the standby node.
Before generating the Interstage system definition files, it is necessary to decide the scale of the Interstage system that will run in the cluster system.
Example:
When the system scale is "large"
isgendef large |
The isgendef command is stored in the following location.
[Command location]
OS | Location |
|---|---|
Windows | <Interstage installation directory>\bin |
Solaris | /opt/FSUNtd/bin |
Linux | /opt/FJSVtd/bin |
Refer to the Interstage Application Server Reference Manual (Command Edition) for details on the isgendef command.
Register the Interstage system definition file
Execute the isregistdef command to register the Interstage system definition files on both the active node and the standby node.
Example:
isregistdef |
The isregistdef command is stored in the following location.
[Command location]
OS | Location |
|---|---|
Windows | <Interstage installation directory>\bin |
Solaris | /opt/FSUNtd/bin |
Linux | /opt/FJSVtd/bin |
Refer to the Interstage Application Server Reference Manual (Command Edition) for details on the isregistdef command.
Initialize Interstage on the active node
Initialize Interstage on the active node.
Before initializing Interstage by executing the isinit command, it may be necessary to set up definitions for the Interstage operating environment, depending on which functions are used. Also, factors such as the configuration and functions being used should be taken into account when specifying the operation mode.
Example:
isinit -f type1 |
The isinit command is stored in the following location.
[Command location]
OS | Location |
|---|---|
Windows | <Interstage installation directory>\bin |
Solaris | /opt/FSUNtd/bin |
Linux | /opt/FJSVtd/bin |
Refer to the Interstage Application Server Reference Manual (Command Edition) for details on the isinit command.
Note
When PRIMECLUSTER is used
In the Interstage operating environment definitions, do not specify the host name used by the CORBA Service ("Corba Host Name").
When Sun Cluster is used [Solaris]
To specify the host name used by the CORBA Service ("Corba Host Name") in the Interstage operating environment definitions, specify either the takeover IP address for the default system and the extended system, or the host name corresponding to the takeover IP address.
Initialize Interstage on the standby node
Make the standby node the active node by failing the cluster over, and then initialize Interstage.
Specify the "-w" option when executing the isinit command.
Use the same Interstage operating environment definition settings and operation mode as were used when the active node was initialized.
Example:
isinit -f -w type1 |
The isinit command is stored in the following location.
[Command location]
OS | Location |
|---|---|
Windows | <Interstage installation directory>\bin |
Solaris | /opt/FSUNtd/bin |
Linux | /opt/FJSVtd/bin |
Refer to the Interstage Application Server Reference Manual (Command Edition) for details on the isinit command.
Check the settings
Check that the CORBA Service environment for the cluster system has been set up correctly as a result of initializing Interstage.
Perform the following check on both the active node and the standby node.
Start Interstage.
Example:
isstart |
The Interstage start command (isstart) is stored in the following location.
[Command location]
OS | Location |
|---|---|
Windows | <Interstage installation directory>\bin |
Solaris | /opt/FSUNtd/bin |
Linux | /opt/FJSVtd/bin |
Refer to the Interstage Application Server Reference Manual (Command Edition) for details on the Interstage start command (isstart).
Check the host name and IP address information by executing the OD_or_adm command.
The environment has been set up correctly if host names such as "NameService" and "InterfaceRepository" in the execution results of the command match the takeover IP addresses that were specified in "Pre-processing".
The OD_set_env command is stored in the following location.
[Command location]
OS | Location |
|---|---|
Windows | <Interstage installation directory>ODWIN\bin |
Solaris | /opt/FSUNod/bin |
Linux | /opt/FJSVod/bin |
Example:
Execution results of the "OD_or_adm" command
> OD_or_adm -l ImplementationRepository IDL:FJ/ImplementationRep:1.0 (Local host name:8002:1.0:) FJ_LightInterfaceRepository IDL:FJ/Repository:1.0 (Local host name:8002:1.0:) FJ_ORB_admin IDL:OM_ORB/admin:1.0 (Local host name:8002:1.0:) nill_oref InterfaceRep IDL:CORBA/InterfaceRep:1.0 (Takeover IP address:8002:1.0:) InterfaceRepLock IDL:CORBA/IrOBF/backup:1.0 (Takeover IP address:8002:1.0:) InterfaceRepository IDL:CORBA/Repository:1.0 (Takeover IP address:8002:1.0:) NameService IDL:CosNaming/NamingContextExt:1.0 (Takeover IP address:8002:1.0:) |
Refer to the Interstage Application Server Reference Manual (Command Edition) for details on the OD_or_adm command.
Creating an SSL environment
Create an SSL environment on the server where the Systemwalker Single Sign-On Server has been installed.
To use simple certificates for Systemwalker, use the following procedure to create a certificate environment.
To use certificates other than simple certificates for Systemwalker, create a certificate environment by referring to the Interstage Application Server High Availability System Guide.
Set up the active node
Create a certificate environment for the active node by referring to "Creating an SSL Environment".
Execute the scsexppfx command to back up the certificate environment that has been created.
The scsexppfx command is stored in the following location.
[Command location]
OS | Location |
|---|---|
Windows | <Interstage installation directory>\bin |
UNIX | /opt/FJSVisscs/bin |
In the following command execution example, the following conditions hold.
Nickname: Systemwalker
Example:
[Windows]
When the certificate environment is backed up to "C:\tmp\Cert.p12"
scsexppfx -n Systemwalker -f C:\tmp\Cert.p12 |
>Password: (*1)
>PKCS#12 Password: (*2)
>Retype: (*2)
>SCS: INFO: scs0107: Site certificate and private key was exported <C:\MyCert.p12>
[UNIX]
When the certificate environment is backed up to "/tmp/Cert.p12"
scsexppfx -n Systemwalker -f /tmp/Cert.p12 |
>Password: (*1)
>PKCS#12 Password: (*2)
>Retype: (*2)
>UX: SCS: INFO: scs0107: Site certificate and private key was exported </tmp/Cert.p12>
*1)
Enter the password for accessing the Interstage certificate environment. The password that is entered is not displayed.
*2)
Enter the password for protecting PKCS#12 data. For the "Retype" prompt, enter the same password again in order to confirm the password that was entered. Note that the password that is entered is not displayed.
Refer to the Interstage Application Server Reference Manual (Command Edition) for details on the scsexppfx command.
Set up the standby node
Create a certificate environment by executing the scsmakeenv command.
The storage location and execution example of the scsmakeenv command are shown below.
[Command location]
OS | Location |
|---|---|
Windows | <Interstage installation directory>\bin |
UNIX | /opt/FJSVisscs/bin |
Example:
scsmakeenv -e |
Refer to the Interstage Application Server Reference Manual (Command Edition) for details on the scsmakeenv command.
Execute the scsimppfx command to restore the certificate file that was backed up earlier.
The storage location and execution example of the scsimppfx command are shown below.
[Command location]
OS | Location |
|---|---|
Windows | <Interstage installation directory>\bin |
UNIX | /opt/FJSVisscs/bin |
Example:
When the backup certificate file is "C:\tmp\Cert.p12"
scsimppfx -f C:\tmp\Cert.p12 |
Refer to the Interstage Application Server Reference Manual (Command Edition) for details on the scsimppfx command.
Specify the settings by referring to step 4 in "Creating an SSL Environment". For the Configuration name, specify the same configuration name as was specified for the active node.
Creating an environment for the Systemwalker authentication repository
Create an environment for the Systemwalker authentication repository.
When the Interstage Directory Service is used as the Systemwalker authentication repository
The following operations are explained below.
Creating an environment for the Systemwalker authentication repository
Deleting the Systemwalker authentication repository
Use the following procedure to create an environment for the Systemwalker authentication repository.
To use the Systemwalker Single Sign-On function, perform only step 1-a.
To use only the Systemwalker User Management function, perform the entire procedure.
Set up the active node
Use the following procedure to set up the active node.
Create a Systemwalker authentication repository by referring to "Creating an Environment for the Systemwalker Authentication Repository".
For Database Storage Directory under General Settings and Access log storage directory under Access Log Settings, specify paths on the shared disk.
Back up repository information to a directory by executing the irepbacksys command.
The irepbacksys command is stored in the following location.
[Storage location]
OS | Location |
|---|---|
Windows | <Interstage installation directory>\bin |
UNIX | /opt/FJSVirep/bin |
The following example shows how to execute the irepbacksys command.
Example:
[Windows]
When the repository name is "swrepo" and the backup directory is "c:\tmp\swrepo_back"
irepbacksys -d c:\tmp\swrepo_back -R swrepo -confonly |
[UNIX]
When the repository name is "swrepo" and the backup directory is "/tmp/swrepo_back"
irepbacksys -f /tmp/swrepo_back -R swrepo -confonly |
Refer to the Interstage Application Server Reference Manual (Command Edition) for details on the irepbacksys command.
Set up the certificate environment on the standby node
Fail the cluster over, copy the settings file (that was backed up on the active node) to the standby node, and then execute the ireprestsys command.
The ireprestsys command is stored in the following location.
[Storage location]
OS | Location |
|---|---|
Windows | <Interstage installation directory>\bin |
UNIX | /opt/FJSVirep/bin |
The following example shows how to execute the ireprestsys command.
Example:
[Windows]
When the repository name is "swrepo" and the backup directory is "c:\tmp\swrepo_back"
ireprestsys -d c:\tmp\swrepo_back -R swrepo -confonly |
[UNIX]
When the repository name is "swrepo" and the backup directory is "/tmp/swrepo_back"
ireprestsys -f /tmp/swrepo_back -R swrepo -confonly |
Refer to the Interstage Application Server Reference Manual (Command Edition) for details on the ireprestsys command.
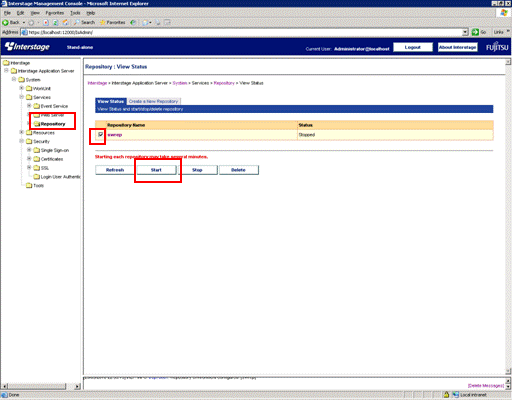
Fail the cluster over, and then start the Systemwalker authentication repository on the active node.
In the Interstage Management Console window, select System >> Services >> Repository, select the check box for the Systemwalker authentication repository that has just been created, and then click the Start button.
Refer to "How to start the Interstage Management Console" for details on how to start the Interstage Management Console.
Use the following procedure to update the Systemwalker authentication repository.
To update a repository operating under an MSCS cluster environment, place the universal services and resources for the target repository (that has been registered with MSCS) offline.
Use the Interstage Management Console to stop the repository on the active node, and then update and start it again.
Fail the cluster over to the standby node, and then repeat step 2 on the standby node.
If the repository was updated in step 1, place the resources that were taken offline back online again.
Use the Interstage Management Console to stop the repository on the active node first, and then update and start it again.
Fail the cluster over to the standby node, and then repeat step 1 on the standby node.
Use the following procedure to delete the Systemwalker authentication repository.
Remove the environment for the authentication server on both nodes. Refer to "Creating an Environment for the Web Server Used for the Authentication Server" for details on how to remove the environment for the authentication server.
To delete a repository operating under an MSCS cluster environment, delete the universal services and resources for the target repository that has been registered with MSCS.
Use the Interstage Management Console to stop the repository on the active node, and then delete it.
Fail the cluster over to the standby node, and then repeat step 3 on the standby node.
Remove the environment for the authentication server on both nodes. Refer to "Creating an Environment for the Web Server Used for the Authentication Server" for details on how to remove the environment for the authentication server.
Use the Interstage Management Console to stop the repository on the active node, and then delete it.
Fail the cluster over to the standby node, and then repeat step 2 on the standby node.
Note
If a mistake is made with the deletion procedure, the cluster service may not fail over correctly.
When Active Directory is used as the Systemwalker authentication repository
Use the following procedure to create an environment for the Systemwalker authentication repository.
Create an environment for the Systemwalker authentication repository by referring to the relevant Microsoft manual.
To use the Systemwalker Single Sign-On function, set up information about access permissions to the public URL by referring to " Creating an environment for the Systemwalker authentication repository". Creating an environment for the Systemwalker authentication repository
Creating an environment for the Web server used for the authentication server
Create an environment for the Web server used for the authentication server on the server where the Systemwalker Single Sign-On Server has been installed.
This section explains how to create and delete an environment for the Web server used for the authentication server.
Use the following procedure to create a Web server to be used for the authentication server.
Set up the active node
Create a Web server for the authentication server on the active node by referring to "Creating an Environment for the Web Server Used for the Authentication Server". Specify the settings on the local disk. For the Server Hostname or IP Address item, specify the takeover IP address.
Back up the information for the Web server to a directory by executing the ihsbackup command.
The ihsbackup command is stored in the following location.
[Storage location]
OS | Location |
|---|---|
Windows | <Interstage installation directory>\bin |
UNIX | /opt/FJSVihs/bin/ |
The following example shows how to execute the ihsbackup command.
Example:
[Windows]
When the backup directory is "c:\tmp"
ihsbackup -d c:\tmp -t all |
[UNIX]
When the backup directory is "/tmp"
/opt/FJSVihs/bin/ihsbackup -d /tmp -t all |
Refer to the Interstage Application Server Reference Manual (Command Edition) for details on the ihsbackup command.
Use the following procedure to delete the environment for the authentication server.
Use the Interstage Management Console to delete the repository server on the active node.
Fail the cluster service over, and then use the Interstage Management Console to delete the repository server on the standby node.
Delete the Systemwalker authentication repository on both nodes.
Note
If a mistake is made with the removal procedure, the cluster service may not fail over correctly.
Creating an environment for the authentication server
Create an environment for the authentication server on the server where the Systemwalker Single Sign-On Server has been installed.
Use the following procedure to create an environment for the authentication server.
Set up the active node
Create a Systemwalker Single Sign-On Server by referring to "Creating an Environment for the Authentication Serverd".
For the Authentication Infrastructure URL and the Repository server (update system) URL, specify the takeover IP address.
If the Systemwalker product is in a cluster configuration, set up the public URL specification on both the active node and the standby node.
Back up the authentication server environment
Use the ssbackup command to back up the settings information.
The storage location and execution example of the ssobackup command are shown below.
[Command location]
OS | Location |
|---|---|
Windows | <Interstage installation directory>\bin |
UNIX | /opt/FJSVssocm/bin |
Example:
[Windows]
When the backup directory is "c:\tmp\ssobackup"
ssobackup -f c:\tmp\ssobackup -sv -ac |
[UNIX]
When the backup directory is "/tmp/ssobackup"
ssobackup -f /tmp/ssobackup -sv -ac |
Refer to the Interstage Application Server Reference Manual (Command Edition) for details on the ssobackup command.
Back up the information for the Systemwalker authentication repository by referring to step 1b in "Creating an environment for the Systemwalker authentication repository".
Set up the standby node
On the standby node, restore the information for the Systemwalker authentication repository that was backed up on the active node, by referring to step 2 of "Creating an environment for the Systemwalker authentication repository".
Copy the Web server settings file for the authentication server (that was backed up on the active node in "Creating an environment for the Web server used for the authentication server") to the standby node.
Copy the following directory (which is created in the directory where information is backed up using the ihsbackup command) to the standby node.
OS | Directory to copy to the standby node |
|---|---|
Windows | IHS |
UNIX | FJSVihs |
Execute the ihsrestore command.
The storage location and execution example of the ihsrestore command are shown below.
[Command location]
OS | Location |
|---|---|
Windows | <Interstage installation directory>\bin |
UNIX | /opt/FJSVihs/bin/ |
Example:
[Windows]
When the backup directory is "c:\tmp"
ihsrestore -d c:\tmp -t all |
[UNIX]
When the backup directory is "/tmp"
ihsrestore -d /tmp -t all |
Refer to the Interstage Application Server Reference Manual (Command Edition) for details on the ihsrestore command.
Change the login screen by referring to step 20 in "Creating an Environment for the Authentication Server".
Copy the settings file (that was backed up on the active node) to the standby node, and then execute the ssorestore command.
The storage location and execution example of the ssorestore command are shown below.
[Command location]
OS | Location |
|---|---|
Windows | <Interstage installation directory>\bin |
UNIX | /opt/FJSVssocm/bin |
Example:
[Windows]
When the backup directory is "c:\tmp\ssobackup"
ssorestore -f c:\tmp\ssobackup |
[UNIX]
When the backup directory is "/tmp/ssobackup"
ssorestore -f /tmp/ssobackup |
Refer to the Interstage Application Server Reference Manual (Command Edition) for details on the ssorestore command.
Setting up the cluster service
Refer to the Interstage Application Server High Availability System Guide for details on the settings that have to be specified for cluster products. However, the following points must be observed when specifying the settings.
If the Interstage Directory Service is used as the Systemwalker authentication repository and the Systemwalker Single Sign-On function is used, the content of the state transition procedure for the Interstage Directory Service must be modified.[Solaris/Linux]
For cluster services, session management operations are not performed by the Systemwalker Single Sign-On function. Do not specify settings for managing sessions for Interstage Single Sign-On.