Use the following procedure to create a Web server to be used for the authentication server.
Start the Interstage Management Console.
Refer to "How to start the Interstage Management Console" for details on how to start the Interstage Management Console.
In the Interstage Management Console window, select System >>Services >> Web Server and then click the Create a new Web Server tab.
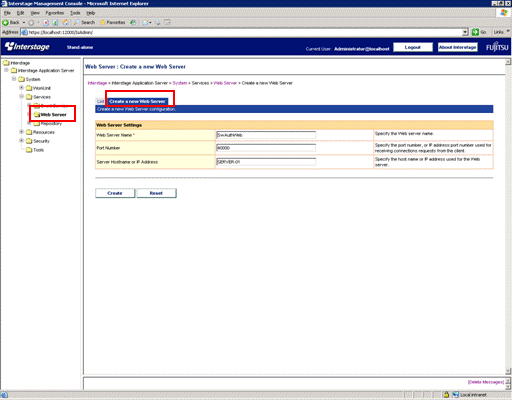
Specify each item as below, and then click the Create button.
Web Server Settings
Web Server Name
Enter the name of the Web server to be created, using up to 64 bytes.
The following characters can be used:
Alphanumeric characters
Symbols (-)
The first and last characters must be alphanumeric characters.
Be sure to specify the Web Server Name.
Note
It is not possible to enter the name of a Web server that already exists.
For Windows, the name is not case-sensitive.
For UNIX, the name is case-sensitive.
Port Number
Enter the port number that will receive connection requests from clients.
Values between 1 and 65535 can be entered for the port number. The IP address and port number can also be specified using "<IP address>:<port number>" format.
Specify the IP address using the "xxx.xxx.xxx.xxx" format (where each "xxx" is a number between 0 and 255, which cannot be omitted). For Solaris, IPv6 addresses can be specified by enclosing the address in square brackets ("[]").
If this item is omitted, the value will be set to "80".
Note
The same port number can be specified for multiple Web servers, but only one of those Web servers can run at any given time. To have multiple Web servers running at the same time, specify a different port number for each Web server, or specify port numbers using the "<IP address>:<port number>" format.
Note that the default value for the port number of the "FJapache" Web server that is created at installation time is "80".
Server Hostname or IP Address
Enter the host name or IP address of the server. For the Windows version, specify a string that is up to 255 bytes long. For the Linux and Solaris versions, specify a string that is up to 106 bytes long.
To specify the IP address, use the "xxx.xxx.xxx.xxx" format (where each "xxx" is a number between 0 and 255, which cannot be omitted).
If this item is omitted, the value will be set to the host name that is found by searching for the IP address that has been set up for the machine.
Note
It is not possible to specify an IPv6 address for the host name or IP address of the server.
The following characters and symbols cannot be used:
Multi-byte characters
Spaces
Symbols (# " /)
In the Interstage Management Console window, select System >> Services >> Web Server >> <Web server name> (*1), and then click the Web Server Settings tab.
*1:
For <Web server name>, select the Web server name that was entered in step 3.
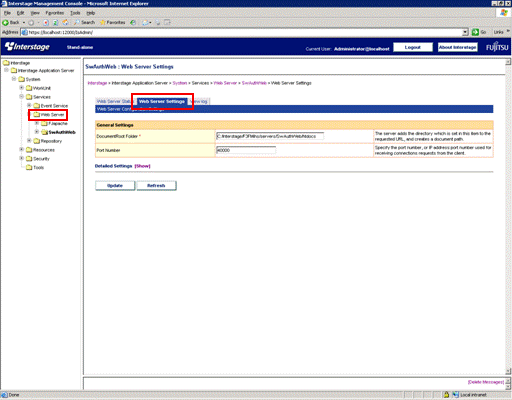
Click the Show link for Detailed Settings.
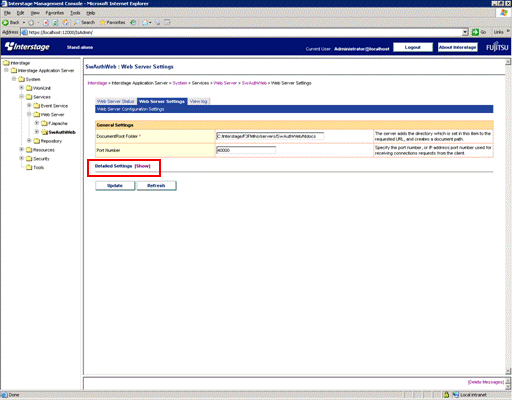
Set up the following items and click the Update button.
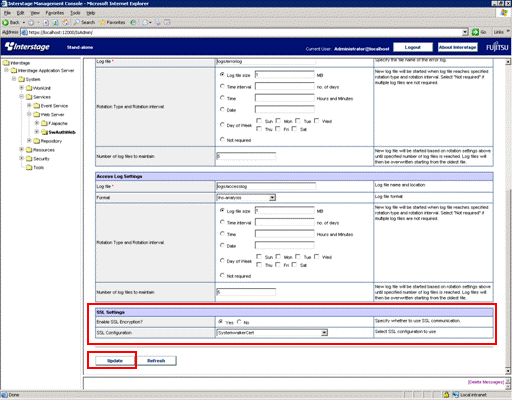
SSL
Enable SSL Encryption?
Select whether to perform SSL communication. Select Yes.
SSL Configuration
If SSL communication is to be performed, use the drop-down list to select which SSL configuration to use. Select the SSL configuration that was specified in "Creating an SSL Environment".