This section explains the procedure for creating the Systemwalker authentication repository.
Use the following procedure to create an environment for the Systemwalker authentication repository.
Start the Interstage Management Console.
Refer to "How to start the Interstage Management Console" for details on how to start the Interstage Management Console.
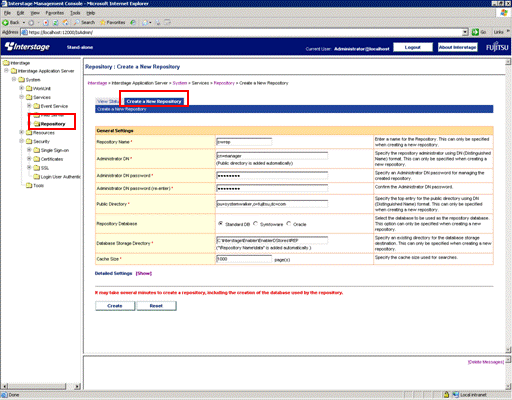
In the Interstage Management Console window, select System >> Services >> Repository and then click the Create a New Repository tab.

Specify each item as below, and then click the Create button.
General Settings
Repository Name
Specify a repository name to identify the Systemwalker authentication repository, using a string that is up to eight bytes long.
The following characters can be used:
Alphanumeric characters
Symbols (_)
The first character must be a letter. If upper-case letters are specified, they will be converted into their lower-case equivalents. The default value is "repnnn", where nnn is a serial number 001, 002, 003, etc.
Be sure to specify the Repository Name item. This can only be specified when creating a new repository.
Note
For Windows: DOS device names cannot be specified as repository names.
Administrator DN
Specify the DN (distinguished name) for the administrator who will manage the Systemwalker authentication repository to be created, using a DN format string that is up to 512 bytes long. The string specified in the Public Directory field will be appended to the specified administrator DN.
The following attributes can be specified for the RDNs (relative distinguished names) that are the components of the DN format: "cn", "ou", "o", "c", "l" and "dc".
The following characters can be specified as attribute values for the RDNs (relative distinguished names) that are the components of the DN format:
Alphanumeric characters
Symbols (- . _)
Place an equals sign ("=") between the attribute names and the attribute values for the RDNs (relative distinguished names) that are the components of the DN format.
To specify multiple RDNs (relative distinguished names), separate each RDN with a comma (",").
The default value is "cn=manager".
Be sure to specify the Administrator DN. This can only be specified when creating a new repository.
Example:
"cn=manager"
"cn=manager, ou=managergroup"
Note
Multiple attributes cannot be used to specify the RDNs (relative distinguished names) for the administrator DN. For example, multiple attributes cannot be specified using a plus sign ("+"), as in "cn=taro+sn=fujitsu".
Administrator DN password
Specify the password for the administrator who will manage the Systemwalker authentication repository to be created, using a string that is up to 128 bytes long. The following characters can be used:
Alphanumeric characters
Symbols (, + = - . _)
Be sure to specify the Administrator DN password.
Administrator DN password (re-enter)
Specify the same string as was specified for the Administrator DN password.
Be sure to specify the Administrator DN password (re-enter).
Public Directory
Specify the top entry to publish the Systemwalker authentication repository, using a DN format string that is up to 512 bytes long.
The following attributes can be specified for the RDNs (relative distinguished names) that are the components of the DN format: "cn", "ou", "o", "c", "l" and "dc".
The following characters can be used as attribute values for the RDNs (relative distinguished names) that are the components of the DN format.
Alphanumeric characters
Symbols (- . _)
Place an equals sign ("=") between the attribute names and the attribute values for the RDNs (relative distinguished names) that are the components of the DN format.
To specify multiple RDNs (relative distinguished names), separate each RDN with a comma (",").
The default value is "ou=interstage, o=fujitsu, dc=com".
Be sure to specify the Public Directory. This can only be specified when creating a new repository.
Example:
"ou=interstage, o=fujitsu, dc=com"
"c=jp"
Note
Multiple attributes cannot be used to specify the RDNs (relative distinguished names) for the public directory. For example, multiple attributes cannot be specified using a plus sign ("+"), as in "cn=taro+sn=fujitsu".
Repository Database
Select Standard DB.
Database Storage Directory
Specify the full path to the directory where the database is stored.
Specify the path using up to 192 bytes for the Windows version and up to 242 bytes for the UNIX version.
For the storage directory, specify a directory that has been created beforehand. The database will actually be stored in the "/<repository name>/data" subdirectory of the specified directory (for the Windows version this is "\<repository name>\data").
The following characters can be used:
[Windows]
Alphanumeric characters
Symbols ($ & ' + - . = @ _ ` ~ [ ] { } : / \)
Spaces
[UNIX]
Alphanumeric characters
Symbols (/ - _ ~)
Multi-byte character encodings cannot be used. For the Windows version, ":" can only be specified as part of the drive letter, and "\" can only be specified as a directory separator. To specify a drive, include "\" as in "C:\ ". The default values are as follows:
OS | Location |
|---|---|
Windows | <Interstage installation directory>\Enabler\EnablerDStores\IREP |
Solaris | /var/opt/FJSVena/EnablerDStores/FJSVirep |
Linux | /var/opt/FJSVena/DStores/FJSVirep |
Be sure to specify Database Storage Directory. This can only be specified when creating a new repository.
Note
Make sure that the database storage directory has sufficient space before specifying this setting. If a directory other than the default directory is specified for the database storage directory, take care with respect to the permission settings.
[Windows]
When specifying a database storage directory other than the one that is displayed by default, grant "full control" access permissions to the members of the Administrators group for all of the directories in the path to the storage directory (from the topmost directory right down to the bottommost directory).
[UNIX]
When specifying a database storage directory other than the one that is displayed by default, set the owner for all of the directories in the path to the storage directory (from the topmost directory right down to the bottommost directory) to "oms", and specify settings so that the owner is allowed to "read", "write" and "execute" files in all of these directories.
The setup procedure is given below. (In this example, the database storage directory is "/data/user".)
a) Create the database storage directory if it has not been created yet. By specifying the -p option, any directories leading up to the specified directory that do not exist will also be created.
mkdir -p /data/user |
b) Specify "read", "write" and "execute" permissions for the directory. By specifying the -R option, the permissions are also set up recursively for all of the subdirectories below the specified directory.
chmod -R 700 /data |
c) Specify "oms" as the owner of the directory. By specifying the -R option, the owners are also set up recursively for all of the subdirectories below the specified directory.
chown -R oms /data |
Cache Size
Specify the size (in pages) of the cache for processing searches. Specify a value between 100 and 65535. One page is 4 KB. The default value is "1000" pages. Be sure to specify this item.
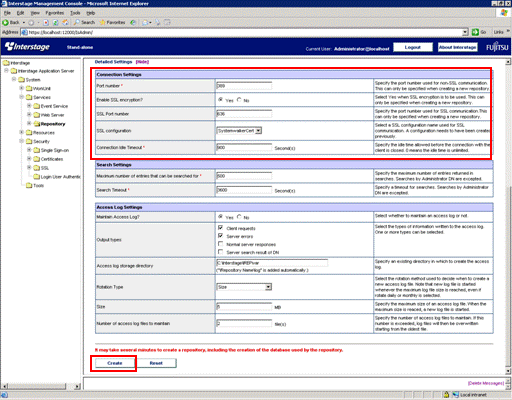
Click the Show link for Detailed Settings.
Specify each item as below, and then click the Create button.
Port number
Specify the port number used for non-SSL communications. This can be specified only when creating a new Systemwalker authentication repository. This value cannot be changed once the repository has been created.
Enable SSL encryption?
Specify whether to perform SSL communications. This can be specified only when creating a new Systemwalker authentication repository. This value cannot be changed once the repository has been created.
SSL Port number
Specify the port number used for SSL communications. This can be specified only when creating a new Systemwalker authentication repository. This value cannot be changed once the repository has been created.
SSL configuration
Decide which SSL definition to use for SSL communications.

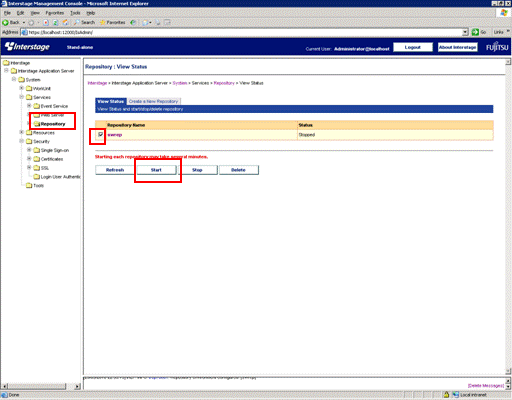
In the Interstage Management Console window, select the check box for the Systemwalker authentication repository that has just been created, and then click the Start button.

Copy the file that contains the settings for the initial data for the Systemwalker authentication repository to an arbitrary directory and then edit this file.
The following tables show the Systemwalker products that contain this settings file, and the storage location of the settings file.
[Systemwalker products that contain the settings file]
Systemwalker product name | Installation type |
|---|---|
Systemwalker Centric Manager | Operation Management Server |
Systemwalker Service Quality Coordinator | Operation Management Client |
[Storage location]
OS | Location |
|---|---|
Windows | %F4AM_INSTALL_PATH%\F4AMidmg\sample\ldif\schema_for_ids.ldf |
UNIX | /opt/FJSVswaic/sample/ldif/schema_for_ids.ldf |
Change all of the "DC=X" parts of the lines in the settings file that start with "dn" to match the environment.
For example, if the public directory has been specified as "dc=fujitsu,dc=com", replace the "DC=X" part with "DC=fujitsu,DC=com".
Use the following command to import the initial data to the Systemwalker authentication repository.
ldapmodify -p <port number> -D <administrator DN> -w <administrator DN password> -a -f <path to the initial data file> |
Specify the TCP port number for the repository.
If this option is omitted, or if "0" is specified, the value will be 389.
Specify the administrator DN for the repository.
Here, specify the value that was specified for the Administrator DN in step 3.
Specify the administrator DN password for the repository.
Here, specify the value that was specified for the Administrator DN password in step 3.
By specifying this option, all input entries that do not contain an LDIF change type statement (a "changetype" line) will be processed as add (an entry will be added).
For the file parameter, specify a file that contains update information for entries.
Here, specify the path to the initial data file that was edited in step 6.
The ldapmodify command is stored in the following location.
[Command location]
OS | Location |
|---|---|
Windows | <Interstage installation directory>\bin |
UNIX | /opt/FJSVirepc/bin |
Use the following procedure to create an environment for the Systemwalker authentication repository.
To use the Systemwalker Single Sign-On function, perform the steps described in "When the Interstage Directory Service is used" as well.
Point
If the operation involves replicating the Active Directory database, these settings must be specified for each Active Directory database.
By default, the maximum number of objects that are returned from a single search using Active Directory is set to 1000. If Active Directory manages more than 1,000 users, groups and organizations, increase the value for MaxPageSize in the LDAP policy for Active Directory.
Create Active Directory.
Refer to the relevant Microsoft documentation for details on how to create Active Directory.
Create a certificate environment for connecting to Active Directory.
Install a certificate service on the server where Active Directory will run. Refer to the relevant Microsoft documentation for details on how to install a certificate service.
Extend the schema for Active Directory.
Use the following procedure to extend the schema for Active Directory.
Copy the settings file for schema extension to an arbitrary directory on the Active Directory server.
The following tables show the Systemwalker products that contain the settings file for schema extension, and the storage location of the settings file.
[Systemwalker products that contain the settings file]
Systemwalker product name | Installation type |
|---|---|
Systemwalker Centric Manager | Operation Management Server |
Systemwalker Service Quality Coordinator | Operation Management Client |
[Storage location]
OS | Location |
|---|---|
Windows | %F4AM_INSTALL_PATH%\F4AMidmg\sample\ldif\schema_for_ad.ldf |
UNIX | /opt/FJSVswaic/sample/ldif/schema_for_ad.ldf |
Execute the ldifde command on the Active Directory server.
Example:
When the settings file for schema extension has been copied to "C:\tmp", the port number is "389" and the domain name is "ad.local".
ldifde -i -f C:\tmp\schema_for_ad.ldf -s localhost -t 389 -k -c "DC=X" "DC=ad,DC=local" |