A configuration example of when the replication operation uses the Storage Cluster Continuous Copy function is shown below.
Figure 7.5 Configuration Example of Replication Operation Using Storage Cluster Continuous Copy Function
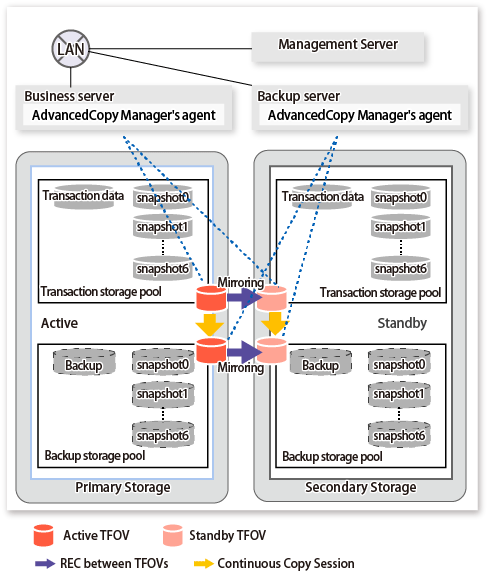
Using 1 physical disk that constitutes a storage pool for transactions, the entire disk is registered.
Backups are saved in the backup storage pool.
Business server (Managed Server): SV
Backup server(Management Server): BKSV (name for registration in AdvancedCopy Manager)
Transaction storage pool: STP1
Backup storage pool: STP1
Disk
Physical Disk | Connection Server | Device Type | Device Name | Purpose (Storage Pool) |
|---|---|---|---|---|
Transaction VOL | SV | LU | c1t1d1 | Transaction storage pool (STP1) |
Backup VOL | BKSV | LU | c2t1d11 | Backup storage pool (STP1) |
A configuration example of when the AdvancedCopy Manager CCM operation uses the Storage Cluster Continuous Copy function is shown below.
Figure 7.6 Configuration Example of AdvancedCopy Manager CCM Operation Using Storage Cluster Continuous Copy Function
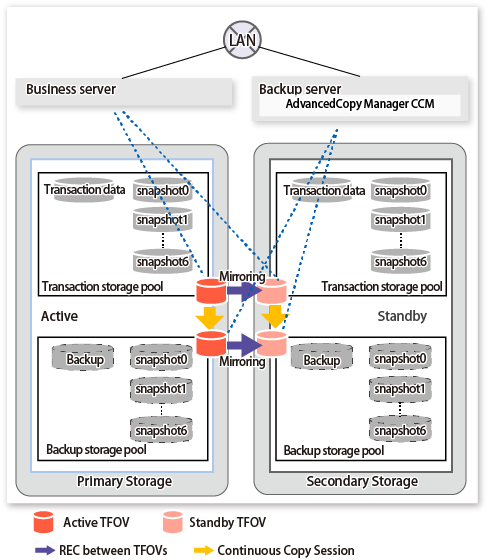
Using 1 physical disk that constitutes a storage pool for transactions, the entire disk is registered.
Backup is saved in the backup storage pool.
Business server: SV
CCM Server: BKSV
Transaction storage pool: STP1
Backup storage pool: STP1
Disk
Physical Disk | Connection Server | LU Number | Device Type | Device Name | Purpose (Storage Pool) |
|---|---|---|---|---|---|
Transaction VOL | SV | 0x01 | LU | c1t1d1 | Transaction storage pool (STP1) |
Backup VOL | BKSV | 0x11 | LU | c2t1d11 | Backup storage pool (STP1) |
Note
REC between the transaction storage pool and the backup storage pool is not supported.
Locate all devices in the same TFO group.
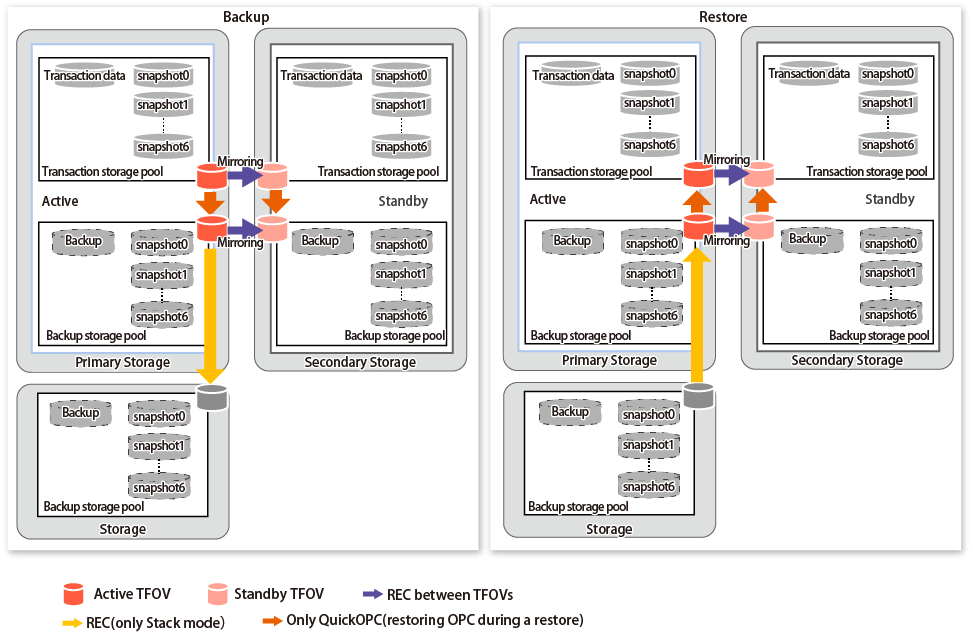
Consider the following points when operating a backup/restore of the ZFS file system by using the backup volume.
TFOVs cannot be specified as a backup volume.
Use QuickOPC for Advanced Copy from the device that configures the ZFS storage pool to the backup storage pool.
Use AdvancedCopy Manager CCM for Remote Advanced Copy from the backup storage pool to the backup volume.
Figure 7.7 Operating Example of Backup/Restore for ZFS File System
Information
If the device that configures the ZFS Storage pool is TFOV, the usable copy type in Advanced Copy to the backup volume is REC only.
Refer to the following sections and operate after understanding the design and operation methods.
"Operations of Advanced Copy Using TFOV" in the AdvancedCopy Manager Operation Guide for Copy Control Module
G.2 Online Backup Using ZFS Snapshot with AdvancedCopy Manager Function
Implement the following procedures for preparation:
Fetching Lists of Devices in Transaction Storage Pools
The method for acquiring the device list within the transaction storage pool is the same as for non-TFOVs. Refer to "Fetching Lists of Devices in Transaction Storage Pools" in "G.2.3 Preparations" for details.
Copy Settings for Backup and Restoration
Execute the copy settings for the transaction storage pool and the backup storage pool (for backup and restoration).
Use the following combinations to register them in AdvancedCopy Manager:
Used for | Copy Source | Copy Destination | Group Name (ex.) |
|---|---|---|---|
Backup/Restoration | Transaction storage pool | Backup storage pool | STP1 |
Device Name | Devices to Be Registered | Example (*1) | |
|---|---|---|---|
Device Name | LU Number | ||
Transaction storage pool | Devices that you confirmed in "Fetching Lists of Devices in Transaction Storage Pools" in "G.2.3 Preparations" to be devices constituting the transaction storage pool | c1t1d1 | 0x01 |
Backup storage pool | Devices that constitute the backup storage pool | c2t1d11 | 0x11 |
*1: When using replication management function, use device name. When using AdvancedCopy Manager CCM, use LU number.
Register copy sources indicated at "Table 7.1 Copy Groups" as copy destination volumes, and copy destinations as copy destination volumes. Then register the devices indicated at "Table 7.2 Registered Devices" respectively.
Since these are controlled synchronously in processing for backup and restoration, you have to register all devices that constitute a storage pool as a single group. For details on controlling groups, refer to "6.4.7 Creating Groups".
[Example]
Specify the source volumes and copy destination volumes to create the 3 groups shown in the chart.
# /opt/FJSVswsrp/bin/swsrpsetvol -o BOTH -Xgroup STP1 /dev/dsk/c1t1d1@SV /dev/dsk/c2t1d11@BKSV
swsrpsetvol completed
# /opt/FJSVswsrp/bin/swsrpvolinfo -L
Server Original-Volume         Size       Replica-Volume           Size       Copy          Op-Server   Group
BKSV   /dev/dsk/c1t1d1@SV      4.0 Gbyte  /dev/dsk/c2t1d11@BKSV    4.0 Gbyte  bi-direction  both        STP1
#
Register each combination of copy sources and copy destinations.
Since these are controlled synchronously in processing for backup and restoration, you have to register all devices that constitute a storage pool as a single group. For details on controlling groups, refer to "Creating Copy Groups" and "Adding Copy Pairs" in the AdvancedCopy Manager Operation Guide for Copy Control Module.
Creation of copy groups
Create a copy group for each copy setting.
[Example]
Create the 3 copy groups shown in the chart. (Copying type: OPC)
# acgroup create -g STP1 -type OPC -a DX440
Successful completion.
#
Registration of copy pairs
In the created copy groups, register the combinations of copy sources and copy destinations. Register all devices that constitute a storage pool.
[Example]
In the created copy groups, register each device shown in the chart.
# acpair add -g STP1 -p DX440/0x01:DX440/0x11
Successful completion.
#
This section describes procedures for backing up and restoring ZFS storage pools. Refer to "Appendix G Backup and Restoration of ZFS File Systems" for details.
Point
When the status of the TFO group is "Normal" and Advanced Copy cannot operate on either the Primary Storage or Secondary Storage, the command may terminate abnormally. Check the cause of the error on both the Primary Storage and Secondary Storage to address the error message in the storage device where the error is occurring.
When the status of the TFO group is "Normal" and its phase is "Maintenance", or when the status of the TFO group is "Halt", the command executes Advanced Copy on the storage device that has an "Active" TFO status and terminates normally. However, Advanced Copy could not be executed on the storage device that has a "Standby" TFO status. In this case, swsrp2882 message may be output.
If a swsrp2882 message is output, after the status of TFO group has become "Normal" and the phase is not "Maintenance", refer to "7.10 When Recovering Storage Cluster Continuous Copy Function" to take action.
Advanced Copy cannot be operated during a failover or a failback.
If the volume that is the target of Storage Cluster or the TFO group of the volume is changed, refer to "7.11.2 When Changing Storage Cluster Target Volume" and register the replication volume again.
For TFOVs that are not synchronized between the Primary Storage and Secondary Storage, the following commands cannot be executed:
When the TFO status on the Secondary Storage is "Active", the following commands cannot be executed as well:
To check the status of Advanced Copy and stop the session, use Web Console or AdvancedCopy Manager Copy Control Module commands.
For using Web Console
Refer to "Display/Forcible Suspend/Forcible Cancel Copy Session" in the Web Console Guide.
For using AdvancedCopy Manager Copy Control Module commands
accopy query
accopy fcancel
Refer to "Command References" in the AdvancedCopy Manager Operation Guide for Copy Control Module for information on the commands.
This section shows the procedure for an online backup.
No. | Description | Controlling Server |
|---|---|---|
1 | Export the backup storage pool. | Backup server |
2 | Create a snapshot of the transaction storage pool. | Business server |
3 | Using AdvancedCopy Manager, back up data to a device in the backup storage pool from a device in the transaction storage pool. | Business server |
4 | Check the status of the backup storage pool. | Backup server |
Export the backup storage pool.
For more information on export of ZFS storage pools, refer to the operating system manual.
[Example]
# zpool list
NAME   SIZE   USED     AVAIL    CAP  HEALTH  ALTROOT
STP1   345G   121M     345G     0%   ONLINE  -
# zpool export STP1
#
Create snapshots of the transaction storage pool.
Delete the snapshot that is not restored to the transaction storage pool.
To delete ZFS snapshots, refer to the operating system manual.
Execute the sync command to synchronize the transaction storage pool with the file system.
Create a file system snapshot on the transaction storage pool.
To create ZFS snapshots, refer to the operating system manual.
Execute the sync command to synchronize the transaction storage pool with the file system.
[Example]
# zfs destroy STP1@SNAP0
# sync
# zfs snapshot -r STP1@SNAP0
# sync
#
Using AdvancedCopy Manager, back up data to a device in the backup storage pool from a device in the transaction storage pool.
Specify backup/restore group "STP1" for the -Xgroup option and execute the swsrpmake command.
[Example]
# /opt/FJSVswsrp/bin/swsrpmake -Xgroup STP1
GROUP=STP1 swsrpmake completed
#
Specify backup/restore group "STP1" for the -g option and execute the acopc start command of AdvancedCopy Manager CCM.
[Example]
# /opt/FJSVccm/bin/acopc start -g STP1
DX440/0x01:DX440/0x11
# DATE : 2012/01/01 00:00:00 - << OPC Started >>
# From:BoxID=303045343030304d3323232323234534353053323041232323234b44343033303633393030342323/Olu=01/Adr_high=0/Adr_low=0/size_high=0/size_low=0
# To:BoxID=303045343030304d3323232323234534353053323041232323234b44343033303633393030342323/Olu=11/ Adr_high=0/Adr_low=0
# Standby-Session : DX440SEC/0x02:DX440SEC/0x12
Succeeded : 1
Failed : 0
#
Note
Since processing is carried out for all devices that constitute the storage pool, do not specify any copy pairs.
Check the status of the backup storage pool.
Import the backup storage pool on the backup server.
Export the backup storage pool on the backup server.
For more information on import/export of the ZFS storage pool, refer to the operating system manual.
[Example]
# zpool import
  pool: STP1
    id: 15271135801818262407
 state: ONLINE
action: The pool can be imported using its name or numeric identifier.
config:

        STP1        ONLINE
          c2t1d11   ONLINE
# zpool import -f STP1
# zpool list
NAME   SIZE   USED     AVAIL    CAP  HEALTH  ALTROOT
STP1   345G   345M     345G     0%   ONLINE  -
# zpool export STP1
#
Note
If import/export has failed, re-execute it from step 2.
This section shows the procedure for restoration.
No. | Description | Controlling Server |
|---|---|---|
1 | Export the transaction storage pool. | Business server |
2 | Export the backup storage pool. | Backup server |
3 | Using AdvancedCopy Manager, restore data to a device in the transaction storage pool from a device in the backup storage pool. | Business server or Backup server |
4 | Import the transaction storage pool. | Business server |
5 | Roll back the transaction storage pool to a restored snapshot. | Business server |
6 | Mount the target ZFS file systems. | Business server |
If any transaction storage pool exists, export it.
For more information on export of ZFS storage pools, refer to the operating system manual.
[Example]
# zpool list
NAME   SIZE   USED     AVAIL    CAP  HEALTH  ALTROOT
STP1   345G   345M     345G     0%   ONLINE  -
# zpool export STP1
#
Export the backup storage pool.
For more information on export of ZFS storage pools, refer to the operating system manual.
[Example]
# zpool list
NAME   SIZE   USED     AVAIL    CAP  HEALTH  ALTROOT
STP1   345G   121M     345G     0%   ONLINE  -
# zpool export STP1
#
Using AdvancedCopy Manager, restore data to a device in the transaction storage pool from a device in the backup storage pool.
Specify backup/restore group "STP1" for the -Xreverse option and the -Xgroup option and execute the swsrpmake command.
[Example]
# /opt/FJSVswsrp/bin/swsrpmake -Xgroup STP1 -Xreverse
GROUP=STP1 swsrpmake completed
#
Specify backup/restore group "STP1" for the -r option and the -g option and execute the acopc start command of AdvancedCopy Manager CCM.
[Example]
# /opt/FJSVccm/bin/acopc start -g STP1 -r
DX440/0x11:DX440/0x01
# DATE : 2012/01/01 00:00:00 - << OPC Started >>
# From: BoxID=303045343030304d3323232323234534353053323041232323234b44343033303633393030342323/Olu=11/Adr_high=0/Adr_low=0
# To: BoxID=303045343030304d3323232323234534353053323041232323234b44343033303633393030342323/Olu=01/Adr_high=0/Adr_low=0/size_high=0/size_low=0
# Standby-Session : DX440SEC/0x12:DX440SEC/0x02
Succeeded : 1
Failed : 0
#
Note
Since processing is carried out for all devices that constitute the storage pool, do not specify any copy pairs.
In the transaction storage pool, import the device restored at step 3 in the restore procedure.
For information on how to import a ZFS storage pool, refer to the operating system manuals.
[Example]
# zpool import STP1
#
Roll back the transaction storage pool to a restored snapshot.
To see how to roll back the ZFS storage pool to a snapshot, refer to the operating system manual.
[Example]
For rolling back to the "SNAP1"
# zfs list -t snapshot
NAME           USED  AVAIL  REFER  MOUNTPOINT
STP1@SNAP1       0       -    19K   -
STP1@SNAP2     16M       -    18K   -
STP1@SNAP3     32M       -    18K   -
# zfs rollback -r STP1@SNAP1
#
Mount the target ZFS file systems.
If the ZFS file systems have not been mounted automatically by step 5, mount them manually.
For information on how to mount ZFS file systems, refer to the operating system manuals.
[Example]
# zfs mount STP1/data1
# zfs mount STP1/data2
#