Set up the shared disk as described below:
When mirroring is used among servers, the setting procedures are the same; select the netmirror under Type on the Group Attributes Definition screen.
When the GFS Shared File System is to be used
Execute "Volume setup."
Execute "6.4 Initial GFS Setup."
When the ext3 file system is to be used
Execute "Volume setup."
Execute "File system setup."
Create a Gds resource and register it to a cluster application.
For details, see "6.7.3.4 Setting Up Gds Resources" and "6.7 Setting Up Cluster Applications."
When the file system is not to be used
Execute "Volume setup."
For use as a RAW device, make the settings according to the manual pages related to the "raw(8)" command and rawdevices.
Create a Gds resource and register it to a cluster application.
For details, see "6.7.3.4 Setting Up Gds Resources" and "6.7 Setting Up Cluster Applications."
Note
"When the GFS Shared File System is to be used" and "When the file system is not to be used," "File system setup" is not necessary.
The setup procedures for "When the ext3 file system is to be used" and "When the file system is not to be used" must be carried out before the Gds resources are set up. For details, see "6.7.3.3 Preliminary Setup for Gds Resources."
"When the GFS Shared File System is to be used," "6.7.3.4 Setting Up Gds Resources" must not be carried out.
The local class disks or shared class disks used by GDS on the guest OS should be configured as the following virtual disks if they are used in the virtual machine environment.
KVM environment
virtio-SCSI devices or virtio block devices
There are five types of volumes:
Single volume
Mirror volume
Stripe volume
Volume created in a concatenation group
Netmirror volume
This section separately describes the volume setup procedures for a single volume (a) and for other volumes (b, c, d, e). For details, see "Class, Group, Volume Settings" in "PRIMECLUSTER Global Disk Services Configuration and Administration Guide."
The values to be set for the individual items correspond to the values in "Setup (GDS Local Class)" and "Setup (GDS Shared Class)" of PRIMECLUSTER Designsheets.
Note
If you plan to add, delete, or rename a disk class from the GDS Management screen (hereinafter main screen), close the Cluster Admin screen before starting the operation.
When neither the system nor the GDS Management screen are reactivated after "2. Registering a shared disk" of "5.1.3.2 Registering Hardware Devices," the registered shared disk might not be correctly recognized to GDS. In this case, setup the volume after updating physical disk information. Physical disk information can be updated by selecting Update Physical Disk Information from Operation menu of the main screen.
If you are not using a single volume, this setup is unnecessary.
Start the main screen.
Choose Global Disk Services on the Web-Based Admin screen.
Disk class creation and physical disk registration
At the main screen, select Class Configuration from the Settings menu.
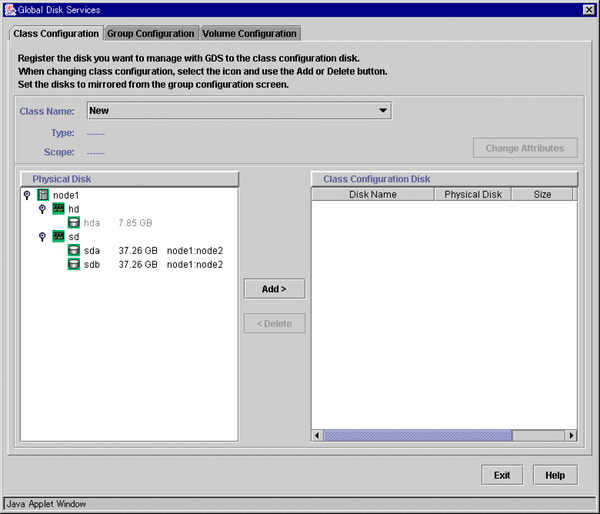
At the above screen, select the physical disk to be registered from the Physical Disk list, and then click Add. When Add is clicked, the Class Attributes Definition screen opens. Enter the Class Name but do not change the Type value (leave the value as "shared").
Disk type attribute setup
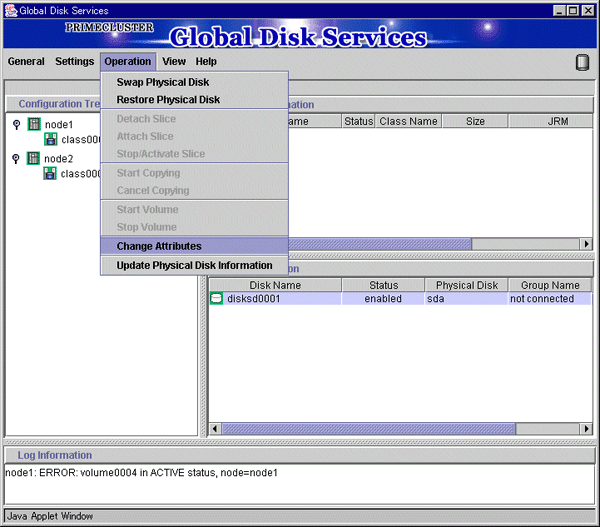
At the main screen, select the disk that was registered in Step 2 from the Disk Information field, and select Operation -> Change Attributes from the menu bar.
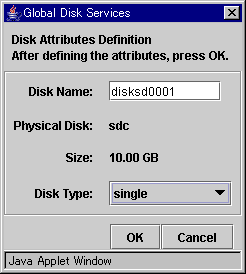
Set Disk Type to "single," and then click OK.
Volume creation
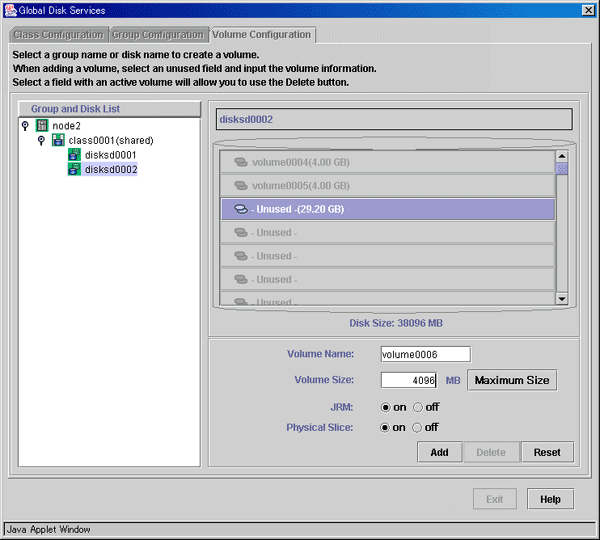
Select Settings -> Volume Configuration, and then select the disk that was registered in Step 2 from the Group and Disk List. Select "Unused" in the volume diagram, and enter the Volume Name, the Volume Size, and the volume attributes.
Click Add to enable the settings.
Check the settings, and then click Exit.
If you are using only "single" volumes, this setup is unnecessary.
Creating a disk class and registering physical disks
At the main screen, select "Class Configuration" from "Settings" menu.
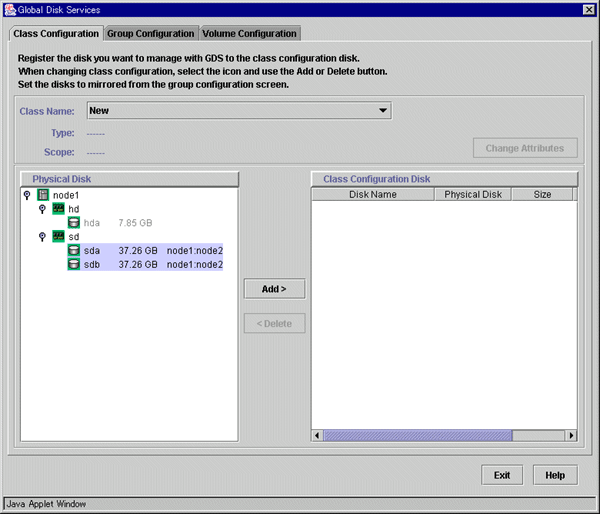
At the above screen, select the physical disks to be registered from "Physical Disk" list, and then click "Add". When "Add" is clicked, the Class Attributes Definition screen opens. Enter "Class Name" but do not change "Type" value (leave the value as "shared"). Then click "Exit".
Setting up the disk group configuration
Click the Group Configuration tab.
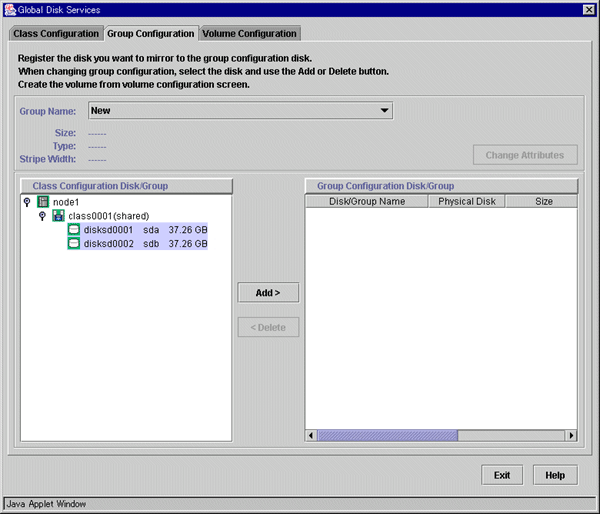
At the above screen, select the disks to be added to the group from "Class Configuration Disk/Group" list, and then click "Add".
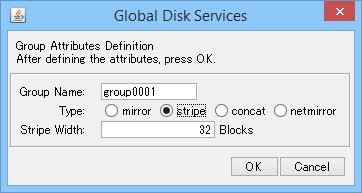
Enter "Group Name", "Type", and "Stripe width" in the Group Attributes Definition screen, and then click "OK".
For the mirroring among servers, select "netmirror" for "Type".
Enter "Stripe width" only when selecting "stripe" for "Type".
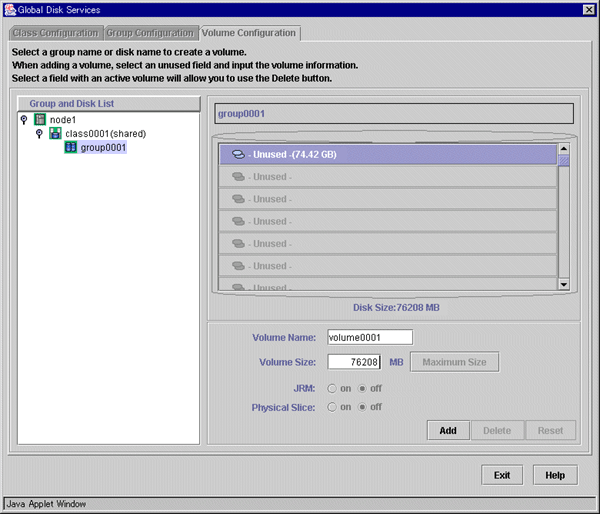
Creating a volume
Click the Volume Configuration tab, and select the group that was created in Step 2 from the Group and Disk List. Select Unused in the volume diagram, and enter the Volume Name, the Volume Size, and the volume attributes.
Click Add to enable the settings.
Check the setup information, and then click Exit.
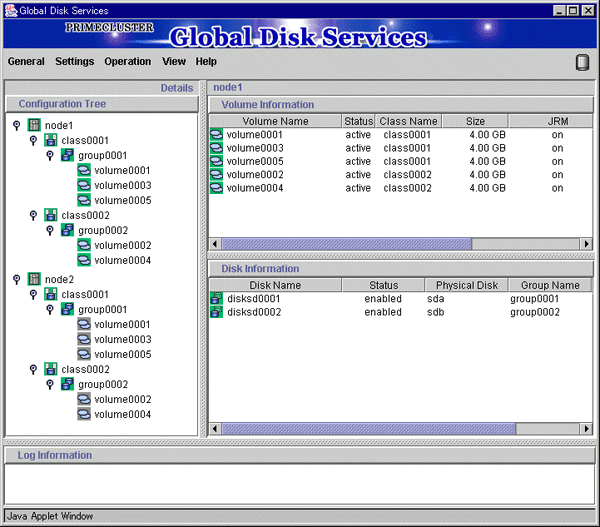
Checking the configuration
The disk configuration is displayed as shown below.
Create a file system for each created volume.
Example: class name = Class1, volume name = Volume1, and file system type = ext3
# mkfs -t ext3 /dev/sfdsk/Class1/dsk/Volume1See
For how to create file system, see the file system manual.