This section explains how to set up the resource database that the cluster resource management facility (CRM) manages.
Set up the CRM resource database according to the following procedure:
Initial setup
Set up the resource database that CRM manages.
Registering Hardware Devices
Register the connected hardware devices (shared disks and network interface cards) to the resource database that CRM manages.
Set up the CRM resource database from the CRM main window. Use the CRM main window as follows:
Operation Procedure:
Select PRIMECLUSTER -> Global Cluster Services -> Cluster Admin in the Web-Based Admin View operation menu.
When the "Cluster Admin" screen is displayed, select the crm tab.
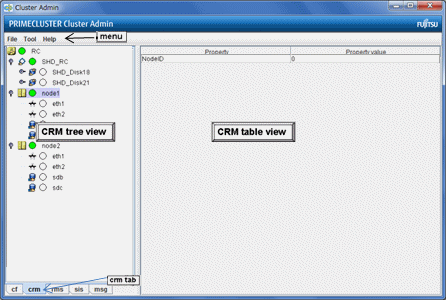
The areas shown in the screen are described below.
This area displays the menu. See "7.1.2.1.3 Operations."
This area displays the resources registered to CRM. The resources are displayed in a tree structure.
For details on the colors and status of the icons displayed in the tree, see "7.1.2.1 Displayed Resource Types."
This area displays attribute information for the resource selected in the CRM tree view. For information on the displayed information, see "7.1.2.2 Detailed Resource Information."
Set up the resource database that CRM manages.
When setting up the initial configuration, make sure that all the nodes in the cluster have been started and that CF configuration is completed.
Operation Procedure:
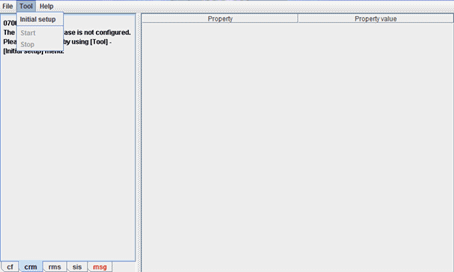
Select the Initial setup in the Tool menu.
Figure 5.1 Screen for cluster resource management facility
Note
The Initial setup can be selected only if the resource database has not been set.
The screen for initial setup is displayed.
Figure 5.2 Screen for initial setup
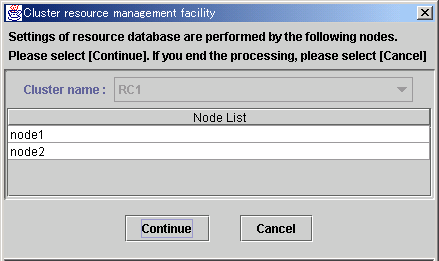
This area displays the names of the clusters that make up the resource database. The cluster names displayed here were defined during CF configuration.
This area displays the list of the nodes that make up the resource database.
Note
Check that the nodes that were configured in the cluster built with CF and the nodes displayed here are the same.
If the nodes do not match, check the following:
Whether all the nodes displayed by selecting the cf tab in the Cluster Admin screen are Up.
Whether Web-Based Admin View is operating in all the nodes.
For instructions on checking this, see "4.3.3.2 Confirming Web-Based Admin View Startup."
Click this button to set up the resource database for the displayed cluster.
Initial setup is executed on all the nodes displayed in the Node list.
Click this button to cancel processing and exit the screen.
Check the displayed contents, and click the Continue to start initial setup.
The screen below is displayed during execution of initial setup.

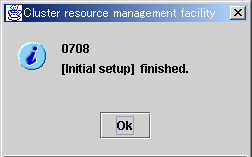
When initial setup ends, the following message is displayed.
Note
If a message appears during operation at the CRM main window, or if a message dialog box entitled "Cluster resource management facility" appears, see "3.2 CRM View Messages" and "Chapter 4 FJSVcluster Format Messages" in "PRIMECLUSTER Messages."
If you want to add, delete, or rename a disk class from the Global Disk Services screen after executing Initial Setup from the CRM main window, close the Cluster Admin screen.
Register the connected hardware devices (shared disks and network interface cards) to the resource database that CRM manages.
Operation Procedure:
Confirm that all the nodes have been started in multi-user mode.
Perform the following procedure on any node in the cluster system.
Log in the node using system administrator access privileges.
Execute the "clautoconfig" command.
# /etc/opt/FJSVcluster/bin/clautoconfig -r -nFor details on this command, see the manual pages of "clautoconfig".
Note
Do not execute the "clautoconfig" command on the node in which the "clautoconfig" command is being executed or on any other node while the "clautoconfig" command is being executed. If you execute it, a shared disk device cannot be registered correctly. If you have executed it, execute the following operation on all the nodes that constitute the cluster system to re-execute "5.1.3 Initial Setup of the Cluster Resource Management Facility" described in this chapter:
Reset the resource database using the "clinitreset" command. For details on this command, see the manual pages of "clinitreset".
Restart the node.
Only an active network interface card is automatically detected. Confirm the state of the network interface card using the "ip(8)" command in RHEL7 or later, or the "ifconfig(8)" command in RHEL6 or earlier.
Execute the following command to activate the network interface:
[RHEL6 or earlier]
# ifconfig network interface card up
(Example) Enable the network interface card eth1
# ifconfig eth1 up[RHEL7 or later]
# ip link set dev network interface card up
(Example) Enable the network interface card eth1
# ip link set dev eth1 upWhen you use GDS, register a shared disk in the resource database using the following steps on any one of the nodes of the cluster system. These steps are required also when performing the mirroring among servers.
For details on the procedure, see "Shared Disk Resource Registration" in "PRIMECLUSTER Global Disk Services Configuration and Administration Guide."
Log in any one of the nodes of the cluster system using system administrator access privileges.
Set the disk for performing the mirroring among servers.
For performing the mirroring among servers, set the local disk device to be accessed from each node as an iSCSI device.
For details, see "Disk Setting for Performing Mirroring among Servers" in "PRIMECLUSTER Global Disk Services Configuration and Administration Guide."
By this setting, the target disk device can be used from each node as the shared disk device is used. For the procedure below, describe the iSCSI device in the shared disk definition file.
Create a shared disk configuration file in the following format.
The configuration file defines settings of a shared disk connected to all the nodes of the cluster system.
Create a shared disk definition file with an arbitrary name.
<Resource key name> <device name> <node identifier>
<Resource key name> <device name> <node identifier>
                     :
Define "resource key name device name node identifier" for each shared disk in one row.
"resource key name", "device name", and "node identifier" are delimited by a single space.
Set up resource key name, device name and node identifier as follows;
Specify a resource key name that indicates the sharing relationship for each shared disk. You need to specify the same name for each disk shared between nodes. The resource key name should be specified in the "shd number" format. "shd" is a fixed string. For "number", you can specify any four-digit numbers. If multiple shared disks are used, specify unique numbers for each shared disk.
(Example) When /dev/sdb and /dev/sdc are shared between nodes
Resource key name of /dev/sdb: shd0001
Resource key name of /dev/sdc: shd0002
Specify a device name by the full device path of the shared disk.
(Example) In the case of /dev/sdb
/dev/sdb
Note
When using DM-MP
- Describe a device name with /dev/mapper/mpathX format.
- Do not describe a device name with /dev/dm-X format.
- Do not describe a native device (sd device) which composes mpath devices.
For a guest in the virtual environment
Describe a device name for a guest.
For example, for the virtio block device of the KVM guest, describe the device name for the KVM guest /dev/vdX, not the device name for the host OS /dev/sdX.
Specify a node identifier for which a shared disk device is available. Confirm the node identifier by executing the "clgettree" command. For details on this command, see the manual pages of "clgettree".
(Example) node1 and node2 are node identifiers in the following case:
# /etc/opt/FJSVcluster/bin/clgettree
Cluster 1 cluster
    Domain 2 PRIME
        Shared 7 SHD_PRIME
        Node 3 node1 ON
        Node 5 node2 ON
The following example shows the configuration file of the shared disk when shared disks /dev/sdb and /dev/sdc are shared between node1 and node2.
 shd0001 /dev/sdb node1
 shd0001 /dev/sdb node2
 shd0002 /dev/sdc node1
 shd0002 /dev/sdc node2
When adding a shared disk device and registering the added shared disk device on the resource database, define only the information of the added shared disk device.
Example: When registering the added disk device /dev/sdd (*1) on the resource database after shd0001 and shd0002 are already registered on the resource database:
shd0003 /dev/sdd node1
shd0003 /dev/sdd node2
(*1) Note
The device name of the added shared disk device may not follow the device name of the registered device in alphabetical order. Make sure to check the device name of the added shared disk device before defining the information of the added disk device.
Execute the "clautoconfig" command to register the settings of the shared disk device that is stored in the configuration file in the resource database.
Specify the "clautoconfig" command in the following format:
(Format)
/etc/opt/FJSVcluster/bin/clautoconfig -f [full path of the shared disk definition file]
(Example)
# /etc/opt/FJSVcluster/bin/clautoconfig -f /var/tmp/diskfile
Note
If the "clautoconfig" command ends abnormally, take corrective action according to the error message. For details on the messages of this command, see "PRIMECLUSTER Messages."
This command does not check whether the shared disk defined in the configuration file is physically connected.
If the device name of the shared disk device varies depending on a node, execute the "clautoconfig" command on the nodes in which all the device files written in the shared disk configuration file exist. If a device file written in the shared disk configuration file does not exist on the node in which the "clautoconfig" command is executed, the resource registration fails and the following message is displayed.
FJSVcluster: ERROR: clautoconfig: 6900: Automatic resource registration processing terminated abnormally.
(detail: /dev/device_name)
For details, see "PRIMECLUSTER Global Disk Services Configuration and Administration Guide."
If you found an error in the shared disk configuration file after executing the "clautoconfig" command, reset the resource database by executing the "clinitreset" command and restart the node.
When the registration of the hardware device is completed, the following screen appears.
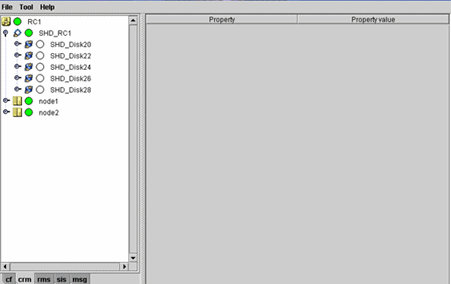
Go to the CRM main window and confirm that the resource registration is completed successfully by checking the following. In the CRM main window of Initial Setup, check that the selected device resources are registered correctly.
Whether the disk configuration is different among the nodes.
Whether the number of disks in each node differs from the number of shared disk units.
Whether the number of shared disk unit resources is less than the actual device configuration.
Whether any disks other than shared disk unit are registered as shared disk unit.
Whether the number of public LAN resources is less than the actual device configuration.
If the actual device configuration and the resources do not match each other as described above, the following may be the causes:
There is a connection path failure (such as cable disconnection) between a host device and a disk array unit.
A disk array unit is not ready.
A network adapter failed.
A network adapter driver failed.
If the resources are not registered correctly, first review the above causes, and then register the resources again.
Note
If a message appears during operation at the CRM main window, or if a message dialog box entitled "Cluster resource management facility" appears, see "3.2 CRM View Messages" and "Chapter 4 FJSVcluster Format Messages" in "PRIMECLUSTER Messages."
If you want to add, delete, or rename a disk class from the Global Disk Services screen after executing Initial Setup from the CRM main window, close the Cluster Admin screen.