This section describes procedures for building non-global zones. Implement the procedures for only the operational system if one is using a configuration which shares non-global zone images between cluster nodes. If using a configuration which does not share non-global zone images between cluster nodes, implement the procedures in all nodes. To create non-global zones, the following conditions must be satisfied.
Must be Whole Root Zone (a zone not sharing system files with the global zone)
The non-global zone autoboot (the setting to automatically start up the non-global zone during startup of the global zone; the default setting is false) must be set to false.
If using a configuration where non-global zone images are not shared between cluster nodes, the zone names (the names of zones as defined by zonecfg and zoneadm -z) must match for all nodes.
If not otherwise specified in the subsequent parts of this section, implement the procedures for only the operational system if one is using a configuration which shares non-global zone images between cluster nodes. If using a configuration which does not share non-global zone images between cluster nodes, implement the procedures in all nodes.
For each creation of a non-global zone, create a resource pool beforehand. Create it on all nodes. For details on the procedure, see "System Administration Guide: Oracle Solaris 9 Containers" or "System Administration Guide: Oracle Solaris 8 Containers."
If building a cluster with a Solaris Containers environment, make the number of CPU cores to be allocated to the global zone two or more.
Using the zonecfg command, create the non-global zones. Create them by referring to the following example.
# zonecfg -z zone-a *1*1: "zone-a" is the zone name (it is the same below).
zone-a: No such zone configured
Use 'create' to begin configuring a new zone.
zonecfg:zone-a> create -t SUNWsolaris9  (For Solaris 9 Container)
zonecfg:zone-a> create -t SUNWsolaris8  (For Solaris 8 Container)
zonecfg:zone-a> set zonepath=/zone-a-system  *2
zonecfg:zone-a> set autoboot=true (for warm-standby)
zonecfg:zone-a> set autoboot=false (for cold-standby)
*2: For /zone-a-system, specify the directory to which the zone-a images are allocated.
If sharing images, specify the mountpoint registered as an Fsystem resource. If not sharing images, specify the file system on the local system.
zonecfg:zone-a> set limitpriv="default,proc_priocntl"
zonecfg:zone-a> add fs
zonecfg:zone-a~:fs> set dir=/oracle-data
zonecfg:zone-a~:fs> set special=/zone-a-oracle  *3
zonecfg:zone-a~:fs> set type=lofs
zonecfg:zone-a~:fs> end
*3: For /zone-a-oracle, specify the directory of the Fsystem resource corresponding to the volume for zone-a Oracle data allocation.
[If making the non-global zone's network mode a shared IP zone configuration]
zonecfg:zone-a> add net   (If making it a shared IP zone configuration)
zonecfg:zone-a:net> set physical=e1000g0  *4
zonecfg:zone-a:net> set address=10.20.30.40/24
zonecfg:zone-a:net> end
*4: If specifying a network interface multiplexed with GLS, specify the Primary interface for the corresponding Gls resource.
[If making the non-global zone's network mode an exclusive IP zone configuration]
zonecfg:zone-a> set ip-type=exclusive
zonecfg:zone-a> add net
zonecfg:zone-a:net> set physical=e1000g0  *5
zonecfg:zone-a:net> end
*5: Specify the physical interface exclusive to Containers. Perform the IP address setup and physical interface multiplexing from within Containers. If the physical interface is activated, perform deactivation.
zonecfg:zone-a> add net
zonecfg:zone-a:net> set physical=e1000g1  *6
zonecfg:zone-a:net> end
*6: If the physical interface is multiplexed within Containers, it is necessary to specify two or more physical interfaces.
zonecfg:zone-a> verify
zonecfg:zone-a> commit
zonecfg:zone-a> exit
Note
If using a shared IP zone configuration
For the IP address set up to the non-global zone, set up the IP address which is not being used with GLS. Perform the setup of the default gateway to the zone on the global zone. If one has set up the default gateway using the zonecfg command, the paths will be disabled when performing NIC switching with GLS.
Create Solaris 8 Containers or Solaris 9 Containers from the flash archive created in the migration source, Solaris 8 environment or Solaris 9 environment.
Note
When expanding a flash archive to the GDS volume on the shared disk, activate the GDS volume and then mount the file system on it.
Example: When expanding a flash archive to the file system (ufs) on GDS volume
# sdxvolume -N -c class0001 -v volume0001
# mount -F ufs /dev/sfdsk/class0001/dsk/volume0001 /zone-a-system
# zoneadm -z zone-a install -u -a /var/tmp/zone-a-system.flar
     Log File: /var/tmp/ zone-a-system.install.1987.log
       Source: /Etude/zone-a-system.flar
   Installing: This may take several minutes...
For details, see "System Administration Guide: Oracle Solaris 9 Containers" or "System Administration Guide: Oracle Solaris 8 Containers."
If PRIMECLUSTER has been installed to the migration source environment, uninstall the PRIMECLUSTER in the migration source with the following procedure:
Startup the non-global zone under single-user mode.
# /usr/lib/brand/solaris8/s8_p2v zone-a  (For Solaris 8 Container)
# /usr/lib/brand/solaris9/s9_p2v zone-a  (For Solaris 9 Container)
# zoneadm -z zone-a boot -s
Mount the medium of PRIMECLUSTER with the same version as the migration source in the global zone. The mountpoint needs to be the directory which can be referred from the non-global zone.
Log in to the non-global zone.
# zlogin -C zone-aPrepare for PRIMECLUSTER deletion in the non-global zone. When a flash archive is created from a server where GDS has not been installed, perform the procedure after Step 8.
Check if files other than the class.db exist under the /etc/opt/FJSVsdx/sysdb.d. Moreover, check that the inside of the class.db is empty.
# cd /etc/opt/FJSVsdx/sysdb.d
# ls
class.db
* If files other than the class.db exist, delete them with the rm command.
* If the information exists in the class.db file, delete the line.
(The line which starts with # is a comment line.)
Check if files other than the _adm, _diag exist under the /dev/sfdsk.
# cd /dev/sfdsk
# ls
_adm _diag ...
* If files other than the _adm, _diag exist, delete them with the rm-rf command.
Remove the GDS Basic Software package (FJSVsdx).
# pkgrm FJSVsdxBack up the preremove and postremove files of SMAWcf package.
# cd /var/sadm/pkg/SMAWcf/install
# cp preremove /var/tmp/preremove.orig
# cp postremove /var/tmp/postremove.orig
Update the preremove and postremove files of SMAWcf package with the following procedure.
# cat /var/tmp/preremove.orig | sed -e 's,$CFCONFIG -u,echo " ",' | \
sed -e 's,/opt/SMAW/bin/cipconfig -u,echo " ",' \
> preremove
# cat /var/tmp/postremove.orig | sed -e 's,^module_id.*,module_id="",' | \
sed -e 's,out=`rem_drv.*,out=" "; echo " ",'\
> postremove
Uninstall PRIMECLUSTER from the non-global zone.
Follow the "PRIMECLUSTER Installation Guide" which is the same version as the migration source to uninstall the PRIMECLUSTER. If the uninstallation procedure varies depending on the server models, follow the procedure for the server you were using before the migration for uninstallation.
For 4.2A00 or earlier, execute the uninstallation script in the non-global zone. Use the uninstallation script of the medium of PRIMECLUSTER mounted beforehand.
If PRIMECLUSTER Wizard for Oracle and PRIMECLUSTER Wizard for NAS have been installed in the migration source environment, uninstall them from the non-global zone before uninstalling PRIMECLUSTER. For the procedure for uninstalling each Wizard product, see the installation guide of the same version as each Wizard product in the migration source.
Delete the backups of the preremove and postremove files created in Step 8.
# rm /var/tmp/preremove.orig /var/tmp/postremove.orig
Using the zoneadm boot command, start up the zone for which installation was performed. After that, acquire the console and perform Solaris OS setup (setup of node names, time zones, and so on).
# /usr/lib/brand/solaris8/s8_p2v zone-a  (For Solaris 8 Container)
# /usr/lib/brand/solaris9/s9_p2v zone-a  (For Solaris 9 Container)
# zoneadm -z zone-a boot
# zlogin -C zone-a
From now on, set up the Solaris OS according to the instructions on the screen.
For details, see the manual for the zoneadm and zlogin commands, and also "System Administration Guide: Oracle Solaris 9 Containers" or "System Administration Guide: Oracle Solaris 8 Containers."
Note
Specify the host name to be set to the non-global zone with up to 11 characters including alphabetical characters and the "-" and "_" signs.
If monitoring applications in the non-global zone, proceed to Procedure "13.3.4.4 Preparations for Installing PRIMECLUSTER to the Non-Global Zone."
If not monitoring applications in the non-global zone, proceed to Procedure "13.3.4.13 Sharing Non-Global Zone Configuration Information."
Before installation, preparation work is required in the non-global zone created above and in the global zone. This procedure varies depending on which environment you use: Solaris 8 Containers environment or Solaris 9 Containers environment.
Preparations on the Non-Global Zone (for Solaris 8 Containers)
Mount the DVD or CD medium of PRIMECLUSTER set in the global zone to the file system under a non-global zone.
Note
If the non-global zone is in the Solaris 8 Containers environment and that PRIMECLUSTER was used in the migration source environment, the installation CD medium used in the Containers environment in the migration source is required.
Log in to the non-global zone.
# zlogin zone-a
Mount the DVD medium of this software or the CD1 medium of PRIMECLUSTER in case that PRIMECLUSTER was used in the migration source on the non-global zone, or copy the contents of the medium, so that the contents can be accessed from the non-global zone. In the following example, the directory (CD mount point) in the non-global zone is <CDROM_DIR>. (When using the DVD medium of this software, <CDROM_DIR> is <DVD mount point>/Solaris8/CD1.)
For Solaris 8 Containers environments, install the SMAWskel package with the following procedure.
If you are asked to input some value while executing the pkgadd(1M) command, input the default value. If there is no default value, select "y."
# cd <CDROM_DIR>/Solaris9/products/CF/sparc
# pkgadd -d . SMAWskel
Preparations on the Non-Global Zone (for Solaris 9 environment)
Mount the DVD or CD medium of PRIMECLUSTER set in the global zone to the file system under a non-global zone.
Note
If the non-global zone is in the Solaris 9 Containers environment and that PRIMECLUSTER was used in the migration source environment, the installation CD medium used in the Containers environment in the migration source is required.
Log in to the non-global zone.
# zlogin zone-a
Mount the DVD medium of this software or the CD1 medium of PRIMECLUSTER in case that PRIMECLUSTER was used in the migration source on the non-global zone, or copy the contents of the medium, so that the contents can be accessed from the non-global zone. In the following example, the directory (CD mount point) in the non-global zone is <CDROM_DIR>. (When using the DVD medium of this software, <CDROM_DIR> is <DVD mount point>/Solaris9/CD1.)
For Solaris 9 Containers environments, install the SMAWskel package with the following procedure.
If you are asked to input some value while executing the pkgadd(1M) command, input the default value. If there is no default value, select "y."
# cd <CDROM_DIR>/Solaris9/products/CF/sparc
# pkgadd -d . SMAWskel
Preparations in the Global Zone (for both Solaris 8 and 9 environments)
Perform this task in the global zone.
Execute the cfzinstall script. If an error message is output and it requires you to restart the non-global zone, select "yes" and restart the non-global zone. Then, proceed to the next step.
# /opt/SMAW/SMAWcf/bin/cfzinstall zone-a
CF configuration set to: zone-a ZONE-A
/usr/sbin/zlogin zone-a /etc/init.d/cf start
Execute the hvzonesetup script.
# hvzonesetup -z zone-a -c
NOTICE: User can now install PCL in zone zone-a.
        After installing PCL run "hvzonesetup -z zone-a -u".
Copy the FSUNclnet.str package prepared in "13.3.3.1 Preparations for Necessary Packages" to any one of the directories in the non-global zone.
Information
The following process is performed by the cfzinstall script:
Installation and setup of CF for the non-global zone
The following processes are performed by the hvzonesetup script:
Changing the zonename command temporarily (This command is restored by hvzonesetup -u to be executed after installing PRIMECLUSTER)
Configuring the RMS environment variables for the non-global zone (hvenv.local file setting)
Adding PATH settings to /etc/profile
Note
When migrating the environment that used the other cluster software in the migration source to the new PRIMECLUSTER environment, and also when the cluster software used in the migration source was not deleted before creating a Flash Archive, follow the specification of the cluster software used in the migration source and delete it from the Containers environment.
This procedure varies depending on which environment you use: Solaris 8 Containers environment or Solaris 9 Containers environment. For Solaris 8 Containers environment, refer to Step 1 and for Solaris 9 Containers environment, refer to Step 2.
Installation Procedure (for Solaris 8 Containers environment)
Perform this task in the non-global zone. If you are asked to input some value while executing the pkgadd(1M) and pkgrm(1M) commands, input the default value. If there is no default value, select "y."
Check that FJSVsnap, FJSVwvcnf, and FJSVwvbs have been installed in the non-global zone.
# pkginfo -l FJSVsnap.\*
# pkginfo -l FJSVwvcnf.\*
# pkginfo -l FJSVwvbs.\*
If the version of FJSVsnap is 2.3.1 or earlier, remove its package from the system.
# pkgrm FJSVsnapIf the version of FJSVwvcnf is other than 4.11, or the version of FJSVwvbs is other than 4.1.2, remove both packages from the system.
# pkgrm FJSVwvcnf
# pkgrm FJSVwvbs
If old version packages were removed in the task above, or packages have not been installed, execute the pkgadd(1M) command to install the target packages. The directory in the non-global zone of PRIMECLUSTER DVD or CD1 mounted or copied in the previous section is <CDROM_DIR>.
# pkgadd -d <CDROM_DIR>/Tool/Pkgs FJSVsnap
# pkgadd -d <CDROM_DIR>/Solaris8/products/Base_GUIs/sparc FJSVwvcnf
# pkgadd -d <CDROM_DIR>/Solaris8/products/Base_GUIs/sparc FJSVwvbs
Install the FSUNclnet component. Below is an example when placing FSUNclnet.str to /var/tmp/package in the non-global zone.
# cd /var/tmp/package
# pkgadd -d FSUNclnet.str
Install PRIMECLUSTER from PRIMECLUSTER DVD or CD1 mounted or copied in the previous section. The directory in the non-global zone is <CDROM_DIR>.
# cd <CDROM_DIR>/Solaris8/products/Base_GUIs/sparc
# pkgadd -d . SMAWcj2re
# pkgadd -d . FJSVwvmpc
# pkgadd -d . SMAWrcadm
# pkgadd -d . SMAWrcaja
# cd <CDROM_DIR>/Solaris8/products/CF/sparc/
# pkgadd -d . FJSVclapi
# pkgadd -d . FJSVcldbm
# cd <CDROM_DIR>/Tool
# ./cluster_install -p RMS
# ./cluster_install -p WT
If the physical interface is multiplexed by GLS in the non-global zone with an exclusive IP zone configuration, install PRIMECLUSTER GLS from PRIMECLUSTER DVD or CD2. The directory (CD mount point) in the non-global zone is <CDROM_DIR>. (When using the DVD medium of this software, <CDROM_DIR> is <DVD mount point>/Solaris8/CD2.)
[Only when using GLS to the non-global zone with an exclusive IP zone configuration]
# mv /usr/sbin/add_drv /usr/sbin/add_drv.save
# touch /usr/sbin/add_drv
# chmod 555 /usr/sbin/add_drv
# pkgadd -d <CDROM_DIR>/Solaris8/products/GLS/sparc FJSVhanet
# mv /usr/sbin/add_drv.save /usr/sbin/add_drv
Mount or copy the DVD or SUPPLEMENT CD medium of PRIMECLUSTER on the non-global zone to enable the CD1 medium to access from the non-global zone. In the following example, the directory (CD mount point) in the non-global zone is <CDROM_DIR>. (When using the DVD medium of this software, <CDROM_DIR> is <DVD mount point>/Solaris8/CD3.)
# cd <CDROM_DIR>/Tool
# ./cluster_install -p GUIs
# cd <CDROM_DIR>/Solaris8/products/CF_Add_On/sparc
# pkgadd -d . FJSVclapm
# cd <CDROM_DIR>/Solaris8/products/RMS_Add_On/sparc
# pkgadd -d . FJSVclrms
# pkgadd -d . FJSVclrwz
# pkgadd -d . FJSVclsfw
Note
The following messages may be output during installation, but it does not affect the system's behavior.
Warning: The package <SMAWccbr> has not been installed.
prtconf: devinfo facility not available
After installing the packages, apply the newest emergency corrections of PRIMECLUSTER. The versions necessary for applying emergency corrections to the non-global zone are stored in the following directory in the DVD. All the emergency corrections must be applied.
<DVD mount point>/Solaris8/patch
Below is an example when applying the emergency correction 901172-32 to the non-global zone.
# cd <DVD mount point>/Solaris8/patch
# patchadd 901172-32
If you installed PRIMECLUSTER using the medium of PRIMECLUSTER which was used in the migration source, the following emergency corrections need to be applied to the non-global zone.
Solaris 8 Containers | Solaris 8 Containers |
|---|---|
901167-07 or later | 901167-07 or later |
901172-34 or later | 901172-34 or later |
901173-24 or later | 901173-24 or later |
913855-05 or later | 913855-05 or later |
914111-03 or later | 914111-03 or later |
914112-10 or later | 914112-10 or later |
914120-01 or later | 914346-01 or later |
914346-01 or later | 914351-02 or later |
914351-01 | 914530-01 |
914530-01 | 915102-01 or later |
915102-01 or later |
Below is an example of applying 901172-32 when placing /var/tmp/patch in the non-global zone.
# cd /var/tmp/patch
# zcat 901172-32.tar.Z | tar xf -
# patchadd 901172-32
Edit /etc/inet/hosts and add the entry of "host name + RMS in the non-global zone" to any one of IP addresses assigned to the non-global zone.
# vi /etc/inet/hosts
ipadress      zonename  zonenameRMS
                        ^^^^^^^^^^^addition
ipadress: a given IP address assigned to the non-global zone
zonename: host name in the non-global zone
Set environment variables of java_home for Web-Based Admin View.
# /etc/opt/FJSVwvbs/etc/bin/wvSetparam java_home \
 /opt/SMAW/SMAWcj2re/jre
local:java_home         /opt/SMAW/SMAWcj2re/jre
Installation procedure (for Solaris 9 Containers environment)
Perform this task in the non-global zone If you are asked to input some value while executing pkgadd(1M) and pkgrm(1M) commands, input the default value. If there is no default value, select "y."
Check that FJSVsnap, FJSVwvcnf, and FJSVwvbs have been installed in the non-global zone.
# pkginfo -l FJSVsnap.\*
# pkginfo -l FJSVwvcnf.\*
# pkginfo -l FJSVwvbs.\*
If the version of FJSVsnap is 2.3.1 or earlier, remove its package from the system.
# pkgrm FJSVsnapIf the version of FJSVwvcnf is other than 4.11, or the version of FJSVwvbs is other than 4.1.2, remove both packages from the system.
# pkgrm FJSVwvcnf
# pkgrm FJSVwvbs
If old version packages were removed in the task above, or packages have not been installed, execute the pkgadd(1M) command to install the target packages. The directory in the non-global zone of PRIMECLUSTER DVD or CD1 mounted or copied in the previous section is <CDROM_DIR>.
# pkgadd -d <CDROM_DIR>/Tool/Pkgs FJSVsnap
# pkgadd -d <CDROM_DIR>/Solaris9/products/Base_GUIs/sparc FJSVwvcnf
# pkgadd -d <CDROM_DIR>/Solaris9/products/Base_GUIs/sparc FJSVwvbs
Install the FSUNclnet component. Below is an example when placing FSUNclnet.str to /var/tmp/package in the non-global zone.
# cd /var/tmp/package
# pkgadd -d FSUNclnet.str
Install PRIMECLUSTER from PRIMECLUSTER DVD or CD1 mounted or copied in the previous section. The directory in the non-global zone is <CDROM_DIR>.
# cd <CDROM_DIR>/Solaris9/products/Base_GUIs/sparc
# pkgadd -d . SMAWcj2re
# pkgadd -d . FJSVwvmpc
# pkgadd -d . SMAWrcadm
# pkgadd -d . SMAWrcaja
# cd <CDROM_DIR>/Solaris9/products/CF/sparc/
# pkgadd -d . FJSVclapi
# pkgadd -d . FJSVcldbm
# cd <CDROM_DIR>/Tool
# ./cluster_install -p RMS
# ./cluster_install -p WT
If the physical interface is multiplexed by GLS in the non-global zone with an exclusive IP zone configuration, install PRIMECLUSTER GLS from PRIMECLUSTER DVD or CD2. The directory (CD mount point) in the non-global zone is <CDROM_DIR>. (When using the DVD medium of this software, <CDROM_DIR> is <DVD mount point>/Solaris9/CD2.)
[Only when using GLS to the non-global zone with an exclusive IP zone configuration]
# mv /usr/sbin/add_drv /usr/sbin/add_drv.save
# touch /usr/sbin/add_drv
# chmod 555 /usr/sbin/add_drv
# pkgadd -d <CDROM_DIR>/Solaris9/products/GLS/sparc FJSVhanet
# mv /usr/sbin/add_drv.save /usr/sbin/add_drv
Mount or copy the DVD or SUPPLEMENT CD medium of PRIMECLUSTER on the non-global zone to enable the CD1 medium to access from the non-global zone. In the following example, the directory (CD mount point) in the non-global zone is <CDROM_DIR>. (When using the DVD medium of this software, <CDROM_DIR> is <DVD mount point>/Solaris9/CD3.)
# cd <CDROM_DIR>/Tool
# ./cluster_install -p GUIs
# cd <CDROM_DIR>/Solaris9/products/CF_Add_On/sparc
# pkgadd -d . FJSVclapm
# cd <CDROM_DIR>/Solaris9/products/RMS_Add_On/sparc
# pkgadd -d . FJSVclrms
# pkgadd -d . FJSVclrwz
# pkgadd -d . FJSVclsfw
Note
The following messages may be output during installation, but it does not affect the system's behavior.
Warning: The package <SMAWccbr> has not been installed.
prtconf: devinfo facility not available
After installing the packages, apply the newest emergency corrections of PRIMECLUSTER. The emergency corrections required for non-global zones are stored in the following directory in the DVD. All the corrections must be applied.
<DVD mount point>/Solaris9/patch
Below is an example when applying the emergency correction; 901196-24 to the non-global zone.
# cd <DVD mount point>/Solaris9/patch
# patchadd 901196-24
If you installed PRIMECLUSTER using the medium of PRIMECLUSTER which was used in the migration source, the following emergency corrections need to be applied to the non-global zone.
Solaris 9 Containers | Solaris 9 Containers | Solaris 9 Containers |
|---|---|---|
901167-07 or later | 901167-07 or later | 901196-35 or later |
901172-34 or later | 901172-34 or later | 901215-04 or later |
901173-24 or later | 901173-24 or later | 901217-29 or later |
913855-05 or later | 913855-05 or later | 901254-02 or later |
914111-03 or later | 914111-03 or later | 913855-05 or later |
914112-10 or later | 914112-10 or later | 914111-03 or later |
914120-01 or later | 914346-01 or later | 914112-10 or later |
914346-01 or later | 914346-01 or later | 914346-01 or later |
914351-01 | 914351-02 or later | 914351-02 or later |
914530-01 | 914530-01 | 914530-02 or later |
915102-01 or later | 915102-01 or later | 915102-01 or later |
Below is an example of applying 901196-24 (Solaris 9) when placing /var/tmp/patch in the non-global zone.
# cd /var/tmp/patch
# zcat 901196-24.tar.Z | tar xf -
# patchadd 901196-24
Edit /etc/inet/hosts and add the entry of "host name + RMS in the non-global zone" to any one of IP addresses assigned to the non-global zone.
# vi /etc/inet/hosts
ipadress      zonename  zonenameRMS
                        ^^^^^^^^^^^addition
ipadress: a given IP address assigned to the non-global zone
zonename: host name in the non-global zone
Set environment variables of java_home for Web-Based Admin View.
# /etc/opt/FJSVwvbs/etc/bin/wvSetparam java_home \
 /opt/SMAW/SMAWcj2re/jre
local:java_home         /opt/SMAW/SMAWcj2re/jre
Executing the script to configure the non-global zone
Execute the hvzonesetup script by specifying the -u option in the global zone.
# hvzonesetup -z zone-a -u
Information
The following process is performed by the hvzonesetup script.
Restore the changes of the zonename command implemented by hvzonesetup -z zone-a -c.
Changing kernel parameters
This task is unnecessary if one is not installing PRIMECLUSTER to the non-global zone.
Add the number of non-global zones to be created and make this the value for the kernel parameter detailed in "Table 13.19 Kernel Parameters Requiring Revision" below to the /etc/system for all of the global zones which comprise the cluster system. Then restart the global zone.
# shutdown -y -g0 -i6
Kernel Parameters | Attribute | Value | Remarks |
shmsys:shminfo_shmmni | Add | 30 | Value required for resource database per Containers |
semsys:seminfo_semmni | Add | 20 | Value required for resource database per Containers |
Note
Do not delete the following definitions written in the non-global zones' /etc/system.
set semsys:seminfo_semmni=30
set shmsys:shminfo_shmmni=130
set in_sync=1
Check the value of shmsys:shminfo_shmseg set in /etc/system in the non-global zone.
If the value is less than 30, or no value has been set
Set the non-global zones' /etc/system to the following.
set shmsys:shminfo_shmseg = 30
If the value is 30 or larger
No action is required.
After checking it, add the value of the kernel parameter detailed in table 3.1 to the non-global zones' /etc/system. Then, restart the non-global zone.
# zlogin zone-a shutdown -y -g0 -i6
Registering the GDS shared class volume
This procedure is necessary if attempting to access the GDS shared class volume from the non-global zone.
Copy the special file of the GDS shared class volume to under /<zonepath>/dev. Execute the following commands from the global zone.
(If the zonepath is /zone-a-system, the class name is class0001, and the volume name is volume0001)
# cd /dev
# tar cvf /var/tmp/dsk.tar sfdsk/class0001/dsk/volume0001
# tar cvf /var/tmp/rdsk.tar sfdsk/class0001/rdsk/volume0001
# cd /zone-a-system/dev
# tar xvf /var/tmp/dsk.tar
# tar xvf /var/tmp/rdsk.tar
Note
The GDS volume special file copied in the procedure above will be deleted by the OS specifications if one detaches, and then attaches a non-global zone. That being the case, re-performs this procedure after attaching a non-global zone.
Create the file system to the volume in the non-global zone. Execute the following command from the non-global zone.
(If the class name is class0001, the volume name is volume0001, and the file system is UFS)
# newfs /dev/sfdsk/class0001/rdsk/volume0001Note
Perform the creation of the above file system only from the one node first used.
Perform this task in the non-global zone.
See "4.2.3 Initial Setup of Web-Based Admin View," and perform the setup and startup for Web-Based Admin View. When doing so, specify the same non-global zone IP addresses as those for both the primary management server and the secondary management server specified with "4.2.3.1 Initial setup of the operation management server." In addition, refer to "7.1 Network address" in "PRIMECLUSTER Web-Based Admin View Operation Guide" to set the same IP addresses to mip and httpip.
(Example: If the non-global zone IP address is 10.20.30.40)
# /etc/init.d/fjsvwvcnf stop
# /etc/init.d/fjsvwvbs stop
# /etc/opt/FJSVwvbs/etc/bin/wvSetparam primary-server 10.20.30.40
# /etc/opt/FJSVwvbs/etc/bin/wvSetparam secondary-server 10.20.30.40
# /etc/opt/FJSVwvbs/etc/bin/wvSetparam mip 10.20.30.40
# /etc/opt/FJSVwvbs/etc/bin/wvSetparam httpip 10.20.30.40
# /etc/opt/FJSVwvbs/etc/bin/wvCntl start
# /etc/init.d/fjsvwvcnf start
After setup, use the procedure "4.3 Starting the Web-Based Admin View Screen" to confirm that one is able to start up the GUI screen.
Perform this task in the non-global zone.
After starting up the Web-Based Admin View screen, see "5.1.3 Initial Setup of the Cluster Resource Management Facility" and "5.1.3.1 Initial Configuration Setup" and perform the initial configuration setup for the cluster resource management facility.
It is not necessary to perform CF and CIP setups, shutdown facility setup, or automatic configuration for the non-global zone.
Note
If performing initial configuration setup for the cluster resource management facility, the message below will be output onto the non global zone console, but this will not be a problem for its operation.
/dev/rdsk/*: No such file or directory
In addition, if initial configuration setup failed, it is possible that the non-global zone kernel parameters were insufficient. See the "A.5 Kernel Parameter Worksheet" and correct the kernel parameter value. After restarting the non-global zone, perform resource database initialization using the clinitreset (1M) command and re-perform the initial configuration setup.
This procedure is necessary only if one is using the NIC switching mode with an exclusive IP zone configuration. If setting up GLS on a non global zone, refer to the "PRIMECLUSTER Global Link Services Configuration and Administration Guide: Redundant Line Control Function" and perform the setup for multiplexing the physical interface.
Perform this task in all of the non-global zones which are to build the cluster system.
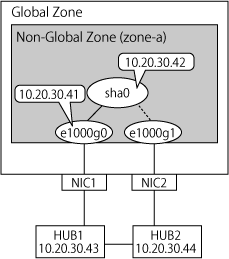
Figure 13.16 Example of an Environment Setup for if Configuring Between the Non-Global Zones with a Warm-standby Configuration
System settings
1-1) Define the IP address to be used and the host name to the /etc/inet/hosts file.
10.20.30.42 zone-a0    # zone-a virtual IP(takeover IP)
10.20.30.41 zone-a01   # zone-a physical IP
10.20.30.43 swhub1     # primary monitoring destination HUB IP
10.20.30.44 swhub2     # secondary monitoring destination HUB IP
Note
Set up the zone-a physical IP address such that it does not overlap with other non-global zone physical IP addresses.
1-2) Write the host name defined above to the /etc/hostname.e1000g0 file.
Contents of /etc/hostname.e1000g0
zone-a01
1-3) Define the subnet mask to the /etc/inet/netmasks file.
10.20.30.0 255.255.255.0
Rebooting
Execute the following command and reboot the non-global zone. Perform this command from the global zone. After reboot, execute the ifconfig command to confirm that the e1000g0 is activated.
# /usr/sbin/zlogin zone-a shutdown -y -g0 -i6Creating the virtual interface
# /opt/FJSVhanet/usr/sbin/hanetconfig create -n sha0 -m d -i 10.20.30.42 -e 10.20.30.41 -t e1000g0,e1000g1Note
Always be sure that the physical IP address defined to the option "-e" matches with the physical IP address set up to the /etc/ hostname.e1000g0.
Setup of standby patrol function
# /opt/FJSVhanet/usr/sbin/hanetconfig create -n sha1 -m p -a 00:00:00:00:00:00 -t sha0Note
When using the standby patrol function in the non-global zone, you need to apply emergency correction patches (Solaris 8 and Solaris 9: 914111-03 or later) to the function.
The -a option cannot be omitted in an OSLC environment.
Specify 00:00:00:00:00:00 to the -a option value and execute the command.
Setup of HUB monitoring function
# /opt/FJSVhanet/usr/sbin/hanetpoll create -n sha0 -p 10.20.30.43,10.20.30.44 -b offCreating the takeover virtual interface
# /opt/FJSVhanet/usr/sbin/hanethvrsc create -n sha0Note
This setting is not necessary for single-node cluster operations.
Starting HUB monitoring
# /opt/FJSVhanet/usr/sbin/hanetpoll onFor the installation procedure and points of caution for Wizard for Oracle, see "PRIMECLUSTER Wizard for Oracle Configuration and Administration Guide."
For the installation procedure and points of caution for Wizard for NAS, see "PRIMECLUSTER Wizard for NAS Configuration and Administration Guide."
If the global zone is a single-node cluster, edit the following lines of "/opt/SMAW/SMAWRrms/bin/hvenv.local" file to enable the automatic startup of RMS in the non-global zone.
export HV_RCSTART=0
export HV_RCSTART=1
This section explains the procedure for creating cluster applications on the non-global zone.
Perform the following procedure taking into account the cluster resources that are to be set up.
No. | Task Overview | Procedure | Configuration | ||||
|---|---|---|---|---|---|---|---|
1 | 2 | 4 | 6 | 7 | |||
1 | Setup of the Cmdline resource | 1 | A | A | A | B | A |
2 | Setup of the Oracle resource | 2 | A | A | A | B | A |
3 | Setup of the Netapp resource | 3 | A | A | A | B | A |
4 | Setup of the state transition procedure resources | 4 | A | A | A | B | A |
5 | Setup of the Gls resource | 5 | A | B | A | B | B |
6 | Setup of the Fsystem resource | 6 | A | A | B | B | A |
7 | Creation of the cluster applications | 7 | A | A | A | B | A |
A: Perform as required, B: Unrequired
Setup of the Cmdline resource
For the method for setting up the Cmdline resource, refer to "6.7.1.1 Creating Cmdline Resources."
Setup of the Oracle resource
Refer to the "PRIMECLUSTER Wizard for Oracle Configuration and Administration Guide" and perform the setup of the cluster resource.
Setup of the NetApp resource
Refer to the " PRIMECLUSTER Wizard for NAS Configuration and Administration Guide" and perform the setup of the cluster resource.
Setup of the state transition procedure resources
Refer to the middleware manual and set up the state transition procedure resources. As for the availability of middleware products and PRIMECLUSTER in combination in a non-global zone, contact field engineers.
Refer to "6.7.1.6 Creating Procedure Resources" and perform the setup of the procedure resources.
Setup of the Gls resource
This procedure is necessary only if one is using an exclusive IP zone configuration.
Refer to "6.7.1.4 Creating Gls Resources" and perform the setup of the Gls resource.
Setup of the Fsystem resource
This procedure is necessary if using a switching file system with a non-global zone.
Refer to "6.7.1.2 Creating Fsystem Resources" and perform the setup of the Fsystem resource.
Note that you cannot set ZFS to Fsystem resources in non-global zones. Instead of that, only the UFS file system can be set.
Creation of the cluster applications
Create the cluster applications on non-global zones.
For the method for creating the cluster applications, follow "6.7.2.1 Creating Standby Cluster Applications." However, there are the following differences in procedure:
Cluster application attributes
Set No to AutoStartUp, AutoSwitchOver, and HaltFlag. However, when the global zone is operated on a single-node cluster, set Yes to AutoStartUp.
If on a warm-standby configuration and wishing to put the cluster applications on the standby system's non-global zone into Standby mode, set the ClearFaultRequest to StandbyTransitions. For all other circumstances, set No to it.
Set NONE to Shutdown Priority.
Set 0 to Online Priority.
If using cold-standby, stop the non-global zone in the operational system nodes.
# zlogin zone-a shutdown -i0 -g0 -y
If sharing non-global zone images in cold-standby operation, make it so that one is able to use the information for the non-global zone created thus far from the standby system's nodes as well.
Export the non-global zone configuration information. Execute the following command on the node that the non-global zone was set in the procedure up to this step.
# zonecfg -z zone-a export -f /var/tmp/zone-a.exp
Copy the output file (/var/tmp/zone-a.exp in the example above) to the standby system nodes.
Import the non-global zone in all other nodes.
# zonecfg -z zone-a -f /var/tmp/zone-a.exp
Note
When performing import, since it is not necessary to access the non-global zone's file system, do not perform an operation with all other nodes making the cluster application Online. In addition, do not perform an operation which attaches or starts up the non-global zone.