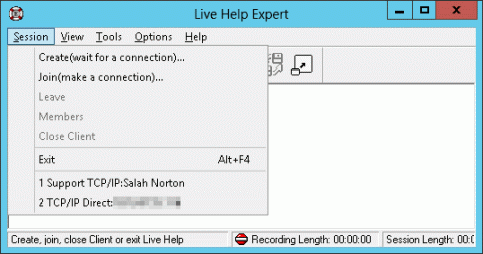
![]() To start Live Help Expert, select the Live Help Expert shortcut from the Start menu or the Apps screen.
To start Live Help Expert, select the Live Help Expert shortcut from the Start menu or the Apps screen.
To start the Live Help Expert application, select the Live Help Expert shortcut in the Fujitsu Live Help folder on the Start menu or the Apps screen. The Live Help window and the Live Help Expert toolbar appear.
The Client can use one of the following methods to authenticate Live Help connections.
Live Help Password Authentication | This authentication method allows the Client to authenticate Live Help connections using the password registered on the Live Help Client application. |
Windows group based authentication (Active Directory and local) | This authentication method allows the Client to authenticate Live Help connections using the Windows(R) Groups registered on the Client's system. Live Help Client checks the user name, password, and domain name that a Support Specialist specifies against the user accounts database that OS manages. The Support Specialist will be allowed to connect to the Client's computer only when he/she joins the Client session using a user who belongs to the groups that the Client has grant the permission. The Client can use this method only when Live Help Client is V13.1.0 or later.
The user specified by a Support Specialist will be used only to authenticate Live Help connections. After authentication, the Support Specialist will remotely operate the Client's computer based on the privileges of the logged in user of the Client's computer. |
You need to select appropriate authentication method in the Join a Session dialog box.
Refer to the "Changing your Configuration" in the Live Help Client's Guide for the details on how to use these authentication methods.
![]() Click this button to display the Join a Session dialog box.
Click this button to display the Join a Session dialog box.
To make a connection to your colleague's computer, choose Join from the SESSION menu or click the Join button. The Join a Session dialog box displays, as shown in the following example. In this example we are using a Support Center to connect over the network.
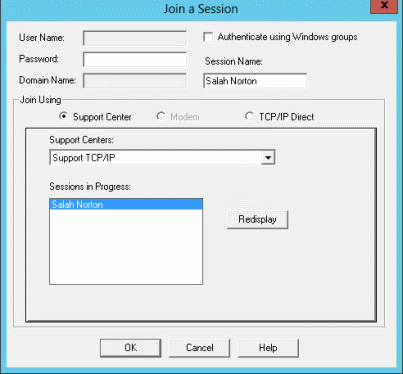
Joining a password protected support session
To join a support session on which Live Help password authentication is enabled, specify each item in the Join a Session dialog box as follows.

Field | Description |
|---|---|
Authenticate using Windows group | Leave this check box empty (that means selecting the Live Help password authentication). |
User Name | Not used (Grayed out). |
Domain Name | Not used (Grayed out). |
Password | If the Client set a password, type it in this field. Otherwise, leave the field blank. |
Join Using | Here's where you must choose the same connection method that your colleague is using. The choices are Support Center, Modem, and TCP/IP Direct. |
Support Center | If the Client is configured to use a network Support Center, you must choose the same Support Center from the drop-down box. Once you do, a list of support requests displays in the Sessions In Progress list. Your colleague's name appears in the list, and you click on the name to select it. The name now appears in the Session Name field at the top of your Join a Session dialog box. |
Modem | Refer to the section Starting a Modem Support Session in Take a Test Drive to learn more about modem sessions. |
TCP/IP Direct | If the Client is configured for TCP/IP Direct, you can type the person's TCP/IP address instead of using a Support Center (and Connection Manager). When the Client application started, their TCP/IP address is displayed on the Client startup dialog box instead of their name. Ask the Client to read the address to you, so you can type it in the TCP/IP Address field. You can also add an entry to your TCP/IP Address Book. |
Session Name | For Support Center connections If your colleague started the support request using a Support Center on the network, you must specify their name in this field. When the Client application starts, a dialog box displays the session name For TCP/IP Direct and Modem connections This field will be grayed out showing your Live Help name that you have specified in Name menu item in the OPTIONS menu. |
After specifying required items, click OK. A connection is established, and the support session begins.
Joining a support session on which Windows group based authentication is enabled
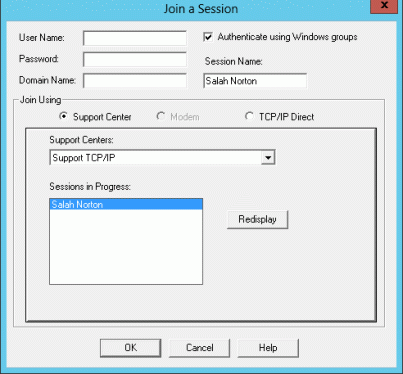
To join a support session on which Windows group based authentication is enabled, specify each item in the Join a Session dialog box as follows.
Field | Description |
|---|---|
Authenticate using Windows groups | Select this check box to use Windows group based authentication. |
User Name | You must specify a user name that Live Help uses for Windows group based authentication in this field. A user name cannot: |
Domain Name | If your colleague's computer is a member of a domain and you want to connect his/her computer using a domain user, specify an appropriate domain name or computer name in this field. Otherwise, leave the field blank. When the field is blank, Live Help Client will try to authenticate the user on the Client's local computer first. Refer to the section Important notes for Windows group based authentication for more details. A domain name or computer name cannot: |
Password | Specify the password of the user specified in the User Name field. |
Join Using | Here's where you must choose the same connection method that your colleague is using. The choices are Support Center, Modem, and TCP/IP Direct. |
Support Center | If the Client is configured to use a network Support Center, you must choose the same Support Center from the drop-down box. Once you do, a list of support requests displays in the Sessions In Progress list. Your colleague's name appears in the list, and you click on the name to select it. The name now appears in the Session Name field at the top of your Join a Session dialog box. |
Modem | You cannot use Windows group based authentication over modem connections (Grayed out). |
TCP/IP Direct | If the Client is configured for TCP/IP Direct, you can type the person's TCP/IP address instead of using a Support Center (and Connection Manager). When the Client application started, their TCP/IP address is displayed on the Client startup dialog box instead of their name. Ask the Client to read the address to you, so you can type it in the TCP/IP Address field. You can also add an entry to your TCP/IP Address Book. |
Session Name | For Support Center connections If your colleague started the support request using a Support Center on the network, you must specify their name in this field. When the Client application starts, a dialog box displays the session name For TCP/IP Direct connections This field will be grayed out showing your Live Help name that you have specified in Name menu item in the OPTIONS menu. |
After specifying required items, click OK. A connection is established, and the support session begins.
Behavior that differs depends on what to specify
Depends on what you specify in the Join a Session dialog box, there are some points to note regarding Windows group based authentication.
Specified Items | Points to Note |
|---|---|
User name (no domain name and password) | |
User name and domain name (no password) | |
User name and password (no domain name) | Refer to Authentication priority. |
User name, password, and domain name | Refer to Authentication with wrong computer name or domain name. |
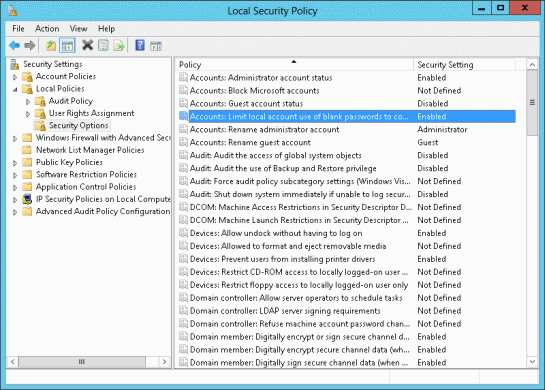
On some computers, Live Help Client may fail to authenticate a user with no password because of the security policy settings.
To avoid this, follow the steps below to change the security policy settings of the Client's system.
Open Administrative Tools in Control Panel.
Start one of the following Control Panel applets.
Domain Controller Security Policy
Domain Security Policy
Local Security Policy
Double-click the following security setting in the details pane.
Security Settings
+ Local Policies
  + Security Options
     Accounts: Limit local account use of blank passwords to console logon only
If the security setting is enabled, disable it.
Refer to your Windows(R) User's Guide for further information.
If you specify the user name and password but not domain name in the Join the Session dialog box, Live Help Client program will authenticate the specified user in the following order.
First, it will try to authenticate the specified user on the local computer.
If the user is not authenticated on the local computer on which:
Windows(R) XP, Windows Server 2003 or later , Windows Vista or later is running, no further authentication is done.
No need to consider the authentication order when you specified a computer name or domain name in the Domain Name field. In such case, Live Help Client will try to authenticate the user on the specified computer first.
In case of a wrong computer name or domain name is specified, refer to the following section, "Authentication with wrong computer name or domain name".
Live Help Client program will ignore the specified computer name or domain name and try to authenticate the specified user on the local computer when:
The computer name specified in the Domain Name field is invalid.
The Client's computer is not member of the specified domain.
How the password change of a domain user take effect
In case of an environment where Windows Server 2003 or later is the domain controller, there is a note on changing password of domain users. Depends on how you change the password of a domain user, how the change take effect differs as follows.
When a domain user changes his/her password by him/her self:
New password | The new password will become valid right after the password change. |
Old password | The old password will become invalid right after the password change. |
When the domain administrator changes (resets) a domain user's password:
New password | The new password will become valid right after the password change. |
Old password | The old password will become invalid when: The domain user logon to the domain using the new password. Or... More than one hour passed after resetting the password. Therefore, you will be able to use the old password for Windows group based authentication for a while, even though the password has already been changed. |
Changing password of domain users must be done carefully.
If the information you specified in the Join a Session dialog box is denied by the Live Help Client program, a dialog box appears and requests you to re-enter information for a Live Help connection.
Figure 3.1 The dialog box to request a password for Live Help authentication
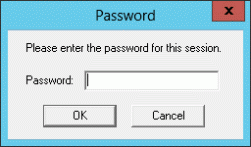
The dialog box above appears when:
You have chosen the Windows group based authentication in the Join a Session dialog box and tried to connect to the Client, but the Client computer is configured to use Live Help password authentication.
The password you specified in the Join a Session dialog box did not match with the password the Client has set.
Figure 3.2 The dialog box to request information for Windows group based authentication
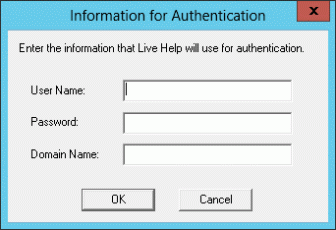
The dialog box above appears when:
You have chosen the Live Help password authentication in the Join a Session dialog box and tried to connect to the Client, but the Client computer is configured to use Windows group based authentication.
The information you specified in the Join a Session dialog box, such as user name, domain name, and password, did not match with data in the user accounts database of the Client system.
The user you specified in the Join a Session dialog box does not belong to the groups that the Client has grant the permission.
When you successfully made a connection to a Client, the information of the Client is added to the MRU connections list of your Live Help Expert program. By using the MRU connections list, you can easily connect to the Client computer without specifying the IP address or session name of the Client.
The password of the Client is not contained in the information for MRU connections list. Enter the appropriate password when the dialog box to request a password appears.
