

| ETERNUS SF AdvancedCopy Manager Operator's Guide 13.0 -Microsoft(R) Windows(R) 2000- -Microsoft(R) Windows Server(TM) 2003- |
|
Contents
Index
|
This chapter describes the backup operation for AdvancedCopy Manager on the Windows 2000/2003 system. AdvancedCopy Manager backups are created in units of partitions. Throughout this manual, a volume is expressed as a "device".
This chapter describes the backup and restore functions of AdvancedCopy Manager.
AdvancedCopy Manager performs high-speed backup between volumes, regardless of the volume capacities, using the advanced copy function (OPC or EC function) of a disk array unit.
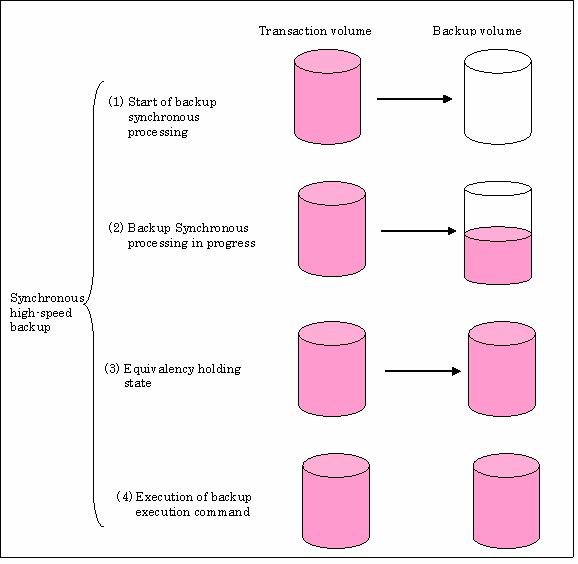
Backup that uses the One Point Copy (OPC) or Remote One Point Copy (ROPC) function of a ETERNUS storage system disk array unit is called snapshot fast backup. Backup that uses the Equivalent Copy (EC) or Remote Equivalent Copy (REC) function is called synchronized high-speed backup.
Automatic snap shot backup can be scheduled without first estimating the time required because it does not require backup synchronous processing. Note, however, that when the save number is 1, a state in which there is no backup data may occur, because a snap shot backup deletes the history prior to copy processing.
Because synchronized high-speed backup deletes the history after the completion of backup processing, there is no status in which backup data does not exist even though the generation number is 1. However, synchronized high-speed backup requires one more backup volume than snapshot fast backup. Synchronized high-speed backup also requires synchronized backup processing before the backup execution command is entered. Therefore, execution of automatic synchronized high-speed backup must be scheduled so that the time required for synchronized processing is estimated in advance. Synchronized backup processing is then started based on the estimated time, and the backup execution command is entered after equivalency maintains status has been achieved.
When backing up an Oracle database, it is combining with the sample script which AdvancedCopy Manager's offers, and on-line backup can be performed.
Even for online processing, databases such as Oracle and SQL Server can be backed up in combination with the sample script provided by AdvancedCopy Manager. If other files (general files, etc.) are to be backed up, the transaction must be temporarily stopped before and after backup.
AdvancedCopy Manager automatically manages and selects a medium to be used for backup (a backup volume).
AdvancedCopy Manager also manages the backup carriers and generations and allows you to restore data from the latest or other past generations.
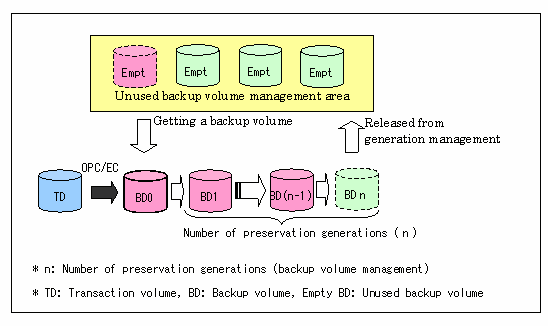
The OPC/ ROPC function of the disk array unit ETERNUS storage system is used to copy data from a transaction volume to an unused backup volume.
The snapshot fast backup performs processing as follows:
On the transaction volume list view, select [Backup] from the Operation menu ((1) in Figure 4.2). The following processing will be performed:
If backup volumes under generation management exist for all the generations, the oldest backup volume will be assumed as an unused backup volume.
An unused backup volume will be acquired from the unused backup volume management area.
Data on the transaction volume will be copied to the acquired unused backup volume ((2) to (4) in Figure 4.2).
Backup carrier information will be set.
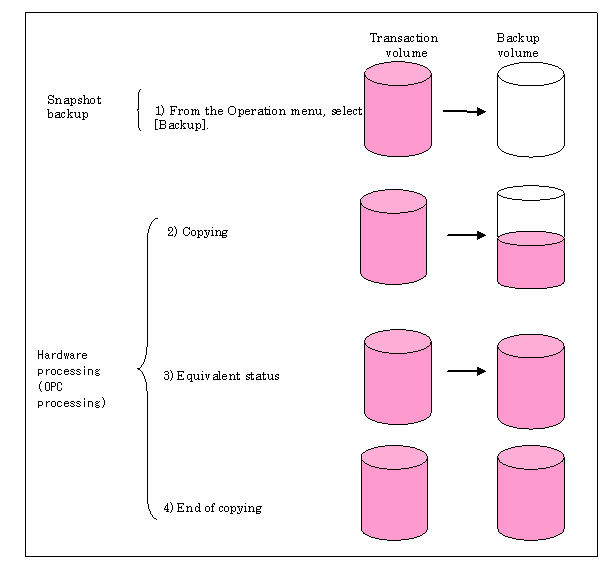
The snapshot fast backup is completed as soon as you specify to execute backup. The actual data copying will be internally performed by the OPC function of the disk array unit ETERNUS storage system.
Using the QuickOPC function in the snapshot high-speed backup, physically copying only the difference data from the start of the previous backup can create a complete snapshot image, which can greatly reduce the time taken for physical copying.
For information on the QuickOPC function, see "Backup Operation by the QuickOPC Function."

If all generations of backup volumes are managed, and if no backup volume can be obtained from the unused region in the backup volume management area, backup copies cannot be created.
Backup using ROPC is limited to disk array devices within the same Storage Server that support ROPC.
The EC/ REC function of the ETERNUS storage system of disk array units is used to copy data from a transaction volume to an unused backup volume.
Synchronized high-speed backup performs processing as follows:
On the transaction volume list view, select [Start Synchronized Backup Processing] from the Operation menu ((1) in Figure 4.3). An unused backup volume having the same capacity as the transaction volume is selected from the unused backup management area, and the synchronized backup processing starts.
The transaction and backup volumes are both placed in equivalence status. From this point on, equivalence between the transaction volume and backup volume is maintained. This status is referred to as equivalency maintain status ((3) in Figure 4.3).
On the transaction volume list view, select [Backup] from the Operation menu ((4) in Figure 4.3). The backup synchronization processing stops and the backup history information is set.
If the backup data exceeds the number of generations when backup has been completed, the oldest backup volume is treated as an unused backup volume.

The backup execution command cannot be executed before the transaction and backup volumes have become equivalent.
During synchronous high-speed backup using the Suspend/Resume function, the equivalency maintain status of EC can be set to Suspend or Resume. Consequently, the synchronous backup process can be made faster because the function can create a differential copy from the Suspend state.
For information on the Suspend/Resume function, see "Backup Operation That Uses the Suspend/Resume Function."

If all generations of backup volumes are managed, and if no backup volume can be obtained from the unused region in the backup volume management area, backup copies cannot be created.
Backup using REC is limited to disk array devices within the same Storage Server that support ROPC/REC.
This chapter describes restoring data on AdvancedCopy Manager.
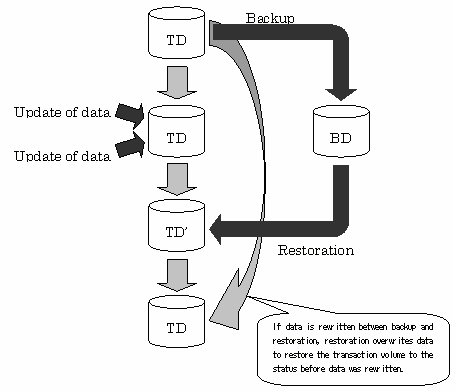
The restoration operation refers to restoring data from a backup volume managed by the backup carrier information to a transaction volume.
The restoration operation from a backup volume refers to using the OPC function provided by the disk array unit to restore data from a backup volume to a transaction volume.
If the data on a backup volume under carrier management is restored to a transaction volume, the carrier management information will not change.
Note that data will be restored to a transaction volume that is the backup source. However, you can change the restoration destination.

It is not guaranteed about the newest backup volume extraction time and the data rewritten though the contents of operating volume were rewritten by the time it performed restoration operation.
The backup operation on AdvancedCopy Manager is aimed at a device (partition) in a disk array unit. This device is managed by a unique name determined by AdvancedCopy Manager. It is called a "AdvancedCopy Manager device name". For information on a AdvancedCopy Manager device name, see "Managing a Device on ETERNUS SF AdvancedCopy Manager".
This chapter describes the backup operation on AdvancedCopy Manager.
Design a backup operation as follows:
The backup operation can be performed on one of the following servers.
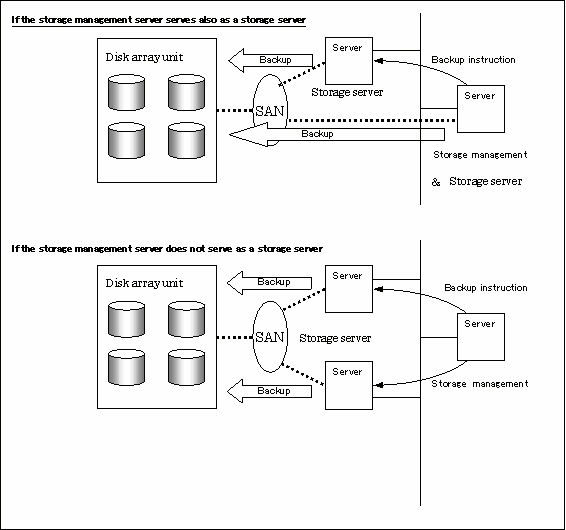
Storage management server
Multiple storage servers are unified and operated centrally. The storage management server can also be used as a storage server.
Storage server
AdvancedCopy Manager operations are performed.

For the backup management function, both the target backup transaction volume and the backup volume of the backup destination must be on the same storage server in order to enable backup server operation.(*1)
If the backup server operation is performed, then the replication management function must be used.
*1 The backup server is different from the transaction server and is used for backing up the transaction volume.
AdvancedCopy Manager backs up data in units of devices. A device that stores work data is called a transaction volume. A transaction volume to be backed up must be placed on the disk array unit ETERNUS storage system.
For information on setting up a transaction volume, see "Setting the operation type for a device".

Please make applicable to backup neither the disk with which the system is stored, nor the disk with which AdvancedCopy Manager is installed.

Refer to "General notes" of this manual as a point which it is careful of when deciding the candidate for backup.
Size of a Logical Disk
Types of Logical Disks
Exclusion from Backup Targets or Replication Targets
Dynamic Volume of Windows2000/Windows2003
GPT disk
About the composition of a disk
To setup a backup policy on a transaction volume, set the following items:
The number of preservation generations refers to how many generations of backup data should be kept.
The snapshot fast backup first releases the oldest generation from the generation management. If a system failure or any other failure occurs while the backup is running, there may not be as many generations of backup data as required. In such a case, you are recommended to perform backup immediately again.
By snapshot type high-speed backup, when employing the number of preservation generations as 1, we recommend you also backup data to a tape.
A synchronous high-speed backup operation releases the oldest generation from generation management after backup of the latest generation is completed. Thus, backup volumes for (number of backup generations + 1) are necessary.
The interval days refers to an interval at which backup should be performed.
The delay of backup is displayed if more days than the specified number of interval days have passed after the last backup date.
Note that backup is not performed periodically even if you have specified the interval days.
For information on setting a backup policy, see "Setting a backup policy".
Prepare the backup volume.
The backup unit of AdvancedCopy Manager is a device. In AdvancedCopy Manager, the device in which the transaction data used as the candidate for backup is stored is called transaction volume. A backup volume must be placed on the disk array unit ETERNUS storage system.
A backup volume must have the same size as a transaction volume. For more information, see "Size of a logical disk".
The number of backup volumes is determined by whether snapshot fast backup or synchronized high-speed backup is performed:
|
Backup |
Number of required backup volumes |
|---|---|
|
For snapshot fast backup |
Number of backup generations |
|
For synchronized high-speed backup |
Number of backup generations + 1 |
When backup policies have already been set for multiple transaction volumes, the registration of a backup policy for a newly registered transaction volume requires that the following number of backup volumes be registered beforehand:
|
Backup |
Number of required backup volumes |
|---|---|
|
For snapshot fast backup |
Total number of backup generations in the registered backup policies + number of generations in the new backup policy being set |
|
For synchronized high-speed backup |
Total number of backup generations in the registered backup policies + number of registered transaction volumes + number of generations in the new backup policy being set + 1 |

For backup volumes, do not select disks in which a system is stored or AdvancedCopy Manager is installed.
For information on setting a backup volume, see "Setting the operation type for a device".

If the number of backup volumes that can be prepared in synchronized high-speed backup is only the number of preservation generations, the backup operation can be carried out by saving the backup volumes to secondary media, such as tapes.
In such cases, follow the procedure below.
Start backup synchronization.
Confirm the equivalency maintain status.
Execute backup.
Save the backup volumes to secondary media.
Delete history information.
Return to step 1.
If the history information is deleted, the restore execution command cannot be used for restoration of data of the period beginning from the time of deletion until the time of the next backup is completed. In this event, the data must be restored directly from the secondary media.
The backup operation of AdvancedCopy Manager can be automated using SystemWalker Operation Manager, etc.
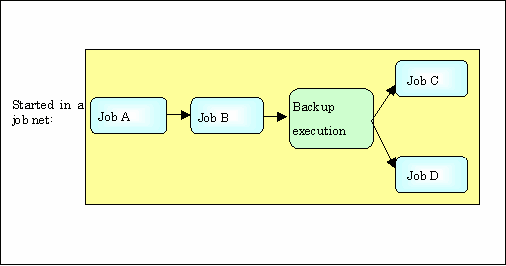
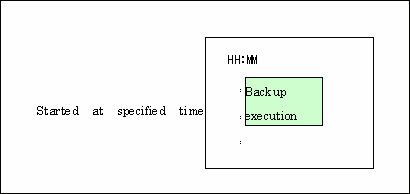
Automatic snapshot fast backup can be executed in one of the following two ways.
Start the backup command in a job net of a batch job every time when a backup should be collected.
Start the backup command at the specified time.
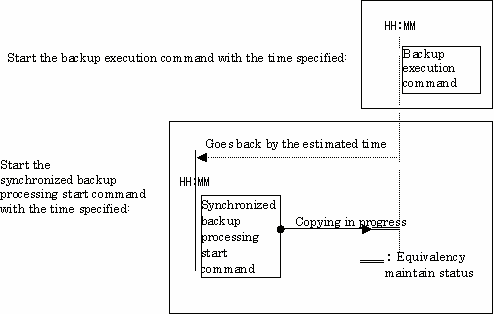
For synchronized high-speed backup, the transaction and backup volumes must have maintained equivalency status at the scheduled time for backup.
For this reason, if synchronized high-speed backup is automated, the synchronized backup processing start command and the backup execution command must be started separately, as described below.
At first, theoretically calculate the time required for the synchronized backup processing. Execute the synchronized backup processing start command by specifying the time obtained by subtracting that theoretical time or more from the time that the backup execution command is to start. The transaction and backup volumes will then have maintained equivalency status when backup is executed.
The time between the start of synchronized backup processing and the transition to equivalency status being maintained depends on the capacity of the volume to be copied.
Use either of the following methods to automatically execute the backup execution command:
Start the backup execution command in a job net of a batch job at the same time at which the backup data is to be collected.
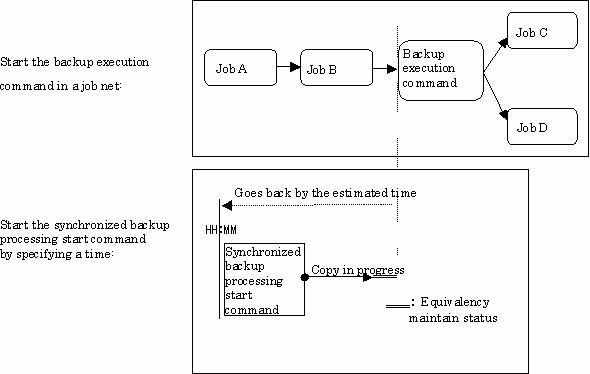

If there are other jobs (jobs A and B in the figure) to be executed before the backup execution command in the job net, the start time of the backup execution command cannot be determined. Assume that the start time of the backup execution command is the time obtained by adding the shortest time required for jobs A and B to the job net start time. Determine the start time of the synchronized backup processing start command by subtracting the estimated time from the start time of the backup execution command.
Start the backup execution command with the time specified.
The following shows the flow of backup operation on a regular transaction volume.
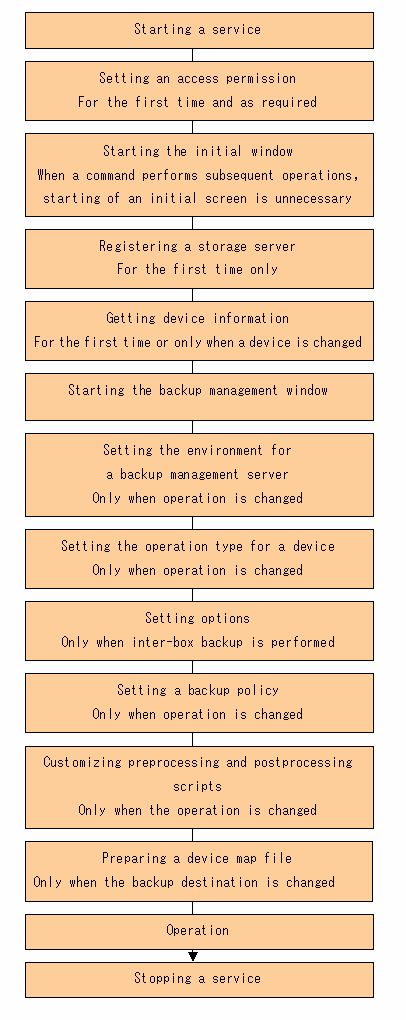
The following preparations are required before the backup operation is started.
Before the backup operation is started, the services of AdvancedCopy Manager must be started on the storage management server and the Storage servers. Normally, these services are automatically started up when the system is started. If the startup of a service fails for some reason or if a service has been stopped, you need to start the service on each server. For information on starting a service, see "Starting and Stopping a Service".
When performing backup employment from a backup management screen, an access permission of each operation of a backup management screen is set up. For details of the Setting Method, see "Security Operation Using Authentication Feature".
When only a command performs backup employment, a setup of access permission is not required.
Specify the following URL to start the initial window of AdvancedCopy Manager. In cluster operation, URL is different. For details, please refer to "Initial Window," in the ETERNUS SF AdvancedCopy Manager User's Guide."
|
http://storage-management-server-address(:port-number)/swstorage/index.html |
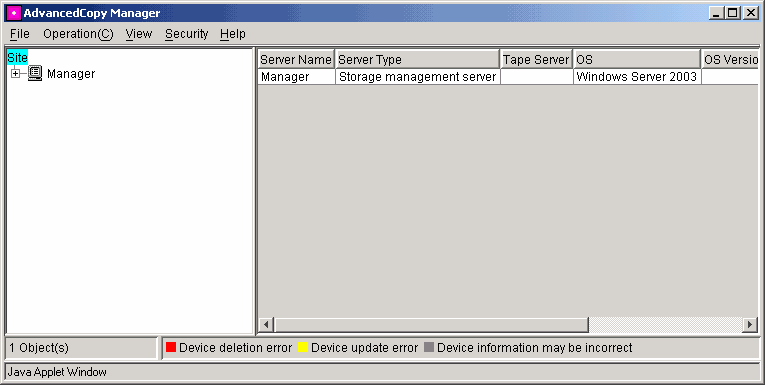
The following GUI (server list view) will be started.
When applying only by the command, without using GUI, it is not necessary to perform this operation.
 When the storage management server is in cluster operation
When the storage management server is in cluster operation, you must configure an authentication-related file (according to "Configuring the authentication-related file" in the ETERNUS SF AdvancedCopy Manager User's Guide) to use Web screens.
The Storage management server registers the Storage server to be managed. When the Storage server is operated as a Storage management server the server does not need to be added.
Select the [Operation] menu, select [Add Server]. The following window will be displayed.
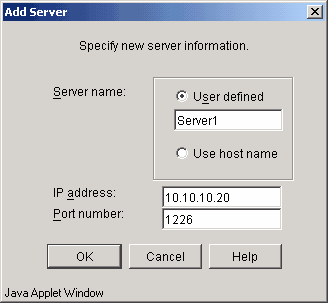
For the Storage server to be added, specify a server name, IP address, and port number required for communications. The port number is specified as the "communications service port number", when Agent of AdvancedCopy Manager was installed.
In cluster operation, specify the logical IP address of the Storage server as IP address. And specify the port number registered at the time of the cluster setup of Storage server transaction.
The [OK] button is pushed after inputting the above item, and additional processing of a Storage server is carried out.
In addition, this processing can be carried out also by the server information addition command (stgxfwcmaddsrv).
As part of replication management, device information on a storage server must first be stored in the repository. To acquire information on a device on the storage manager server, the [Operation] menu, select [Refresh Server]. The following window will be displayed.
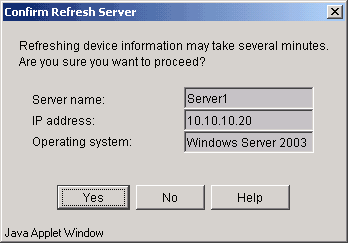
Check the server from which device information should be acquired and then press the [Yes] button.
After device information is acquired from each server, the following dialog will be displayed.
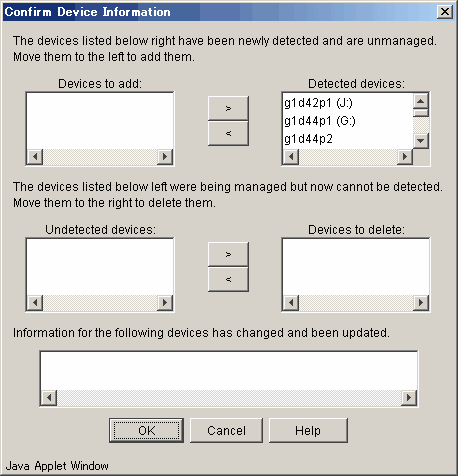
The new devices detected will be displayed in the uppermost list box. Move a device to be managed to the list box on the left. The second list box displays devices currently under management but not detected. Move a device that you no longer want to manage to the list box on the right. The lowermost list box displays devices whose device information has been updated (e.g., the mount point name has been changed).
All the device names displayed in this dialog box are "AdvancedCopy Manager device names".
The OK button is pushed after carrying out the above operation, and acquisition processing of device information is carried out.
In addition, this processing can be carried out also by the device information collection/reflection command (stgxfwcmsetdev).

It takes the time proportional to the total of the device defined in the selected Storage server for this operation. Please execute CPU load and the I/O load low when there are a lot of numbers of devices.
It takes about 0.5 seconds a device (partition) as a standard with there no load, and refer, please.

When backup synchronous processing or synchronous replication processing is being performed, device information may be unable to be acquired correctly. Therefore, when you take in device information, where all synchronous processing are canceled, please carry out.
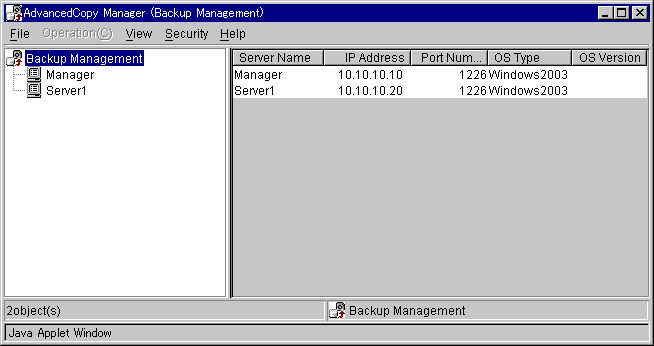
On the server list view, select the [File] menu and then [Backup Management]. The server list view for the backup management will be displayed.
Set the environment for each storage server. From the server list view, select backup management in the tree view displayed on the left side. Then, select the storage server in a list view displayed on the right side of the window. Finally, select [Set Storage Server Configuration Information] from the [Operation] menu. The following setup window will be displayed.
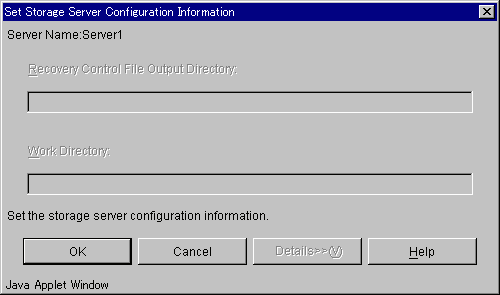
If the target Storage server is Solaris or Linux and the Symfoware database exists in the Storage server, a recovery control file output place directory and a work directory are inputted. When a Symfoware database does not exist in a Storage server, or when a Storage server is HP-UX or AIX, this input item cannot serve as a half-tone display, and cannot be inputted.
After completing the input of necessary items, click the [OK] button.
You need to make this environment setting also on the storage management server if it serves also as a storage server. This step is not required if the environment setting has already been made on the storage servers.
You can also make this environment setting also using the storage server configuration information setting command(swstsvrset).
For operation only with commands, the storage server configuration information setting command must be executed as part of startup operations.
Set up the following device operation type, before backing up in a storage server. The operation type is as follows:
Define the volume to be backed up as a transaction volume.
Prepare backup volumes. Prepare as many volumes, each of which has the same size as the transaction volume, as the number required for the backup type, and define them as the backup volumes:
|
Backup |
Number of required backup volumes |
|---|---|
|
Snapshot fast backup |
Number of backup generations |
|
Synchronized high-speed backup |
Number of backup generations + 1 |
Set an operation type on the server list view. On the server list view, select a storage server and select the [Operation] menu and then [Set Device Information]. The following setup window will be displayed.
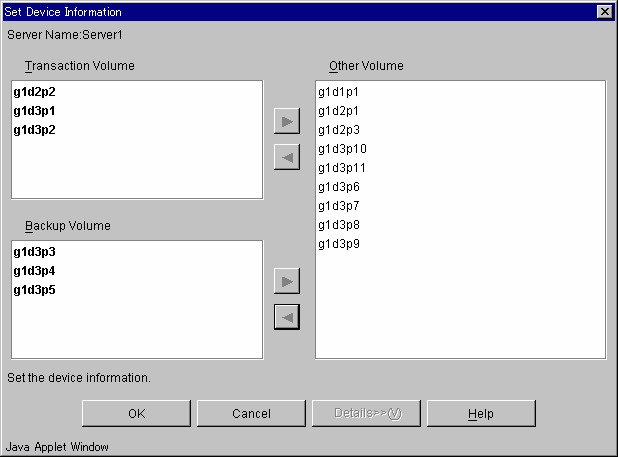
A volume displayed in "Other volume" field has no specified device operation type. Set a device operation type as follows:
Setting as a "transaction volume"
After selecting a target volume, click the [<] button on the "Transaction volume" side. The target volume will be moved to the "Transaction volume" field.
Setting as a "backup volume"
After selecting a target volume, click the [<] button on the "Backup volume" side. The target volume will be moved to the "Backup volume" field.
After making settings for all the volumes, click the [OK] button.
You can make this setting also using the device information setting command (swstdevinfoset).

In order to set up volume as operating volume, there are some points which should be taken into consideration. For details, see "General notes"

To change the configuration of a partition registered as the transaction volume or backup volume, take the following steps. First, delete the registered configuration, and then change the configuration. Next, try to fetch the device information on the storage server. Lastly, register the information by executing the device information setting command(swstdevinfoset).

Backup volume needs to be the same size as operating volume.

Backup is not supported for the system disk or the disk where AdvancedCopy Manager is installed.

The mounted device cannot be set to backup volume. (It is possible to set it to the transaction volume. )

You can check what has been registered as follows:
Checking on a GUI window
You can view information on a transaction volume on the transaction volume list view or information on a backup volume on the backup volume list view. For more information on each of these views, see "AdvancedCopy Manager User's Guide".
Checking using a command
You can view information on a registered transaction volume or backup volume using the device usage status display command(swstdevdisp).
Set options when performing backup to a backup volume in a cabinet that is not the same as the cabinet containing the transaction volume.

Disk array devices must support the REC or ROPC function.
Both cabinets must be connected to an FCRA (FC Remote Adapter).
Since data flows only from the INIT side to TARG side through an FCRA connection, FCRA connections must be established in minimum sets of two.
In a backup operation involving a disk array device that does not support the ROPC function (and only the REC function can be used), backing up data to a backup volume in a cabinet containing no transaction volume is impossible since the backup operation uses the ROPC function during restoration.
Create the following files to set options:
|
For normal operation (non-cluster) <environment-setting-directory>\etc\backup\data\DEFAULT\check.ini For cluster operation <logical-node-environment-setting-directory>\etc\backup\data\DEFAULT\check.ini |
Code as follows:
|
[check] RemoteCopy=Yes |

If the option settings file is changed after operation starts, backup may not be able to continue. For this reason, do not change the option settings file after the start of operation.
To change the option settings file, you must set the backup policy again.
For a transaction volume registered on a storage server, set the following backup policy:
Number of preservation generations
Means how many generations of backup data should be kept.
Interval days
Means the number of days before next backup should be performed. If the specified number of days is exceeded, you will be prompted to perform backup on the GUI window of AdvancedCopy Manager.
Specify the backup policy settings from the Transaction Volume List view. Select "Transaction Volume" of the storage server from the tree to display the transaction volume list. After selecting a transaction volume for which you want to set a backup policy, click the right mouse button. From the popup menu, select [Set Backup Policy]. The following setup window will be displayed.
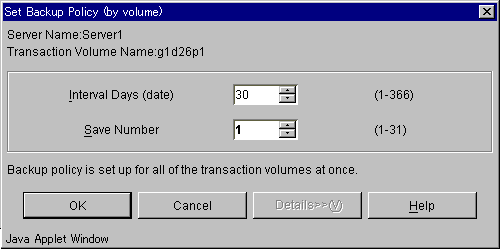
On this window, specify the number of interval days and the number of preservation generations and click the [OK] button. Perform this procedure on all the transaction volumes. You can set a backup policy also using the backup policy setting command (swstbkpolset).

Even if the number of interval days has been specified, AdvancedCopy Manager does not automatically collect backup. This value is used only to prompt the user to perform backup when the number of backup interval days is exceeded.
When you set a backup policy, there must be as many registered backup volumes as required to perform backup according to the specified backup policy. For information on the necessary number of backup volumes, see "Preparing a backup volume".
Even though the number of backup volumes required for the backup may not have been registered beforehand when backup policies for synchronized high-speed backup were set, the number required can be set if the number of backup volumes that are required for snapshot fast backup have been registered. However, synchronized high-speed backup may not be able to be executed.

You can check what has been defined as follows:
Checking on a GUI window
You can view information on a backup policy on the transaction volume list view. For more information on the window, see the "ETERNUS SF AdvancedCopy Manager User's Guide".
Checking using a command
You can view information on a defined backup policy using the backup policy display command (swstbkpoldisp).
If the case of the operation explained below, the backup preprocessing and postprocessing scripts need to be customized:
When you want to add special preprocessing and postprocessing to the preprocessing and postprocessing scripts
Refer to "Preprocessing and Postprocessing of Backup and Restoration" for information on the customization.
 When AdvancedCopy Manager is upgraded
The script after upgrade may be updated.
Therefore, customize the script after upgrade rather than reusing the script which was being used by the previous version.
In the backup operation on AdvancedCopy Manager, a backup volume with the same capacity as a transaction volume is automatically selected from the registered backup volumes.
If the backup volume is recognized in a "Device map file", i.e., a file defining the correspondence between transaction and backup volumes, it must be created.
Create a device map file anywhere on the storage server that performs backup. If you specify this file while performing backup, an operation in recognition of the backup destination is enabled.

To manage multiple generations, multiple device map files must be prepared.
Moreover, the device map file which can be used when backing up or starting synchronous processing should meet either of the following requirements.
An unused backup volume is specified.
The backup volume used in the history deleted by this backup is specified.
Therefore, it is necessary to use the device map file properly according to the situation of the backup volume at operation which uses two or more backup volumes.
If the number of backup volumes that can be prepared in synchronized high-speed backup is only the number of preservation generations, the backup operation can be carried out by saving the backup volumes to secondary media, such as tapes, and then deleting history information.
In such cases, the device map file that is subsequently specified at the start of backup synchronous processing is the device map file specifying the backup volumes that become unused because of the last deletion of history information.
The following shows a description example of a device map file.

The following lists rules for creating a device map file.
Describe a transaction volume and a corresponding target backup volume in one line. Separate a transaction volume and a backup volume with one or more "half-size blank or tab characters". One or more "half-size blank or tab characters" may be included between the beginning of a line and a transaction volume name or between the end of a backup volume name and the end of a line (new line character).
A blank line ("half-size blank or tab characters") may be included in a file.
The portion from the symbol "#" to the end of a line is assumed as a comment.
You cannot specify more than one target backup volumes for one work disk in one device map file. In such a case, the information in the line first found will be valid. While a device map file is read, the system will not detect such a redundant line.
A device map file may include descriptions of transaction volumes other than the processing target. (See the description example provided in the beginning of this chapter.)
This chapter describes the backup operation on AdvancedCopy Manager.
Before performing the backup operation, make environment settings required for the backup operation according to "Preparations".
There are the following two kinds of employment of backup of AdvancedCopy Manager.
Snapshot type high-speed backup employment
synchronous high-speed backup employment
Perform the snapshot fast backup as follows:
Before backing up a general file system, stop work.
Display the transaction volume list view and select a volume to be backed up.
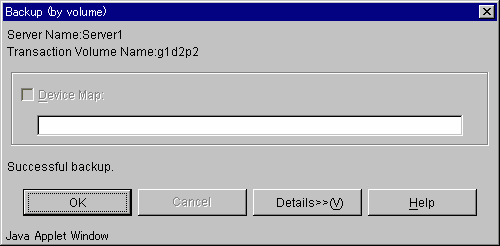
From the Operation menu, select [Backup] to display the following window.
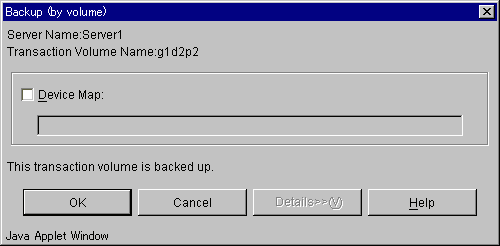
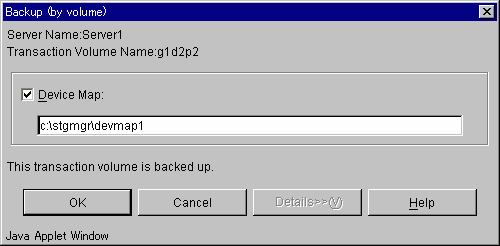
Check the displayed server names and transaction volume names and perform the following:
To use a volume automatically selected by AdvancedCopy Manager a backup volume:
Click the [OK] button.
To use a specific volume as a backup volume:
Specify a device map file created on the storage server that performs backup (e.g., C:\stgmgr\devmap1) and then click the [OK] button.
After the backup is completed, the following window will be displayed. Click the [OK] button and you will be sent back to the transaction volume list view.

This completes backup. Now you can restart work. At this point, however, the physical copying of a volume is not completed at the back end. To check the status of physical copying, do as follows:
Display the transaction volume list view and check the [Status] field of a target transaction volume. You can check the current copying status because this field displays the progress status of copying processing.
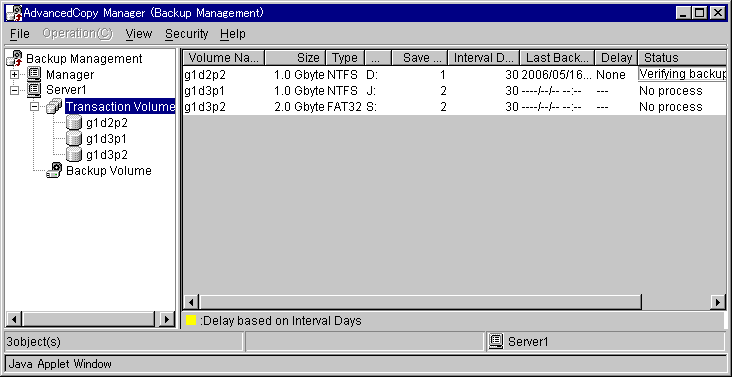
To check the latest copying status, either:
Click the [PF5] key, or
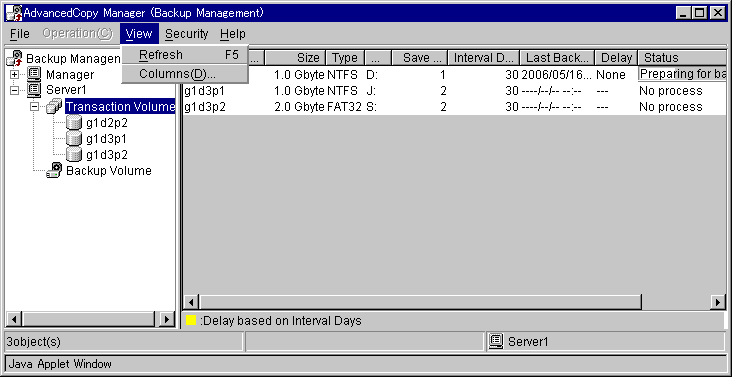
Select [Refresh] from the View menu.

If you have stopped work in Step 1, restart the work.

You can perform backup also using the backup execution command(swstbackup).
You can check the backup status also using the backup execution status display command(swstbackstat).

When the QuickOPC function is used for snapshot high-speed backup, the operations listed below cannot be performed from the Transaction Volume List view. Enter the appropriate command for each operation.
Execute the backup command with -T specified (swstbackup).
Execute the tracking cancel command (swstcanceltrk).
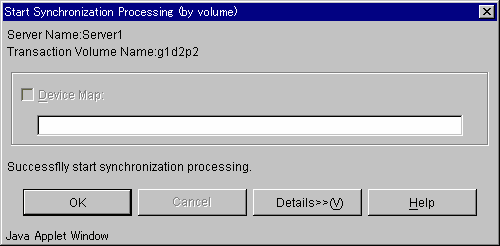
Perform the synchronized high-speed backup for a transaction volume as follows:
Display the transaction volume list view and select a volume to be backed up.
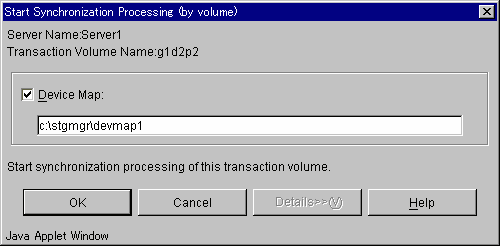
On the Operation menu, select [Start Synchronization processing] to display the following window.
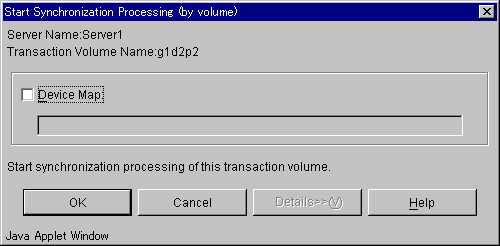
Check the displayed server name and transaction volume name, and perform one of the following operations:
To use a volume automatically selected by AdvancedCopy Manager as a backup volume:
Click the [OK] button.
To use a specific volume as a backup volume:
Specify a device map file name created on the storage server (e.g., C:\stgmgr\devmap1) for which backup will be performed and then click the [OK] button.
When the synchronized backup processing is completed, the window shown below appears. Click the [OK] button to return to the transaction volume list view.
Physical copying from the transaction volume to backup volume now starts. To check the status of the physical copying, do the following:
Display the transaction volume list view and check the [Status] field of the target transaction volume. This field displays the progress of the coping processing. Use it to check the current status of the copying.
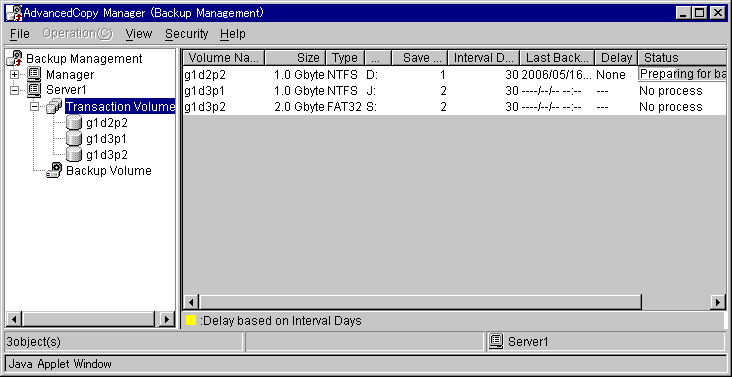
To check the latest copying status, perform one of the following operations:
Click the [PF5] key.
Select [Refresh] from the View menu.
The transaction and backup volumes have obtained equivalency status when the [Status] field indicates [Backup Preparation Completed].
To create a backup history, select the target transaction volume from the transaction volume list view and select [Backup] from the Operation menu. The following window appears.

Check the displayed server name and transaction volume name, and click the [OK] button.
When the backup is completed, the window shown below appears. Click the [OK] button to return to the transaction volume list view.

The backup execution command causes an error if it is executed before the transaction and backup volumes have entered equivalence status.
The device map cannot be specified during backup.

Backup synchronous processing is started with Backup synchronous processing start command(swststartsync).
A backup synchronous processing state is checked with Backup synchronous processing progress display command(swstsyncstat).
Backup can also be executed with the backup execution command(swstbackup).
The backup status can also be checked with the backup execution status display command(swstbackstat).

When the Suspend/Resume function is used for synchronous high-speed backup, the operations listed below cannot be performed from the Transaction Volume List view. Enter the appropriate command for each operation.
Execute the backup command with -suspend specified (swstbackup).
If one transaction volume has multiple synchronous processing (EC sessions), then specify the backup volume and cancel only the specified EC session (swstcancelsync).
This chapter describes restoring a volume or data that has been backed up.
Restore all the data in a volume, which has been backed up in the snapshot fast backup as follows:
Stop work if you want to perform restoration on a general file system.
Display the transaction volume list view. Select a volume to be restored.

From the Operation menu, select [Restore] to display the following window. As the restore source volume, the latest backup destination volume for the concerned transaction volume will be selected.

Check the name of volume to restore.
As the name of volume to restore, a transaction volume name selected in the transaction volume list view will be displayed. Click the [OK] button to restore data to this transaction volume. To change the restore destination, mark the Name of volume to restore checkbox, and then click the [...] button. The following window will be displayed.
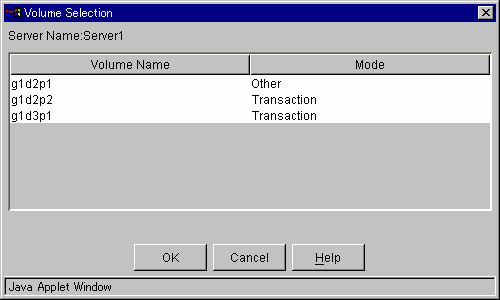
Select a volume to which you want to restore data and then click the [OK] button. You will be sent back to the restore window.
Check that the name of volume to restore is correct and then click the [OK] button on the [Restore Window].
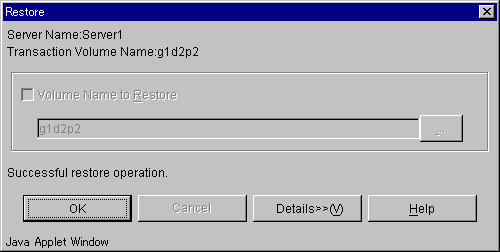
The following window will appear when the restoration is completed. Click the [OK] button and you will be sent back to the transaction volume list view.
This completes restoration. Now you can restart the work. At this point, however, the physical copying of a volume is not completed at the back end. To check the status of physical copying, do as follows:
Display the transaction volume list view and check the [Status] field of a target transaction volume. You can check the current restoration (physical copying) status because this field displays the progress status of copying processing.

To check the latest information, either:
Click the [PF5] key, or
Select [Refresh] from the View menu.
Business is resumed when business is not resumed.

You can perform restoration also using the restore execution command(swstrestore).
You can check the restore status also using the restore execution status display command (swstreststat).
See the ETERNUS SF AdvancedCopy Manager User's Guide for restoration in which absolute generations and relative generations are indicated in the backup data that is subject to history management. (For absolute generations, 1 is assigned to the data backed up first and the number increases sequentially. For relative generations, 1 is assigned to the latest data, and the number increases as the data becomes older.)
Restore an individual file as shown below. Note that you cannot restore an individual file on the GUI window.
Using the drive letter allocation command(swstdrvset), assign a drive letter to a backup volume.
Either execute the COPY command on the DOS prompt window or copy the file using Explorer.
Using the drive letter deallocation command(swstdrvunset), do not assign the drive letter that has been allocated to the backup volume.
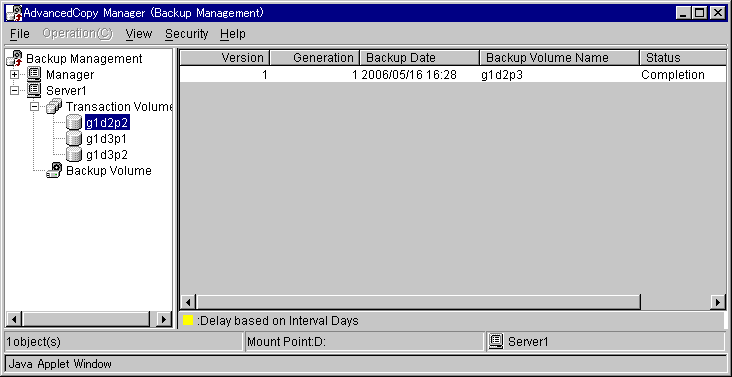
Display backup history information to check backup volume names, backup date, etc. of backup data under generation management for a transaction volume.

Backup history information is used to manage only information stored on a backup volume.
Any backup history information exceeding the number of preservation generations defined in a backup policy will be automatically deleted.
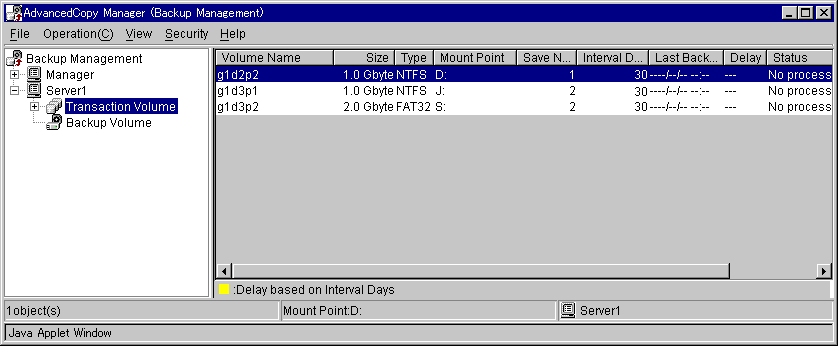
You can display a backup history on the backup history list view. To display the backup history list view, first access the server list view, display a storage server in a tree view, and select a transaction volume on the storage server.

You can display a backup history also using the history information display command(swsthistdisp).
Delete a backup history on the server list view. If you display a storage server in a tree view on the server list view, a list of transaction volumes on this storage server will be displayed. After selecting a transaction volume history for which you want to delete a backup history, click the right mouse button and, from the popup menu, select [Delete History]. The following setup window will be displayed.
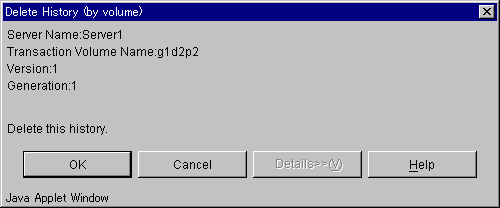
Carefully check the displayed server name and transaction volume name and click the [OK] button.

You can delete a backup history also using the history information delete command(swsthistdel).
You need to change the setting information of AdvancedCopy Manager if any change is made on a storage server or device used in the backup operation. This chapter describes changing the setting information when various changes are made.
After a device is added to any storage server, incorporate it in the backup operation of AdvancedCopy Manager as follows:
Display the initial window. For more information, see "Starting the initial window".
Fetch all the device information for a storage server. When device information is fetched, a newly added device will be detected. Move it to the [Device to be added] field. For information on fetching device information, see "Fetching device information on a storage server".
Display the backup management window. For more information, see "Displaying the backup management window".
Set the operation type for a device that has been added. For more information, see "Setting the operation type for a device".
If the added device has been defined as a transaction volume, set a backup policy for it. For more information, see "Setting backup policies".
This chapter describes deleting a device depending on the device type.
To delete a transaction volume, follow the steps shown below. Please be sure to do this work before removing the operating volume for deletion.
Display the backup management window. For more information, see "Displaying the backup management window".
Delete a backup history for the transaction volume to be deleted. For more information, see "Deleting a backup history".
Delete a backup policy for the transaction volume to be deleted.
If you display a storage server in a tree view, a list of transaction volumes on this storage server will be displayed. After selecting the transaction volume for which you want to delete, select delete backup policy. You can click the right mouse button or from the popup menu, select [Delete backup policy]. The following setup window will be displayed.
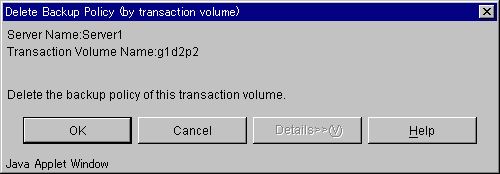
Carefully check the displayed server name and transaction volume name and click the [OK] button.
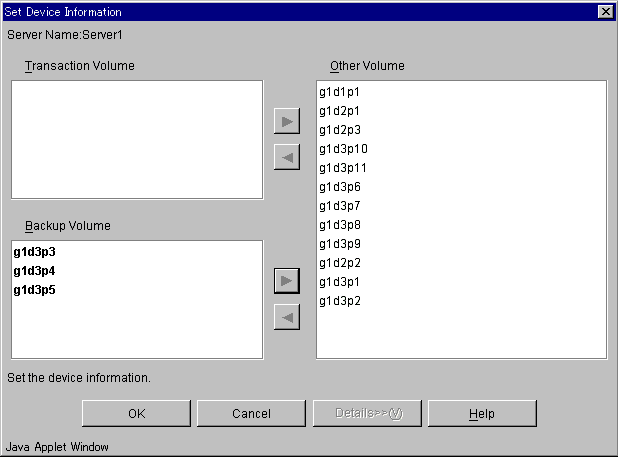
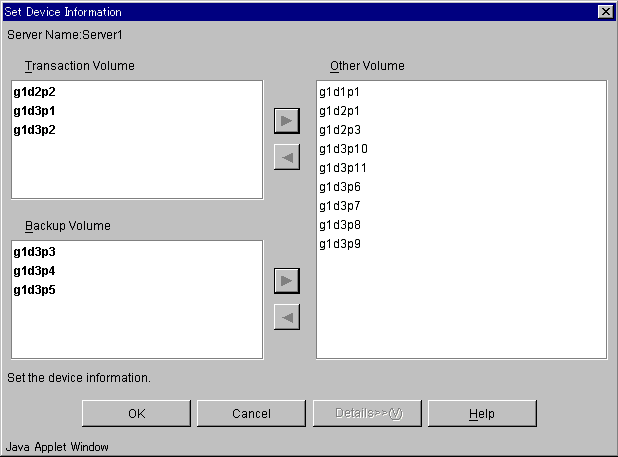
Delete device information for a transaction volume to be deleted.
After selecting a storage server, select [Set Device Information] from the [Operation] menu. The following setup window will be displayed.

Move a target transaction volume displayed in the "Transaction Volume" field to the "Other Volume" field. Click the [>] button to move a transaction volume.

You can execute this processing also using the history information delete command, backup policy deletion command, or device information setting command.
To delete a backup volume follow the steps as shown below. Please be sure to do this work before removing the operating volume for deletion.
Display the backup management window. For more information, see "Displaying the backup management window".
Send the backup volume to be deleted into the unused status.
When a volume is unused, this volume does not exist in a backup history. If the volume exists in a backup history, delete the backup history. If the volume is already unused, skip to the next step.
Delete device information for the backup volume to be deleted.
After selecting a storage server, select [Set Device Information] from the [Operation] menu. Then, the following setup window will be displayed.
Move a target backup volume displayed in the "Backup Volume" field to the "Other Volume" field. Click the [>] button to move a backup volume.

If a backup volume is deleted, an already defined backup policy may no longer be met (e.g., the number of backup volumes is less than the number of preservation generations). In such a case, the backup operation can no longer be continued. To avoid such a status, be sure to check already defined backup policies before deleting a backup volume.
If only an insufficient number of backup volumes exist as described earlier, first register a backup volume and then delete the target backup volume.

You can execute this processing also using the history information delete command, or device information setting command.
Add a storage server to the backup operation as follows:
Display the initial window. For more information, see "Starting the initial window.
Register a storage server. For more information, see "Registering a storage server".
Fetch all the information of devices connected to the added storage server. For more information, see "Fetching device information on a storage server".
Display the backup management window. For more information, see "Displaying the backup management window".
Set the information for the storage server. For more information, see "Setting the environment for a backup operation server".
Set the operation type for a device whose information has been fetched in Step 3. For more information, see "Setting the operation type for a device".
Set a backup policy for all the transaction volumes registered in Step 5. For more information, see "Setting a backup policy".
To delete a storage server follow the steps as shown below. Please be sure to do this work before removing the operating volume for deletion.
Display the backup management window. For more information, see "Displaying the backup management window".
Delete the backup history for all the transaction volumes on the storage server to be deleted. For more information, see "Deleting a backup history".
Delete the backup policy for all the transaction volumes on the storage server to be deleted.
If you display a storage server in a tree view, a list of transaction volumes on this storage server will be displayed. After selecting a transaction volume for which you want to delete, delete the backup policy. Click the right mouse button and from the popup menu, select [Delete backup policy]. The following setup window will be displayed.

Carefully check the displayed server name and transaction volume name and click the [OK] button.
Delete device information on the storage server to be deleted.
After selecting a storage server, select [Set Device Information] from the [Operation] menu. The following setup window will be displayed.
Move all the volumes displayed in the "Transaction Volume" and "Backup Volume" fields to the "Other Volume" field. Click the [>] button to move volumes.
Display the initial window. For more information, see "Starting the initial window".
Delete a Storage server.
Select a Storage server and select [Delete Server] from the Operation menu. The following window will be displayed.
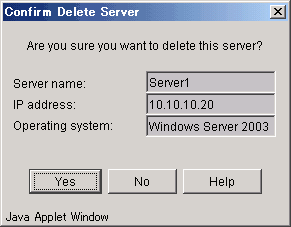
Carefully check the server name and click the [Yes] button.
You can delete server information also using the server information deletion command (stgxfwcmdelsrv).
To stop the backup operation, stop services on a Storage server. Normally, services are automatically stopped when the system is stopped.
You can stop an individual service if you need to do so for some reason. For more information, see "Starting and Stopping a Service".

When the service stops, all functions of AdvancedCopy Manager running on the Storage server stop.
Stop services on a Storage management server only after checking that all the Storage servers that it manages are stopped.
|
Contents
Index
|