
| Machine Administration Guide 2.6 |
Contents
Index
 
|
| Appendix B Disk Drive Replacement | > B.2 Flow of Fault Replacement | > B.2.3 Mounting disks |
This section describes how to mount the disk, which has been unmounted by the GDS automatic unmount function, with the system operation stopped.
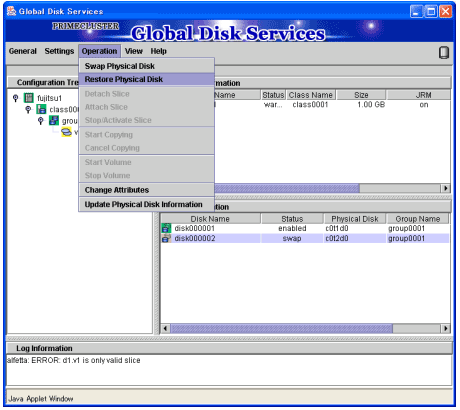
This procedure follows the procedure in Section B.2.2.2, "Cold swap." Two kinds of procedures are available: Mounting a disk using the Machine Administration menu, and mounting a disk using the SynfinityDisk/GDS GUI.

If a disk unmounted by the automatic unmount function has been cold-swapped, be sure to follow this procedure to mount the disk again. If you fail to follow this procedure, the Fault-LED may remain lit.

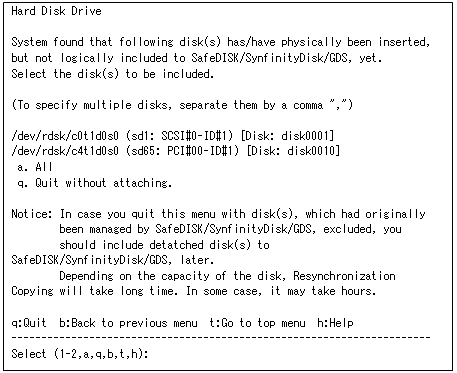
Select the disk you want to mount.
To mount all disks, enter "a".

Mount them one at a time.
In this case, start mount processing after copying of the spare disk is completed.

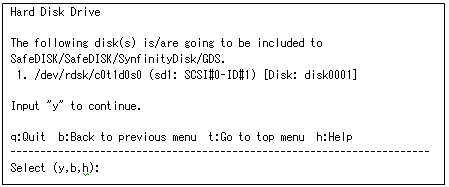
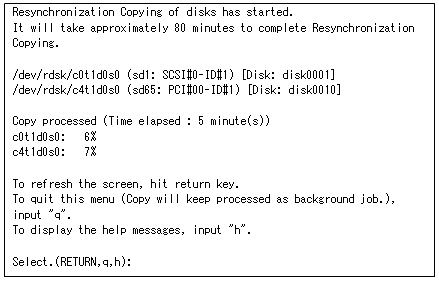
If the message content is acceptable, enter "y". Mounting the disk on GDS begins and the progress of resynchronization copying is displayed as shown below.

This screen is renewed every minute and changes to the subsequent screen after resynchronization copying is finished.
You can also renew the progress window by pressing the Return key.
You can also enter "q" to quit the progress display. In this case, resynchronization copying continues to be executed in the background.
You can check whether resynchronization copying is complete by using the sdxinfo command or checking messages output to /var/adm/messages.
For more information, refer to the "SynfinityDisk Handbook" or "PRIMECLUSTER Global Disk Services Handbook."


If an error occurs during replacement or mount processing, an error message displaying the action to be taken appears as shown below.
See Section B.6, "Messages," for information on the message that appears.

To mount a disk using the SynfinityDisk/GDS GUI, you have to use resethardstat in advance to reset the disk status information retained by Machine Administration.
# /usr/sbin/FJSVmadm/resethardstat <instance name>

Contents
Index
 
|