When applying fixes to a system that uses the smart workload recovery feature, note the following.
Refer to "A.5.1.2 Summary of Application/Removal Procedure" and apply/delete in multi-user mode.
Provides an overview of the procedure for applying various corrections to a system that uses the smart workload recovery feature.
Note
Be sure to take a snapshot and back up the storage for the instance before applying/removing the corrections.
Snapshots can only be taken when the OS is stopped.
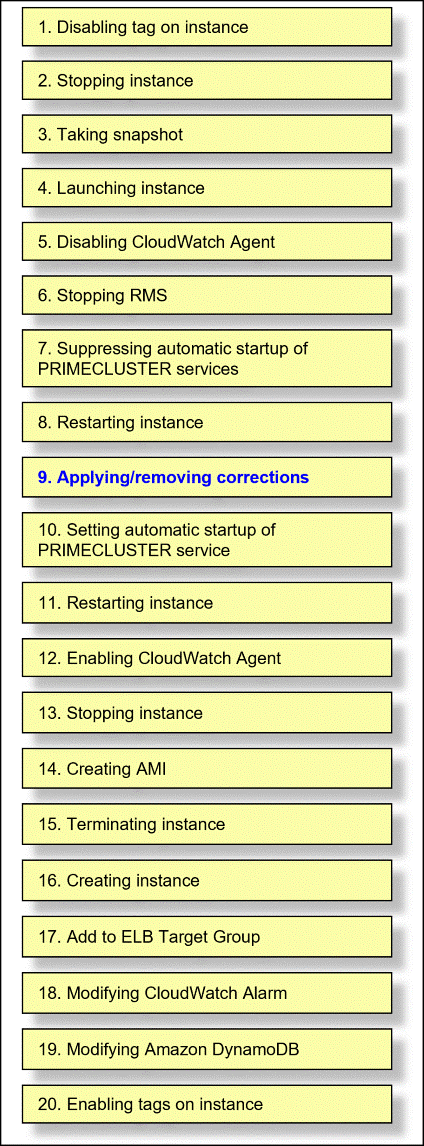
Figure A.8 Flow of Operations
Copy the corrections that should be applied to the instance to the instance's local file system in advance.
Disabling tag on instance
Using the AWS Management Console, set the value of the tag "fujitsu.pclswr.is_recovery_target" for the instance of the cluster node to false.
Stopping instance
Using the AWS Management Console, stop the instance of the cluster node.
Taking snapshot
Using the AWS Management Console, take a snapshot of the instance of the cluster node.
Launching instance
Using the AWS Management Console, launch an instance of the cluster node.
Disabling CloudWatch Agent
Disables monitoring of RMS by the CloudWatch agent and changes the setting to log monitoring only. For more information, see "A.3.1.2 Operation when RMS startup is stopped / RMS monitoring is disabled".
Stopping RMS
Stop RMS by running the following command on the instance of the cluster node.
# hvshut -a
Suppressing automatic startup of PRIMECLUSTER services
Execute the following command on the instance of the cluster node to suppress the automatic startup of the PRIMECLUSTER service.
# /opt/FJSVpclinst/bin/pclservice off
Restarting instance
Restart the instance by running the following command on the instance of the cluster node .
# /sbin/shutdown -r now
Applying/removing corrections
Apply the corrections previously copied to the local file system on the instance of the cluster node.
Or delete the correction.
Applying corrections
After copying the corrections to the working directory, run the following command.
# cd <working directory>
# /opt/FJSVfupde/bin/uam add -d ./ -i <correction number>
If the following message is output at this time, select "Y".
When displayed in Japanese
シングルユーザモードで適用が必要な修正です。マルチユーザモードで修正を適用しますか?(Y/N)Y
When displayed in English
It is required to update with single user mode. Do you want to apply the update now? (Y/N)Y
When the following message is output, select "N".
When displayed in Japanese
すぐに再起動しますか?(Y/N)N
When displayed in English
Do you want to restart your computer immediately? (Y/N)N
Deleting corrections
Run the following command on the instance.
# /opt/FJSVfupde/bin/uam remove -i <correction number>If the following message is output at this time, select "Y".
When displayed in Japanese
シングルユーザモードで復元が必要な修正です。マルチユーザモードで修正を復元しますか?(Y/N)Y
When displayed in English
It is required to restore with single user mode. Do you want to restore the updated product to its pre-update state now? (Y/N)Y
When the following message is output, select "N".
When displayed in Japanese
すぐに再起動しますか?(Y/N)N
When displayed in English
Do you want to restart your computer immediately? (Y/N)N
Setting automatic startup of PRIMECLUSTER service
Execute the following command on the instance of the cluster node to restore the PRIMECLUSTER service settings that you suppressed in step 7.
# /opt/FJSVpclinst/bin/pclservice on
Restarting instance
Restart the instance by running the following command on the instance of the cluster node .
# /sbin/shutdown -r now
Enabling CloudWatch Agent
Enables monitoring of RMS with the CloudWatch agent. For more information, see "A.3.1.2 Operation when RMS startup is stopped / RMS monitoring is disabled".
Stopping instance
Using the AWS Management Console, stop an instance on a cluster node. Note the integer value and instance ID that identifies the cluster node, which is the value of the cluster node instance tag "fujitsu.pclswr.id".
Creating AMI
Using the AWS Management Console, create an AMI for the instances on your cluster nodes.
Terminating instance
Terminate the instance that you stopped in step 13.
Create instance
Create an instance from the AMI created in Step 14, as described in "A.2.3.1 Creating Cluster Node Instance". Set the value of the cluster node instance tag "fujitsu.pclswr.id" to an integer value that identifies the cluster node in step 13. Also note the instance ID of the instance you created.
Add to ELB Target Group
Add the instance you created to the ELB's target group.
Modifying CloudWatch Alarm
Change the instance ID for the CloudWatch alarm from the instance ID in Step 13 to the instance ID in Step 16. Determine what to change by the integer value that identifies the cluster node at the end of the alarm name. For more information about alarm names, see "A.2.4.3 Configuring CloudWatch Alarm".
Modifying Amazon DynamoDB
Modifies the items of a eligible instance registered to the table "Fujitsu-Pclswr-DB-Switcher" in Amazon DynamoDB. The items to be modified are checked from the items "SystemID" and "InstanceID". Change the value of the item "InstanceID" from the instance ID in step 13 to the instance ID in step 16. For more information about the items, see "A.2.4.4 Configuring Amazon DynamoDB".
Enabling tags on instance
Using the AWS Management Console, verify that the value of the tag "fujitsu.pclswr.is_recovery_target" for the instance on the cluster node is true.
Note
If you want to apply a fix to the switcher Lambda function, use the AWS Management Console to reconfigure the Lambda function that contains the fix. See "A.2.4 Construction of Switcher and Resource monitor" for instructions.
See
For instructions about using the AWS Management Console, see the official AWS documentation.