Provides step-by-step instructions on how to create an AMI for an instance on a cluster node.
Create an instance to be a cluster node and do the following.
Configure the security group that you designed in "A.1.3.5.1 Rules for Instances".
Create IAM role and attach it to the instances that will be cluster nodes, as described in "A.1.5 Policy Design".
Because you are creating a file system for EFS in "A.1.4 Disk Design", the following file systems must be mounted.
RMS logs
Shared data (if created by the user)
To mount EFS file system on a cluster node.
Install amazon-efs-utils as described in "Manually installing the Amazon EFS client" in the Amazon Elastic File System User Guide.
Create mount points before installing PRIMECLUSTER.
# mkdir -p /var/opt/SMAWRrms/log
# chmod -R 755 /var/opt/SMAWRrms
# mkdir -p <Any directory>
Set to mount automatically at startup.
fstab settings (for IAM authenticated mounts)
# When the file-system-id of the RMS log is added to /etc/fstab:
file-system-id:/ /var/opt/SMAWRrms/log efs _netdev,noresvport,tls,iam 0 0
# When the file-system-id of the user-shared data is added to /etc/fstab:
file-system-id:/ <Any directory> efs _netdev,noresvport,tls,iam 0 0
Note
Note that forgetting "_netdev" option causes the instance to become unresponsive when automounting fails.
RHEL 8 has SELinux enabled by default. When SELinux is enabled, users are restricted from accessing shared data, so you may need to specify a context in the mount options.
After you configure automount, reboot to ensure that RMS log area and shared data are successfully mounted at startup.
Perform the following steps on the cluster nodes to disable the Firewall. Before installing PRIMECLUSTER, disable the firewall on the cluster node. The procedure is as follows.
Make sure firewalld is disabled.
# systemctl is-enabled firewalld If enabled, disable it.
# systemctl stop firewalld
# systemctl disable firewalld
To install PRIMECLUSTER, use the installation script (CLI Installer).
Install PRIMECLUSTER using the installation script on an instance where Linux (R) software and related software are already installed.
Note
If the OS has not been restarted since the instance was created, restart it before installing PRIMECLUSTER.
See
For more information on how to install/uninstall, see the "PRIMECLUSTER Cloud Edition Installation Guide".
It is necessary to change the kernel parameters required by RMS for each environment of the cluster node.
Check the PRIMECLUSTER design sheet and reconfigure kernel parameters if necessary.
See
For more information about kernel parameters, see "RMS Configuration" in "3.1.7 Checking and Setting the Kernel Parameters" in the "PRIMECLUSTER Installation and Administration Guide".
Note
Restart the OS to enable the changed kernel parameters.
After uninstalling PRIMECLUSTER, return the kernel parameter settings to the state before installing PRIMECLUSTER, if necessary.
Install and configure applications to run on a cluster system, as necessary.
See
Refer to the documentation for your application for instructions on how to set up your preferences.
For information about how AWS handles PRIMECLUSTER-related products, see the documentation for each product.
Set the name of /etc/hosts file on the cluster node by appending string "RMS" to the hostname (the node name output by the "hostname" command).
Add the name you configure to only one of the loopback addresses or the addresses assigned to the node you are building.
Result of executing the hostname command
# /bin/hostname
hostname
[Before adding]
# /bin/cat /etc/hosts
127.0.0.1   localhost localhost.localdomain localhost4 localhost4.localdomain4
[After adding]
# /bin/cat /etc/hosts
127.0.0.1   localhost localhost.localdomain localhost4 localhost4.localdomain4 hostnameRMS
Additional example when the output result of the hostname command is "node1"
# /bin/cat /etc/hosts
127.0.0.1   localhost localhost.localdomain localhost4 localhost4.localdomain4 node1RMS
For more information on how to build a cluster application on a cluster node, refer to "Chapter 6 Building Cluster Applications" in the "PRIMECLUSTER Installation and Administration Guide" to create a 1:1 standby cluster application and configure it as you would in a single-node cluster operation.
Also, you need to register FaultScript in "6.7.2 Setting Up userApplication" of the "PRIMECLUSTER Installation and Administration Guide". For information about creating a script to register, see "A.2.2.8.1 Creating FaultScript". "6.2 Initial GLS Setup", "6.3 GDS Configuration Setup" and "6.4 Initial GFS Setup" of the "PRIMECLUSTER Installation and Administration Guide" do not need to be set.
Also, because the clchkcluster command is not available, you do not need to perform the "6.9 Checking the Cluster Environment" in the "PRIMECLUSTER Installation and Administration Guide".
Note
Do not select "Does not start up automatically." for "6.1 Initial RMS Setup" in the "PRIMECLUSTER Installation and Administration Guide".
Set the AutoStartUp attribute to "yes" for the userApplication attribute that is set in "6.7.2 Setting Up userApplication" in the "PRIMECLUSTER Installation and Administration Guide".
If you do not set it to "yes", RMS does not start automatically when an instance switch occurs due to an error.
You do not need to configure the nodes that make up userApplication in step 4 of "6.7.2.1 Creating Standby Cluster Applications" in the "PRIMECLUSTER Installation and Administration Guide".
Register "hostnameRMS" configured in "A.2.2.7 OS Configuration" by performing the following steps before "6.7.2 Setting Up userApplication" in the "PRIMECLUSTER Installation and Administration Guide".
Run the hvw command.
To start RMS Wizard as the configuration file name (testconf)
# /opt/SMAW/SMAWRrms/bin/hvw -n testconf
Select "RMS-CreateMachine" from "Main configuration menu".
node1: Main configuration menu, current configuration: testconf
No RMS active in the cluster
 1) HELP                                10) Configuration-Remove
 2) QUIT                                11) Configuration-Freeze
 3) Application-Create                  12) Configuration-Thaw
 4) Application-Edit                    13) Configuration-Edit-Global-Settings
 5) Application-Remove                  14) Configuration-Consistency-Report
 6) Application-Clone                   15) Configuration-ScriptExecution
 7) Configuration-Generate              16) RMS-CreateMachine
 8) Configuration-Activate              17) RMS-RemoveMachine
 9) Configuration-Copy
Choose an action: 16
Select "FREECHOICE" and enter "hostnameRMS".
"hostnameRMS" is "hostnameRMS" set in "A.2.2.7 OS Configuration".
The following is an example of setting "node1RMS".
Creation: Add hosts to a cluster:
Current set:
1) HELP
2) QUIT
3) RETURN
4) FREECHOICE
Choose the host to add: 4
        >> node1RMS
Select "QUIT" to finish the setting.
Creation: Add hosts to a cluster:
Current set: node1RMS
1) HELP
2) QUIT
3) RETURN
4) FREECHOICE
Choose the host to add: 2
Note
In "Chapter 6 Building Cluster Applications" of the "PRIMECLUSTER Installation and Administration Guide" start RMS Wizard by specifying the configuration file used to register "hostnameRMS".
To configure userApplication for your application, see "6.6 Setting Up Online/Offline Scripts" in the "PRIMECLUSTER Installation and Administration Guide".
Create FaultScript that registers with userApplication. This script enables you to stop an instance and switch jobs when an application fails.
Create a file for the script. Specify any name for the script file name.
# touch script
# chmod 700 script
Add the following to the script.
#!/bin/sh
LOG_TRANSFER_SECONDS=10

NODE=${HV_NODENAME:-unknown}
STATE=${HV_SCRIPT_TYPE:-unknown}

function Msg {
    echo ${NODE}: ${STATE}: $(date "+%Y-%m-%d %H:%M:%S"): $*
}

Msg NOTICE: Waiting ${LOG_TRANSFER_SECONDS} seconds for log transfer.
/usr/bin/sleep ${LOG_TRANSFER_SECONDS}

/usr/bin/systemctl -f poweroff
Ret=$?
if [ ${Ret} != 0 ]; then
    # systemctl Message when the command fails
    Msg ERROR: systemctl failed. Return code ${Ret}.
    exit 1
fi

exit 0
The script uses the following variables to specify values to adjust for your environment.
Parameter | Description |
|---|---|
LOG_TRANSFER_SECONDS | In CloudWatch Agent settings, set a value that is twice the force_flush_interval in the Logs section. The unit is seconds. For details about the force_flush_interval check method, default values, and other specifications, see the official AWS documentation. |
Note
OfflineScript does not run when userApplication is notified of a fault. If you have something to do before stopping the instance, do the following.
Add an action to the third line of the script to be registered.
Specify multiple commands during FaultScript registration procedure.
Note that the scripts for FaultScript must be listed at the end.
(In the example below,/var/tmp/FaultScript.sh is the script for FaultScript.)
/var/tmp/command ; /var/tmp/FaultScript.sh
An extension of the systemctl command unmounts the file system. If unmounting takes a long time (for example, due to a file system error), the switch may take a long time. Also, if the systemctl command fails, use the AWS Management Console to stop the machine.
Configure RMS to start after the log area of RMS is mounted.
Setting the Startup Order
Create a drop-in unit file for RMS service to configure the boot order.
Create /etc/systemd/system/smawrs.service.d directory.
# mkdir /etc/systemd/system/smawrrms.service.d
# chmod 755 /etc/systemd/system/smawrrms.service.d
Create a configuration file in the directory you created.
# touch /etc/systemd/system/smawrrms.service.d/pclswr-efs.conf
# chmod 644 /etc/systemd/system/smawrrms.service.d/pclswr-efs.conf
Unit file settings
[Unit]
Wants=var-opt-SMAWRrms-log.mount
After creating the unit file, execute the following command.
# systemctl daemon-reload
Checking the Startup Order
Verify that RMS service dependency includes "var-opt-SMAWRrms-log.mount", which is the unit file associated with the mount, by running the following command.
# systemctl list-dependencies smawrrms.serviceSample Output (RMS Service Dependencies)
# systemctl list-dependencies smawrrms.service
smawrrms.service
● ├─system.slice
● ├─var-opt-SMAWRrms-log.mount
● └─sysinit.target
●   ├─dev-hugepages.mount
(omit)
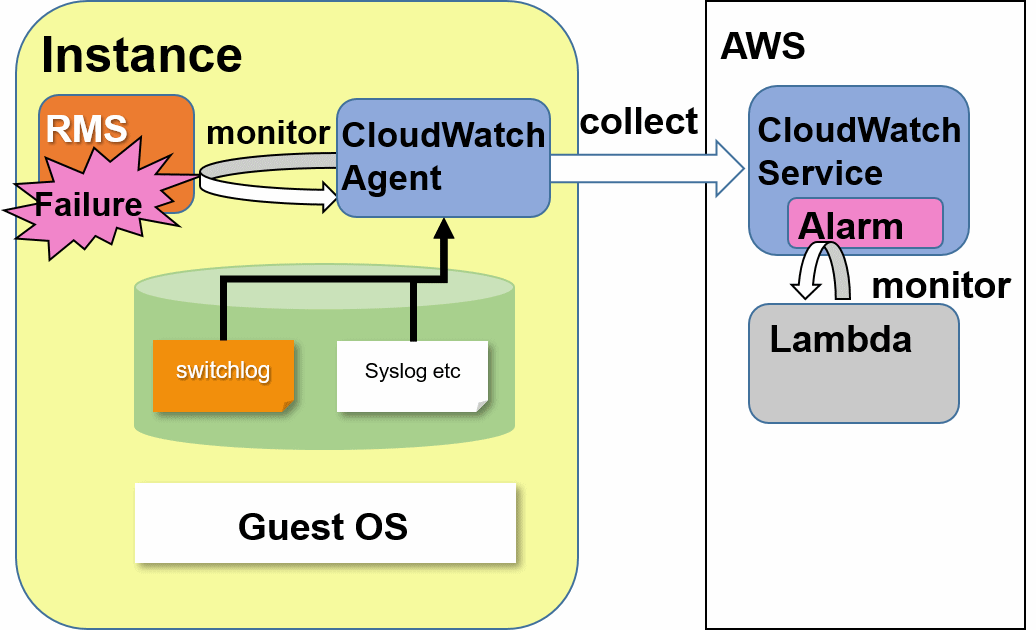
You can collect CloudWatch Agent information by installing it on your instances and configuring the information that you want to collect. You can use the collected information to monitor RMS service in CloudWatch services and switch instances when failure is detected.
The Smart Workload Recovery feature uses CloudWatch Agent to monitor and log RMS process survival.
Figure A.7 Monitoring and Logging RMS with CloudWatch Agent
Install CloudWatch Agent by using the command line, AWS Systems Manager, or AWS CloudFormation methods. For more information, see "Installing CloudWatch Agent" in the "Amazon CloudWatch User Guide".
Provides step-by-step instructions on how to configure CloudWatch Agent.
Configuring CloudWatch Agent
Create a CloudWatch Agent configuration file. Specify the configuration file that you created to launch CloudWatch Agent. For more information, see "Create CloudWatch Agent configuration file" in the "Amazon CloudWatch User Guide". Include the following in the configuration file.
{
	"agent": {
		"metrics_collection_interval": 60,
		"logfile": "/opt/aws/amazon-cloudwatch-agent/logs/amazon-cloudwatch-agent.log",
		"debug": false
	},
	"metrics": {
		"namespace": "RMS",
		"append_dimensions": {
			"InstanceId":"${aws:InstanceId}",
			"InstanceType":"${aws:InstanceType}"
		},
		"metrics_collected": {
			"procstat": [
				{
					"pattern": "/opt/SMAW/SMAWRrms/bin/bm",
					"measurement": [
						"pid_count"
					],
					"metrics_collection_interval": 60
				}
			]
		},
		"force_flush_interval": 60
	},
	"logs": {
		"logs_collected": {
			"files": {
				"collect_list": [
					{
						"file_path": "/var/log/messages*",
						"log_group_name": "system1_messages",
						"log_stream_name": "{instance_id}"
					},
					{
						"file_path": "/opt/aws/amazon-cloudwatch-agent/logs/amazon-cloudwatch-agent.log",
						"log_group_name": "system1_cwa_messages",
						"log_stream_name": "{instance_id}"
					}
				]
			}
		},
		"force_flush_interval":5
	}
}
When you choose all metrics from the CloudWatch menu, the custom namespace displays the "RMS" that you specified for "namespace" in the metrics section. After you choose a log group from the CloudWatch menu, the logs are displayed by instance ID under the "system1_messages" that you specify for "log_group_name" in the logs section.
Information
You can change the values of the following parameters that set how often metrics and logs are collected.
metrics_collection_interval
force_flush_interval
To add or delete a monitoring log, add or delete the "collect_list" entry in the logs section.
Note
The "RMS" specified in "namespace" in the metrics section should only be used in this configuration.
After CloudWatch Agent starts, CloudWatch Agent configuration file is renamed and moved to the following directory.
/opt/aws/amazon-cloudwatch-agent/etc/amazon-cloudwatch-agent.d
Example) CloudWatch Agent configuration files are stored in the
/opt/aws/amazon-cloudwatch-agent/etc/amazon-cloudwatch-agent.json
CloudWatch Agent configuration file is:
/opt/aws/amazon-cloudwatch-agent/etc/amazon-cloudwatch-agent.d/file_amazon-cloudwatch-agent.json
Configuring CloudWatch services startup order
Configure CloudWatch services to start after RMS startup.
Note
If the /etc/systemd/system/smawrs.service.d directory does not exist, you may not have performed a "A.2.2.9 Configuring RMS Boot Order". Please check if it is implemented.
Sets the start/stop order for CloudWatch Agent service.
Create a configuration file in the /etc/systemd/system/smawrs.service.d directory.
# touch /etc/systemd/system/smawrrms.service.d/pclswr-cwa.conf
# chmod 644 /etc/systemd/system/smawrrms.service.d/pclswr-cwa.conf
Include the following in the configuration file.
[Unit]
Before=amazon-cloudwatch-agent.service
Reflects the start/stop order setting for CloudWatch Agent service.
# systemctl daemon-reloadCheck the start/stop order settings for CloudWatch Agent service.
Ensure that amazon-cloudwatch-agent.service is included.
# systemctl show smawrrms.service | grep "Before="
Before=shutdown.target amazon-cloudwatch-agent.service multi-user.target
Use the AMI when switching instances.
Use the following procedure to create an AMI from the AWS Management Console.
Stop the instance that will be the cluster node
Create an AMI for the instance that will be the cluster node.
Terminate the instance that will be the cluster node.
See
For more information about AMIs and instructions for creating AMIs, see the official AWS documentation.
Note
Be sure to create an AMI. If you don't, PRIMECLUSTER launches an instance from an AMI for which "A.2 Installation" has not been implemented when you switch instances. In this case, the instance is not guaranteed to work.
If you make changes to the OS settings (such as network settings) while the instance is running, recreate the AMI.
For instructions about creating an AMI in the operating instance, see Create an AMI "A.5.8 Procedure for Getting AMI in Operation".
After you launch a new instance, the AMI, snapshot, and CloudWatch logs associated with the previous instance remain, so delete them if you don't need them to prevent charges. For instructions, see the official AWS documentation.