This section describes how to change hardware.
To change a shared disk device, you need to delete resources of the target shared disk device beforehand. After the change, you need to add the resources of the changed shared disk device.
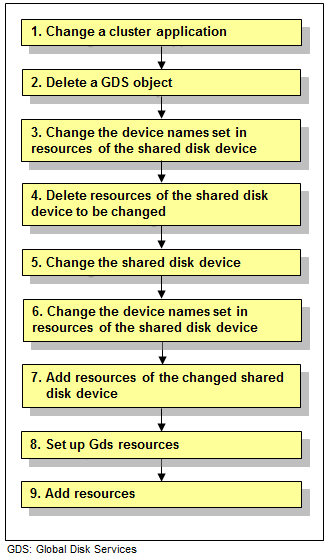
Figure 8.5 Changing a shared disk device
Operation Procedure:
Change a cluster application.
Delete the following resources, which are using the shared disk device to be changed, from the cluster application:
Fsystem resource
Gds resource
See
For details on how to change the cluster application configuration and delete resources, see "10.3 Changing a Cluster Application" and "10.5 Deleting a Resource."
Delete a GDS object.
Delete a GDS object related to the shared disk device to be changed.
See
For deleting a GDS object, see "Removing Configuration" of "PRIMECLUSTER Global Disk Services Configuration and Administration Guide."
Change the device names set in resources of the shared disk device.
Before deleting resources, update the device names set in the resources to the current device names. Execute the following command. For filepath, specify an empty file with absolute path.
# /etc/opt/FJSVcluster/bin/clautoconfig -f filepath
Delete resources of the shared disk device to be changed.
Delete resources of the registered shared disk device by using the "cldelrsc" command.
For details on the "cldelrsc" command, see the manual page.
After executing the "cldelrsc" command, execute the following command to inform that resources are deleted to GDS.
Specify the full path of an empty file for filepath.
# /etc/opt/FJSVcluster/bin/clautoconfig -f filepath
Note
When resources of the shared disk device to be deleted are registered to a GDS class, delete the shared disk device from the GDS class first, and then delete resources of the shared disk device. To delete the shared disk device from a GDS class, see "PRIMECLUSTER Global Disk Services Configuration and Administration Guide."
When SDX_UDEV_USE=off is described in the GDS configuration file /etc/opt/FJSVsdx/sdx.cf, do not execute the clautoconfig command.
Change the shared disk device.
See "12.2 Maintenance Flow" and ask field engineers to change the shared disk device.
Change the device names set in resources of the shared disk device.
Before adding resources to the changed shared disk device, update the device names set in the resources to the new device names. Execute the following command. For filepath, specify an empty file with absolute path.
# /etc/opt/FJSVcluster/bin/clautoconfig -f filepath
Note
When SDX_UDEV_USE=off is described in the GDS configuration file /etc/opt/FJSVsdx/sdx.cf, do not execute the clautoconfig command.
Add resources of the changed shared disk device.
Register resources corresponding to the changed shared disk device to the resource database.
See
For information on how to register the resource database, see "5.1.3.2 Registering Hardware Devices."
Set up Gds resources.
To use GDS, set up GDS and create Gds resources.
See
For information on how to set up GDS and create Gds resources, see "6.3 GDS Configuration Setup" and "6.7.3.4 Setting Up Gds Resources."
Add resources.
If you have deleted Fsystem resources in Step 1, add Fsystem resources.
See
To add resources, see "6.7.3 Setting Up Resources."
To change a network interface card used for the public LAN and the administrative LAN, you need to delete resources of the target network interface card beforehand. After the change, you need to add resources of the network interface card.
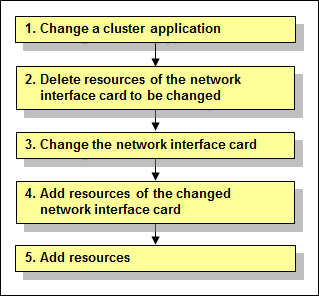
Figure 8.6 Procedure to change a network interface card
Operation Procedure:
Change a cluster application.
Delete the following resources, which are using the network interface card to be changed, from the cluster application:
Takeover network resource
Gls resource
See
For details on how to change the cluster application configuration and delete resources, see "10.3 Changing a Cluster Application" and "10.5 Deleting a Resource."
Delete resources of the network interface card to be changed.
Delete resources of the registered network interface card by using the "cldelrsc" command.
For details on the "cldelrsc" command, see the manual page.
Change the network interface card.
See "12.2 Maintenance Flow" and ask field engineers to change the network interface card.
Add resources of the changed network interface card.
Register resources corresponding to the changed network interface card to the resource database.
See
For information on how to register the resource database, see "5.1.3.2 Registering Hardware Devices."
Add resources.
If you have deleted takeover network resources and Gls resources in Step 1, add takeover network resources and Gls resources.
See
To add resources, see "6.7.3 Setting Up Resources."
Below is an example when changing from eth3 to eth4.
Note
A network interface card used for cluster interconnects cannot be replaced using PCI Hot Plug. Stop the node and then replace the network interface card.
Procedure when changing from eth3 to eth4
Stop CF on all the nodes configuring a cluster.
For how to stop CF, see "PRIMECLUSTER Cluster Foundation (CF) Configuration and Administration Guide."
Check interfaces currently used by executing the following command on all the nodes.
# cfconfig -g
The own node name the cluster name eth3
Delete CF configuration by executing the following command on all the nodes.
# cfconfig -d
Configure CF by executing the following command on all the nodes.
# cfconfig -S the own node name the cluster name eth4
Check that the interfaces currently used has been changed by executing the following command on all the nodes.
# cfconfig -g
The own name the cluster name eth4 (Check that eth4 has been displayed).
In the environment where the shutdown agent SA_icmp for VMware environment is used, if the cluster interconnect is used to check whether the node is alive or not, modify /etc/opt/SMAW/SMAWsf/SA_icmp.cfg on each node.
See
For details, see "H.2.3.3 Setting Up the Shutdown Facility (when using I/O fencing function)."
Start CF on all the nodes configuring a cluster
Log in to Web-Based-Admin View.
Open Cluster Admin.
Select the cf tab.
Select the driver load.
Select all check boxes (drivers) of a pop-up menu and check "OK."
After starting CF of the first machine (initial connection), select "Start CF" from the CF of the second machine. Then, select the check boxes (drivers) of the pop-up and click "OK."
Check that both nodes are Online on cf in Cluster Admin. In addition, check that each connector is UP.
Finish Cluster Admin.
Log out from Web-Based-Admin View.