This section describes how to delete hardware.
To delete a shared disk device, you need to change a cluster application which includes resources of the shared disk device to be deleted beforehand.
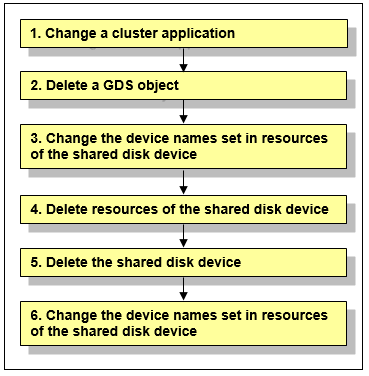
Figure 8.3 Procedure to delete a shared disk device
Operation Procedure:
Change a cluster application.
Delete the following resources using the shared disk device to be deleted from a cluster application:
Fsystem resource
Gds resource
See
To change the configuration of a cluster application and delete resources, see "10.3 Changing a Cluster Application" and "10.5 Deleting a Resource."
Delete a GDS object.
Delete a GDS object related to the shared disk device to be deleted.
See
For deleting a GDS object, see "Removing Configuration" of "PRIMECLUSTER Global Disk Services Configuration and Administration Guide."
Change the device names set in resources of the shared disk device.
Before deleting resources, update the device names set in the resources to the current device names. Execute the following command. For filepath, specify an empty file with absolute path.
# /etc/opt/FJSVcluster/bin/clautoconfig -f filepath
Delete resources of the shared disk device.
Delete resources of the registered shared disk device by using the "cldelrsc" command.
For details on the "cldelrsc" command, see the manual page.
After executing the "cldelrsc" command, execute the following command to inform that resources are deleted to GDS.
Specify the full path of an empty file for filepath.
# /etc/opt/FJSVcluster/bin/clautoconfig -f filepath
Note
When the shared disk device, from which resources are to be deleted, is registered to a GDS class, delete the shared disk device from the GDS class first, and then delete resources of the shared disk device. To delete the shared disk device from a GDS class, see "PRIMECLUSTER Global Disk Services Configuration and Administration Guide."
When SDX_UDEV_USE=off is described in the GDS configuration file /etc/opt/FJSVsdx/sdx.cf, do not execute the clautoconfig command.
Delete the shared disk device.
See "12.2 Maintenance Flow" and ask field engineers to delete the shared disk device.
Change the device names set in resource of the shared disk device.
By deleting the shared disk device, any device name of the shared disk device which has not been deleted may be changed. To modify the device name of the resource of the shared disk device according to the correct device name, execute the following command. Specify the full path of an empty file for filepath.
# /etc/opt/FJSVcluster/bin/clautoconfig -f filepath
Note
When SDX_UDEV_USE=off is described in the GDS configuration file /etc/opt/FJSVsdx/sdx.cf, do not perform Step 6.
To delete a network interface card used for the public LAN and the administrative LAN, you need to change a cluster application which includes resources of the network interface card to be deleted beforehand.
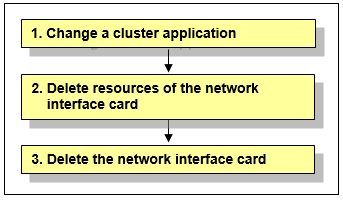
Figure 8.4 Procedure to delete a network interface card
Operation Procedure:
Change a cluster application.
Delete the following resources using the network interface card to be deleted from a cluster application:
Takeover network resource
Gls resource
See
To change the configuration of a cluster application and delete resources, see "10.3 Changing a Cluster Application" and "10.5 Deleting a Resource."
Delete resources of the network interface card.
Delete resources of the registered network interface card by using the "cldelrsc" command.
For details on the "cldelrsc" command, see the manual page.
Delete the network interface card.
See "12.2 Maintenance Flow" and ask field engineers to delete the network interface card.
This section explains the procedure for removing a system board by using Dynamic Reconfiguration (DR) during PRIMECLUSTER system operation.
If a system board is hot-removed by DR, this might affect the PRIMECLUSTER monitoring facility resulting in node elimination. If DR needs to be used, stop the cluster monitoring facility beforehand with the following procedure:
Note
A system board equipped with I/O cannot be removed by DR. Before removing a system board, also make sure to estimate that the ongoing operation can be continued even after the amount of CPU and memory is decreased.
Execute the "hvshut" command on each node to stop PRIMECLUSTER RMS as follows. Answer "yes," then only RMS will stop. The cluster application will remain running.
# hvshut -L
                            WARNING
                            -------
The '-L' option of the hvshut command will shut down the RMS
software without bringing down any of the applications.
In this situation, it would be possible to bring up the same
application on another node in the cluster which *may* cause
data corruption.

Do you wish to proceed ? (yes = shut down RMS / no = leave RMS running).
yes

NOTICE: User has been warned of 'hvshut -L' and has elected to proceed.
Add the following line to the end of the "/opt/SMAW/SMAWRrms/bin/hvenv.local" file on each node.
export HV_RCSTART=0
It is necessary to perform the procedure above so that RMS will not automatically start immediately after OS startup.
Execute the "sdtool" command on each node to stop the PRIMECLUSTER shutdown facility as follows.
# sdtool -e
LOG3.013806902801080028   11   6    30   4.4A00      SMAWsf           : RCSD returned a successful exit code for this command
Perform the following operation on each node to change the timeout value of PRIMECLUSTER CF:
Add the following line to the "/etc/default/cluster.config" file.
CLUSTER_TIMEOUT "600"
Execute the following command.
# cfset -rCheck whether or not the timeout value is valid.
# cfset -g CLUSTER_TIMEOUT
>From cfset configuration in CF module:
Value for key: CLUSTER_TIMEOUT --->600
#
Use DR.
See
For DR operation, refer to the related hardware manual.
Perform the following operation on each node to return the timeout value of PRIMECLUSTER CF to the default value.
First, change the value of CLUSTER_TIMEOUT defined in "/etc/default/cluster.config" file earlier to 10.
Before change:
CLUSTER_TIMEOUT "600"
After change:
CLUSTER_TIMEOUT "10"
Execute the following command.
# cfset -rCheck whether or not the timeout value is valid.
# cfset -g CLUSTER_TIMEOUT
>From cfset configuration in CF module:
Value for key: CLUSTER_TIMEOUT --->10
#
Execute the "sdtool" command on each node to start the PRIMECLUSTER shutdown facility.
# sdtool -bCheck if the PRIMECLUSTER shutdown facility is running. (The following indicates an output example of a two-node configuration.)
# sdtool -s
Cluster Host    Agent                SA State      Shut State  Test State  Init State
------------    -----                --------      ----------  ----------  ----------
node0           SA_mmbp.so           Idle          Unknown     TestWorked  InitWorked
node0           SA_mmbr.so           Idle          Unknown     TestWorked  InitWorked
node1           SA_mmbp.so           Idle          Unknown     TestWorked  InitWorked
node1           SA_mmbr.so           Idle          Unknown     TestWorked  InitWorked
Execute the "hvcm" command on each node to start PRIMECLUSTER RMS.
# hvcm
Starting Reliant Monitor Services now
RMS must be running on all the nodes. Check if each icon indicating the node state is green (Online) in the RMS main window of Cluster Admin.
Finally, remove the following line from "/opt/SMAW/SMAWRrms/bin/hvenv.local" file on each node.
export HV_RCSTART=0
Note
If you plan to use DR, be sure to verify a cluster system during cluster configuration using the above steps.
If a node failure (such as a node panic or reset) or a hang-up occurs due to hardware failure and so on during step 1 through 7, you need to follow the procedure below to start the cluster application, which was running on the node where DR is used on a standby node.
If a hang-up occurs, stop the failed node forcibly, and then check that the node is stopped.
Mark the node DOWN by executing the "cftool" command on any of the nodes where a failure does not occur and specifying the node number and CF node name for failed nodes. However, if the state of the failed node is not LEFTCLUSTER, wait until the node becomes LEFTCLUSTER, and then execute the "cftool -k" command.
# cftool -n
Node  Number State         Os       Cpu
node0 1       UP           Linux    EM64T
node1 2       LEFTCLUSTER  Linux    EM64T
# cftool -k
This option will declare a node down. Declaring an operational
node down can result in catastrophic consequences, including
loss of data in the worst case.
If you do not wish to declare a node down, quit this program now.

Enter node number: 2
Enter name for node #2: node1
cftool(down): declaring node #2 (node1) down
cftool(down): node node1 is down
# cftool -n
Node  Number State        Os        Cpu
node0 1       UP          Linux     EM64T
node1 2       DOWN        Linux     EM64T
#
Perform Steps 5 through 9 on all the nodes where no failure occurred, and then start RMS. If the cluster application is in an active standby configuration, execute the "hvswitch -f " command to force the cluster application to go Online. For details on the "hvswitch" command, see the description of the -f option of the online manual page for the command.
# hvswitch -f userApplication
The use of the -f (force) flag could cause your data to be corrupted and could cause your node to be killed. Do not continue if the result
of this forced command is not clear.
The use of force flag of hvswitch overrides the RMS internal security mechanism. In particular RMS does no longer prevent resources,
which have been marked as "ClusterExclusive", from coming Online on more than one host in the cluster. It is recommended to double
check the state of all affected resources before continuing.
IMPORTANT: This command may kill nodes on which RMS is not running in order to reduce the risk of data corruption!
Ensure that RMS is running on all other nodes. Or shut down OS of the node on which RMS is not running.
Do you wish to proceed ? (default: no) [yes, no]:yes
#
After restoring the failed node, perform step 5 through 9 on the appropriate node to start RMS.