From the Main screen, select [XXXXX Configuration] in the [Settings] menu.
Settings screen for different features appears. Use the screen switch tab to switch between "Class Configuration," "Group Configuration" and "Volume Configuration."
Note
Configuring a System of High Reliability
In order to ensure a system of high reliability, mirroring disks connected to separate I/O adapter, controller and cable is recommended.
In this section, how to create a new class is explained.
In the [Settings] menu, select [Class Configuration]. Class Configuration screen appears.
Figure 5.25 Class Configuration
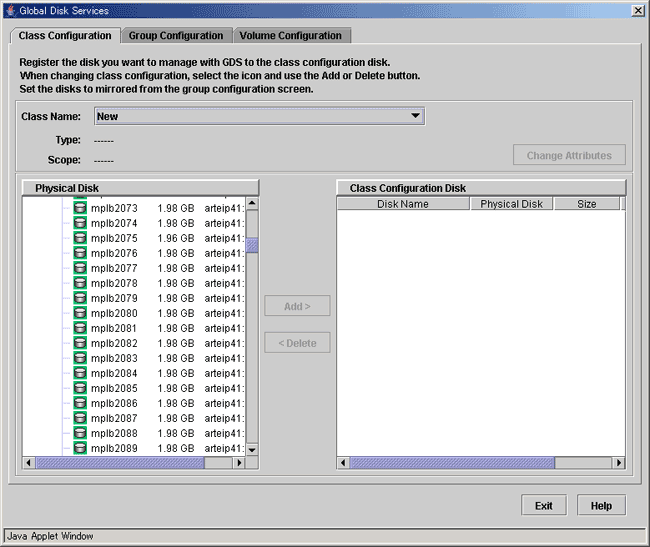
Selecting class name
In the [Class Name] list, select "New."
Selecting physical disk
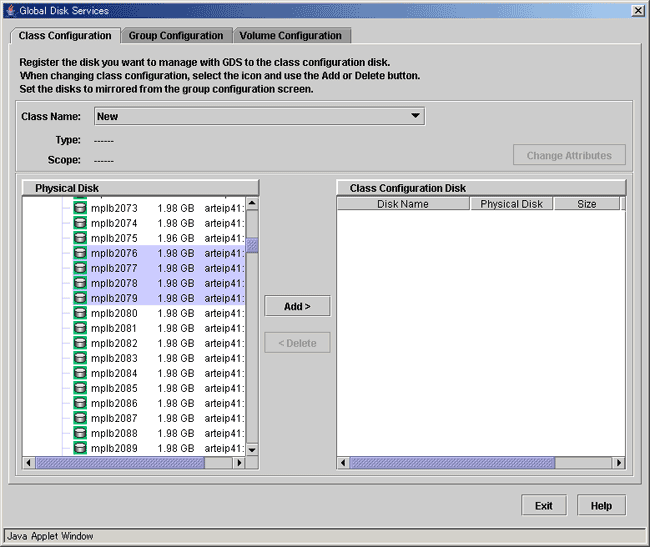
In the [Physical Disk] field, select the physical disk you want to include in the disk class.
You can select more than one physical disk at a time.
Selecting a physical disk will make the <Add> button available.
Note
If all physical disks to be registered with the class are not the same size, select the largest size disk first. For details, see "A.2.7 Disk Size."
Figure 5.26 Selecting Physical Disk to Configure Class
Information
Up to 400 physical disks can be selected at a time.
Creating a class
<Add>, and the message below appears.
Figure 5.27 Warning

Click <Yes> to continue, and <No> to cancel.
Click <Yes>, and Class Attributes Definition screen appears.
Figure 5.28 Class Attributes Definition
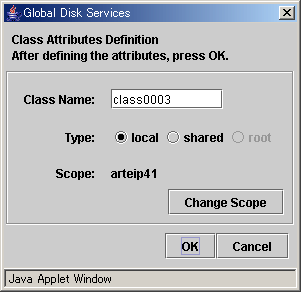
In the [Class Name] of Class Attributes Definition screen, an automatically created disk class name appears as default. Change the [Class Name] if necessary, and click <OK>.
The [Type] is "shared" and the [Scope] indicates a node that can share disks with respect to the class. To accept the settings, click the <OK> button.
Information
Inputting Class Name
Class name will be used for the device path name.
/dev/sfdsk/class_name/rdsk/volume_name
/dev/sfdsk/class_name/dsk/volume_name
You must be careful when inputting the class name, as once the volume is created, it cannot be changed.
Note
Creating Local Type Class with Cluster System
When creating a local type class in cluster system, class name should be set differently for each node.
See
For information on assigning a class name, see "A.1.1 Object Name."
This operation determines the class name.
When using single node, [Type] is fixed to "local" and you cannot change it.
If you click <Cancel> in the Class Attributes Definition screen, registration of the physical disk itself will be canceled.
Setting disk attributes
Selecting the [Disk Name] in the [Class Configuration Disk] field allows you to set the disk attributes. From here, you can change the [Disk Name] and [Type].
Changing disk name
Double-click the [Disk Name] in the [Class Configuration Disk] field, and change the name.
Changing disk type
Display the [Disk Type] in the [Class Configuration Disk] field and select the disk type you wish to change from the list.
When specifying as a spare disk select "spare." When specifying as a single disk, select "single." Default is set to "undef."
Completing class creation
After creating all classes, click <Exit> and close Class Configuration screen.
Note
Classes in Cluster Systems
Creating a class adds a class resource, and removing a class removes a resource.
When removing a class resource, remove the class without using the PRIMECLUSTER cldeldevice(1M) command.
Cluster applications that use resources of a class should be set after the volume configuration is complete.
See
For information on how to create a shared type class in cluster systems, see "5.2.3.2 Cluster System Class Configuration."
In cluster systems, specify [Type] and [Scope] in the Class Attributes Definition screen.
Setting [Type]
Sets the class type.
When creating a new disk class, selecting a physical disk that is not shared by other nodes from the [Physical Disk] field, sets the type to "local" by default.
Selecting a shared physical disk, sets the type to "shared."
Displaying [Scope]
Displays connecting nodes that can share a class.
To change scope, click <Change Scope>.
<Change Scope> Button
Changes nodes connecting to class.
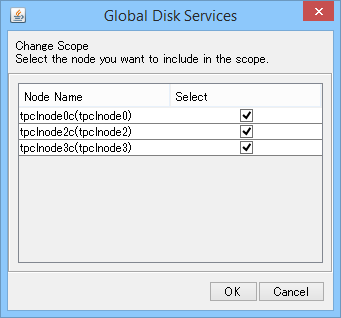
Click <Change Scope>, and Change Scope screen appears.
Figure 5.29 Change Scope Screen
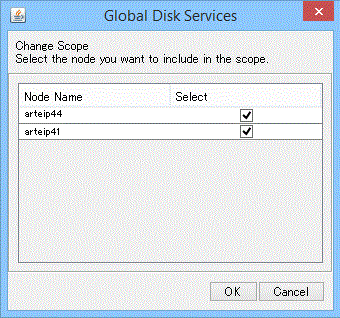
Changing the checkbox in the [Change Scope] dialog box specifies the connecting node (Multiple specification possible).
Clicking < OK > of the [Change Scope] dialog box determines the class connecting node.
Clicking <Cancel> of the [Change Scope] dialog box cancels the changing of the connecting node.
Note
Node Name
A node identifier of PRIMECLUSTER is displayed in the [Node Name] of the [Change Scope] screen and a host name of Web-Based Admin View is displayed in the GDS Configuration Tree field of the Main screen.
A node identifier and a host name may be different. In this case, the both names are displayed in the form of "node identifier (host name)" in the [Node Name].
Figure 5.30 Change Scope Screen (When a node identifier and a host name is different)
Note
Class Resource
In a cluster system, creating a class adds a class resource, and removing a class removes a resource.
When removing a class resource, remove the class without using the PRIMECLUSTER cldeldevice(1M) command.
Cluster applications that use resources of a class should be set after the volume configuration is complete.
See
For information on installation and initial setting of cluster systems, refer to "PRIMECLUSTER Installation and Administration Guide."
In this section, how to create a new group is explained.
In the [Settings] menu, select [Group Configuration]. Group Configuration screen appears.
Figure 5.31 Group Configuration
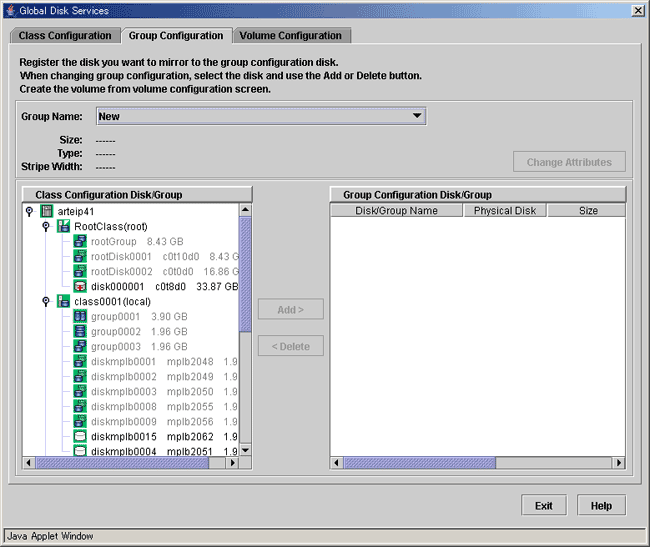
Follow the procedures below to create a new group.
Selecting group name
In the [Group Name] list, select "New."
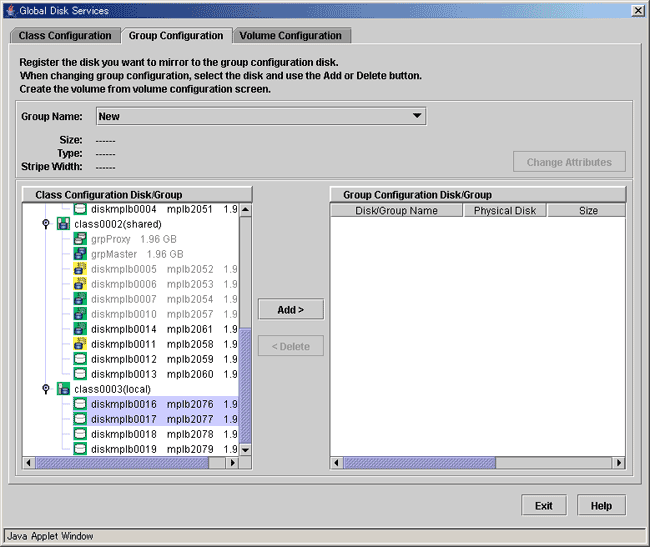
Selecting disk/lower level group
In the [Class Configuration Disk/Group] field, select the disk/lower level group you want to include in the disk group.
You can select more than one disk/group at a time.
Selecting a disk/group will make the <Add> button available.
Figure 5.32 Selecting Disk/Lower level group to Configure Group
Creating a group
Click <Add>, and the Group Attributes Definition screen appears. You will be able to specify the group attributes such as group name, type and stripe width.
Figure 5.33 Group Attributes Definition Screen
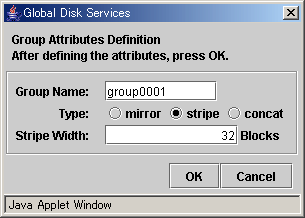
Setting [Group Name]
Enter the group name.
Change the default group name if necessary.
Setting [Type]
Set the group type.
Select "mirror" for mirroring, "stripe" for striping, and "concat" for concatenating. The default setting is "mirror."
Setting [Stripe Width]
You will be able to enter this field only when you select "stripe" for the [Type].
For the stripe width, you can specify a value of two raised to the power. The default setting is "32."
After setting the attributes, click <Exit> and a new group will be created.
If you click <Cancel> in the Group Attributes Definition screen, connection of the disk itself will be canceled.
See
For information on assigning a group name, see "A.1.1 Object Name."
Completing group creation
After creating all groups, click <Exit> and close Group Configuration screen.
In this section, how to create a new volume is explained.
In the [Settings] menu, select [Volume Configuration]. The Volume Configuration screen appears.
Figure 5.34 Volume Configuration
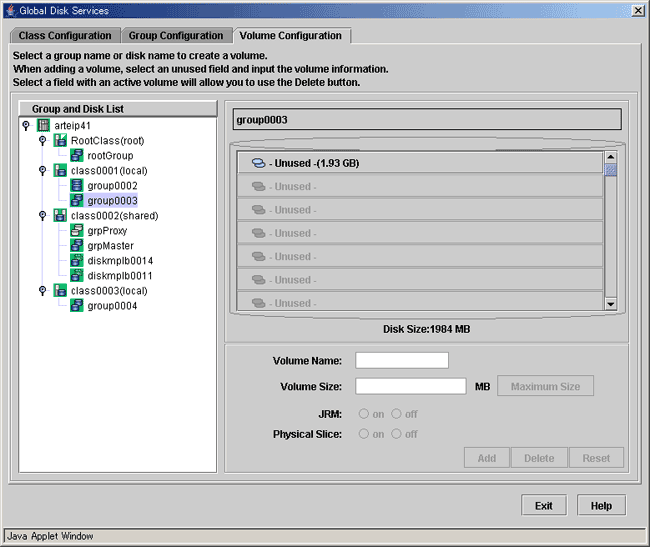
Follow the procedures below to create a volume.
Selecting group/disk
In the [Group and Disk List], select the group or the disk.
Information
Disk Size
The [Disk Size] displayed below the volume figure, displays available size of the group or disk selected in the [Group and Disk List]. Available size is the size of an area (including the area where volume has already been created) that can be used as volume area.
For details about available size of a group, see "A.2.6 Group Size."
For details about available size of a disk, see "A.2.7 Disk Size."
Selecting unused volume
Click <Unused> field with a volume icon, and select an unused volume.
Note
Size displayed in the <Unused> field
The size displayed in the <Unused> field is the maximum size that can be used to create one volume.
If any volume has ever been deleted in the relevant group or on the relevant disk, the size displayed in the <Unused> field and the sum total of free space size may not match.
Setting volume attributes
Selecting an unused volume will allow you to type in the volume attributes field (Volume Name, Volume Size, JRM, Physical Slice).
Setting [Volume Name]
Type the volume name.
See
For information on assigning a volume name, see "A.1.1 Object Name."
Setting [Volume Size]
Type the volume size in MB units, using numbers only.
Note
If Volume Size Does Not Match Cylinder Boundary
- When the specified volume size does not match the cylinder boundary of the disk, it will be automatically adjusted by rounding up. For details, see "A.2.8 Volume Size."
- Since volume sizes are adjusted to fit into the cylinder boundary, volume sizes that can be created may be smaller than the value displayed in [Disk Size].
[Maximum Size] button
Sets the value in the [Volume Size] field to the maximum available size.
Setting [JRM]
Default is set to "on." Change the setting when you want to disable the just resynchronization feature.
When you select a stripe group or concatenation group in step 1., the setting will fail.
Setting [Physical Slice]
Sets the volume's physical slice attribute value. Default is the "on."
on : a volume which consists of physical slices is created.
off : a volume without physical slices is created.
When you select a stripe group or concatenation group in step 1., the setting will fail.
Figure 5.35 Setting Volume Attributes
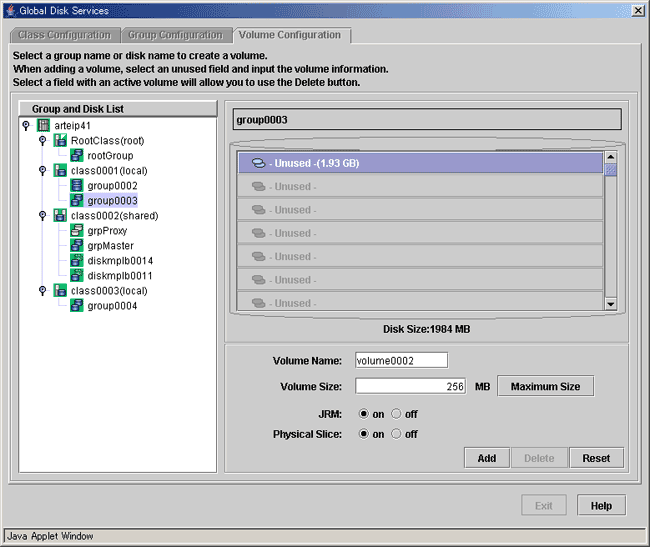
Determining the new volume
After setting the attributes, click <Add>. A new volume will be created.
If you click <Reset>, creation of the new volume will be canceled.
After creating all volumes, click <Exit> and close Volume Configuration screen.
After creating the volume, the volume will be started. You can access to the volume using the following special files.
/dev/sfdsk/class_name/rdsk/volume_name
/dev/sfdsk/class_name/dsk/volume_name
Note
Shared Class Volume Operation
Volume created in a shared class cannot be used from other nodes immediately. If you wish to access from other nodes, you must activate the volume from the node you wish to access.
After activating the volume, the node which created the volume, and the node which activated the volume will gain access. However, since operating from two nodes could affect data consistency, you must be careful when operating the volume.