Perform the client (CT) operation settings (settings of conditions relating to attached data and method of log sending) and smart device (agent) operation settings. Only the system administrator can perform the settings.
The operation settings of the client (CT) is performed in the unit of the Management Server and Master Management Server. The configuration value is obtained from the Management Server and Master Management Server when the client (CT) is started. In addition, when the CT policy is updated immediately, the value of operation settings of the client (CT) will also be updated.
In a 3-layer system structure, when the initial configuration value of terminal operation settings is changed, it has nothing to do with the Active Directory Linkage and the collective management of user policy, and the value must be reset in all Management Servers (when the client (CT) is connected to the Master Management Server, the Master Management Server should be the same.)
Note
The timing for operation settings to be reflected to the client (CT) is as follows:
When the client (CT) operation settings are performed and the CT policy is updated immediately in the client (CT), it will be reflected after the next startup of the client (CT).
When the client (CT) operation settings are performed and the CT policy is not updated immediately in the client (CT) it will be reflected after the next startup of the client (CT).
Android
The timing for the smart device (agent) operation settings to be reflected on the smart device (agent) is as follows:
When the smart device (agent) is started
Once per day at a set time (between 12:00 and 13:00)
When Sync now is selected on the smart device (agent)
iOS
Operation settings are reflected in the profile at the following timing:
When a target device is selected in the Management Console, and Update Immediately is clicked
When a target device is selected in the Management Console, and Update at Next Startup is clicked
The set procedure is as follows:
Start Management Console.
Select Terminal Operation Settings from the Operation Settings menu.
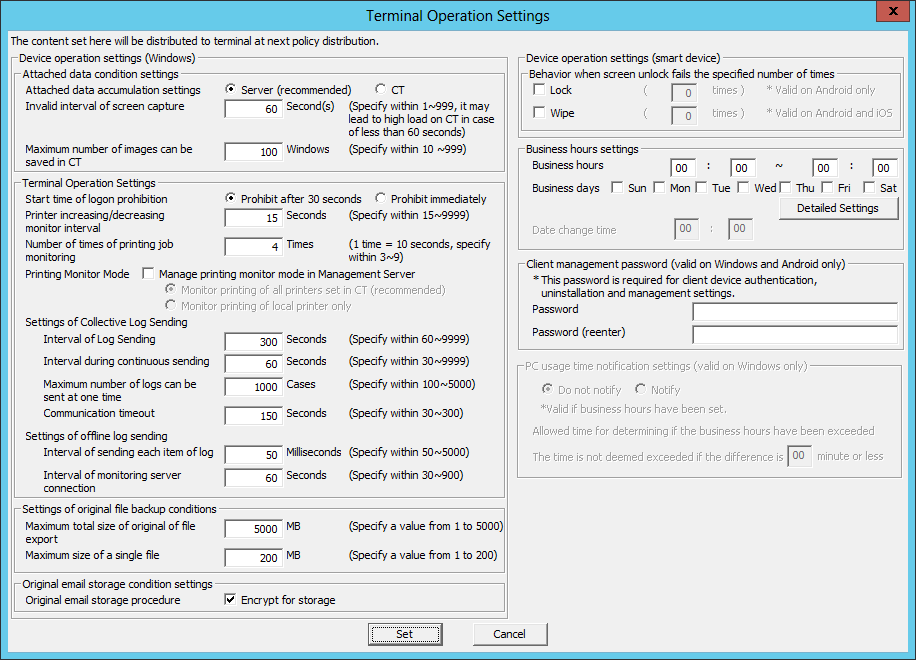
The Terminal Operation Settings window is displayed.

Enter the following information and click the Set button.
Item Name | Description |
|---|---|
Attached data accumulation settings | Specify the location for saving the attached data (screen capture, original file backup in file export).
The initial value is Server (Recommended). |
Invalid interval of screen capture | To prevent the high load of the client (CT), specify the interval between two screen captures. |
Maximum number of images can be saved in CT | The number of maximum screen captures saved in the client (CT) can be specified. The initial value (recommended value) is "100". The minimum value is "10", and the maximum value is "999". It is the settings that are valid for both the screen capture collection in window title logs, and screen capture collection during PrintScreen key operation and PrintScreen key prohibition. When the screen capture data saved in the client (CT) exceeds the value specified in Maximum number of images can be saved in CT, the older images will be deleted. When more screen capture data can be saved in the client (CT), modify Maximum number of images can be saved in CT as needed. |
Item Name | Description | |
|---|---|---|
Start time of logon prohibition | Select the interval from the detection of logon prohibition to logoff or shutdown in the client (CT).
Initial value is Prohibition after 30 seconds. | |
Printer increasing/decreasing monitor interval | Specify monitoring interval (seconds) of printer increase/decrease in the client (CT). Although the monitoring interval of the printer increase/decrease can be prolonged, and the load of imposed on the client (CT) and network can be reduced by increasing this value, it is possible that neither the newly installed printer nor the printing log during printing on this printer will be recorded. Set to the recommended value if there is no particular problem. | |
Number of times of printing jobs monitoring | Specify the monitor times for printing jobs performed by the client (CT) after printing. The initial value is (recommended value) is "4". The minimum value is "3", and the maximum value is "9". (Monitoring interval is 10 seconds.) Increase this value when file names and total number of pages are incorrect in the collected log. | |
Printing Monitor Mode | Select the mode of printing in the client (CT).
The initial value is that Manage printing monitor mode in Management server is not selected | |
Settings of Collective Log Sending | Interval of Log Sending | Specify the interval (seconds) of sending logs when collective log sending. The Interval of Log Sending will be valid when any of the following options in Send log of CT policy is set.
|
Interval during continuous sending (*1) | Specify the interval (seconds) between two times of log sending when collective log are sent. The Interval of Continuous Sending will be valid when any of the following options in Send log of CT policy is set.
| |
Maximum number of logs can be sent at one time | Specify the maximum number of logs that can be sent at one time when collective log are sent. The Maximum Number of Logs Sending for One Time will be valid when any of the following options in Send log of CT policy is set.
| |
Communication Timeout | Specify the timeout value (seconds) of connection between the CT and server when logs are sent collectively. The Communicate Timeout will be valid when any of the following options in Send log of CT policy is set.
| |
Settings of offline log sending | Interval of log sending each item of log | Specify the interval (ms) of sending each log when logs are sent immediately. The Sending Interval of Each Log will be valid when any of the following options in Send log of CT policy is set.
|
Interval of monitoring server connection | Specify the communication confirmation interval (seconds) of the server when logs are sent immediately. The Monitoring Interval of Server Connection will be valid when any of the following options in Send log of CT policy is set.
| |
*1: This setting is valid only for proprietary communication. In case of secure communication, this value is not used and logs are sent with the fixed "0.1" second interval.
Note
About sending command operation log to server
Command logs are always sent immediately after collection (not affected by these settings).
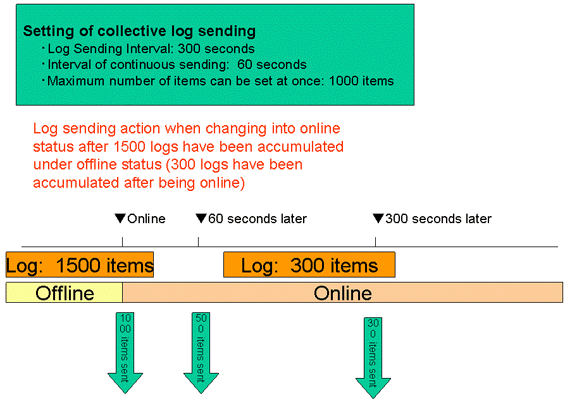
The following describes the settings of collective log sending .

When shifting from offline to online, 1000 logs in the 1500 accumulated logs will be sent first and the remaining 500 logs will be sent 60 seconds later (the interval of continuous sending).
After being online, new logs will continue to accumulated. When the number reaches 300, 300 logs will be sent 300 seconds after 500 logs are sent.
Item Name | Descriptions |
|---|---|
Maximum total size of original of file export | Specify the maximum value of total original files backup in file export that can be saved in the client (CT). The original file backup that exceeds this configuration value cannot be saved. Export cannot be performed either. |
Maximum size of single file | Specify the maximum size per file for storage of the original of export files. Export files that exceed the size specified for this setting are divided up according to the setting value and are saved. A file can be divided into a maximum of 35 parts. Therefore, the maximum size of an export file is 7000 MB (200 MB * 35). However, because Maximum total size of original of file export is 5000 MB, the maximum size of a single file is limited to 5000 MB. |
Item name | Description |
|---|---|
Original email storage procedure | Specify whether to encrypt emails during storage.
By default, Encrypt for storage is selected. |
Point
Viewing emails stored without being encrypted
Emails stored without being encrypted can be viewed by directly referencing the file stored in the folder set in Server settings tool > Folder/CT self version upgrade settings > E-mail content saving target
Note
Original email storage procedure
Even if the Encrypt for storage setting is changed, the emails stored before the change will not be affected by the new setting.
After operation is performed with Encrypt for storage selected (emails are encrypted and then stored), if you clear Encrypt for storage (emails are stored without being encrypted), the new setting will be effective for emails stored after the change. The emails stored before the change will not be affected and will remain encrypted.
Similarly, if Encrypt for storage is cleared (emails are stored without being encrypted) and you then select it (emails are encrypted and then stored), the emails stored before the change will not change and will remain unencrypted.
This setting will be applied to the smart device operation settings.
Refer to "3.7.3 Controlling Smart Device when Password Entry Fails" for details.
This setting will be applied to the smart device operation settings.
Refer to "2.4.1.20 Application (Android)" for details.
Item name | Description |
|---|---|
Business hours | Specify the business start time and finish time in the following format: hhmm - hhmm
Business hours settings are enabled when Business days is selected. The default value is "00:00 - 00:00". |
Business days | Specify the business days by day of the week. Multiple days can be selected from the following days: Sun, Mon, Tue, Wed, Thu, Fri, Sat By default, no value is specified. |
Advanced Settings | Click this item, and the The Business Hours Settings - Advanced Settings window will be displayed. Set exceptions for holidays and other business days. |
Note
Use Business days and Business hours in combination.
If a combination of business days (Mon, Tue, Wed, Thurs, Fri) and business hours (09:00 - 17:30) is specified, business hours will be assumed to be "09:00 - 17:30, Monday - Friday".
Even if 09:00 - 17:30 is set in Business hours, it will not be recognized if Business days is not selected.
Point
Entering the business hours
You can enter a start time that is later than the finish time.
In this case, operation will be performed assuming the business hours are set over two days.
Example: If "18:30 - 05:00" is specified, operation will be performed assuming the business hours run until 5 A.M. the next morning.
You can enter a start time that is the same as the finish time.
In this case, operation will be performed assuming the business operates 24 hours a day.
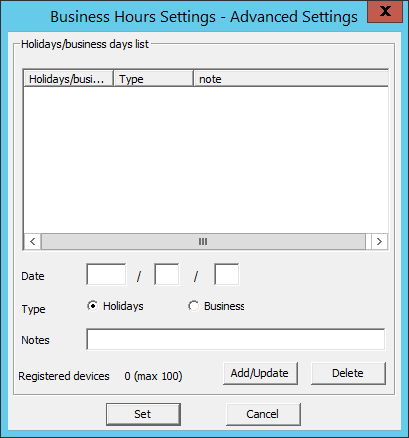
In the Business hours settings, set the exceptions for holidays and other business days.

Item name | Description |
|---|---|
Holidays/business days list | Displays the list of exceptions for holidays and other business days. By default, no value is specified. |
Date | Enter the dates to be set as exceptions for holidays and other business days. Dates from Jan. 1, 2000 to Dec. 31, 2037 can be entered using halfwidth numeric characters. By default, no value is specified. |
Type | Specify whether to set the entered date as a holiday or business day. |
Notes | Enter information regarding dates. By default, no value is specified. |
Registered devices | The number of registered cases and the maximum number of registrations possible are displayed. |
Add/Update | Adds the dates for exceptions for holidays and other business days. Information will be updated when Remarks for the row selected in Holidays/business days list is changed. Date cannot be updated. |
Delete | Deletes the row selected in Holidays/business days list. |
Set | Confirms the information entered, and returns to the previous screen. |
Cancel | Closes the window without saving the settings. |
This setting will be applied to the client (CT) operation settings and smart device operation settings.
By setting the client management password, whether the password entered during the client (CT) installation matches the client management password will be checked when the client (CT) is registered on the Management Server. Once client deployment and version upgrade are completed, changing the password is recommended.
Also, entry of the password that was set will be required during uninstallation of the client (CT) and smart device (agent) (Android).
This password must be set on the Management Server and Master Management Server respectively.
The client management password set on the Master Management Server will be valid only for the client (CT) and smart device (agent) (Android) under the Master Management Server.
Note that when you are changing the connection destination Management Server or Master Management Server for the client (CT), use the same password as before.
Item name | Description |
|---|---|
Password | Specify the password required for authentication, uninstallation and management settings for the client device during its registration. Specify up to 32 halfwidth alphanumeric characters and symbols, except for the following symbols: |
Password (reenter) | Reenter the password. The number and type of characters that can be entered are the same as those for Password. |
The client management password is valid on Windows and Android only. The password will not be valid on iOS.
If the client management password is set, operations on Windows will be as follows:
Authentication will be performed during the registration of the client (CT) to the Management Server. Whether the password entered during the client (CT) installation matches the client management password will be checked, and if they do not match, the device will not be registered.
Entry of the client management password will be required during the client (CT) uninstallation.
Also, operations on Android will be as follows:
Entry of the password will be required during the smart device (agent) (Android) uninstallation.
If the client management password is not set, operations on Windows will be as follows:
Authentication will not be performed during the registration of the client (CT) to the Management Server.
When uninstalling the client (CT), enter the password specified during installation.
Also, operations on Android will be as follows:
A screen prompting password entry will be displayed during the smart device (agent) (Android) uninstallation but password entry will not be required.
Logs Collected in Safe Mode or Safe Mode with Network
Logs collected in safe mode or safe mode with the network will be sent to the Management Server when starting in normal mode next time.