Customize various policies according to the following procedure.
Login to the main menu and click Environment Setup.
The Environment Setup window is displayed.
Click Policy Groups.
The following window is displayed.
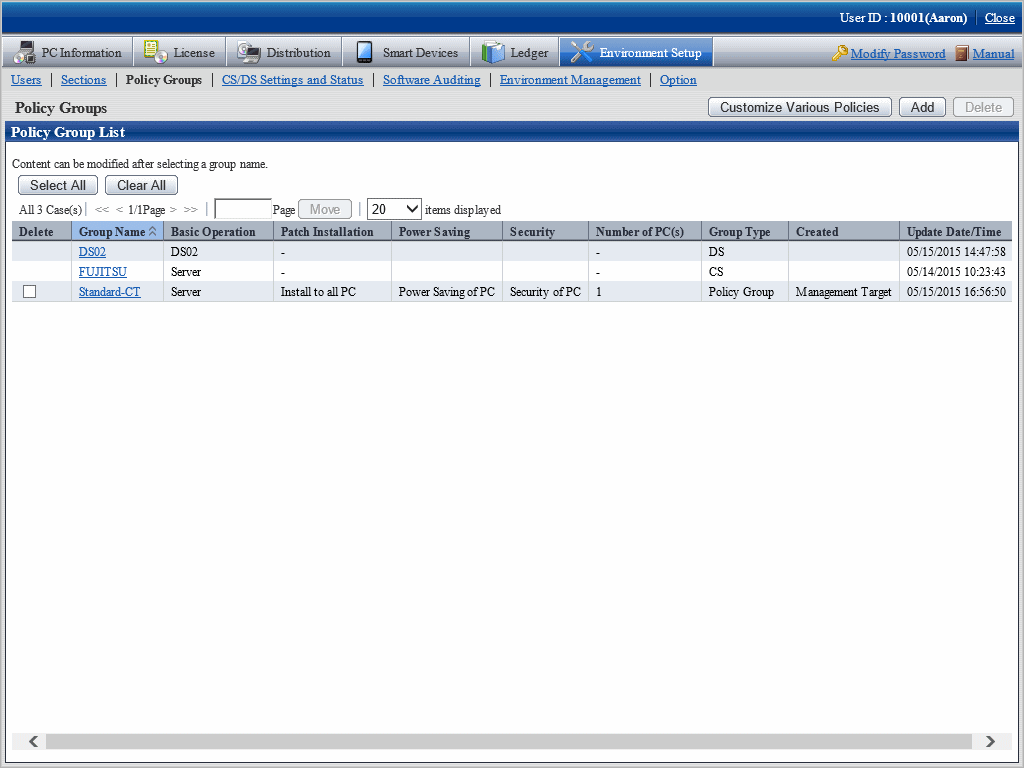
Click the Customize various policies button.
The following window is displayed.
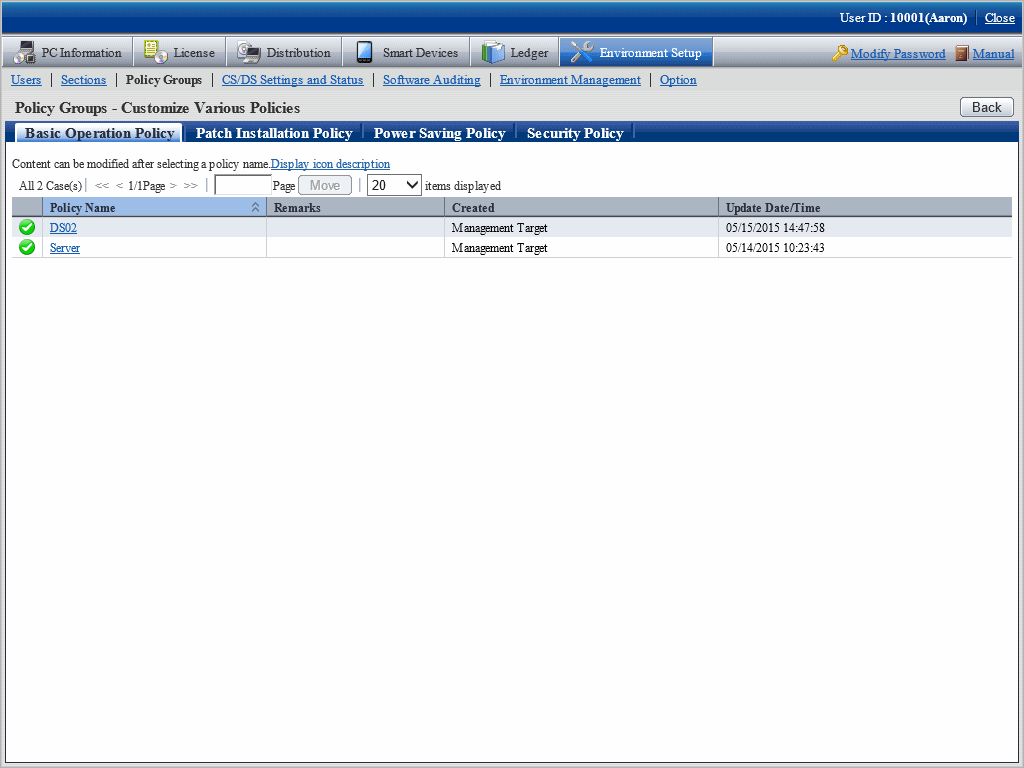
The meaning of each item in this window is shown as follows.
Item | Description |
|---|---|
Icon | It shows whether the group that uses the policy exists or not.
|
Policy Name | It shows the policy name. By clicking on the link, the policy content can be modified or copied, and the policy can be deleted. |
Remarks | The remarks for the policy are displayed. |
Created | The section that created the policy is displayed. When login with system administrator, all policy groups will be displayed. When login with section administrator, only the policy group created within the section will be displayed. |
Update Date/Time | The date and time when policy was updated is displayed. |
Click the following setting tab to be customized.
Basic Operation Policy
Patch Installation Policy
Power Saving Policy
Security Policy
For each window, refer to the following description.
Customize basic operation policy according to the following procedure.
Click the Basic operation policy tab in the Customize various policies window.
By clicking the link of policy name, the following window is displayed.
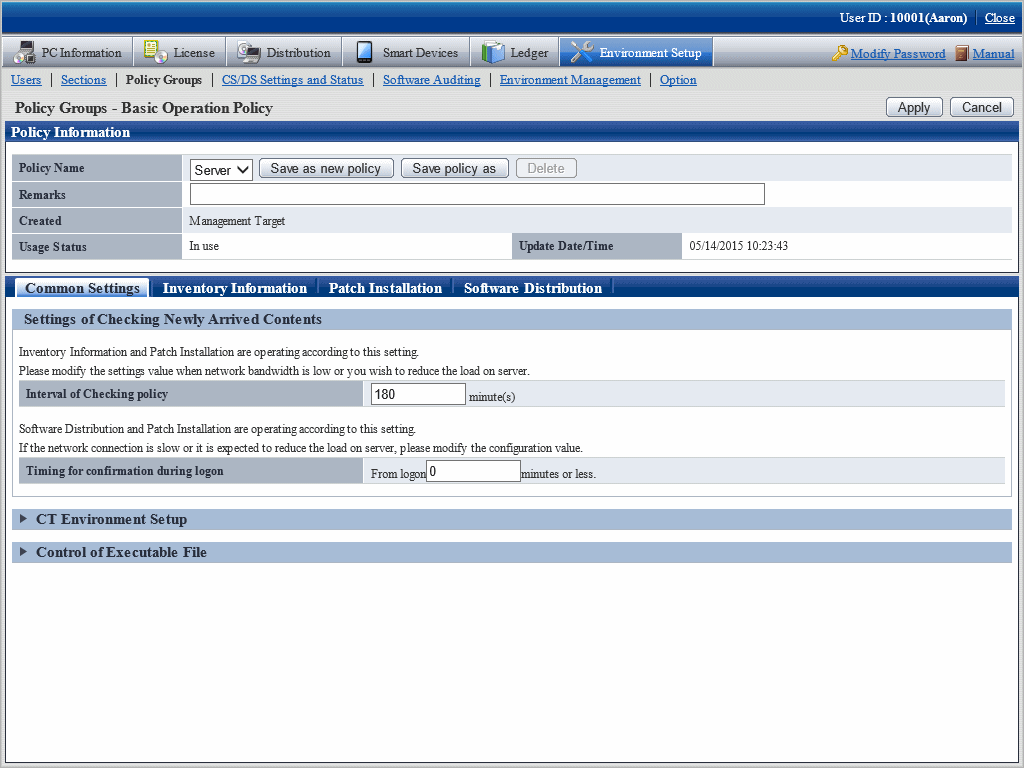
Enter the setting information.
Item | Description |
|---|---|
Policy Name | The policy name of various policies can be selected from the list. |
Save as new policy button | Register the content of various policies with new policy names. Up to 30 multi-byte characters or 60 single-byte characters can be entered in policy name. Characters can be specified are alphanumeric characters and the following single-byte symbols. ("-""@"".""("")""[""]""{""}""<"">"":"";") |
Save policy as button | Modify the selected policy name. Characters can be specified are the same as Save As. |
Delete button | Delete the policy selected from the list. After policy name has been deleted, the group that uses policy previously will be in the status of not using policy. In addition, if no policy name exists in the various policies, the Delete button will be disabled. |
Remarks | Enter the remarks. Up to 128 multi-byte characters and 256 single-byte characters can be entered. |
Set the following items.
Common Settings tab
Perform the following common settings for inventory information collection and installation of security patches.
Item | Description |
|---|---|
Interval of Checking policy | Set the time interval to perform confirmation of newly arrived information when client PC is connected to the higher server in minutes. Specify a value within 30~1440. The inventory collection function and automatic patch installation function run according to this setting. When the bandwidth of network circuit is small and it is expected to reduce the server load, modify this setting value. When the initial value is 180 minutes. The initial timing of newly arrival confirmation is distributed as the maximum value of this value. |
Timing for confirmation during logon | Specify the maximum time from logon to Windows till the newly arrival confirmation in minutes. Specify a value within 0~180. When a value except 0 is specified, the actual time from logon to Windows till the newly arrival confirmation is a random number between 0 and the maximum time. The initial value is 0 minute. |
Inventory Information tab
Perform settings related to the collection of inventory information. For details, refer to "Chapter 3 View PC Information".
Patch Installation tab
Perform the settings related to the installation of security patches. For details, refer to "Chapter 6 Distribute/Install Security Patches".
Software Distribution tab
Perform settings related to software distribution. For details, refer to "Chapter 8 Distribute Software".
Click the Apply button, save the settings.
Common setting window at version update from V13
After version update from V13, the following items will be displayed in Basic Operation Policy > Common Settings tab.
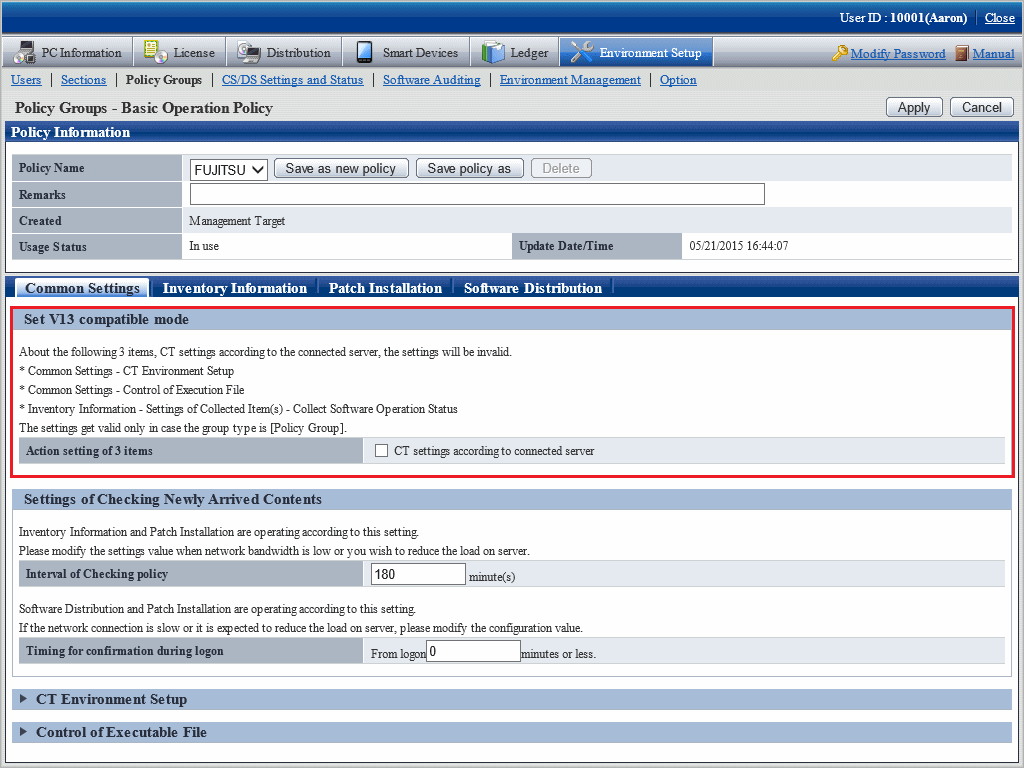
Set V13 compatible mode
Item | Description |
|---|---|
Action setting of 3 Items | When the check box is selected, the setting of following three items will follow the setting of server connected with the CT, and the specification in policy group will be invalid.
This setting is effective only when the group type is "Policy Group". |
The security patch installed to particular PC is selected, set the patch to be installed.
The procedure is as follows.
In the Customize various policies window, click the Patch Installation policy tab.
Click the link of policy name, the following window is displayed.
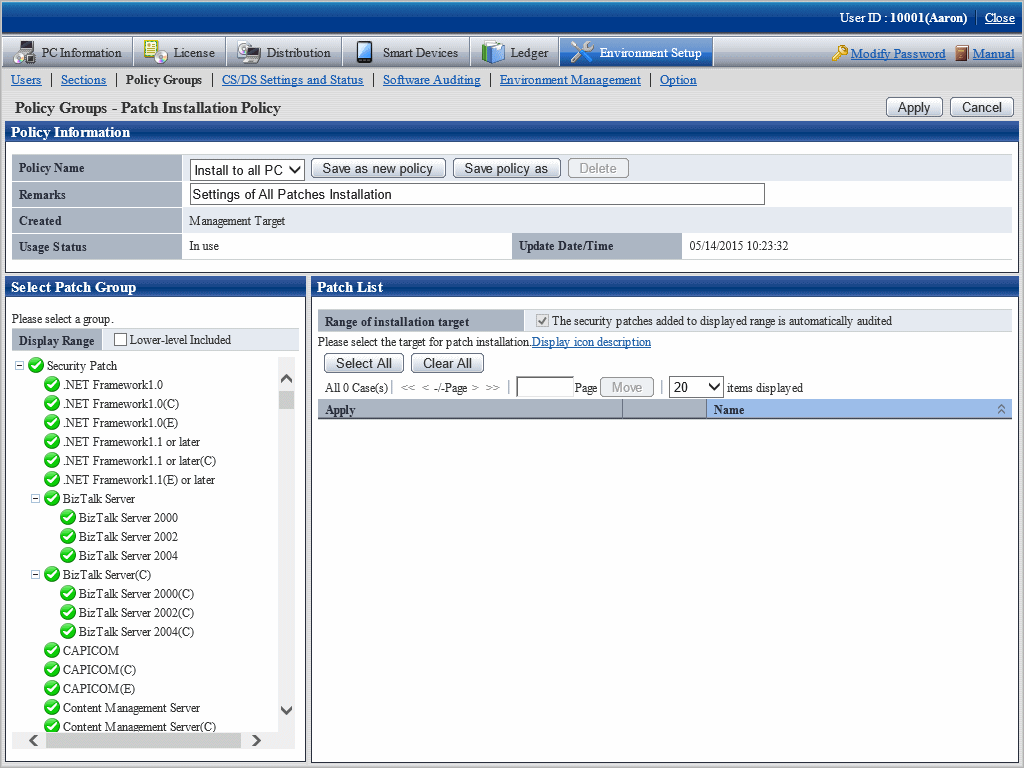
Enter the setting information.
Item | Description |
|---|---|
Policy Name | The policy name of various policies can be selected from the list. |
Save as new policy button | Register the content of various policies with new policy names. Up to 30 multi-byte characters or 60 single-byte characters can be entered in policy name. Characters can be specified are alphanumeric characters and the following single-byte symbols. ("-""@"".""("")""[""]""{""}""<"">"":"";") |
Save Policy as button | Modify the selected policy name. Characters can be specified are the same as Save As. |
Delete button | Delete the policy selected from the list. After policy name has been deleted, the group that uses policy previously will be in the status of not using policy. In addition, if no policy name exists in the various policies, the Delete button will be disabled. |
Remarks | Enter the remarks. Up to 128 multi-byte characters and 256 single-byte characters can be entered. |
Set the security patch to be installed.
For details on the setting method, refer to "6.2.3 Select Security Patches to be Installed to Specific PC".
Click the Apply button, and save the settings.
Customize the power saving settings.
The procedure is as follows.
In the Customize various policies window, click the Power Saving Policy tab.
Click the link of policy name, the following window is displayed.
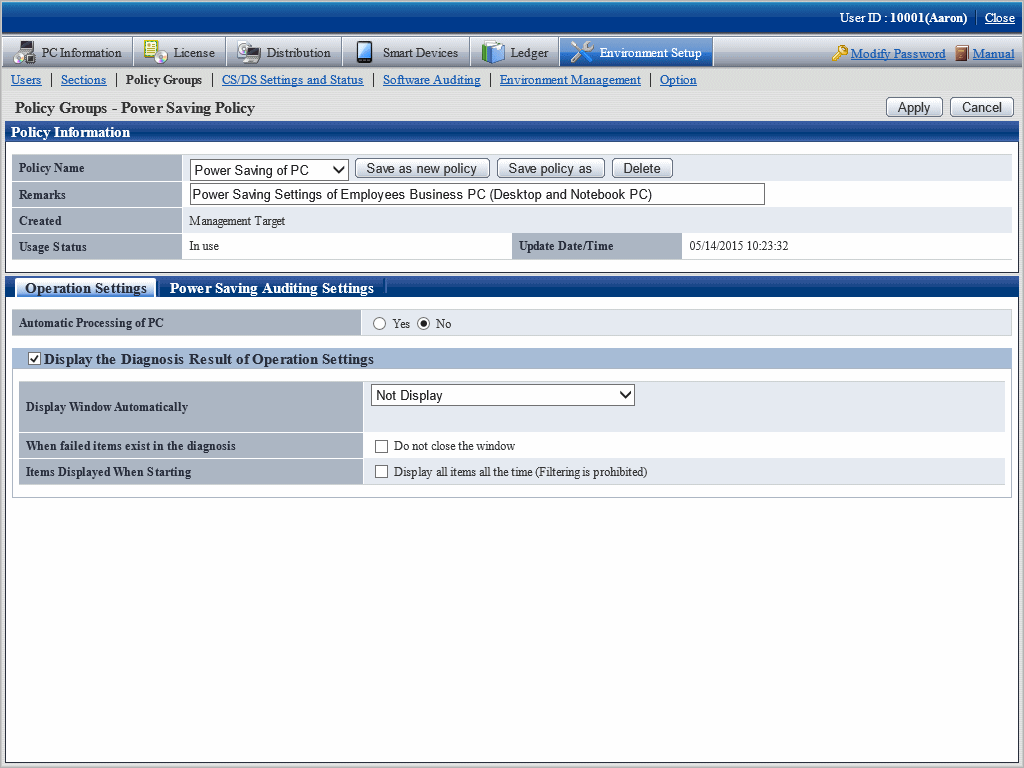
Enter the setting information.
Item | Description |
|---|---|
Policy Name | The policy name of various policies can be selected from the list. |
Save as new policy button | Register the content of various policies with new policy names. Up to 30 multi-byte characters or 60 single-byte characters can be entered in policy name. Characters can be specified are alphanumeric characters and the following single-byte symbols. ("-""@"".""("")""[""]""{""}""<"">"":"";") |
Save policy as button | Modify the selected policy name. Characters can be specified are the same as Save As. |
Delete button | Delete the policy selected from the list. After policy name has been deleted, the group that uses policy previously will be in the status of not using policy. In addition, if no policy name exists in the various policies, the Delete button will be disabled. |
Remarks | Enter the remarks. Up to 128 multi-byte characters and 256 single-byte characters can be entered. |
Set monitoring items.
For details on the setting method, refer to "Chapter 4 Audit/Control PC Operational Configuration".
Click the Apply button, and save the settings.
Customize security policy.
The procedure is as follows.
In the Customize various policies window, click the Security Policy tab.
Click the link of policy name, the following window is displayed.
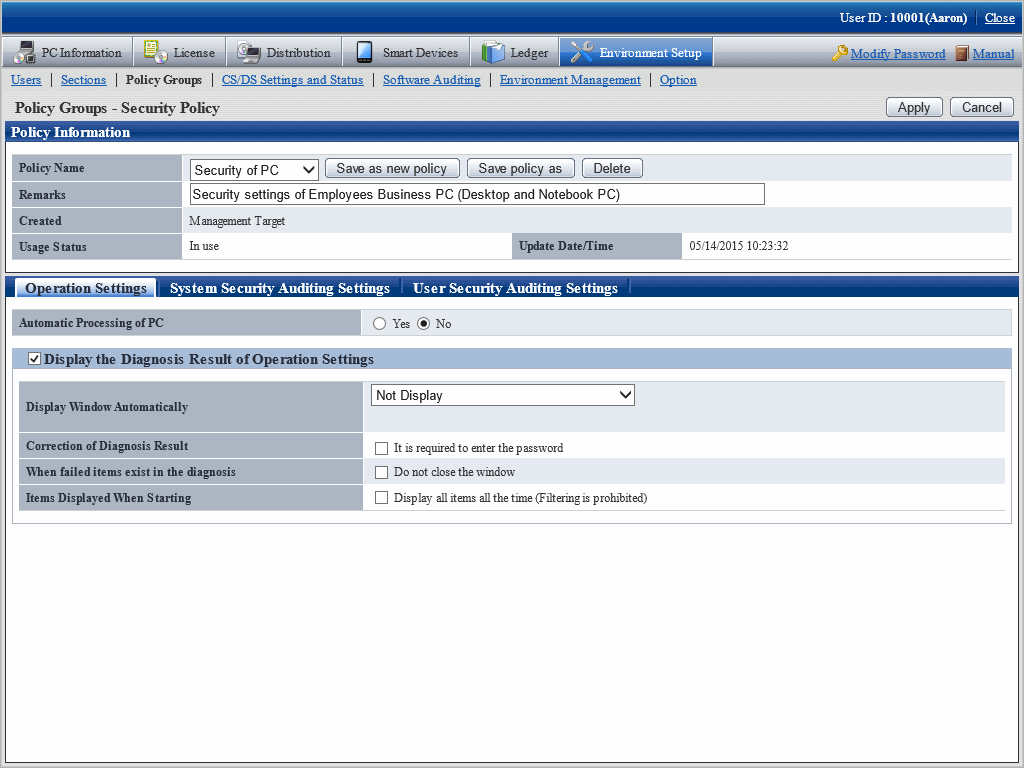
Enter the setting information.
Item | Description |
|---|---|
Policy Name | The policy name of various policies can be selected from the list. |
Save as new policy button | Register the content of various policies with new policy names. Up to 30 multi-byte characters or 60 single-byte characters can be entered in policy name. Characters can be specified are alphanumeric characters and the following single-byte symbols. ("-""@"".""("")""[""]""{""}""<"">"":"";") |
Save policy as button | Modify the selected policy name. Characters can be specified are the same as Save As. |
Delete button | Delete the policy selected from the list. After policy name has been deleted, the group that uses policy previously will be in the status of not using policy. In addition, if no policy name exists in the various policies, the Delete button will be disabled. |
Remarks | Enter the remarks. Up to 128 multi-byte characters and 256 single-byte characters can be entered. |
Set monitoring items.
For details on the setting method, refer to "Chapter 4 Audit/Control PC Operational Configuration".
Click the Apply button, and save the settings.