The platform providers who manage platforms mainly perform the management of services.
This section explains how to add, modify, delete, and confirm services.
This section explains how to add services.
Go to the [Platform Management] menu in the [Home] window and click the [To the list] link. Alternatively, select the [Platforms] navigation tab.
The [Platform List] window is displayed.
Click the name of the target platform for the addition of a service.
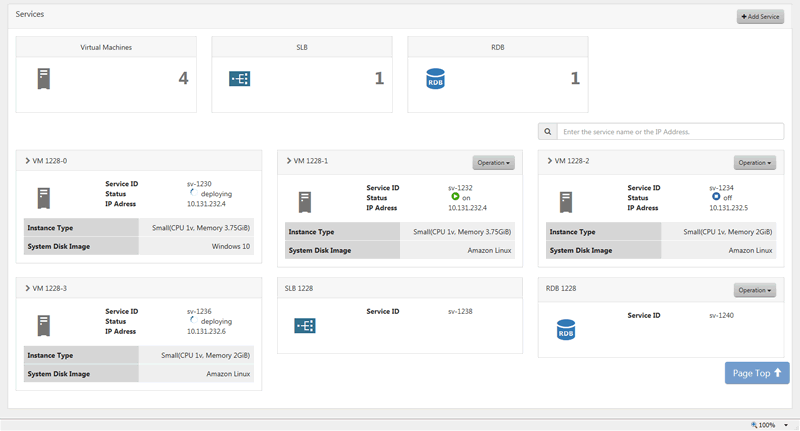
The [Platform Details] window is displayed. Click the [Add Service] button displayed in [Services].
Figure 4.10 Platform Details Window - Services
Note
The addition of a service to a platform under a project which has exceeded its limit of usage charges is not possible. In addition, the [Add Service] button is not displayed.
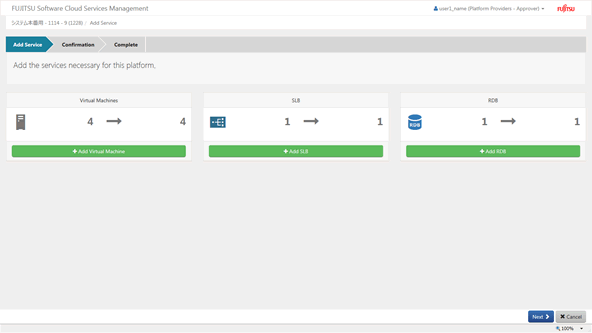
The [Add Service] window is displayed. Specify the details using the wizard. Click the [Next] button to proceed. Clicking the [Cancel] button discards all of the entries.
Add Service
Select the type of service to be added and click the [Add] button, the information fields required for the addition of the corresponding service are displayed. Each time the [Add] button is clicked, information fields for a new service are displayed, allowing for multiple services to be added at once. To cancel an addition, click the cross button above an entry field to remove the entry field.
For SLBs and RDBs, addition is only supported for the platforms created from menus with configuration options which include SLB or RDB (a menu created from an AWS subscription).
Note
The number of virtual machine that can be added in one addition operation can be limited to one depending by the menu linked to the platform. Confirm the restrictions for each menu with the [Menu Details] window displayed when clicking the [Menus] link in the [Platform Details] window. If services are added which exceed the limit of a menu, the request is rejected by the operators.
Specify the following items:
Item | Entry |
|---|---|
Service Name (Required) | Specify the service name. Any UTF-8 format character string up to 64 characters in length, excluding control characters such as line feeds, can be specified. |
Service ID (Required) | Specify the service ID. This item can only be specified during addition and cannot be modified. Do not specify a service ID which has already been added. A character string 3 to 15 characters in length containing lower-case alphanumeric characters and hyphens ("-") can be specified. The first character must be a lower-case alphabetic character, the final character must be a lower-case alphanumeric character. The service ID is used as name of the virtual machine on the cloud service integrated with Cloud Services Management. |
Instance Type (Required) | Select from the list box if several options exist. |
System Disk Image (Required) | Select from the list box if several options exist. |
Type of Additional Data Disk | Select from the list box. |
Number of Additional Data Disks | Only displayed if an additional data disks are specified. Specify using a numeral from 0 to 99999999. |
Note
When additional disks are included in the image of a virtual machine
Specify the number of additional data disks including the number of additional data disks in the image.
When adding the first virtual machine under a platform in ROR
It is necessary to specify the number of additional data disks defined in the L-Platform template for [Number of Additional Data Disks].
When the value is different from the value defined in the L-Platform template, an error occurs.
If you want to modify the number of additional data disks, first add the first virtual machine, and then specify [Number of Additional Data Disks] by modifying the service.
When adding the second or later virtual machines under a platform in ROR
After confirming that the first virtual machine has been added to the cloud, add the second and later virtual machines.
When adding multiple virtual machines at the same time, if virtual machines are added before the L-Platform is created, the addition may fail.
Specify the following items:
Item | Entry |
|---|---|
Service Name (Required) | Specify the service name. Any UTF-8 format character string up to 64 characters in length, excluding control characters such as line feeds, can be specified. |
Service ID (Required) | Specify the service ID. This item can only be specified during addition and cannot be modified. Do not specify a service ID which has already been added. A character string 3 to 15 characters in length containing lower-case alphanumeric characters and hyphens ("-") can be specified. The first character must be a lower-case alphabetic character, the final character must be a lower-case alphanumeric character. |
Figure 4.11 Add Service Window
Confirmation
The Confirmation window for the additional services is displayed. This window shows entries and estimated charges for the monthly usage of the additional services. To correct any incorrect entries, go back to the previous windows for entry using the [Prev] button and make any necessary corrections. Check the box to the left of [Agree] in the user agreement and click the [Request] button on the lower right.
Note
When adding a service would cause usage charges to exceed [Limit] of the selected project, a warning message is displayed.
Even if a warning message is displayed, it is still possible to add the service. However, the available functions are restricted when [Limit] is exceeded.
Consider increasing the [Limit] of charges and then adding the service.
Complete
Click the [Complete] button. The request is indicated as waiting processing, and a request for approval email is automatically sent to the approvers.
Point
If a user agreement is not specified for the menu linked to the platform, the [Agree] check box is not displayed and the check is not necessary.
This section explains how to modify services.
Note
The modification of a service is reflected after the final approval of the request has been granted, and the processing on the integrated cloud has finished.
For AWS, ROR, and VMware, the relevant virtual machine must be stopped once the request for modification is approved by an operator approver. If the virtual machine is running, the service is not modified and an error message is sent to the address specified during setup. When modifying a virtual machine, perform one of the following operations:
Before a virtual machine is modified, stop the virtual machine and do not star the virtual machine again until the modification of the service has completed.
Coordinate with the operators regarding the timing of the modification of the virtual machine before performing the modification. Stop the service by the predetermined time and do not start the services again until modification has been completed.
However, it is not necessary to stop a virtual machine when changing the virtual machine name.
For Azure and K5, a service can be modified even if it is running or stopped. After modification, the status of a service is the same as its status before modification.
Go to the [Platform Management] menu in the [Home] window and click the [To the list] link. Alternatively, select the [Platforms] navigation tab.
The [Platform List] window is displayed.
Click the name of the platform on which services are to be modified.
The [Platform Details] window is displayed. Here, select [Modify] from the [Operation] pull-down menu located next to the name of the target service.
The [Modify Service] window is displayed. The following items can be modified:
Virtual machine modification
Service name
Instance type
Type of Additional Data Disk
Number of Additional Data Disks
SLB/RDB modification
Service name
Note
"Type of Additional Data Disk" can only be modified from "None" once. Only one type of disk can be specified for each virtual machine. Even if the number of additional data disks is modified to "0", the specified types of additional data disks is retained.
When deleting additional data disks, note the following:
For AWS, additional data disks are deleted in reverse order of the disk number of the OS (for Windows) or the name of the block device (for Linux).
For Azure, additional data disks are deleted in descending order of LUN (logical unit number). The order of LUN may not be identical to the order of the devices on the OS. Delete additional data disks after confirming the correspondence relation between the LUN and the devices using OS commands, etc.
In the other cases, additional data disks are deleted according to the device name in descending order.
When collecting snapshots, note the following points:
For K5, when the additional data disks to be deleted are included in a snapshot, the number of additional data disks cannot be decreased.
In addition, when the usage charges have already exceeded [Limit] configured in the project, modification of instance types and attachment of additional data disks are not possible.
Clicking the [Next] button displays the [Confirmation] window. To correct any incorrect entries, go back to the previous windows for entry using the [Prev] button and make any necessary corrections.
Click the [Request] button. The request is indicated as waiting processing, and a request for approval email is automatically sent to the approvers.
This section explains how to delete services.
Go to the [Platform Management] menu in the [Home] window and click the [To the list] link. Alternatively, select the [Platforms] navigation tab.
The [Platform List] window is displayed.
Click the name of the platform on which services are to be deleted.
The [Platform Details] window is displayed. Select [Delete] from the [Operation] pull-down menu located next to name of the target service.
Clicking the [Yes] button on the lower right in the displayed [Confirmation] window causes the request to be indicated as waiting processing, and a request for approval email is automatically sent to the approvers.
Note
For AWS and K5, the snapshots of the service to be deleted are also deleted.
Even the service is running, the snapshots can be deleted.
This section explains how to confirm added services.
Go to the [Platform Management] menu in the [Home] window and click the [To the list] link. Alternatively, select the [Platforms] navigation tab.
The [Platform List] window is displayed.
Click the name of the platform on which services are to be confirmed.
The [Platform Details] window is displayed. The services that are currently available are shown in the [Services] area of the [Platform Details] window. Services which are waiting processing are not displayed.
The operational status of each service can be confirmed.
Figure 4.12 Platform Details Window - Services
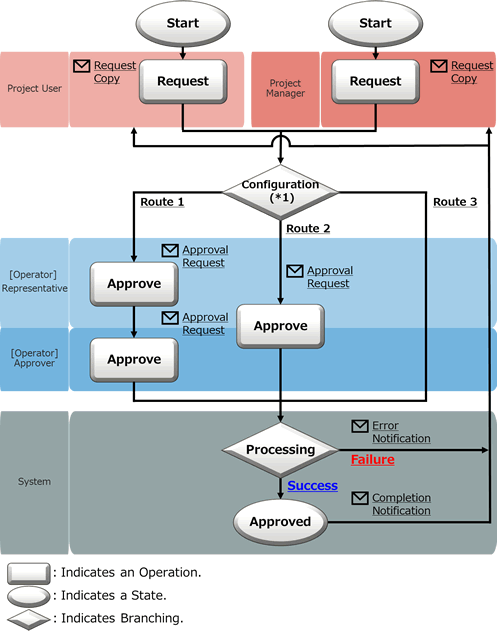
For addition, modification, and deletion of a service, approval by each department is required.
The approval flow of services, in the same way as for addition, modification, and deletion operations targeting platforms, varies according to [Approval Level], and is configured in the linked menu.
When [Approval Level] is specified, the approval flow is as described below.
Figure 4.13 The Service Approval Flow (for Project Users, with the Level Specified)
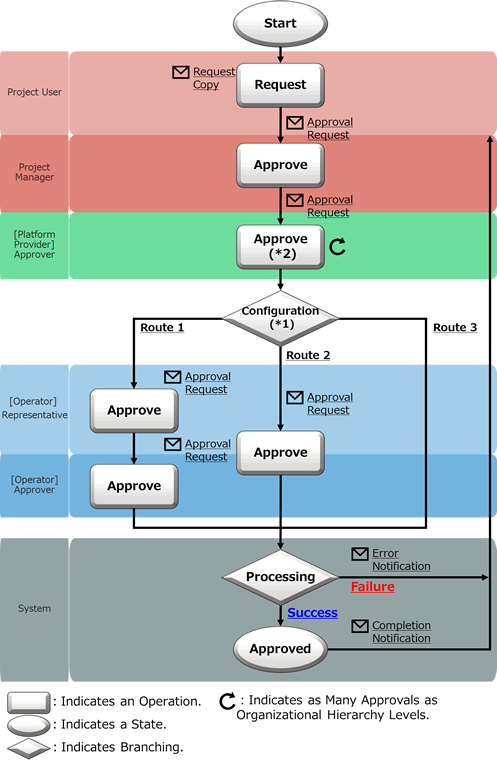
*1: The approval flow is defined according to the settings performed by the operators. Contact the operators.
*2: The approver is a user who has the approver role of the organization linked with the accounting code added to the project information.
In [Operation] in the diagram above, not only approval, but also rejection and cancellation operations can be performed. For details on operations and statuses of requests, refer to "Figure 5.1 Changes in Request Status".
Figure 4.14 The Service Approval Flow (for Project Managers, with the Level Specified)
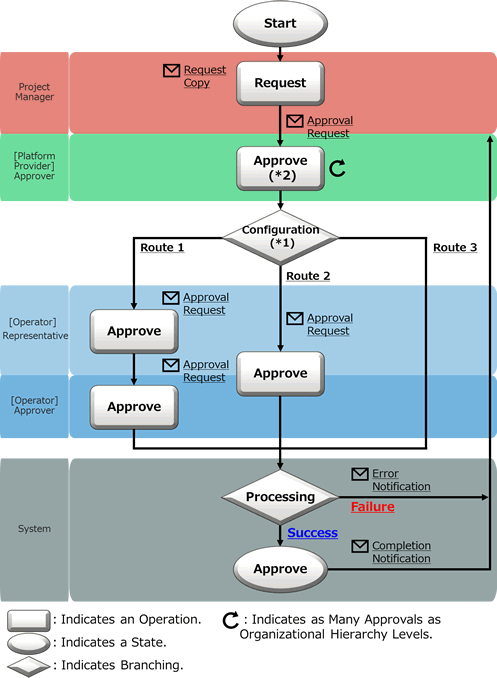
*1: The approval flow is defined according to the settings performed by the operators. Contact the operators.
*2: The approver is a user who has the approver role of the organization linked with the accounting code added to the project information.
In [Operation] in the diagram above, not only approval, but also rejection and cancellation operations can be performed. For details on operations and statuses of requests, refer to "Figure 5.1 Changes in Request Status".
First, approval is granted at the level of the project belonging to the platform. When the user who performs addition, modification, and deletion has the role of project user, approval must be granted by the project manager of the project to which the platform belongs ("Figure 4.13 The Service Approval Flow (for Project Users, with the Level Specified)").
When the operating user is a project manager, approval is not necessary ("Figure 4.14 The Service Approval Flow (for Project Managers, with the Level Specified)").
Next, approval is granted by the organization linked with the accounting code of the project. In the project, the accounting code to manage the payment type of usage charges of the platforms under the project is added. This accounting code links the project to a specific organization and approval is granted by this organization. Next, approval is granted on each level, depending on the level specified in the menu (such as approval by department or division). When there is no organization linked with an accounting code, approval by the organization is skipped.
Last, approval is granted by the operators. The approval flow of operators is a route configured in the system based on the operation environment.
After approval on all levels, addition, modification, and deletion are executed.
Service operations and charge calculations will be performed after all the approvals have been granted and the service becomes available.
When "No Approval" is specified for the approval level of the linked menu, the flow is as described below.
Figure 4.15 The Service Approval Flow (No Approval)
*1: The approval flow is defined according to the settings performed by the operators. Contact the operators.
In [Operation] in the diagram above, not only approval, but also rejection and cancellation operations can be performed. For details on operations related to and statuses of requests, refer to "Figure 5.1 Changes in Request Status".
When the approval level of the menu is "No Approval", the approval at the level of the project to which the user belongs, and the organization linked with the accounting code is not necessary.
After approval is granted by the operators, addition, modification, and deletion are executed.
Information
When addition, modification, and deletion are performed by an administrator user, regardless of the menu settings, addition, modification, and deletion are executed without the need for approval.
Email Notifications Related to Approvals
After a request is submitted or intermediate approval is granted, a request for approval email is sent to all subsequent approvers in the approval flow.
In addition, a notification email with a copy of the request is sent to the user who performs the operation.
After the final approval is granted, the approval completion notification email is sent, and the details of the addition or modification are reflected on the integrated cloud. When the reflection fails for some reason, an error notification email is sent to the requester (TO) and the request operator (CC).
Confirmation of Request Statuses
To confirm the approval statuses and details of requests for addition, modification, and deletion, view the [Request Management] window.
For details on how to perform the main operations in the [Request Management] window, refer to "Chapter 5 Request Management".
Using Services
After the final approval of the request for addition of a service is granted and the service is deployed on a cloud, in addition to a notification of approval completion, a notification of completion of deployment email and an email containing details of the service are sent to the requester.
Use the information described in the deployment completion email to access the virtual machine. For details on the types of deployment completion emails, refer to "Table 4.1 Types and Destinations of Completion Notifications".