The Restricted Connections list displays IP addresses and host names of computers that can connect to a session that a Support Specialist has created. To modify entries in this list, click the Add, Edit or Delete buttons on the TCP/IP Setup dialog box.
Adding Entries
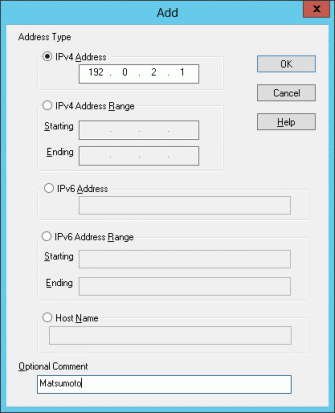
To add entries to the Restricted Connections List, click the Add button. The Add dialog box will display. This dialog box contains three radio buttons that allow you to select the type of entry to add to the list.

IPv4 Address![]() Selecting this radio button permits you to enter the IPv4 address of a single workstation that can join the session. The address is entered in the format ###.###.###.### and is validated for correctness when the OK button is pressed.
Selecting this radio button permits you to enter the IPv4 address of a single workstation that can join the session. The address is entered in the format ###.###.###.### and is validated for correctness when the OK button is pressed.
IPv4 Address Range![]() Selecting this radio button permits you to enter a range of IPv4 addresses that can join the session. This option is particularly useful when, for example, all workstations that might join a created session are located on a single subnet of the network. The addresses are entered in the format ###.###.###.### and are validated for correctness when the OK button is pressed.
Selecting this radio button permits you to enter a range of IPv4 addresses that can join the session. This option is particularly useful when, for example, all workstations that might join a created session are located on a single subnet of the network. The addresses are entered in the format ###.###.###.### and are validated for correctness when the OK button is pressed.
IPv6 Address![]() Selecting this radio button permits you to enter the IPv6 address of a single workstation that can join the session. The address is entered in the RFC5952 format and is validated for correctness when the OK button is pressed.
Selecting this radio button permits you to enter the IPv6 address of a single workstation that can join the session. The address is entered in the RFC5952 format and is validated for correctness when the OK button is pressed.
IPv6 Address Range![]() Selecting this radio button permits you to enter a range of IPv6 addresses that can join the session. This option is particularly useful when, for example, all workstations that might join a created session are located on a single subnet of the network. The addresses are entered in the RFC5952 format and are validated for correctness when the OK button is pressed.
Selecting this radio button permits you to enter a range of IPv6 addresses that can join the session. This option is particularly useful when, for example, all workstations that might join a created session are located on a single subnet of the network. The addresses are entered in the RFC5952 format and are validated for correctness when the OK button is pressed.
Host Name![]() Selecting this radio button permits you to enter the host name of a computer that can join the session. This name must be any of the followings:
Selecting this radio button permits you to enter the host name of a computer that can join the session. This name must be any of the followings:
The host name written in the hosts file if there is the entry for the computer in the hosts file.
The host name of the computer registered on a DNS name server if there is no entry for the computer in the hosts file. (You can check the host name registered on a DNS name server by using NSLOOKUP command of Windows(R))
NetBIOS name (the name displayed as "Unique[00]" when you run NBTSTAT command) of the computer if the computer is not registered on either hosts file or a DNS name server.
Note
You must specify exactly the same name as the name written in the hosts file or displayed by NSLOOKUP/NBTSTAT command in the Restricted Connections List. A computer with a fully qualified host name (e.g. jsmith.fujitsu.com) cannot connect to your support session if you specify a simple host name (e.g. jsmith) in the Restricted Connections List.
When the IP address of Live Help Expert is changed in the NAT environment, the IP address to specify should specify the physical IP address of Live Help Expert.
Wildcards are also allowed. So, for example, if you wish to allow all workstations located on the Fujitsu domain to join the session, you could add *.fujitsu.com as the host name.
The Optional Comment text box can be used to enter a descriptive comment for that particular entry.
After you have supplied an IP address, range of addresses or host name, you can add the entry to your list by pressing the OK button. Pressing the Cancel button would cancel the dialog box without adding anything to your list.
Editing Entries
To edit entries in the Restricted Connections List, select the entry and press the Edit button. You can also edit an entry by double clicking on it in the Address column. The Edit dialog box will display. This dialog box is identical to the Add dialog box with the exception that the IP address, range of addresses or host name fields are filled in with the information from the selected entry.
Make any desired changes to the entry and press the OK button to save the changes. Press the Cancel button to discard any changes that were made.
Deleting Entries
To delete entries in the Restricted Connections List, select the entry that you wish to remove and press the Delete button. A message box will display requesting confirmation of the delete action.