Choose any or all of the network related choices to enable Local Area Network (LAN) and Wide Area Network (WAN) support. The choices are:
Support Centers: To use this option, Live Help CM application is required. Refer to Live Help Connection Manager for information about configuring a Live Help CM application.
If you need to establish Live Help sessions over the Internet through firewalls, you need a computer on which Live Help Connect application is installed instead of Live Help CM application. Refer to the Live Help Connect Administrator's Guide for information about configuring a Live Help Connect computer.
TCP/IP Direct Connect: You will type the Client's TCP/IP address to make a connection to the Client. (Neither a Live Help CM application nor a Live Help Connect computer is required)
Note
If all network fields are empty, you cannot participate in support sessions using a network protocol. This is acceptable if you want to only use a modem during sessions.
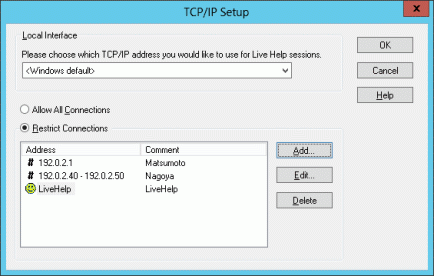
Clicking the TCP/IP Setup button in the Communications Setup dialog box displays the following TCP/IP Setup dialog box:

This allows you to configure two settings. These are:
Local Interface
If your system has multiple network cards with TCP/IP support installed, Live Help detects the cards and allows you to select the TCP/IP address to use for Live Help session communications. Use the pulldown list and select the IP address to use for Live Help sessions. Select "Windows default" to let the Windows(R) system select an appropriate network adapter.
When an IPv6 address is displayed, the global unicast address is displayed if it has been assigned. A unique local unicast address is displayed if a global unicast address has not been assigned.
The following three types of settings are possible in an IPv4/IPv6 dual stack environment:
If waiting for only IPv4 connections, select the IPv4 address that waits for connections.
If waiting for only IPv6 connections, select the IPv6 address that waits for connections.
If waiting for both IPv4 and IPv6 connections, select the IPv4 and IPv6 address pair that waits for connections.
Note
If "Windows default" is selected when Support Specialist Sessions is used, Live Help will wait for connection requests for all network adapters.
Note that the IP address displayed in the Live Help Expert window that waits for connection will be one of the IP addresses set for the terminals on which Live Help Expert is installed.
Restricted Connections List![]() This security feature allows a Support Specialist to restrict access to sessions based on the IP address or host name of the computer attempting to join the session. By default, the Expert software is configured to allow all connections. To restrict access to any Live Help session that you create, select the Restrict Connections radio button. You will then need to configure which IP addresses or host names can have access to your machine.
This security feature allows a Support Specialist to restrict access to sessions based on the IP address or host name of the computer attempting to join the session. By default, the Expert software is configured to allow all connections. To restrict access to any Live Help session that you create, select the Restrict Connections radio button. You will then need to configure which IP addresses or host names can have access to your machine.
The Restricted Connections List contains IP addresses and host names of computers that are allowed to connect to a session that the Expert has created. The list contains two columns. The first column can contain an IP address, a range of IP addresses or a host name. The second column contains an optional comment for each entry in the list.
To help differentiate items in the list, a '#' icon is placed next to IP addresses or ranges of IP addresses. A face icon is placed next to host names in the list.
The list is sorted alphanumerically, first by IP address then by host name. The columns of the list box can be resized as necessary and scroll bars will display should the contents of an entry not fit in the list.
The Add, Edit and Delete buttons can be used to create, modify and remove entries in the list.
Note
The Restricted Connections List is valid only for TCP/IP Direct and Connection Manager sessions. Incoming connections through modems or a Live Help Connect Server will not be restricted by IP address or host name.
Pressing the OK button will save any changes made to either the Local Interface or Restricted Connections List. If you wish to discard any changes made to either the Local Interface or Restricted Connections List, press the Cancel button.