Because Live Help is so versatile, there is no set procedure for conducting a support session. The purpose of the session and the actions you have to take to resolve the problem will determine whether Live Help Expert or Live Help Monitor will be more appropriate and what features will be used.
Help Desk Personnel can participate in a session with a Client, or hold a session with other Specialists.
Live Help Monitor can be run multiple times and be used to observe several Clients at once.
A session begins once the computers running the Expert and Client software make an on-line connection. Live Help automatically starts Screen Transfers of the Client's screen contents to the Support Specialist. If the software is configured appropriately, the Specialist is automatically given Remote Control of the Client's computer. Normally a Specialist leaves these features active during the entire session.
The Support Specialist conducts the support session, using the Screen Sharing, Remote Control, File Transfer, and other facilities to assist the Client. The floating toolbar provides easy access to Live Help features. Once the problem is resolved, the Specialist can close the Live Help Client application on the Client's computer.
Multiple Help Desk Personnel can connect to a Client.
Additional Personnel can join the session at any time, to consult with a Specialist or escalate the problem to a higher level. When a new Support Specialist joins, he or she sees the Client's screen but does not have Remote Control. Only one Support Specialist at a time can use Remote Control. However any Specialist can take Remote Control just by clicking the Remote Control button.
These multi-personnel capabilities also allow help desk supervisors to supervise sessions.
Help Desk Personnel can also hold sessions with each other. The members run the Live Help Expert application, and in this case, a Client is not present.
Support Specialist sessions are a great way for help desk staff to work together in an on-line virtual meeting. For example you can brainstorm a problem, teach junior staff some troubleshooting techniques, review and edit technical support documents with the author, and take a look at a new application that the company will deploy to users desktops.
To establish a connection, one Support Specialist creates a session, and the others join. Once connected, the Specialists use Live Help tools to collaborate and conduct their on-line meeting.
Note
The ability to create sessions is only available in the Live Help Expert application. Live Help Monitor does not support this functionality. Refer to Live Help Monitor for more information.
To create a Support Specialist session, choose Create from the SESSION menu. The Create Session dialog box displays as shown below:
In the following example, we are using a network Support Center called "Accounting Help Desk" and have named the session "Sarah Norton." The Approve Connections check box is selected so the Support Specialist is notified when someone tries to join the session. You can change these fields to meet your requirements.
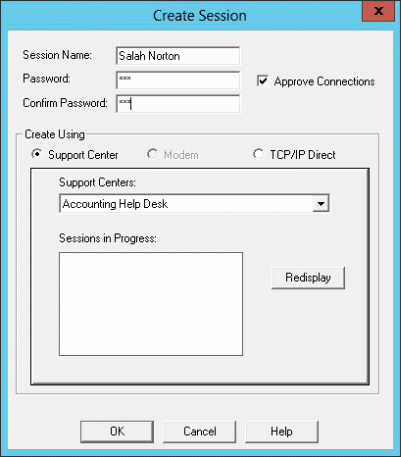
In the Create Using area, choose the connection method you want others to use to connect to your session. The choices are: Network Support Center, Modem, and TCP/IP Direct.
If you choose Support Center, select the appropriate Support Center and a list of other sessions in progress displays at the bottom of the dialog box for your reference. You must choose a unique name for your session. Click OK to create the session.
If you choose Modem, the modem you will use appears in a drop-down list box. You can select another modem if one has been configured in Windows(R). If both you and your colleague have DSVD modems, you can take advantage of the modem's concurrent voice and data capability. Just click OK.
If you choose TCP/IP Direct and click OK, Live Help creates the support session and uses your TCP/IP address as the session name.
To join a Support Specialist session, choose Join from the SESSION menu or click the Join button on the Live Help Expert toolbar. The Join a Session dialog box displays, and you choose the same connection method that was used when the session was created. Depending on the method, complete the fields accordingly. The Join a Session dialog box is explained in detail in the section Joining a support session in Take a Test Drive / Starting a Network Support Session.