This section describes how to set CS operating environment.
CT operation status log collected in CT is saved in CS.
To reduce the disk consumption, the saving target folder of CT operation status log will be performed the compressed folder settings automatically at CS installation.
The default settings of CT operation status log saving target of CS are as follows:
Desktop Patrol CS Installation Directory\FJSVsbinv\ct_trace
And for saving CT operation status log, the following disk capacity is required.
Size of CT Operation Status Log = 30KB * Number of Users * Number of days to save (Default: 30 Days)
The saving target of this CT operation status log can be modified by using SVPolicy.exe (server environment setup) command.
For command details, refer to Systemwalker Desktop Patrol Reference Manual.
To modify the saving target, set the compressed folder as follows.
Start the command prompt.
Start the following command.
compact.exe /c /s:<Saving Folder of CT Operation Status Log>
This section describes how to set CS operation log collection.
Refer to "CS Operation Log File" and "CS Operation Details Log File" in the Systemwalker Desktop Patrol Reference Manual for details on output log format.
Edit the definition file
When modifying the number of days to save and the output target for the log, edit the following definition file of CS.
Saving target: DTP Installation Directory\common\etc
Definition file name: dtpaudit
Field/Key Name | Description | Configuration Value |
|---|---|---|
AUDIT | Field name | - |
FUNCTION | Enable/disable CS operation log collection | Set either of the following. 0: collect 1: not collect (default) |
FUNCTION_DETAIL | Enable/disable CS operation details log collection | Specify one of the following: 0: Do not collect 1: Collect (default value) |
DATE | Number of days to save for the log | Set the following numbers. Default value: 30. 0: no limit for number of days 1-366: number of days When a value out of the range of 1-366 has been set, it will be the default value (30). *When updating the log file, log file in those days before the specified number of days, so delete the unnecessary log file manually. *After the number of days to save has been modified, logs before the number of days to save might be collected when collecting logs before updating log files. *If 0 is specified, log file will increase infinitely, delete unnecessary log file regularly. |
PATH | Log output target | Specify the log output folder with an absolute path using up to 100 fullwidth characters or 200 halfwidth characters. If not specified, the default is the folder under CS. DTP Installation Directory\common\dtpaudit *When an invalid path has been specified, it will be output to the default folder. *When the capacity of log output target folder is insufficient, auditing log cannot be output. |
Example for recording the definition file:
[AUDIT]
FUNCTION=1
FUNCTION_DETAIL=1
DATE=30
PATH=D:\auditlog
The following content can be set as server information.
Modify server name
"CS Name" set here will be used in the following window.
CS Name of Environment Setup > CS/DS Settings and Status of the main menu
CS Name of CT Downloading of the download menu
The procedure is as follows.
Enter the following URL in the Address bar of Web Browser.
http://Server Information (FQDN Name or Host Name or IP Address of CS)/DTP/index.html
The logon window is displayed.
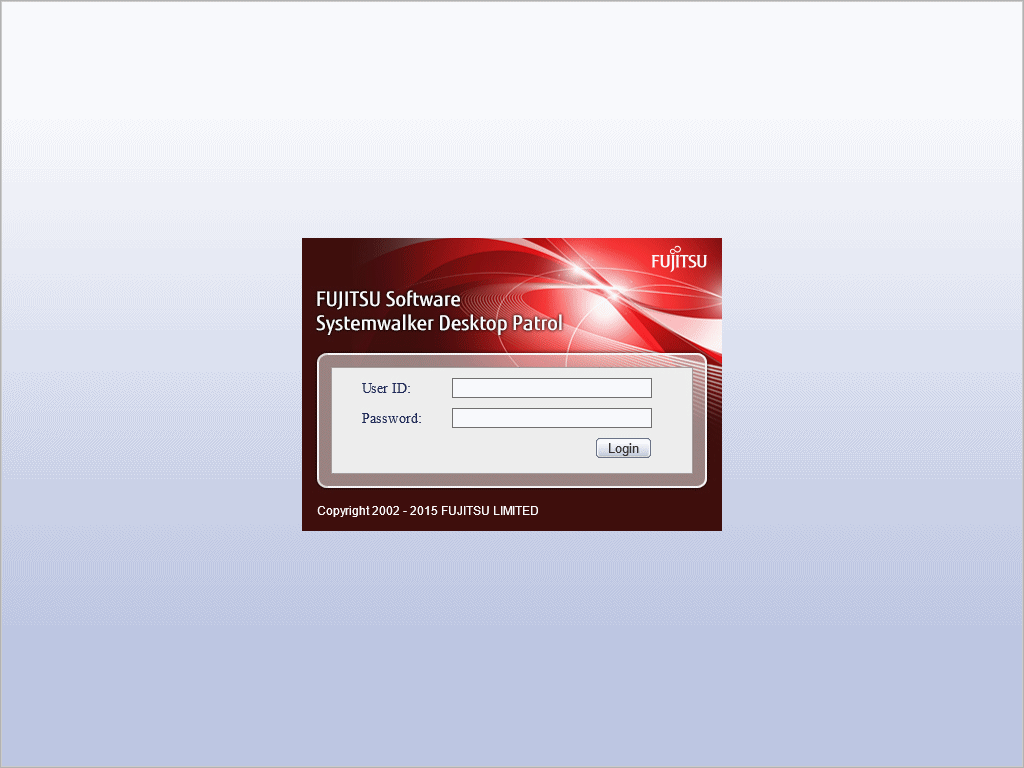
Enter the following information, and click the Login button.
User ID textbox
Password textbox
The main menu is displayed.
If standard installation was performed, the initial value for both user ID and password is "systemadmin". Refer to "2.3.2.1 Standard Installation" for details.
After the initial login, the password must be changed.
If custom installation was performed, the value specified in step 5 of "2.3.3 Construct Database" will be used.
The server information can also be set using the user ID of the system account in which the master data was registered after installation.
Click Environment Setup.
The Environment Setup window is displayed.
Click CS/DS Settings and Status.
The following window is displayed.
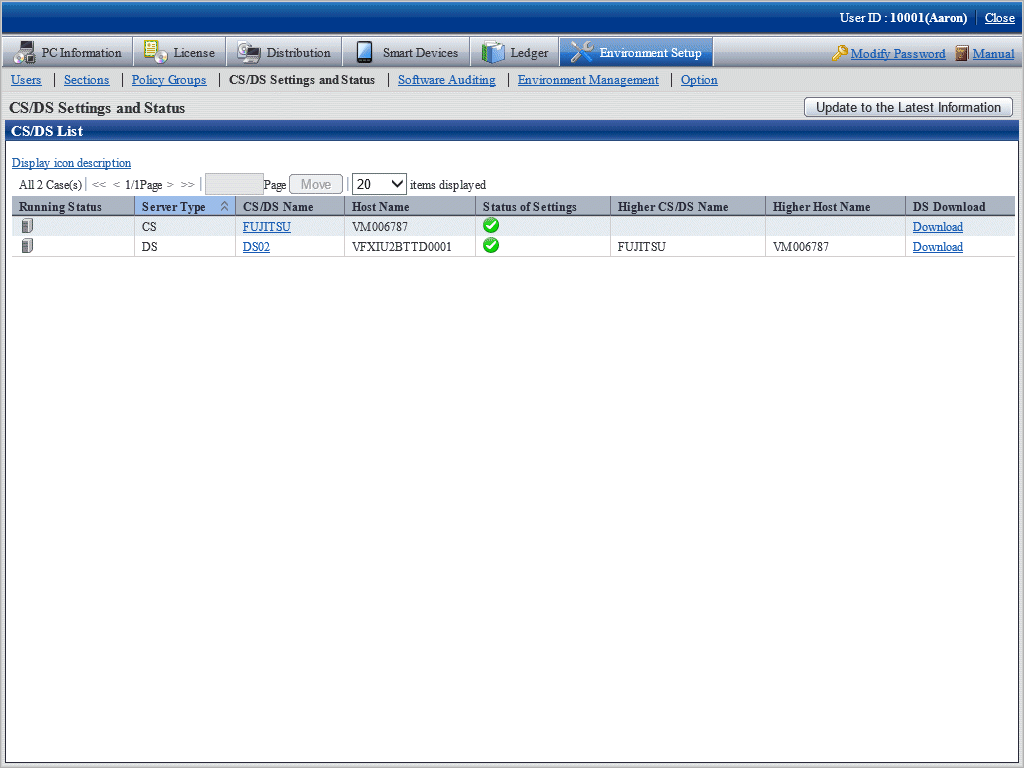
Click the link of CS/DS Name.
The following window is displayed.
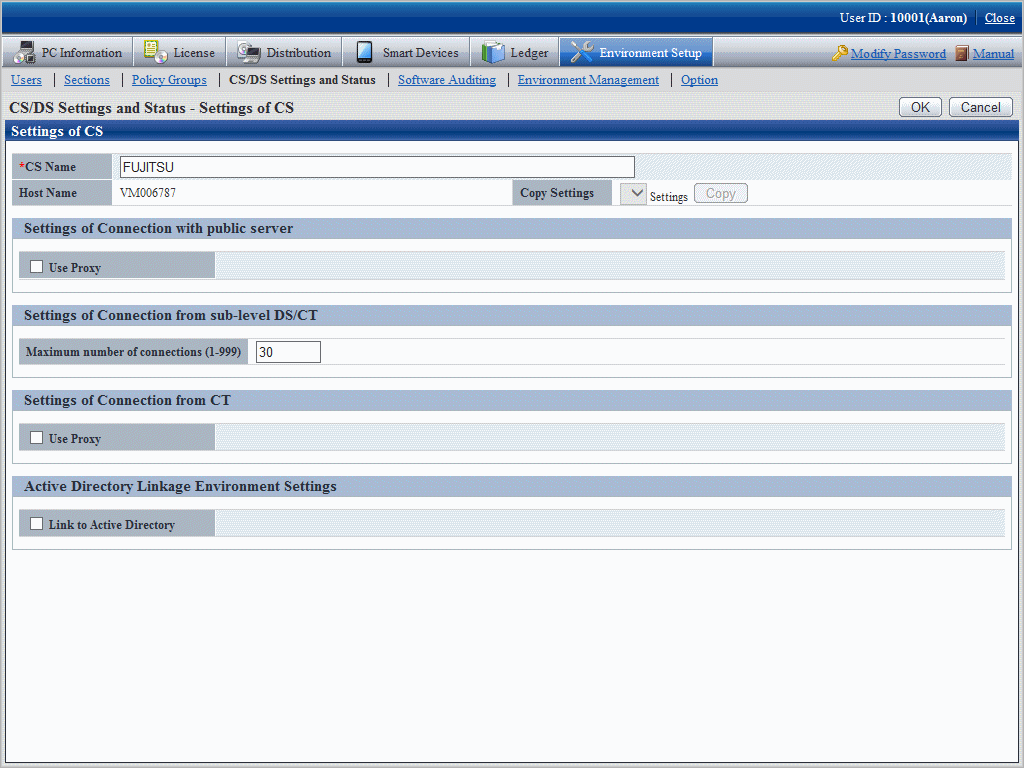
Set the following item.
Item | Content |
|---|---|
CS Name | Display the common name of CS to be installed. Specify CS name as characters within 50 characters included single-byte alphanumeric characters and special characters "-", "@", ".". Blank cannot be specified. Cannot be omitted. |
Click the OK button.
This section describes the settings performed when transmitting information from Systemwalker Desktop Patrol CS to downstream server or Systemwalker Desktop Patrol CT.
The transmitted information contains the following.
Registered Software
Security Patches
Client Policy/Server Properties
And as transmission settings, the following item can be set.
Number of simultaneously connected devices
The procedure is as follows.
Log on to the main menu and click Environment Setup.
The Environment Setup window is displayed.
Click CS/DS Settings and Status.
The following window is displayed.

Click the link of the CS/DS name.
The following window is displayed.

Enter the following item from the communication settings of the downstream DS/Client.
Item | Content |
|---|---|
Maximum number of connections(1-999) | Specify the total number of downstream DS/CT communicating simultaneously with CS/DS within 1-999. Default: 30, cannot be omitted. Set the following values according to the total number of the actually connected downstream server and client. 1000 or less: 30 2000 or less: 40 2000 above: 50 |
Click the OK button.
Proxy can be used when communicating with the public server of Microsoft Company.
Note
About proxy settings
The following proxy server is not allowed.
Software of other companies WEBGUARDIAN
And if the following settings have been performed, the proxy server cannot be used.
Windows authentication has been enabled in ISA Server
Proxy can be used when security patches are acquired from Microsoft Company to CS.
The procedure is as follows.
Log on to the main menu and click Environment Setup.
The Environment Setup window is displayed.
Click CS/DS Settings and Status.
The following window is displayed.

Click the link of CS/DS.Name
The following window is displayed.

Enter items of Settings of Connection with public server.
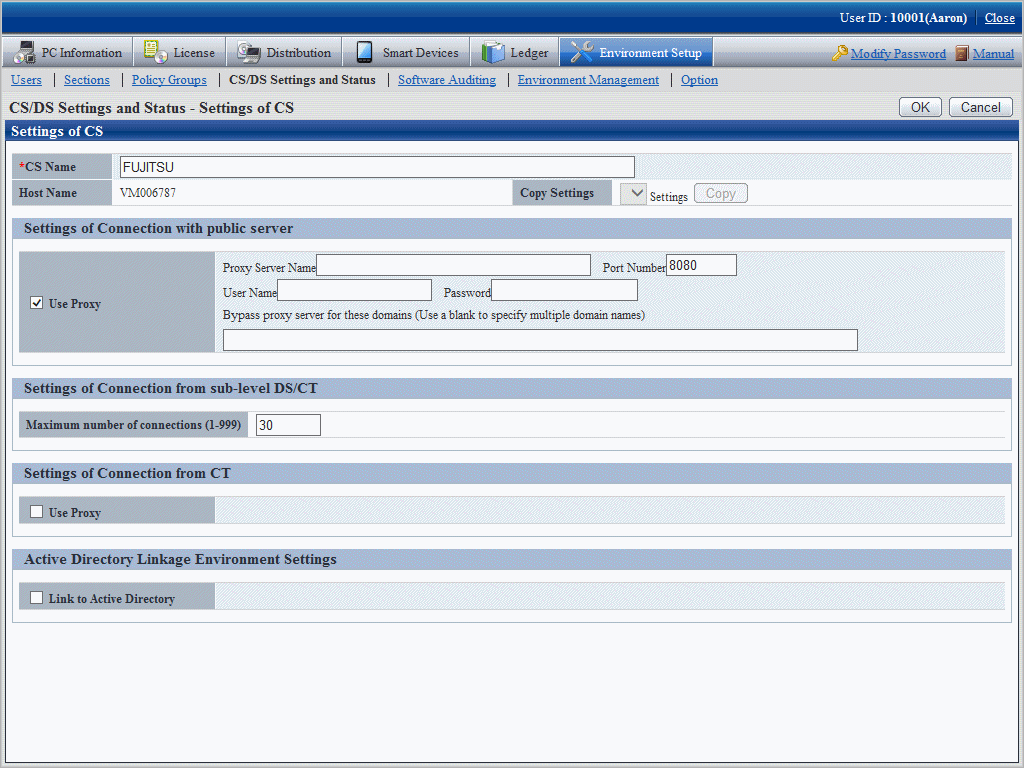
Item | Content |
|---|---|
Use Proxy | Selected when using proxy. The following items can be specified when using proxy.
|
Enter the following items from Settings of Connection from CT.
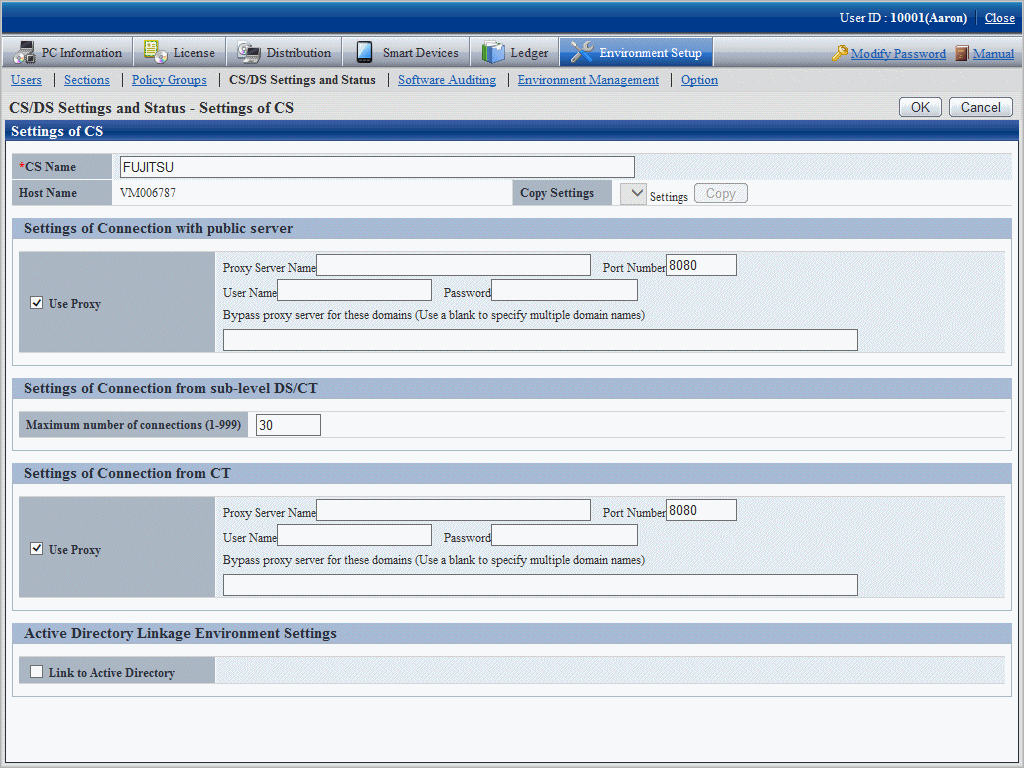
Item | Content |
|---|---|
Use Proxy | Selected when using proxy. The following item can be specified when using proxy.
|
When the proxy server name cannot be analyzed through the PC that connect to the proxy server, set IP address of proxy server in Proxy Server Name.
Click the OK button.
Software dictionary update
A Software Dictionary will be sent from the Systemwalker Support Center to the administrator by E-mail.
To receive a Software Dictionary from the Systemwalker Support Center, select Registration.text in Systemwalker Desktop Patrol CD-ROM\Utilities\Supportcenter folder, and then apply to receive the Software Dictionary through the Systemwalker Support Center service.
To update the Software Dictionary:
Store Software Dictionary attached to the E-mail in an appropriate file on the PC that contains Systemwalker Desktop Patrol CS. For example, suppose that the Software Dictionary is stored in "c:\tmp".
Execute the command below following the command prompt. Specify a folder that contains "Software Dictionary" in the parameter.
DTP Installation Directory\FJSVsbtrs\bin\AtoolETPGT.exe C:\tmp
Set auditing software
The auditing software should be selected when starting to use according to the Support Center definition.
For how to select, refer to Systemwalker Desktop Patrol Operation Guide: for Administrators.
When applying the linkage with Active Directory, set the operation environment according to one of the following procedures.
Besides, in case of changing from the environment of linking with Active Directory to the one of not linking with Active Directory, to change the operating environment, the settings should be performed according to one of the following procedures as well.
Settings procedure using the command
Follow the steps below in CS.
Use dtpadset.exe (Active Directory linkage environment setup) command to set or change the linkage environment with Active Directory.
For dtpadset.exe (Active Directory linkage environment setup) command details, refer to Systemwalker Desktop Patrol Reference Manual.
Follow the steps below:
Log in to the main menu and click Environment Setup.
The Environment Setup window will be displayed.
Click CS/DS Settings and Status.
The window below will be displayed.

Click the link for the server name whose server type is CS.
The window below will be displayed.
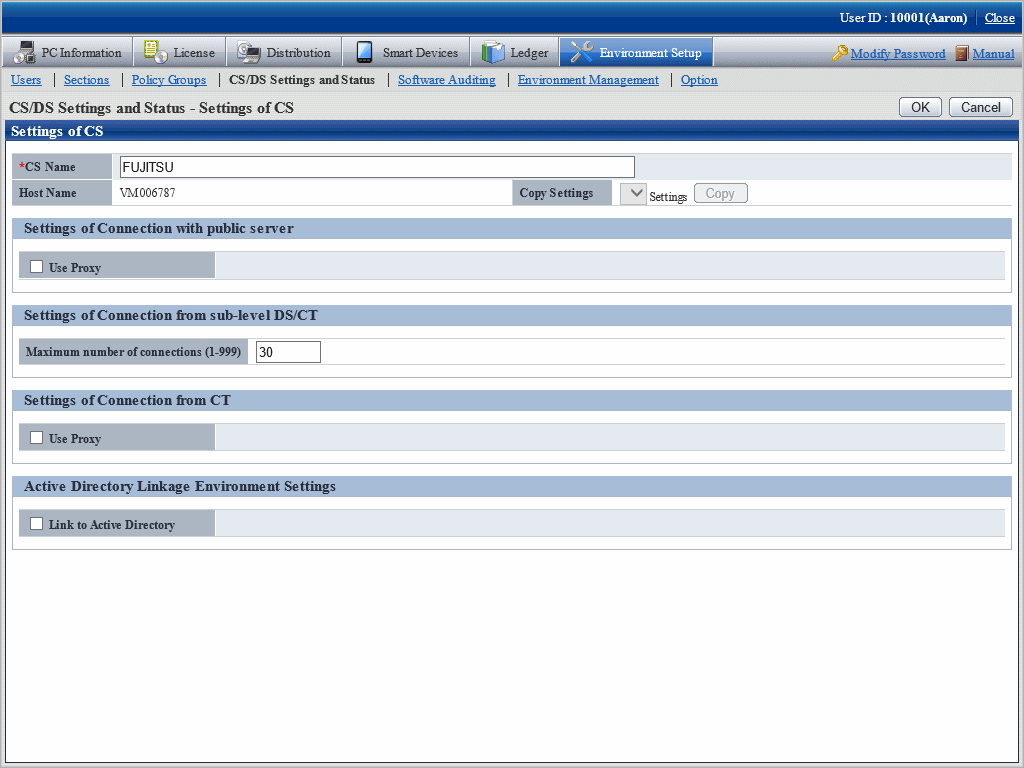
Select Link to Active Directory and enter the appropriate fields.
The window below will be displayed.
Alternatively, to change to an environment not linking to Active Directory, clear Link to Active Directory.
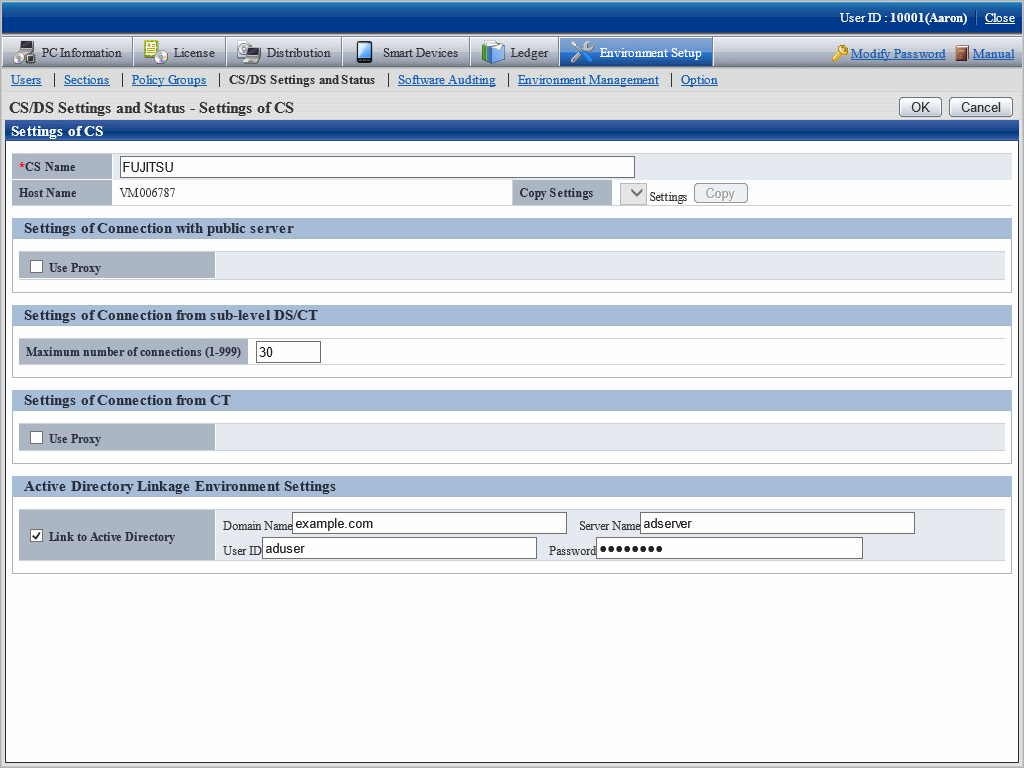
Configure the settings for the following items:
Item | Description |
|---|---|
Domain Name | Domain name for the Active Directory domain server. Specify the domain name using 4 to 36 halfwidth alphanumeric characters, and the following halfwidth symbols: . - _ This item is required. |
Server Name | Name of the Active Directory server connection target. Specify up to 128 halfwidth alphanumeric characters, halfwidth spaces, and the following halfwidth symbols: - = * + ' @ ~ ( ) & $ # " ! ? % \ . , / : ; ` [ ] | < > { _ } Halfwidth spaces at the beginning and end of the value will be ignored. This item is required. |
User ID | User ID of the administrator of the Active Directory server connection target. Specify up to 128 halfwidth alphanumeric characters, halfwidth spaces, and the following halfwidth symbols: - = * + ' @ ~ ( ) & $ # " ! ? % \ . , / : ; ` [ ] | < > { _ } Halfwidth spaces at the beginning and end of the value will be ignored. This item is required. |
Password | Login of the administrator of the Active Directory server connection target. Specify up to 128 halfwidth alphanumeric characters, halfwidth spaces, and the following halfwidth symbols: - = * + ' @ ~ ( ) & $ # " ! ? % \ . , / : ; ` [ ] | < > { _ } This item is required. |
Click OK.
Point
When setting as the environment of linking with Active Directory, but in the information of CT User Identification Information tab, by using the timing for logging on to Windows domain again, the following values are set automatically only during the first logon.
User ID: logon name of Windows domain
PC name: computer name
Timing for automatically setting user ID and PC name is as follows:
When performing Active Directory Linkage after the environment construction
Timing for first logon to Windows after distributing the policy with Active Directory linkage set to CT and DS
When performing Active Directory Linkage in case the environment construction has not been performed
Timing for first logon to Windows after CT and DS are installed
Automatic settings of user ID and PC name are only for the time above during the first logon.
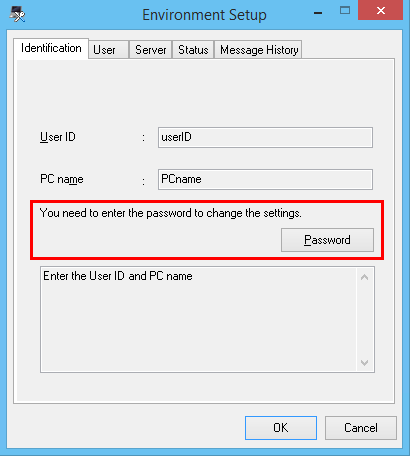
The administrator can set the Environment Setup window of CT collectively as follows.
Message displayed to user
Information required for environment setup can be set as message.
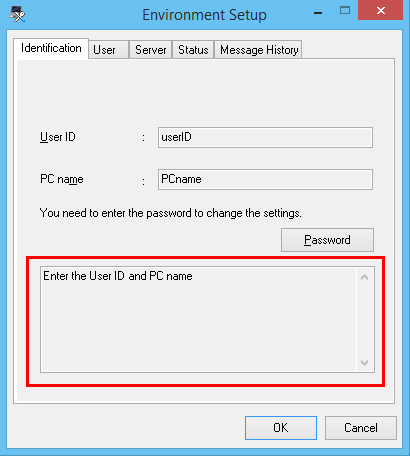
Limit as not being able to modify client settings
Set as not being able to modify user ID and PC name after installation.
Prompt to modify the settings if the environment is changed
Message prompting the modifications can be displayed to PC user when the environment setup (user identification information and user information) need to be modified.

The procedure is as follows.
Log on to the main menu and click Environment Setup.
The Environment Setup window is displayed.
Click Policy Groups
The following window is displayed.
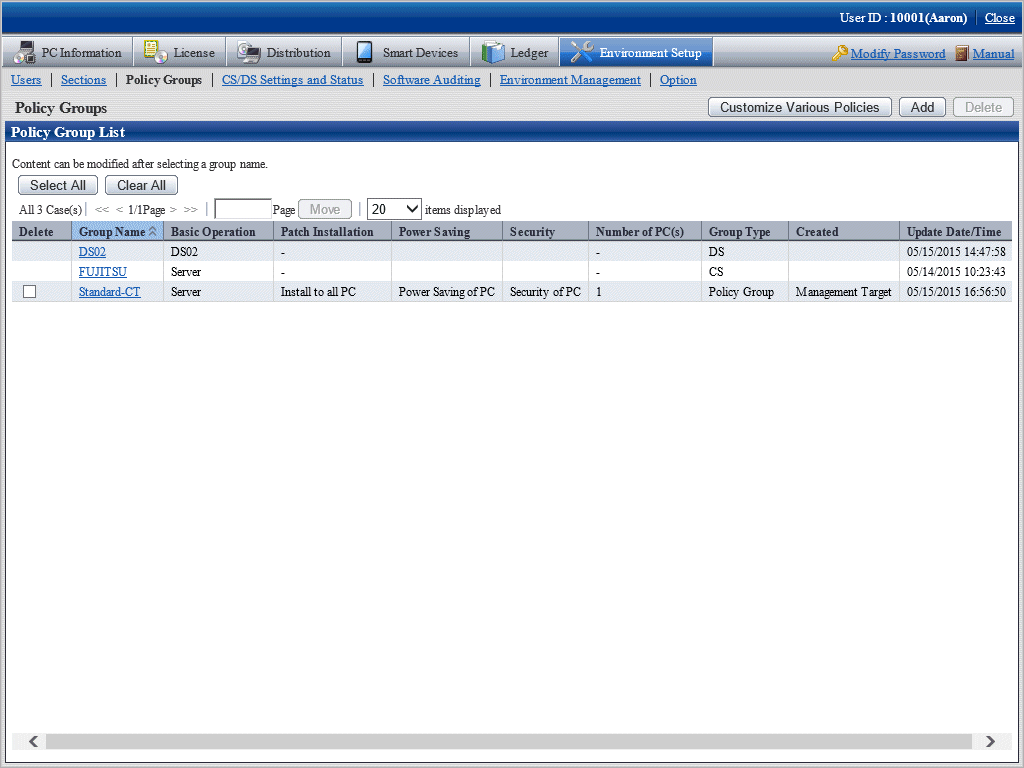
Click the Customize Various Policies button.
The following window is displayed.
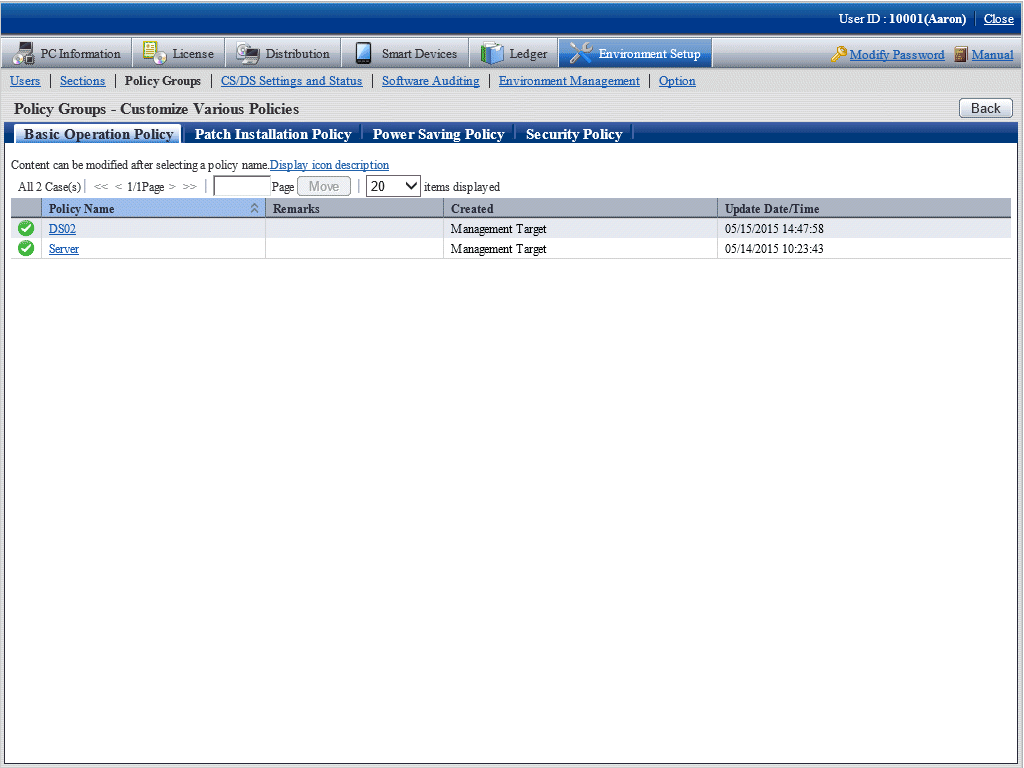
Click the Basic Operation Policy tab.
Click the link of policy name, and the following window is displayed.
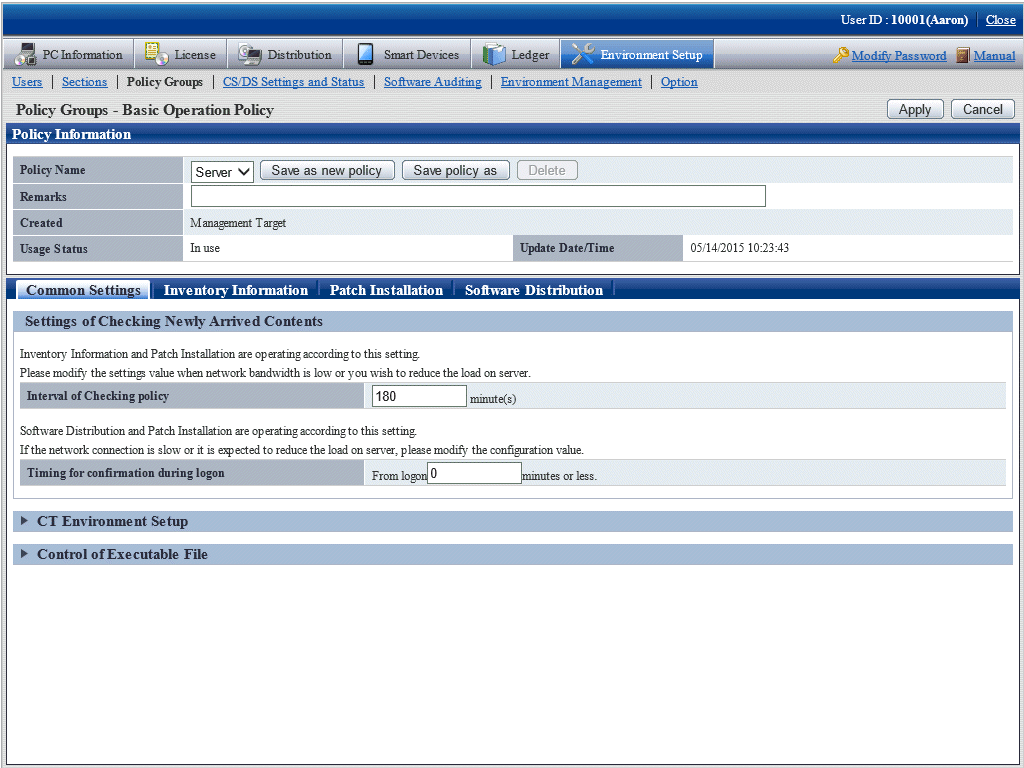
Click CT Environment Setup of the Common Settings tab, the following item will be displayed.
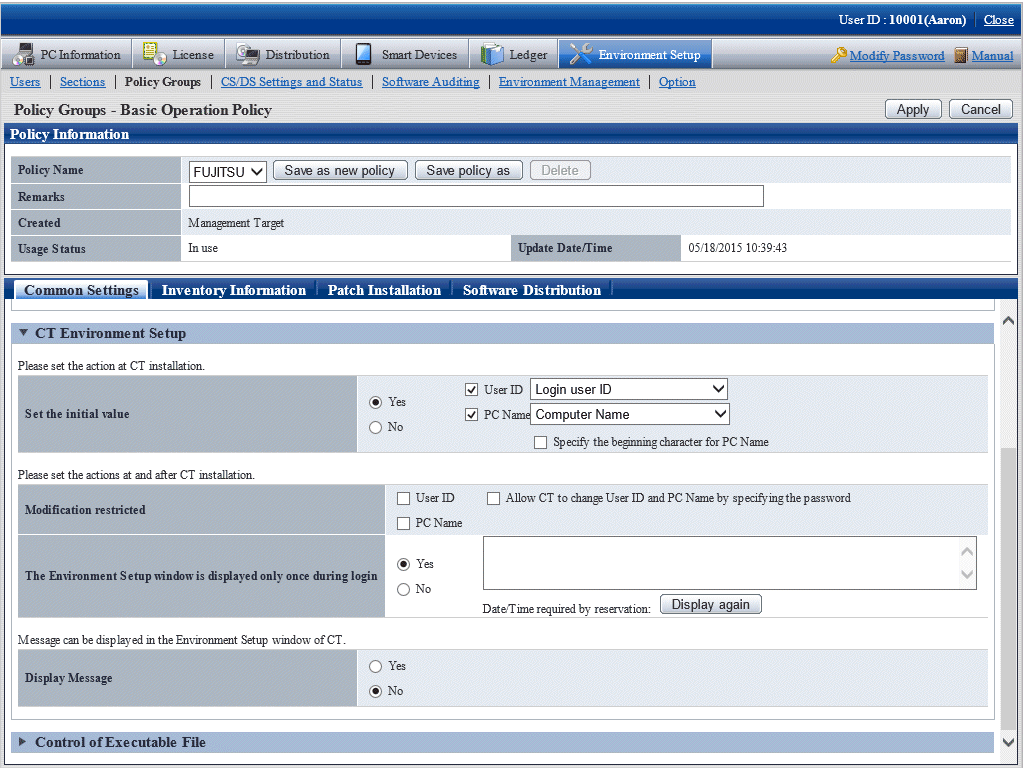
Enter the following item.
Operations during CT installation
Item | Content |
|---|---|
Set the initial value | Select Yes if you hope to set the initial value as operation during CT installation. Specify user ID/PC name. Select one of user ID/PC name as the item for initial value setting.
|
Actions during CT installation and settings after installation
Item | Content |
|---|---|
Modification restricted | Selected when to restrict modifying CT environment setup.
|
The Environment Setup window is displayed only once during login | Selected when it is required to enter the CT environment setup window. To display message in CT, the message should be specified using 2048 fullwidth characters or 4096 halfwidth characters. The following message will appear if omitted. "Confirm 'User ID' and 'PC Name' of 'Environment Setup'." When it is required to update the message and enter again, click the Display again button. |
Display information
Item | Content |
|---|---|
Display Message | Selected when displaying message in the User Identification Information tab of the CT environment setup window. Specify the message displayed in CT using up to 2048 fullwidth characters or 4096 halfwidth characters. The message body cannot be omitted. |
Confirm the settings and click the Apply button.
Set the set assets management information.
To cancel, click the Logout button to log out from the main menu.
Point
About the user ID and PC name of CT installed in the virtual desktop environment
In the virtual desktop environment, desktop mapping (virtual PC) is copied through system mapping.
The user identification information (user ID and PC name) of the system mapping cannot be inherited in this copied virtual PC, Systemwalker Desktop Patrol will initialize the user identification information and reset automatically after detecting the copy of system mapping.
To automatically reset this user identification information, set the policy through the main menu according to the following procedures.
In Environment Setup > Policy Groups > Basic operation policy > CT environment setup of the main menu, set Set the initial value as Yes and select User ID and PC Name, select the item from the drop-down menu.
Create policy group through Policy Groups and register Basic operation policy and PC created in Procedure 1.
Download CT Package from the download menu to install CT.
Note
When getting the initial value of user ID and PC name, it will become the following action. Try using the initial value to make the combination of user ID and PC name different from other PC.
When characters not allowed are contained in the user ID and PC name, this character will be replaced as "." (period).
When the upper limit (20 characters) for characters of user ID and PC name has been exceeded, the exceeding part will be deleted.
When failing to get the initial value of PC name, perform the following action.
Get "Computer Name" if getting "Domain Name" failed.
This section describes how to set client prohibition.
How to set prohibition function
Client prohibition function is disabled by default.
The procedure of setting is as follows.
Execute the (client environment setup) command in Systemwalker Desktop Patrol CS CTPolicy.exe.
Systemwalker Desktop Patrol CT will activate the settings after receiving the policy.
For command details, refer to Systemwalker Desktop Patrol Reference Manual.
When disabling the prohibition function temporarily
To disable client prohibition function temporarily in the maintenance and so on operations of Systemwalker Desktop Patrol CT, perform the following operation.
Execute the Control.exe (disable client prohibition function) command in Systemwalker Desktop Patrol CT.
Stop CT service, uninstall CT or modify the connection server of CT.
Systemwalker Desktop Patrol CT will enable the client prohibition function again after receiving the policy.
For command details, refer to Systemwalker Desktop Patrol Reference Manual.
ADT collects the device information within the network segment, and notifies the collected device information to CS.
This section describes how to set the schedule of notifying device information automatically detected in ADT.
Besides, if ADT function will not be used,, no need to perform the settings.
The procedures for setting automatic detection schedule are as follows:
Click Start > Programs (or All Programs) > Systemwalker Desktop Patrol > Environment Setup > Scheduling of Automatic Detection. Alternatively, select Apps > Systemwalker Desktop Patrol > Environment Setup > Scheduling of Automatic Detection in PC with CS installed.
The Schedule Setup of Auto Detection window is displayed.
Enter the following information and click the Create button.
Setup of Detection to Segment tab
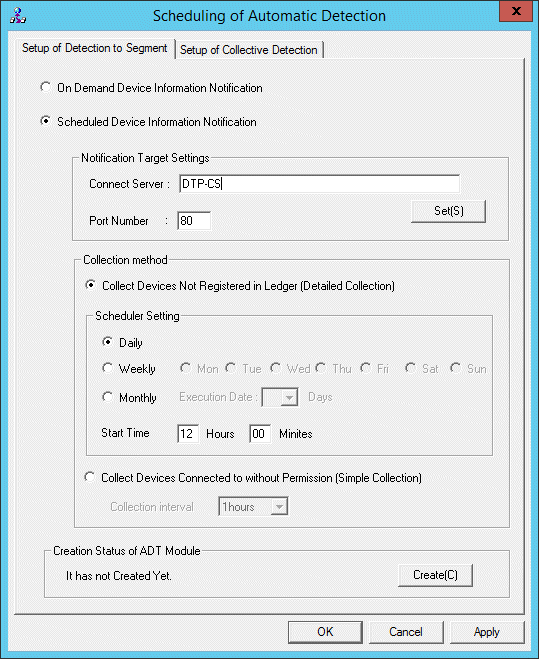
Item | Description | |
|---|---|---|
On Demand Device Information Notification | Selected when not using Scheduler to modify the device information detected through ADT. | |
Scheduled Device Information Notification | Selected when using Scheduler to modify the device information detected through ADT. | |
Notification Target Settings | Connect Server | Note Communication in IPv6 environments IPv6 addresses cannot be specified. For communication in IPv6-only environments, register beforehand using one of the following patterns, and then enter the host name:
|
Port Number | Set the port number for notification target. Set in case it is not the initial value port 80. | |
Set(S) | Used when setting proxy. | |
Collect Devices Not Registered in Ledger (Detailed Collection) | Select this option to perform automatic detection and information collection of devices for maintaining the management ledger. This option cannot be selected if Collect Devices Connected to without Permission (Simple Collection) is selected. | |
Scheduler Setting | Daily | Selected when notifying the device information every day. |
Weekly | Selected when notifying the device information weekly. Set as that Monday to Sunday can be selected. | |
Monthly | Selected when notifying the device information monthly. Select the execution date in Execution Date. Besides, as Execution Date, if the date not existing in the set month has been specified, automatic detection cannot be performed in this month. Thus, to execute at the end of a month, consider executing at 00:00 on the first day of the month. | |
Start Time | Set the time for starting to notify the device information. When using ADT module on server PC which does not operate around the clock, if time late at night has been set, then the power for PC performing automatic detection might be cut off, so pay attention to the time settings. | |
Collect Devices Connected to without Permission (Simple Collection) | Select this option to perform automatic detection and information collection of devices connected to without permission. This option cannot be selected if Collect Devices Not Registered in Ledger (Detailed Collection) is selected. | |
Collection interval | Specify the interval for collecting device information when detecting devices connected to without permission. Device information will be repeatedly collected at this interval. Select one of the following intervals:
| |
Creation Status of ADT Module | Display the creating status of ADT module. If ADT module has been created, the following message will appear. MM/DD/YYYY hh:mm:ss. | |
Create | Create ADT module. | |
Besides, if ADT module has not be started in the set aggregating timing (due to PC power not switched on, etc.), the device information will be notified at the start time for scheduler settings after ADT module is started.
When connecting Systemwalker Desktop Patrol CS by using proxy, click the Set button of connection target server to set the connection information for proxy.
The following window is displayed.
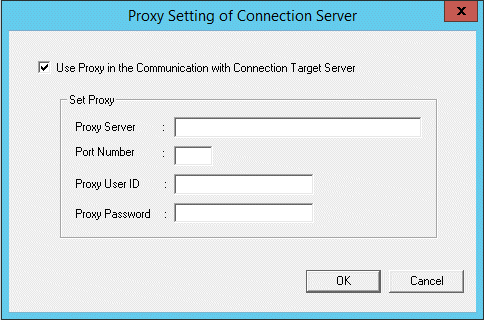
Item | Description | |
|---|---|---|
Use Proxy in the Communication with Connection Target Server | Selected when notifying the device information detected by ADT via proxy. | |
Set Proxy | Proxy Server | Note Communication in IPv6 environments IPv6 addresses cannot be specified. For communication in IPv6-only environments, register beforehand one of the following patterns, and then enter the host name:
|
Port Number | Set proxy server user port number. The initial value is 8080. Set a value within 1-65536. | |
Proxy User ID | Set the user ID for proxy. | |
Proxy Password | Set the password for proxy. | |
Click the Apply button and create "ADT Module" in the following location.
[Save Directory]
<IIS Home Directory>\wwwroot\DTP\ADT
[File Name]
ADTSetup.exe
Setup of Collective Detection tab
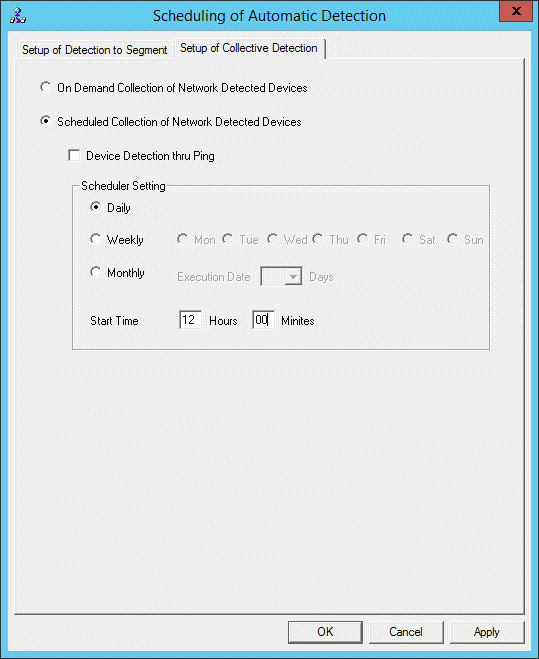
Item | Description | |
|---|---|---|
On Demand Collection of Network Detected Devices | Selected when not performing Batch Network Check by schedule. | |
Scheduled Collection of Network Detected Devices | Selected when performing Batch Network Check by schedule. | |
Device Detection thru Ping | Selected when the devices only responding to Ping are detected as unregistered ones. If selected, devices which cannot get MAC address will also be output to the List of Unregistered Devices window. | |
Scheduler Setting | Daily | Selected when notifying the device information every day. |
Weekly | Selected when notifying the device information weekly. Set as that Monday to Sunday can be selected through option button. | |
Monthly | Selected when notifying the device information monthly. Select the execution date in Execution Date. Besides, as Execution Date, if the date not existing in the set month has been specified, automatic detection cannot be performed in this month. Thus, to execute at the end of a month, study the execution use at 00:00 on the first day of the month. When selecting Monthly, the initial value is 1 Day and the start time is the current time. | |
Start Time | Set the time for starting to collectively detect device information. | |
Click the OK button to restart the system. The settings will take effect after starting the system next time.