This section describes how to install CS.
If Systemwalker Desktop Patrol CS is installed, the Systemwalker Desktop Patrol CT function will be installed at the same time. It can be managed as other CTs do.
The CT function of CS cannot be uninstalled alone.
There are three ways to install CS:
Standard installation should be performed if 300 or less CTs are to be managed on one CS, and default installation setting values are to be used. Custom installation should be performed if more than 300 CTs are to be managed on one CS, and values other than the default are to be used.
Note
CT registration password
To use a CT registration password, ensure that the server administrator uses CustomPolicy.exe (policy for modifying custom setup command) to enable it. CT registration passwords can be set per target server (CS and DS). Refer to the Systemwalker Desktop Patrol Reference Manual for details on the command.
It is recommended to change the CT registration password using CustomPolicy.exe (policy for modifying custom setup command) once the CT is extracted.
If a CT registration password is enabled, it must be set on the CT.
Issues to be confirmed before installation
Stop the following programs before installation.
Resident program included virus check program.
The Service window of Windows
Confirm whether the disk capacity required for the drive specified in the installation target of the database installation folder has been ensured by referring to "Operation Environment" of Systemwalker Desktop Patrol User's Guide.
Confirm "Products that cannot be Used in Mixture" by referring to "Operation Environment" of Systemwalker Desktop Patrol User's Guide.
Confirm the port number in use by referring to "List of Port Numbers" of Systemwalker Desktop Patrol Reference Manual.
When specifying "FQDN" or "Windows Host Name" in Host Name of the Server Environment Setup window set at installation, the address of this "FQDN" or "Windows Host Name" should be analyzed through Systemwalker Desktop Patrol CT, so confirm before installation.
If you install Systemwalker Desktop Patrol to an environment where Systemwalker Desktop Keeper is installed, the service managing iOS devices will be stopped automatically. In this case, the service managing iOS devices will not be available for use until the system is restarted.
Note
If the address of host name cannot be analyzed, install it again
When the address cannot be analyzed, it is likely that patch installation, software distribution and Inventory collection cannot be performed in Systemwalker Desktop Patrol CT. Systemwalker Desktop Patrol CS should be installed again.
The table below lists the default values used in standard installation.
Refer to the appropriate sections in "2.3.2.2 Custom Installation" or "2.3.3 Construct Database" for the details on item names.
Note
Standard installation uses fixed values for the system administrator user ID and initial password.
For security reasons, change the initial password when you log in the main menu for the first time.
Until the initial password is changed, a warning message prompting you to change the password will be displayed when you log in the main menu.
Setting context | Item and referenced section | Default value | Can be updated? | |
|---|---|---|---|---|
Folder settings | Install folder (step 5 in "2.3.2.2 Custom Installation") | If installing a 32-bit version of CS on a 32-bit version of the operating system or installing a 64-bit version of CS on a 64-bit version of the operating system: C:\Program Files\Fujitsu\Systemwalker Desktop Patrol If installing a 32-bit version of CS on a 64-bit version of the operating system: C:\Program Files (x86)\Fujitsu\Systemwalker Desktop Patrol | Y | |
IIS (Internet Information Services) home directory (step 6 in "2.3.2.2 Custom Installation") | (IIS home directory) | |||
Server environment setup | Server name (step 8 in "2.3.2.2 Custom Installation") | Corporate server | ||
Host name (step 8 in "2.3.2.2 Custom Installation") | (Obtained automatically.) | Y | ||
Software distribution port number (step 8 in "2.3.2.2 Custom Installation") | 2922 | Y | ||
Port number for inventory transmission (step 8 in "2.3.2.2 Custom Installation") | 2856 | Y | ||
Directory for saving distributed software (step 8 in "2.3.2.2 Custom Installation") | "dtpInstallDir\FJSVsbtrs\data\swc" | |||
Maximum size | 5000 MB | |||
Environment setup for Systemwalker Desktop Patrol CT | Identification | User ID (step 9 in "2.3.2.2 Custom Installation") | systemadmin (user ID for system administrator) | |
PC name (step 9 in "2.3.2.2 Custom Installation") | First 20 characters of host name | |||
User | Content (step 9 in "2.3.2.2 Custom Installation") | (No default value) | ||
Server | Connection Server (step 9 in "2.3.2.2 Custom Installation") | (Obtained automatically.) | ||
Database construction | Register the system account | User ID (step 5 in "2.3.3 Construct Database") | systemadmin (user ID for system administrator) | |
Password (step 5 in "2.3.3 Construct Database") | systemadmin (initial password for system administrator) | |||
Enter database information | Database Storage Location (step 6 in "2.3.3 Construct Database") | C:\DESKTOPPATROL_DBSP | ||
Number of PC(s) (step 6 in "2.3.3 Construct Database") | 300 | |||
Number of smart devices (step 6 in "2.3.3 Construct Database") | 0 | |||
Number of managed non-PC(s) (step 6 in "2.3.3 Construct Database") | 0 | |||
Collection of EXE Information (step 7 in "2.3.3 Construct Database") | Not checked. | |||
Collection of Software Operation Information or Control of Execution File (step 7 in "2.3.3 Construct Database") | Not checked. | |||
Follow the steps below to perform standard installation (refer to the Systemwalker Desktop Patrol User's Guide for details on the operating environment):
Log on to Windows using an account that belongs to the Administrators group.
If you are using other applications, close them.
After inserting DVD-ROM of Systemwalker Desktop Patrol into PC, the following window is displayed.
Select CS Installation.
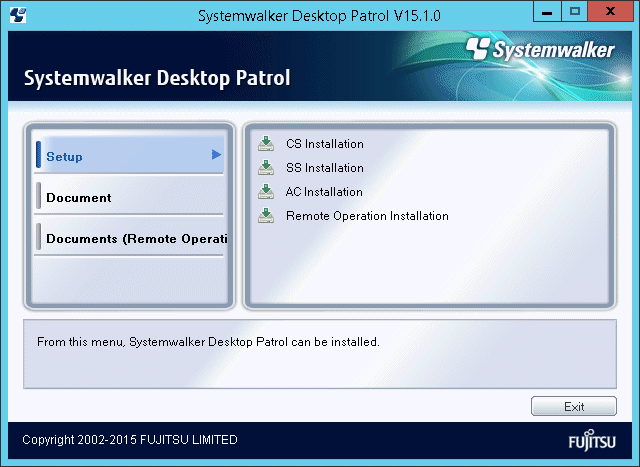
If the above installer is not started, start "swsetup.exe" of DVD-ROM drive.
Note
If the operating system in use is Windows Server(R) 2008 or later, execute this as administrator.
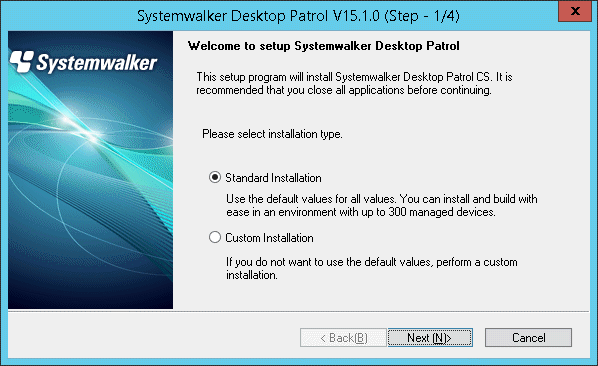
The Welcome to setup Systemwalker Desktop Patrol window is displayed, select Standard Installation, and click the Next button.
The Installation Parameter Settings window will be displayed.
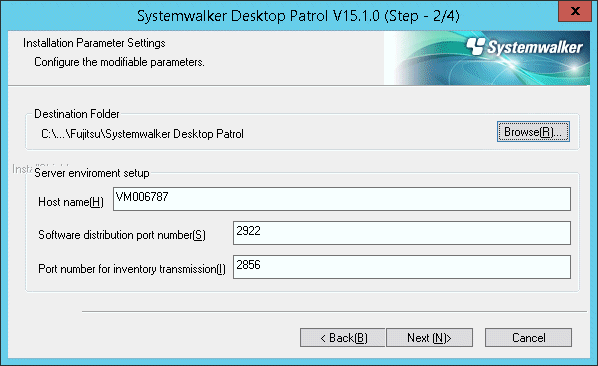
If you want to use the displayed item values, click Next.
If you want to modify the displayed item values, change according to the table below, and click Next.
Item | Description | |
|---|---|---|
Destination Folder | CS installation folder. To change the value, click Browse and specify a different folder. Specify a folder not used by other programs. This product must not coexist with other programs in the same folder. For this reason, do not install other programs under the installation folder after this product is installed. Note Invalid characters Do not specify fullwidth characters or halfwidth Japanese characters for Destination Folder, otherwise client policy will not be distributed. | |
Server environment setup | Host name (this value cannot be changed after installation) | Change the value as required. If the default value is not displayed, consider the following conditions and enter the host name. Specify the FQDN format, IP address, or Windows host name of the PC on which Systemwalker Desktop Patrol CS will be installed. Specify up to 50 characters, using alphanumeric characters, hyphens ("-") and periods ".". Example: cs.example.com Specify an environment that can be resolved using the Systemwalker Desktop Patrol DS/CT that will be connected. Note Communication in IPv6 environments IPv6 addresses cannot be specified. For communication in IPv6-only environments, register beforehand using one of the following patterns, and then enter the host name:
|
Software distribution port number (this value cannot be changed after installation) | Port number used for software distribution. The default value is 2922. Specify a value from 5001 to 65535 that does not conflict with other systems. | |
Port number for inventory transmission (this value cannot be changed after installation) | Port number to be used for inventory transfer. The default value is 2856. Specify a value from 5001 to 65535 that does not conflict with other systems. | |
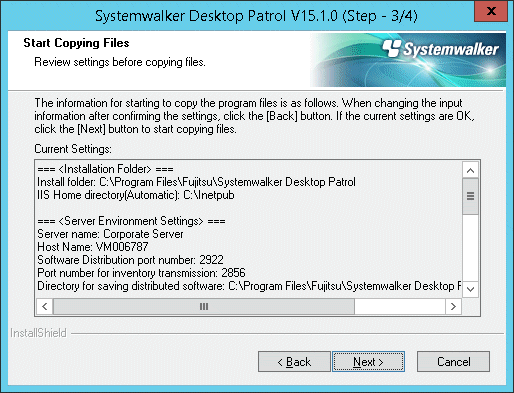
In the Confirm Installation window, ensure that the information displayed is correct, and click Install to start installation. If you need to revise the parameters, click Back.
Once installation is completed, the window below will be displayed.
Click Finish.
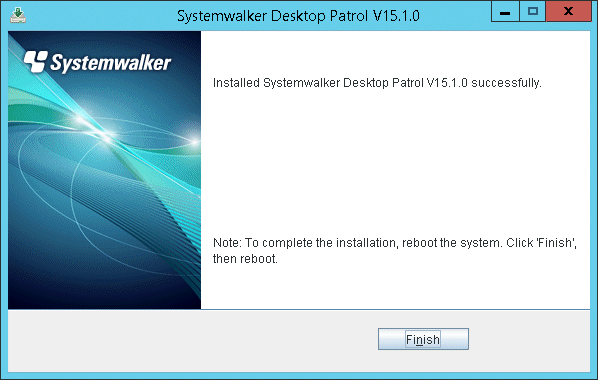
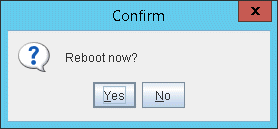
To use the program, the system must be restarted.
Click Yes.
After installation, perform the tasks described in "2.3.4 Construct an iOS Management Database" and later sections.
Follow the steps below to perform custom installation (refer to the Systemwalker Desktop Patrol User's Guide for details on the operation environment):
Log on to Windows using an account that belongs to the Administrators group.
If you are using other applications, close them.
Insert the Systemwalker Desktop Patrol DVD-ROM in the PC.
In the window below, select CS Installation.
If the above installer window is not displayed, start "swsetup.exe" in the DVD-ROM drive.
Note
In Windows Server(R) 2008 or later, execute this as administrator.
The Welcome to setup Systemwalker Desktop Patrol window will be displayed. Click Custom Installation, and then Next.

The Please Read window is displayed, confirm the content and click the Next button.
The Select Installation Folder window is displayed.
If you do not want to modify the displayed installation target, click the Next button.
To modify the displayed installation target, click the Browse button of the folder to be modified, and click the Next button after the folder is modified.
When installing this product, create a folder different from that of other programs and install to this folder. Do not install this product to the folder same as other programs. Besides, after installing this product, do not install other programs to the installation target folder of this product.
Besides, the capacity required for installation and the available capacity of the selected Installation Target Folder will also be displayed in the window. To confirm the capacity of other disks, click the Disk Capacity button.
Note
About characters that cannot be specified
Do not specify directory containing Multi-byte in Installation Target Folder. If characters not allowed have been set in the directory, client policy cannot be distributed.
The "Select IIS (Internet Information Services) Home Directory" window is displayed.
If you do not want to modify the displayed home directory, click the Next button.
To modify the displayed home directory, click the View button of the folder to be modified, click the Next button after the home directory is modified.
The Start to Copy File window is displayed, confirm whether the content displayed in the window is incorrect, and click the Next button.
The Installation Status window is displayed, start installation.
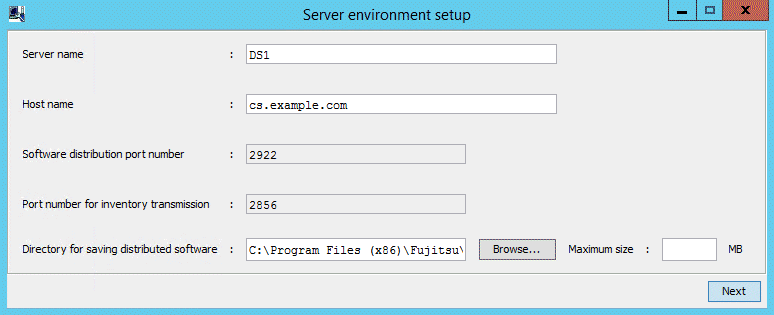
The Server environment setup window will be displayed during installation.
Note
The Server environment setup window will be displayed behind the background window during installation sometimes.
Display this window by switching the window through the taskbar or Alt+TAB key.
Enter the following information, and click the Next button after confirmation.
It is unable to return to this window after the following Environment Setup window is displayed.
Item | Description |
|---|---|
Server name (Required) | Specify "Company Name" for installing Systemwalker Desktop Patrol CS. Any characters within 50 characters which contain single-byte letters and numerals, special character "-", "@" and "." can be specified. Example) Fujitsu Company |
Host name (Required) (cannot be modified once set here) | Display the initial value, modify it as required. If the initial value has not been displayed, input the host name according to the following conditions. Specify "FQDN Format", "IP Address" or "Windows Host Name" of PC with Systemwalker Desktop Patrol CS installed. Specify up to 50 alphanumeric characters, "-"(hyphen) or "." (period). Example) cs.example.com This host name should be set in the environment where the name can be analyzed through the connected Systemwalker Desktop Patrol DS/CT. Note Communication in IPv6 environments IPv6 addresses cannot be specified. For communication in an IPv6-only environments, register beforehand using one of the following patterns, and then enter the host name:
|
Software distribution port number (Required) (cannot be modified once set here) | Specify a port number for software distribution. The initial value is set as "2922". To modify, specify it as a value within 5001-65535 that is not in conflict with other numbers in system. |
Port number for inventory transmission (Required) (cannot be modified once set here) | Specify a port number for Inventory transmission. The initial value is set as "2856". To modify, specify it as a value within 5001-65535 that is not in conflict with other numbers in system. |
Directory for saving distributed software (cannot be modified once set here) | Specify a directory for saving distributed software. Specify an absolute path using up to 128 characters, except for the following symbols: / * ? \ " < > | The initial value is set as "dtpInstallDir\FJSVsbtrs\data\swc". To modify, specify a directory with sufficient available capacity. In addition, when automatically applying security patches, specify a directory other than Windows installation drive, which has sufficient available capacity. Point To prevent OS damage, it is recommended to specify the space excluding the Setup disk To prevent insufficient disk space due to registering/distributing software or automatically applying security patches, it is recommended to specify distribution software saving directory as other space excluding OS Setup disk |
Maximum size | Specify the maximum disk capacity of Directory for saving distributed software in "MB". The maximum size can be specified within 1-999999. If this value is omitted, the available capacity of the specified directory is assumed to be the maximum. A value larger than the available capacity of the drive specified in Directory for saving distributed software can be set. Set the maximum combining with the PC environment design. |
The Environment Setup window is displayed.
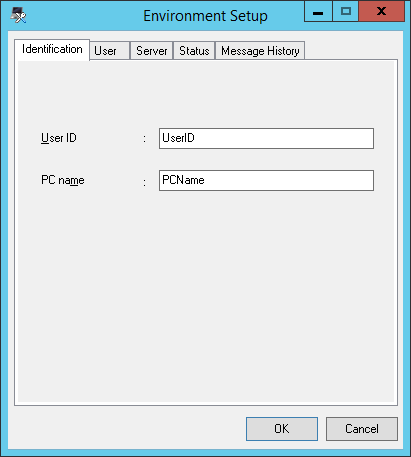
Enter the following information, and click the OK button after confirmation to continue installation.
Point
During installation, specify the appropriate items in Identification and User. Some items are required.
To perform this setting later, click the Cancel button. At this time, the installation will be continued as well. When performing the settings later, click Start > Program > Systemwalker Desktop Patrol CT > Environment Setup or Apps > Systemwalker Desktop Patrol CT > Environment Setup.
Environment Setup Tab | Item | Description |
|---|---|---|
Identification | User ID (Required) | Specify the user ID to manage as Systemwalker Desktop Patrol CT. It must be specified. The user ID set here will be displayed in the main menu for identifying a certain user. You can specify up to 20 halfwidth alphanumeric characters and the following symbols: - @ . _ Alphabetic characters are case-sensitive. |
PC name (Required) | Specify the name to manage as Systemwalker Desktop Patrol CT. You can specify up to 20 halfwidth alphanumeric characters. You cannot specify fullwidth characters, spaces and the following symbols: + * ? < > , ; : \ / " | | |
User | Content | Enter when it is indicated to input in "System Administrator". You can specify up to 256 fullwidth characters, halfwidth alphanumeric characters, halfwidth spaces, and the following symbols: - @ . ( ) [ ] < > : ; / { } |
Server | Connection server | Specify the host name of the connection server in FQDN format or with IP address. If it has been set at installation, there is no need to input/modify. You can specify up to 256 characters, and the following symbols: - . Note Communication in IPv6 environments IPv6 addresses cannot be specified. For communication in IPv6-only environments, register beforehand using one of the following patterns, and then enter the host name:
|
Status | Policy received on | After operation is started, this item displays the operation status of each CT item. |
Inventory collection | ||
Patch installation status | ||
Message History | None | After operation is started, the history of the messages sent from the administrator is displayed. |
The Operation Environment Maintenance Guide window for constructing the CS database will be displayed.
Refer to "2.3.3 Construct Database", and execute tasks to construct the database.
Once installation is completed, the window shown below will be displayed.
Click Finish.
Reboot the system to use the program.
Click Yes.
Note
Silent installation can only be performed when you are performing custom installation for the first time.
Installation process must not be interrupted during silent installation.
Define a non-encrypted password in the installation parameter CSV file and in the response file.
It is the responsibility of the user to manage the installation parameter CSV file and the response file.
Follow the steps below to perform silent installation:
Create an installation parameter CSV file.
Refer to "A.1.1 Installation Parameter CSV File" for details.
If you are performing installation using the default values for all parameters, this step is not required.
Use the parameter setup command to create a response file.
Refer to "A.1.2 Parameter Setup Command" for details.
If you did not create an installation parameter CSV file in step 1, this step is not required.
Execute the silent installation command.
Refer to "A.1.4 Silent Installation Command" for details.
Check the installation result in the returned value and message from the silent installation command.
Refer to "A.1 Silent installation of CS" for details on the files and commands used, and messages output, in silent installation.
After installation, perform the tasks described in "2.3.4 Construct an iOS Management Database" and later sections.
If you already have a license key, register it using the license key input command after the product is installed. This will make you an official user of the product. Official use of the product will start once you start it after becoming an official user.
If you are not yet an official user of the product, you will not be able to start the product.
The license key is registered using the fjlic register command (license key input command). The command can be executed either by specifying the license key in the parameter directly or by specifying the license key file. Refer to the Systemwalker Desktop Patrol Reference Manual for details on the command.
Specifying the license key in the fjlic register command directly
fjlic.exe register -k <license key>Specifying the license key file in which the license key is stored in the fjlic register command
fjlic.exe register -f <license key file full path>