The following explains how to define the system operating information.
If you have changed the operating information definition, you must restart Job Execution Control services or daemons to make your change valid.
Outline
The basic job execution environment can be defined using the seven sheets (Operation Control, Logs, Use Function, Previous Compatibility, Cluster Setup, Network, and Printing Formats, or using the six sheets excluding Printing Formats with the UNIX version) of the Define Operating Information window.
Windows used for operating information definition:
Definition procedure
Open the Define Operating Information window.
Click Operating Information in the Systemwalker Operation Manager Environment Setup window to display the Define Operating Information window.
Select the desired sheet (Operation Control, Logs, Use Function, Previous Compatibility, Cluster Setup, Network, or Printing Formats).
To define the job and queue control, select the Operation Control sheet.
To define the storage of job execution history and operation records, select the Logs sheet.
To define the code conversion of files and termination code of job steps, select the Options sheet.
To use the previous compatibility in the updated system version, select the Previous Compatibility sheet.
To define the server setup in cluster system operation, select the Cluster Settings sheet.
To define the retry operation in the case of a connection error, select the Network sheet.
When connected to a server running in the Windows version and when you define the printing format of jobs using the Job Results Batch Output function in JCL, check the Enable prt parameter on the Options sheet and select the Printing Formats sheet.
Change the definitions.
When Systemwalker Operation Manager is first installed, the standard definitions including Job Control and Queues of the Operating control sheet the job execution history (Saved Directory and Retention) of the Logs sheet are set. Change the definitions of each sheet according to the system operation.
Save your settings.
Click OK to save your settings.
Apply your settings.
When you restart the Job Execution Control services or daemons in the next time, the system starts in the Initialization mode and your settings apply.
Syntax rules
In the Define Operating Information window, the following syntax rules apply to the definitions.
A space, a tab, and the following symbols are NOT allowed to enter.
, ; * ? " < > |
Symbol "\" is NOT recognized as an escape character.
An alphabet, special characters, a space, and a tab are NOT allowed to enter.
A space, a tab, and the following symbols are NOT allowed to enter.
\ / : ; , * ? " < > |
Note
However, symbols are allowed in the following windows.
Only alphanumeric characters, hyphens (-) and underscores (_) can be used. The first character must always be an alphabet. Queue names are NOT case sensitive.
A space, a tab, and the following symbols are NOT allowed to enter.
\ / ; * ? " < > | ( )
If you edit the initialization file directly
Any change in the Define Operating Information window applies to the initialization file of Job Execution Control. You can directly edit the initialization file using an editor such as "vi" or Notepad.
For the definition to allow direct editing of initialization file, see "B.1 Initialization File (Job Execution Control)".
To enable the definitions in the initialization file after editing it, it is required to start Job Execution Control in the initialization mode as described below.
Execute the mjstop operation termination command by specifying the -c option to terminate the Job Execution Control operation, and then execute the mjstart operation start command to restart the operation. For the mjstart operation start command and mjstop operation terminate command, see the Systemwalker Operation Manager Reference Guide.
Operating control sheet in the Define Operating Information window
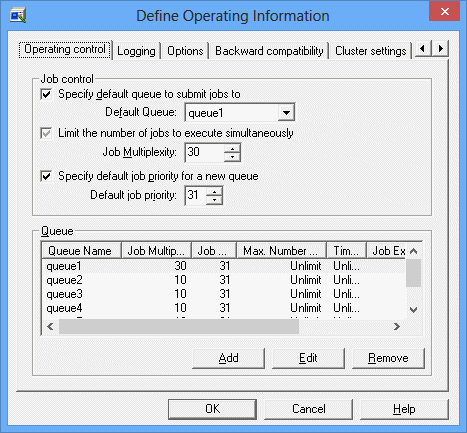
Specifies a default queue to be used when a job is submitted or when a job is registered in the job net (having the Job Execution Control attributes). The queue name you have defined in the Create Queue window must be entered in the Default Queue field.
If the destination queue is omitted during job submission, the job is placed in the queue you have specified here. If you omit this option, you must specify the job submission queue during job entry.
Limits the maximum number of jobs that can be executed concurrently on all servers where Systemwalker Operation Manager has been installed. You must specify this limit in the Job Multiplexity. It can be an integer of 1 to 99 in the Windows system, and an integer of 1 to 999 in the UNIX system.
Note that the default value for Windows is 30 and the default value for UNIX is 256.
![]() If multi-subsystems are operating, this limit applies to the jobs concurrently executed on each subsystem. In such case, you cannot limit the number of concurrently executable jobs on the entire server.
If multi-subsystems are operating, this limit applies to the jobs concurrently executed on each subsystem. In such case, you cannot limit the number of concurrently executable jobs on the entire server.
This priority is used for the queue if the Default job priority is not checked in the Create Queues window. You can specify a value between 0 and 63, and the larger value has the higher priority.
If omitted, you must check the Default job priority in the Create Queue window for all queues.
Lists queues.
To create a queue, click Add. To change the setup of an existing queue, select it from the list and click Edit. To delete a queue, select it from the list and click Remove.
When you click Add, the Create Queue window appears. When you click Edit, the Edit Queue window appears. You can set a queue you wish to add to its list or change the setup of an existing queue in the Create/Edit Queues window.
Up to 64 queues can be created.
Note
At the Job Multiplexity, you can specify a value between 1 and 99 [Windows]/999 [UNIX]. For Windows version, you are recommended to specify a value below 30 as a guide. If the job multiplicity is increased to a higher level, a performance problem may occur or the desktop heap (the area controlled by the Windows system) may be exhausted and the job may terminate abnormally. If you specify 31 or more, be sure to sufficiently verify the performance before operation.
Create/Edit Queue window
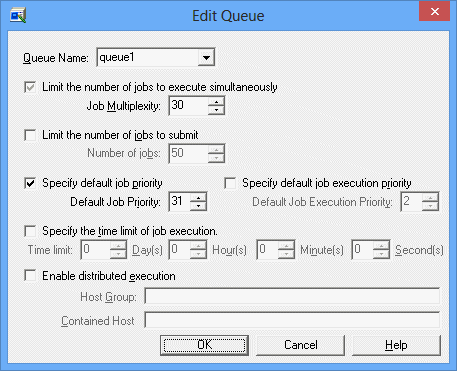
The following explains the queue definition.
When you define a queue and press OK, it is added to or reflected on the definition of the queue list. However, if you enter a queue name already used in the Queue Name field or if you enter an incorrect value, its error is displayed.
Specifies a queue name. Specify a queue name, using up to 15 bytes.
The queue name is always required.
Limits the maximum number of jobs that can be executed concurrently in the queue (the job multiplicity in the queue). The Job Multiplexity can be an integer of 1 to 99 in the Windows system or an integer of 1 to 999 in the UNIX system.
Limits the number of jobs that can be submitted to this queue (total number of jobs in this queue). The Number of jobs can be an integer of 1 to 999.
You can avoid having jobs to be queued by specifying the same value as the Job multiplicity of the queue.
If it is omitted, the number of submittable jobs is NOT limited.
Specifies the priority of jobs placed in the current queue. The Default Job Priority can be an integer of 0 to 63. If the priority is omitted during job submission, the operand specified here is used as the priority of the job.
You must specify this option if the Default Job Priority is omitted on the Operation Control sheet of Define Operating Information window.
Specifies a priority of program thread to be started by the job. The Default Job Execution Priority can be an integer of 0 to 4. The larger value has the higher priority of thread.
The following compares priority values 0 to 4.
Set value | Priority class | Thread priority |
|---|---|---|
4 | NORMAL | HIGHEST |
3 | NORMAL | ABOVE_NORMAL |
2 | NORMAL | NORMAL |
1 | NORMAL | BELOW_NORMAL |
0 | NORMAL | LOWEST |
Value 2 is set by default.
Specifies the CPU allocation priority to jobs. The Default Job Execution Priority can be an integer of -20 to 19. The smaller value has the higher CPU allocation priority.
It specifies an execution priority of the process that executes jobs. Values -20 to 19 correspond to the nice values in the UNIX system.
Value 0 is set by default.
A value of -20 to 19 specified here is converted into a value of 0 to 39 and indicated (as the "Default execution priority") in both the Temporarily Change Queue Definitions and Display Detailed Queue Information dialog boxes. The larger value indicates the higher CPU allocation priority.
Limits an elapsed time of job execution in the current queue. The time can be an integer of 1 second to 999 days, 23 hours, 59 minutes and 59 seconds.
The job execution elapsed time is NOT set by default.
Job Execution Control allows distributing the load of each server by allocating the submitted jobs to other servers. It is called the Distributed Execution function. To apply this function to the current queue, specify the Host Group and Contained Host. The queue that is created when Enable distributed execution is selected is referred to as the Distributed Execution queue.
The Host group must be a name of host group (group of servers for load distribution), consisting of up to 64 bytes.
The Configuration host name must be a host name of the server which configures the host group and a multiplicity of jobs (the number of concurrently executable jobs on each server) in the "host-name (multiplicity)" format. You can specify up to 100 host names. Also, you can specify a PC name (including the local host) as the host name. The host name itself CANNOT contain a left parenthesis "(" and a right parenthesis ")". The job multiplicity (the number of jobs that can run concurrently on each server) should be specified as a number between 1 and 99 in Windows versions and a number between 1 and 999 in UNIX versions. You can specify multiple sets of job multiplicity by separating them from each other by a comma (,) and by enclosing those sets by a pair of parentheses.
An example is:
(host1(4),host2(2)) |
When the Distributed Execution function is used, the "number of executing jobs divided by the multiplicity you have specified in Configuration host name is executed by the server having the least load.
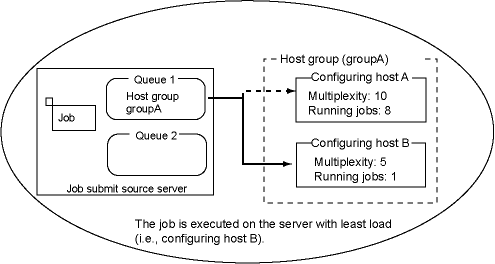
During operation, you can change job multiplexity at the distributed server or add/delete a configuration host from the host group for distributed execution. For more details, refer to the Systemwalker Operation Manager Reference Guide.
Notes on Distributed Execution function
When using the Distributed Execution function, you must take the following notes.
If the Distributed Execution function and the Previous Load Distribution function are mixed in the same environment, the system operation is unreliable.
If you have checked the Enable the Distributed Execution function box and if you have distributed to the execution servers the policy of operation information that defines the Host Group and Contained Host, you must delete these definitions of the Distributed Execution function from the execution servers.
If a server for distributed job execution has gone down, the problem server is deleted and the distributed jobs are executed by the remaining servers. When the down server is recovered, it may take up to 10 minutes of idling time to restart the distributed job execution.
If a sever goes down when it is executing a distributed job, this job is terminated abnormally.
In UNIX versions, the maximum job multiplicity that can be specified is 999, but the job multiplicity that can actually be achieved depends on environmental factors such as the hardware specifications and the network speed.
A server down is determined when jobs are submitted to distributed execution servers. When determined, the submitted jobs are distributed to other servers.
The jobs placed in the distributed execution queue CANNOT be moved to another queue.
The jobs placed in a queue other than the distributed execution queue CANNOT be moved to the distributed execution queue.
Jobs submitted using the Distributed Execution function cannot be submitted to a particular subsystem (on the execution server) (when the submitter makes the request for the job, it cannot specify the subsystem number).
When adding a server that can run in Systemwalker Operation Manager V11.0L10 or later to use the Previous Load Distribution function, you must enable the Previous Load Distribution function.
Limited use of Distributed Execution function
You cannot use the Distributed Execution function if:
Jobs are written in the Job Control Language (JCL).
Network jobs are submitted, that is if:
You have checked the Submit a Job as a Network Job checkbox and the specified the Requesting Host Name on the Standard information sheet of the Add/Change-Jobs window,
You have checked the Submit a Job in the Job Net as a Network Job checkbox and specified the Default Host Name on the Standard information sheet of the Job Net Properties window,
You have specified a host name with the "-rh" option in the qsub command, or
You have specified a host name with the "-rh" option in the submitinf argument of Mp_SubmitJob API.
Jobs are submitted to any given subsystem using the qsub command with the -rsys option specified.
Jobs are submitted by another host.
If the job is a network job submitted from the request source host
If the job is submitted using the Distributed Execution function from the request source host
If the job is submitted from the request source host, specifying the host name of another server using Job Control Language (JCL), etc.
Jobs are submitted by anything other than the job net having Job Execution Control attributes.
The following jobs or commands are used.
Task Link command
SMS command [Windows]
Interstage Work Units
Requirements for the Distributed Execution function
When using the Distributed Execution function, you must satisfy the following requirements.
The account to be inherited must match between this server and the distributed servers. For the account details, see "User privileges required for network jobs and Distributed Execution function" in "2.5.2.1 User Control in Systemwalker Operation Manager."
Previous Load Distribution function [Windows]
If the Enable the previous Load Distribution Functions box is checked on the Previous Compatibility sheet of Define Operating Information window, the Load Distribution functions provided by Systemwalker OperationMGR V10.0L21 or earlier are used. The queue created by specifying Enable the Load Balancer function of the previous version in the Create/Edit Queue window is referred to as the Backward Compatibility Load Balancing Queue.
You can define a host name for servers in the same domain as the current server in the "Host group" and "Configuration host name." You cannot define a host name of the server participating in another domain or a host name of the server NOT participating in the current domain.
The following message is output to the standard error of jobs. The job execution is NOT affected even if this message is output.
'\\job-submitting-computer-name\F3CU_RMT\_wk\job-number' is invalid as the current directory path. UNC path is not supported. Windows directory will be used. |
For details on the previously compatible Load Distribution functions, see the respective manuals of Systemwalker OperationMGR V10.0L21 or earlier.
Notes on setup in the Create/Edit Queues window
The following gives the notes you notice during setup in the Create/Edit Queues window.
You cannot omit the definition in the Create Queues window.
To submit an online job (for startup and shutdown control of InterStage work units), define a queue dedicate to online jobs. During this time, do not set the job execution time limit.
When Systemwalker Operation Manager is first installed, the "online1" queue which is dedicated to online jobs is defined. You can use this queue. It has the following preset parameters.
Queue name: online1
Number of concurrently executable jobs: 30[Windows]: 256[UNIX]
Default queue priority: 31
However, if you have upgraded the system from version V5.0L10 or earlier (or V4.1 or earlier in UNIX system), the "online1" queue is NOT defined. You must add a queue dedicate to online jobs.
Logging sheet in the Define Operating Information window
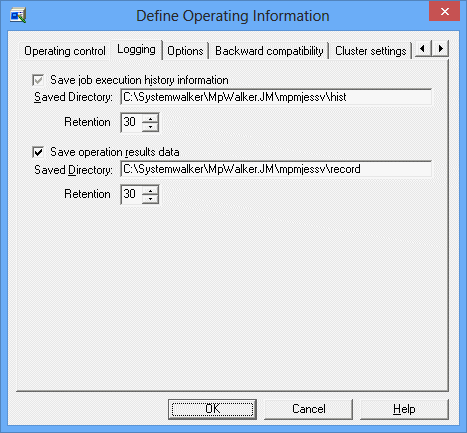
Saves the job execution history information (log file) of Systemwalker Operation Manager. If selected, the Job execution history information box is always checked. You can only change the Saved Directory and Retention on this sheet.
Specify a full path name where you create a log file. The path name can be up to 245 bytes long. If you have entered a non-existing path name, you are asked for your confirmation.
A log file is named as follows and it is created under this path.
date.log |
date: The date (year, month and day) when a log file is created.
The year is indicated by 4 digits, the month is indicated by 2 digits, and the day is indicated by 2 digits.
When the system is first installed, the log file is stored under the following directory.
[Windows]
Systemwalker Operation Manager installation directory\MpWalker.JM\mpmjessv\hist |
![]() When connected to the server during multi-subsystem operation, you must specify the following path.
When connected to the server during multi-subsystem operation, you must specify the following path.
Subsystem number 0: Destination path (the path where the log file is created)
Subsystem numbers 1 to 9: Destination-path\n (where, "n" if a subsystem number).
[UNIX]
/var/spool/mjes/hist |
![]() When connected to the server during multi-subsystem operation, you must specify the following path.
When connected to the server during multi-subsystem operation, you must specify the following path.
Subsystem number 0: Destination path (the path where the log file is created)
Subsystem numbers 1 to 9: Destination-path/n (where, "n" if a subsystem number).
Specifies a number of days when the log file is kept. It can be from 1 day to 31 days. When a log file exceeds its storage period, it is deleted.
You must specify this option to collect the operating results data.
Specify a full path name where you create an operating results data file. The path name can be up to 245 bytes long. If you have entered a non-existing path name, you are asked for your confirmation.
The operation results data file is named as follows and it is created under this path.
date.csv |
date: The date (year, month and day) when an operating results data file is created.
The year is indicated by 4 digits, the month is indicated by 2 digits, and the day is indicated by 2 digits.
![]() When connected to the server during multi-subsystem operation, you must specify the following path.
When connected to the server during multi-subsystem operation, you must specify the following path.
Subsystem number 0: Destination path (the path where the log file is created)
Subsystem numbers 1 to 9: destination-path\n (where, "n" if a subsystem number).
It must be "destination-path/n" (where, "n" if a subsystem number) in the UNIX system.
Specifies a number of days when the operating results data file is kept. It can be from 1 day to 31 days. When an operating results data file exceeds its storage period, it is deleted.
For details on the operation result information files, refer to the Systemwalker Operation Manager Reference Guide.
Estimation for log files and operation results data files
If you have specified the Storage location option for log files and operation results data files, they are created and stored in the specified location. Therefore, you must calculate the required disk capacity and assign it in advance. If jobs are forcibly terminated, the slightly larger disk capacity is required. You must assign an enough disk capacity.
Estimation Formula for Log Files
(No. of jobs per day) x (300 bytes) x (Storage period in days) + (No. of forcible termination times of jobs) x (80 bytes) |
Estimation Formulas for Operation Results Data Files
(Service startup/shutdown record capacity + Job record capacity + Step record capacity) x Storage period in days |
Service startup/shutdown record capacity (in bytes per day)
  (72 + h) x S
	h: Host name length
	S: Number of service/daemon startup/shutdown times in a day

Job record capacity (in bytes per day)
  (429 + (4 x h) + j + u + (2 x q) + c) xJ
	h: Host name length (Use its maximum value.)
	j: Job name length (Use its maximum value.)
	u: User name length (Use its maximum value.)
	q: Queue name length (Use its maximum value.)
	c: Command name length (Use its maximum value.)
	J: Number of job startup times in a day

Step record capacity (in bytes per day)
  (182 + (2 x h) + j + s)x S
	h: Host name length (Use its maximum value.)
	j: Job name length (Use its maximum value.)
	s: Step name length (Use its maximum value.)
	S: Maximum number of steps within the job startup count in a day

If the maximum values are unknown, use the following reference values.
	h: Host name length	64 bytes
	u: User name length	64 bytes
	j: Job name length	64 bytes
	q: Queue name length	15 bytes
	s: Step name length	16 bytes
Options sheet in the Define Operating Information window
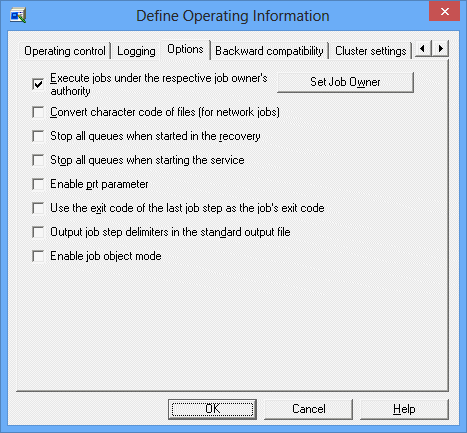
The jobs executed on Systemwalker Operation Manager of the Windows version are executed under the privilege of the Job Execution Control service log on account on the server. If you check this box, the user having the job execution privilege can execute each job.
If this function is used with network jobs, this checkbox must be selected on both the server from which the job is submitted and the server to which it is submitted.
Refer to "2.5.2.2 Job Execution Privileges" for information about job execution privileges assigned when this checkbox is selected.
In order to execute jobs under the authority of the respective job owners, you must carry out the following tasks in addition to specifying this parameter.
Select Administrative Tools >> Local Security Policy in the Control Panel, to assign Log on as a batch job privileges to the respective accounts of the job owners.
When using this function for network jobs, execute on both the server that submits the job and the server that receives the job. Also execute on both the server that actually submits jobs and the server used to execute jobs for domain users.
Define the job owner information.
When using this function for network jobs, execute on the server that submits the job.
Enable the Set Job Owner button by selecting the Execute jobs under the respective job owner's authority check box. Click Set Job Owner to define the job owner information. Refer to "2.9.3 Defining the Job Owner Information [Windows]" for details.
Notes if the Execute job under the respective job owner's authority option is specified:
You cannot execute a network job for which the job submitting server is running UNIX and the destination server is running Windows if you specified Execute jobs under the respective job owner's authority on the destination server. If you use the previous Load Distribution functions by selecting the Execute job under the respective job owner's authority option, you must assign the same job owner password on all servers. When network jobs are submitted or when the distributed execution queues are used for job submission to other servers, the authentication data used on the job submitting server is passed to the destination server. Therefore, if the password does not match between those servers, the jobs are terminated abnormally.
The password matching between servers depends on the user account type as follows.
Account type of job execution user | Relationship between job submitting server and its destination server | ||
|---|---|---|---|
Within the same domain | Within the trusted domain | Outside of the domain | |
Domain account | _ | _ | _ |
Local account | Same | Same | Same |
_: Different passwords may be used.
Same: The same password must be used.
The file code conversion is required for execution of network jobs or distributed execution jobs among the servers having different code systems. Specify the operation code conversion if required during execution of network jobs or distributed execution jobs.
If not specified, no code conversion takes place during execution of those jobs.
Note
If a non-text file is specified as the standard output file for execution of network jobs or distributed execution jobs, the code conversion may fail.
If the system is shut down due to a system crash or power failure, Job Execution Control services will resume operations with the queue in progress when the system starts up next time (Recovery mode). However, before resuming operations, you may want to take the required corrective actions by checking the status of servers and jobs where Systemwalker Operation Manager has been installed. In such case, you must check this box.
If you have checked this box, the jobs are waited (stopped queue status). The jobs are executed only when the queue is started. After you have taken the corrective actions, you can restart the operation by activating the queue using the qstart command.
Use this option if you do not start job execution until you have checked the system status during periodical hardware maintenance or others. If you have checked this box, the jobs are waited (stopped queue status) when the Job Execution Control services or daemons are restarted. After you have taken the corrective actions, you can restart the operation by activating the queue using the qstart command.
Use this option to use the Batch Output function for JCL job results.
When you check this box, the Printing Formats sheet appears and you can set the printing parameters on it.
Check this box to use a termination code of the recently executed job step written in the Job Control Language (JCL) as the job termination code. If not checked, a termination code of the largest job step written in the JCL is used as the job termination code.
Use this option to output both the job step name and the job step termination code to the standard output file of job steps written in the JCL.
When this check box is selected, jobs within the subsystem for which this option has been enabled will operate in job object mode. When this check box is cleared, jobs within the subsystem for which this option has been disabled will operate in trace mode.
Refer to "Job Process Startup Modes [Windows]" in the Systemwalker Operation Manager User's Guide for details on the job object mode and the trace mode.
Backward compatibility sheet in the Define Operating Information window
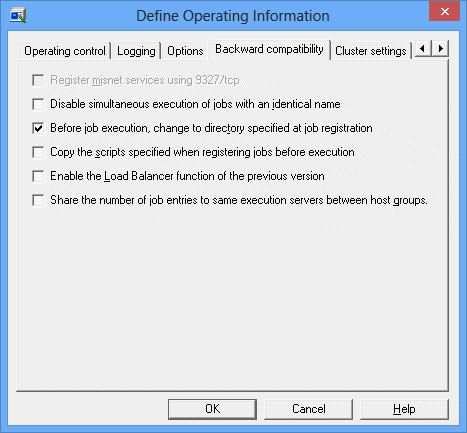
Use this option to add the "mjsnet" services to the services file using 9327/tcp. We recommend you to specify this option here as the port numbers must be consistent between servers for network job execution. You can use this option if you are using the system in V5.0L30 only.
Use this option NOT to execute jobs having the same name concurrently.
This is checked by default. Usually, you need not to change it. If checked, jobs having Job Execution Control attributes are executed in the directory you have specified during job registration. If unchecked, jobs are executed in the following directory.
[Windows]
Jobs are executed in the temporary work area of Job Execution Control.
[UNIX]
Jobs are executed in the home directory of the project owner who has registered the job net.
Use this option to copy the script or batch file you have specified during job registration to the spool and execute it.
If checked, the options of the batch file are resolved during job submission.
Use this option to enable the previous Load Distribution functions. If unchecked, the Distributed Execution function is enabled.
For distributed execution jobs, select this checkbox to share the "number of jobs submitted to identical execution servers" between different host groups.
If this checkbox is selected and execution servers with the same name have been defined in different host group definitions, "the number of jobs submitted" will be shared between the host groups. If the host groups have different settings for the maximum number of jobs that can execute concurrently, jobs will be allocated within the maximum number of concurrent jobs that has been defined for each group.
By default, this option is not selected.
If the Enable the Load Balancer function of the previous version checkbox has been selected, this option will be grayed out and the function cannot be enabled.
Cluster settings sheet in the Define Operating Information window
The following explains how to configure the cluster system using the Cluster Setup sheet.
Setup of schedule server
The following explains your setup on the schedule server.
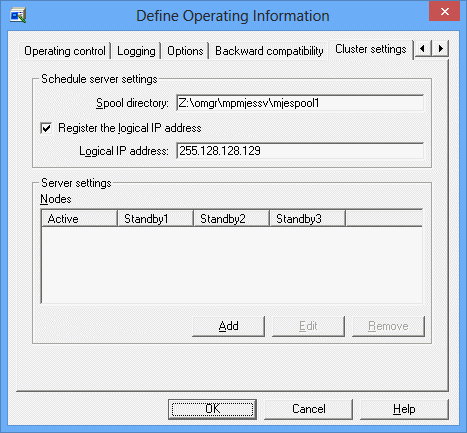
You must set the followings on ALL schedule servers which configure the cluster system.
Specifies a location to store the spool directory if the cluster system on the schedule server runs in the Windows version. The storage location must be the shared disk.
Use this option to control network job submission using its logical IP address. Use this option to specify a logical IP address, using up to 64 bytes. The same logical IP address must be used on both active and standby systems of all schedule servers which configure the cluster system.
If you have set the logical IP address, you need not set it up on the execution servers.
Use this option for setup on the destination server which executes the submitted network jobs. No setup is required on the schedule server.
Information
The logical IP address is used as the destination address of the job termination notification.
When the logical IP address of the cluster is registered, the execution server can notify the schedule server of job termination even if the active and standby systems are switched due to failover of the schedule server in the middle of network job execution.
Setup of execution servers
The following explains your setup on the execution servers.
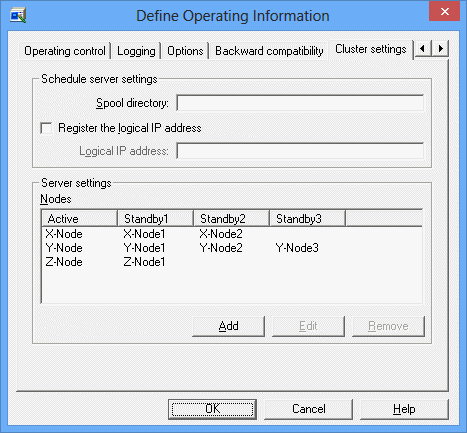
Use this option for setup on the network job submitting server. No setup is required on the execution servers.
Use this option for setup on the destination server which executes the submitted network jobs. You must set this option to accept network jobs submitted by the schedule server which configures the cluster system. This setup is NOT required if you do not accept network jobs submitted by the schedule server which configures the cluster system. Also, this setup is NOT required if you have specified the logical IP address during schedule server setup.
Click Add to open the Add Node window, and you can configure the schedule server for network job submission.
When you have set, the schedule server which configures the cluster system is displayed on the Node tree.
When you select a row on the Node tree and click Edit, the Editing the Node Name Definition window appears and you can change the schedule server of the cluster system. Click Remove to delete the schedule server configuration from the selected Node tree.
Add/Edit Node window
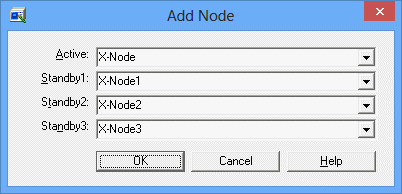
Specifies a node name of the active (or currently operating) schedule server which configures the cluster system.
Specifies a node name of the standby schedule server which configures the cluster system. You can specify standby2 and 3 if they exist.
If multiple standby systems exist, you must specify the active system first and specify the standby systems according to their failover priority. If the standby systems are NOT specified according to their priority, more time may be required for network job execution.
Network sheet in the Define Operating Information window
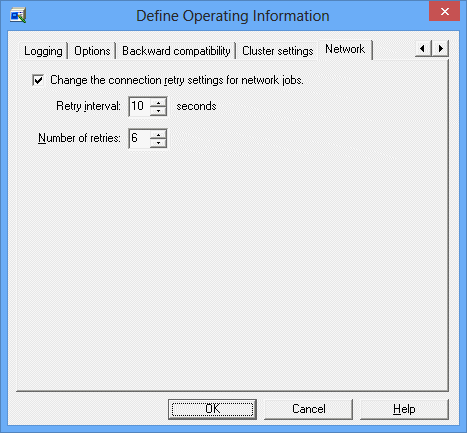
When this checkbox is checked, Retry interval and Number of retries can be set for the retry operation.
Set the interval between retries in the range from 0 to 600 (seconds). The default is 10 (seconds).
Set the number of retries in the range from 0 to 20 (times). The default is 6 (times).
Print format sheet in the Define Operating Information window [Windows]
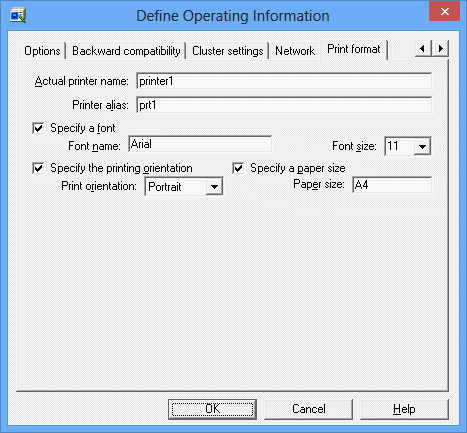
You can use the Print format sheet for the Batch Output function of JCL job execution results. This sheet is displayed if you have selected the Enable prt parameter option on the Options sheet.
If you use the Batch Output function of JCL job results, the attributes for print formats are used in the following priority.

Therefore, you can omit the print attribute setup of JCL jobs if you have defined the attributes here.
For the JCL details, refer to the Systemwalker Operation Manager Reference Guide.
Specifies the actual name of the printer to be controlled by Printer Manager, using up to 32 alphanumeric bytes. The printer alias CANNOT contain a space, an ampersand (&), and left and right parentheses.
Specifies an alias of the printer. You can specify any printer name consisting of up to 32 alphanumeric bytes. The printer alias CANNOT contain a space, an ampersand (&), and left and right parentheses.
In addition to the actual printer name, you can specify the printer alias you have defined here in the "prt" operand of JCL file control statement.
Specifies the default font name of the current printer. You can enter a font name in the Font name field, and select a font size in the Font Size field. If omitted, the definitions of the Print Manager are used.
Specifies a printing direction or a print orientation of the printer. You can select the horizontal or vertical print orientation in the Print orientation field. The definition of Print Manager is always used for a continuous feed printer.
Specifies the default paper size for the specified printer.
The definitions of Print Manager are always used for a continuous feed printer.