This section explains how to define the job owner information.
Outline
You must define the job owner information if you have selected the Execute job under the respective job owner's authority option on the Options sheet of the Define Operating Information window.
When using Systemwalker Operation Manager, a user having job owner privileges can execute jobs if his or her password has been set as the job owner information.
If Execute jobs under the respective job owner's authority has been specified, all jobs and job nets requested from users whose Status is "Undefined" in the Define Job Owner's Information window will terminate abnormally.
Definition procedure
The following explains the procedure for defining job owner information for scheduled jobs and on-demand jobs.
Definition procedure for scheduled job owners
If a project was defined using the standard procedure, the job owner information can be defined by specifying the owner and the owner password in the New Project window.
However, if Execute jobs under the respective job owner's authority is enabled in the Options sheet of the Define Operating Information window after the project is defined, use the following procedure to define the job owner information:
Display the Define Job Owner Information window.
Display this window by using one of the following methods:
Open the Define Operating Information window and the Options sheet. Select Execute jobs under the respective job owner's authority to enable the Set Job Owner button, and then click it.
Click Job owner in the Systemwalker Operation Manager Environment Setup window.
Ensure that the registered project owner is displayed in the User ID column.
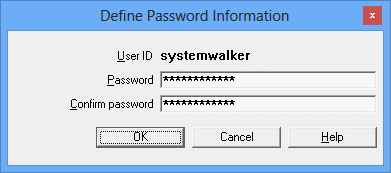
Set a password in the Define Password Information dialog box.
Select the target user in the Define Job Owner's Information window, and then select Define from the User menu. The displayed Define Password Information dialog box appears. Enter password information.
If the entry is properly authenticated, the "Defined" for the target user will be displayed in the Status field of Define Job Owner Information window.
Note
If there are multiple projects with the same owner in the Define Job Owner's Information window, and password information is defined to a project with "Undefined" password information, it will also be applied to all the other projects (that have "Undefined" password information). The status will be changed to "Defined" when the screen is refreshed.
However, if the password information is changed for a project where the password information is already "Defined", only the definition for that project will be changed.
Definition procedure for on-demand job owners
Display the Define Job Owner Information window.
Display this window using one of the following methods:
Open the Define Operating Information window and the Options sheet. Select Execute jobs under the respective job owner's authority to enable the Set Job Owner button, and then click it.
Click Job owner in the Systemwalker Operation Manager Environment Setup window.
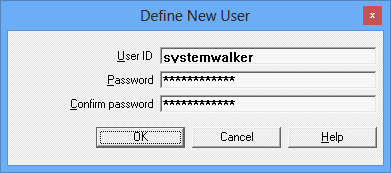
Set up the job owner information in the Define New User dialog box.
In the Define Job Owner Information window, select New User from the User menu. When the Define New User dialog box appears, enter the on-demand job owner information and click OK.
If the entry is properly authenticated, the user information will be displayed in the Define Job Owner Information window.
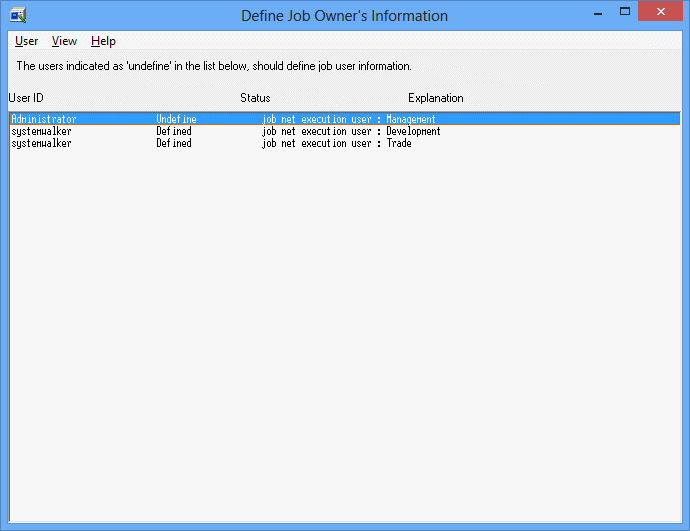
Define the Job Owner's Information window

This window displays a list of the scheduled job owner names you have set in the project definition of Jobscheduler and on-demand job owner names you have registered in the Define New User dialog box. The following explains their meanings.
This is the job owner name. User IDs that are displayed as "job net execution user" in the Explanation column are the owners of scheduled jobs. Other user IDs are the owners of on-demand jobs.
Indicates whether or not the password for the relevant user has been set.
No password has been registered.
The password has been registered.
If the relevant user is a scheduled job owner, this column indicates which project owner this user is.
If the relevant user is an on-demand job owner, it displays one of the following depending on whether or not this user is a domain user.
The domain name is displayed.
Nothing is displayed.
The sequence for displaying User Names in the Define Job Owner Information window can be selected from the following two types by selecting Sort Users from the View menu.
The user IDs are sorted and displayed in alphabetical order.
The user names are sorted and displayed in the order from "Undefined" to "Defined" according to the display of the Status field.
Define Password Information dialog box

Each column is described below.
This field displays the target user ID.
Enter a password of the relevant user. This password should be same as the password that is used when logging onto the server. Entry characters are indicated by asterisks (*) indicating the number of characters you have entered.
You must re-enter the password for confirmation. Entry characters are indicated by asterisks (*) indicating the number of characters you have entered.
Press it to register the password.
The password is actually tested for authentication to confirm if the entered password is correct. If it is correct, the Status field of the relevant user is changed to the "Defined" in the Define Job Owner's Information window. If the specified password is incorrect, an error message is displayed, and the Define Password Information dialog box is displayed again.
Define New User dialog box

Enter the user ID of the owner of the on-demand job. To specify a domain account, separate the NETBIOS domain name and the user ID with a backslash ("\").
Enter a password of the relevant user. Entry characters are indicated by asterisks (*) indicating the number of characters you have entered.
You must re-enter the password for confirmation. Entry characters are indicated by asterisks (*) indicating the number of characters you have entered.
Authentication will be performed on the user ID and password that have been entered. An error message will be displayed if the specified user ID and password are incorrect. If authentication is successful, the user will be registered and the status of the user will appear as "Defined" in the list in the Define Job Owner's Information window.