Note
Do not use this procedure if operating Systemwalker Software Configuration Manager under the following conditions:
If linked to ServerView Resource Orchestrator
If operating on the same admin server as the Systemwalker Runbook Automation Management Server
Check whether Systemwalker Software Configuration Manager has been installed, and whether the system was restarted after the installation.
Ensure that you are logged in as a user with administrator privileges.
To cancel the setup, the login ID used for the setup will be required.
Use either the isstat command or the Interstage Management Console to check whether Interstage is running. Refer to the Interstage Application Server Reference Manual (Command Edition) for details on the command. Refer to Interstage Management Console Help for details on the Interstage Management Console.
Refer to Technical Guide, estimate database for Systemwalker Runbook Automation operation, and prepare enough size of file system.
Prepared file system is not mounted on operating system, mount file system on operating system. For details on how to mount, refer to the operating system manuals.
Decide directory for registering process management database. Decide the directory so as to become directory on file system as prepared in 1. above.
Add access authority to directory.
Without creating directory for registering process management database (when specified directory does not exist, Setup command will create it with adding appropriate access authority), from root directory to registering real database directory for process management, if one of them are already created, add the following access authority to directory.
Add changeable authority to User group which belong to operating system user "swrbadbuser".
Also do not add changeable authority to only operating system user "swrbadbuser". Add changeable authority to User group. If you add changeable authority to only operating system user "swrbadbuser", setup will be aborted with error.
Add authority so that the "swrbadbuser" operating system user can read from and write to the file system (or directory).
Point
The "swrbadbuser" operating system user is created when this product is installed.
To use ServerView Operations Manager Single Sign-On authentication, register user information with OpenDJ/OpenDS.
This section explains the procedure for registering users with OpenDJ/OpenDS.
This section explains how to register user information using LDIF files, which is one of the methods for registering users.
How to Register User Information Using Sample LDIF File
This section explains how to register the user information required to create an environment of Systemwalker Runbook Automation built into Systemwalker Software Configuration Manager by using a sample LDIF file that defines the user information.
Register LDIF sample on as below.
[Windows]
%SWRBA_HOME%\etc\sample\ldif
[Linux]
/etc/opt/FJSVswrbam/sample/ldif/
LDIF file | Description |
|---|---|
swrba_svsso_sample.ldif | This is an LDIF file for creating users, groups and organizational units, and for adding users to groups. To use the authentication infrastructure for ServerView Operations Manager Single Sign-On, use this sample file. |
This sample file assumes the following LDAP configuration.
Edit the file according to the LDAP environment being used.
Note
Only user name and password for "Process control user" and "Schedule startup user" can be changed.
Do not change "Public directory", "Organizational unit that contains users" and "Organizational unit that contains groups".
Public directory | dc=fujitsu,dc=com(*1) |
Organizational unit that contains users | ou=users(*1) |
Organizational unit that contains groups | ou=Group(*1) |
Process control user | swrbaadmin(*2) |
Process control user password | systemwalker#1(*3) |
Schedule startup user | swrbasch(*2) |
Schedule startup user password | systemwalker#2(*3) |
*1: The specified value is fixed. Do not change.
*2: Although it is suggested user name, it is possible to specify any name.
*3: This is the default. The password cannot contain halfwidth spaces, fullwidth characters, or $ \ " = | [ ] : * ; + , < > ? /.
Use the ldapmodify command to register the definition information contained in the LDIF file with the LDAP directory:
[Windows]
<OpenDJ/OpenDS installation directory>\bat\ldapmodify.bat -p <port number> -Z -D <administrator DN> -w <password for the administrator DN> -f <name of the edited LDIF file> |
[Linux]
<OpenDJ/OpenDS installation directory>/bin/ldapmodify -p <port number> -Z -D <administrator DN> -w <password for the administrator DN> -f <name of the edited LDIF file> |
*4: Specify "cn=Directory Manager,cn=Root DNs,cn=config".
*5: Specify the Administrator DN password for OpenDJ/OpenDS. Default is "Admin".
*6: When the content of the sample set is not changed, the sample can be specified directly.
Example
Port number: 1474
Administrator DN: cn=Directory Manager,cn=Root DNs,cn=config
Administrator DN password: admin
Name of the LDIF file that was edited: cfmguser.ldif
[Windows]
ldapmodify.bat -p 1474 -Z -D "cn=Directory Manager,cn=Root DNs,cn=config" -w admin -f cfmguser.ldif |
[Linux]
ldapmodify -p 1474 -Z -D "cn=Directory Manager,cn=Root DNs,cn=config" -w admin -f cfmguser.ldif |
Set up Systemwalker Runbook Automation.
Log in to the Admin Server as a user with administrator privileges.
Start the setup:
%SWRBA_HOME%\bin\swrba_setup -s |
Note
If the operating system being used is Windows Server 2008 or a subsequent version, execute the command above as an administrator.
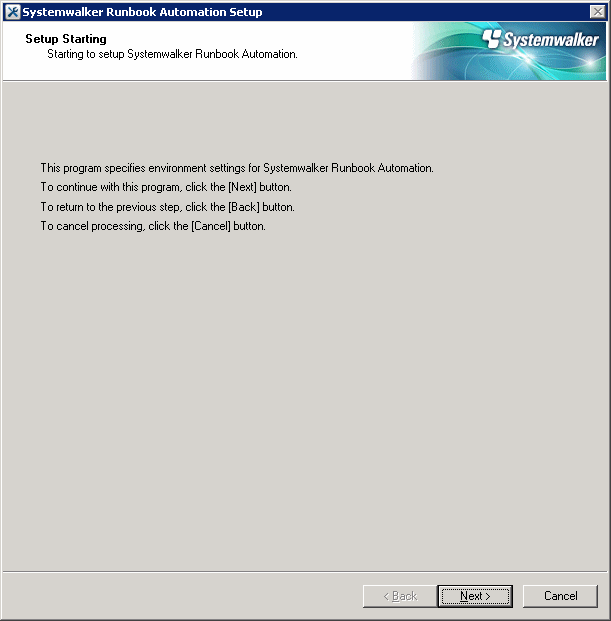
The Systemwalker Runbook Automation Setup Tool will start.
Check the settings displayed, and then click the Next button.
Specify the server type settings.
Enter each setting, and then click the Next button.

Item name | Input value | |
|---|---|---|
Select the build server type: | Select the operating type of the Admin Server from the following options:
| |
High-Reliability Environment Settings | Inherit File Storage Directory | This field is disabled if you selected Standalone Server (Normal operations). |
Primary Node Host Name | This field is disabled if you selected Standalone Server (Normal operations). | |
Secondary Node Host Name | This field is disabled if you selected Standalone Server (Normal operations). | |
Set up the Process Management Database.
Enter each setting, and then click the Next button.
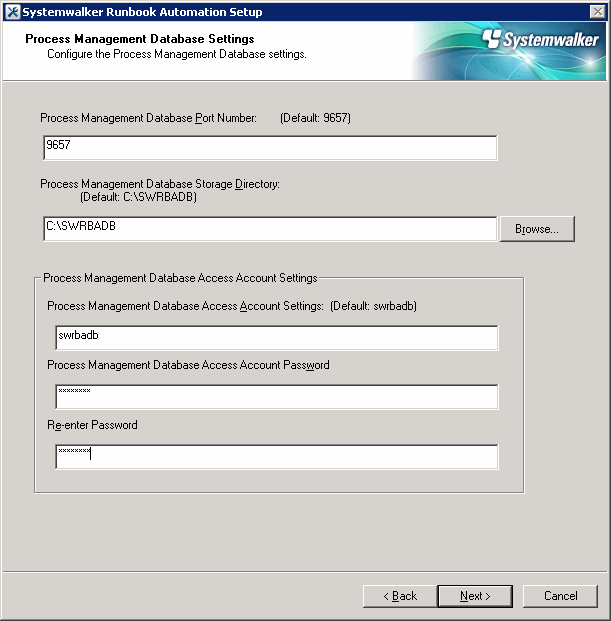
Item name | Input value |
|---|---|
Port number for Process Management Database | Specify the port number for accessing the Process Management Database to be used by Systemwalker Runbook Automation. |
Process Management Database Storage Directory | Specify the directory for storing the database. The value can be up to 100 characters long, and can contain halfwidth numeric characters, hyphens ("-"), underscores ("_") and halfwidth spaces.Directories in "C:\Program Files" or "C:\Program Files (x86)" can also be specified. Paths or relative paths that begin with \\ cannot be specified. Note that read and write permissions for the directory specified in this step must be granted to the "Users" group. |
Account for Process Management Database | Register a new account, which will be required for Systemwalker Runbook Automation to access the Process Management Database. The value can contain up to 18 initial alphanumeric characters. Note that the value specified for this item is required to directly manipulate the Process Management Database. |
Account Password for Process Management Database | Specify the password for the account for accessing the Process Management Database. The value can contain up to 18 alphanumeric characters and symbols (*1). Note that the value specified for this item is required to directly manipulate the Process Management Database. *1: The following symbols can be used: !#%=~:,_ |
Re-enter Password | Re-enter the password for the account for accessing the Process Management Database. |
Set up the environment for the authentication server.
Enter each setting, and then click the Next button.
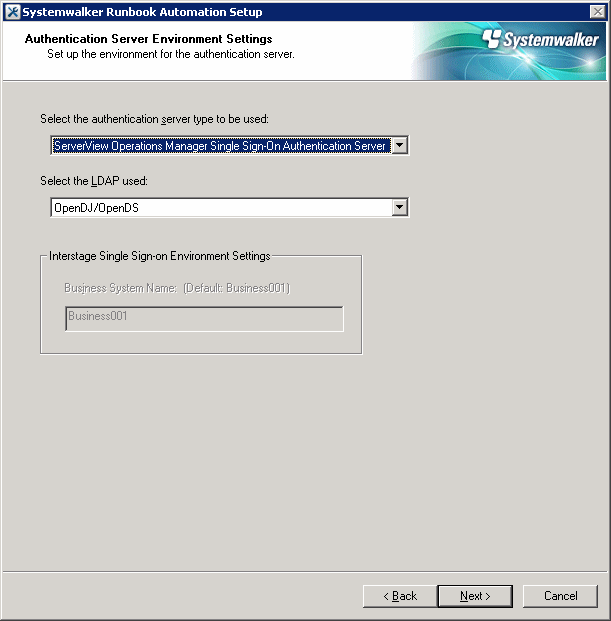
Item name | Input value |
|---|---|
The authentication server type to be used | Select the type of the authentication server to be used from the following options:
|
LDAP Used | Select the LDAP to be used, depending on the authentication server type. Interstage Single Sign-On Authentication Server
|
Interstage Single Sign-on Environment Settings | This field is disabled if you selected ServerView Operations Manager Single Sign-On Authentication Server as the type of authentication server to be used. |
Set up the environment for user authentication.
Enter each setting, and then click the Next button.
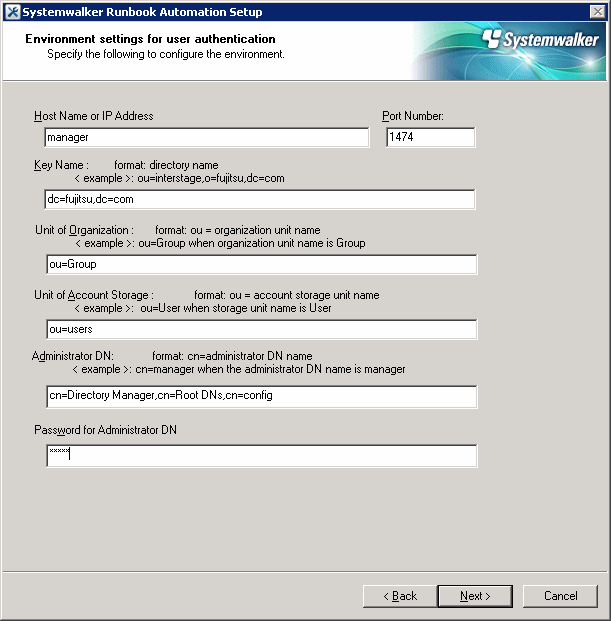
Item name | Input value |
|---|---|
Host Name or IP address | Specify the host name or IP address for the LDAP server. The value can contain up to 64 characters. Note If an LDAP environment has been created on the Admin Server, an IP address in the IPv6 format cannot be specified for this item. In this case, specify a host name or an IP address in the IPv4 format. |
Port Number | Specify the port number for the LDAP server. The value must be between 1 and 65535. Default: 1474 |
Key Name | Set up the public directory: |
Organizational Unit | Specify the name of the organizational unit: |
Account Storage Unit | Specify the name of the account storage unit: |
Administrator DN | Specify the distinguished name (DN) for the administrator of the LDAP repository: cn=Directory Manager,cn=Root DNs,cn=config |
Password for Administrator DN | Specify the password for the LDAP repository administrator. Note that $, \, ", and spaces cannot be used. The password cannot contain halfwidth spaces, fullwidth characters, or $ \ " = | [ ] : * ; + , < > ? /. Default: admin |
Note
To click the Next button, Confirm authentication to LDAP Server.
Failed to confirm authentication to LDAP Server, Review the setting value with displayed error messages.
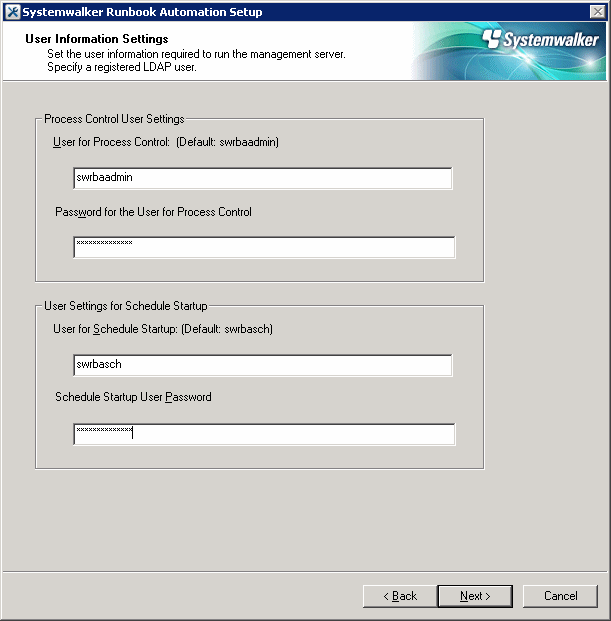
Specify user information.
Enter each setting, and then click the Next button.
Item name | Input value |
|---|---|
User for Process Control | Specify the name of the user for process control that you registered (refer to "3.1.2.3 Registering Users, Groups and Organizational Units" for details). |
Password for the User for Process Control | Specify the password for the user for process control that you registered (refer to "3.1.2.3 Registering Users, Groups and Organizational Units" for details). |
User for Schedule Startup | Specify the user for schedule startup that you registered (refer to "3.1.2.3 Registering Users, Groups and Organizational Units" for details). |
Password of User for Schedule Startup | Specify the password of the user for schedule startup that you registered (refer to "3.1.2.3 Registering Users, Groups and Organizational Units" for details). |
Note
To click the Next button, Confirm authentication to LDAP Server.
Failed to confirm authentication to LDAP Server, Review the setting value with displayed error messages.
And confirm as below.
Because there may be error on setting LDAP Server, get back to previous window, and confirm if the information is set normally or not.
Confirm if user information registered on LDAP server and group information are correct or not.
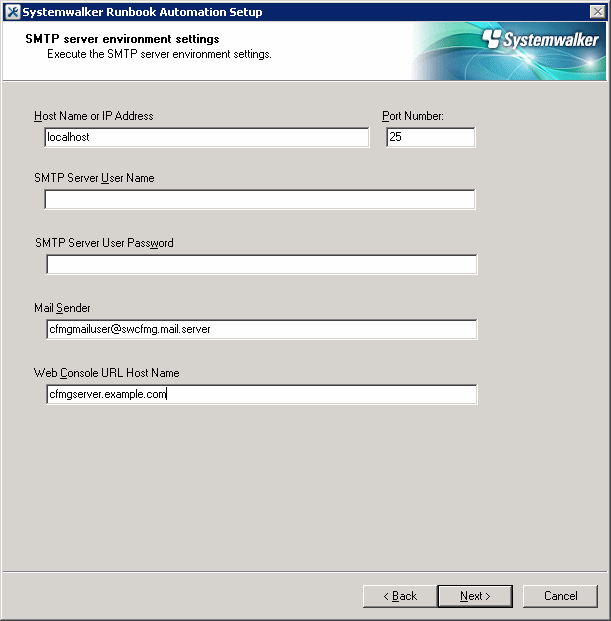
Set up an environment for the SMTP server.
Enter each setting, and then click the Next button.
Item name | Input value |
|---|---|
Host Name or IP Address | Specify the host name or IP address for the SMTP server for sending emails. It is not necessary to change the value from the default. Default value: localhost [Mandatory] |
Port Number | Specify the port number for the SMTP server for sending emails. It is not necessary to change the value from the default. Default value: 25 [Mandatory] |
SMTP server user name | Not required. |
SMTP server user password | Not required. |
Mail sender | Specify the email address of the infrastructure administrator. [Mandatory] |
Web console URL host name | Specify the host name of the Admin Server in FQDN format [Mandatory] |
Information
Systemwalker Software Configuration Manager does not use the email function of Systemwalker Runbook Automation. However, you must set values for the following items in accordance with the table above, because they are required for Systemwalker Runbook Automation setup.
Host Name or IP Address
Port Number
Mail sender
Web console URL host name
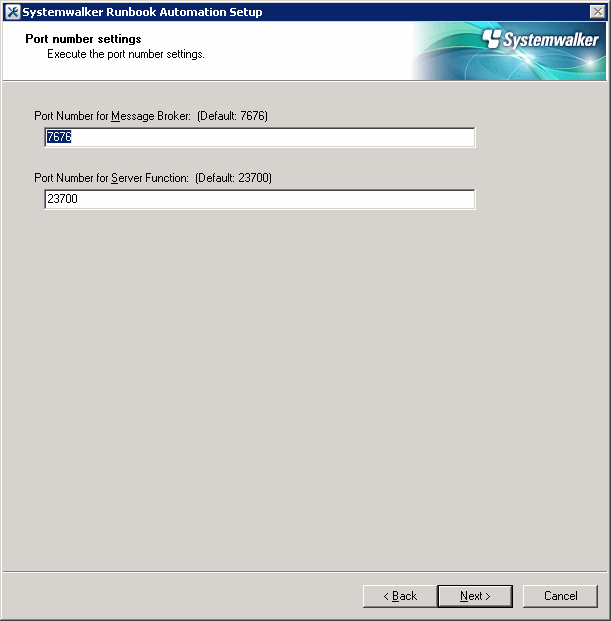
Configure the port number to be used by Systemwalker Runbook Automation.
Enter relevant values, and click Next.
Item name | Input value |
|---|---|
Port Number for Message broker | Specify the port number required by Systemwalker Runbook Automation to use the Java EE feature. Default value: 7676 |
Port Number for Server Function | Specify the port number required to run the Systemwalker Runbook Automation server feature. Default value: 23700 |
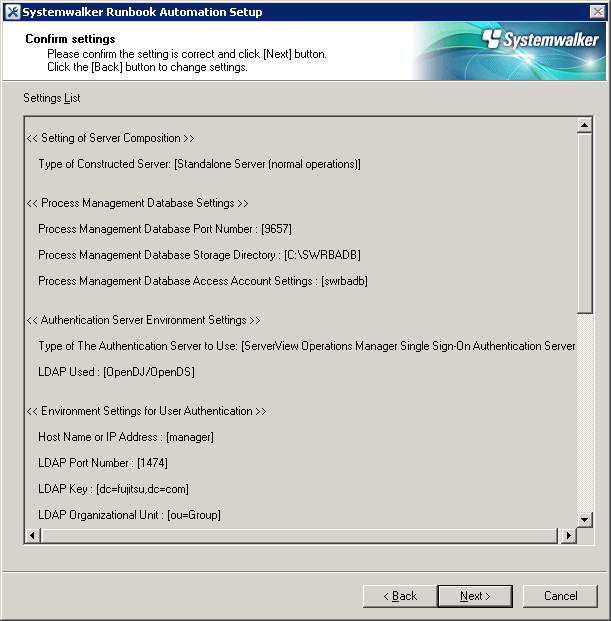
The settings will be displayed.
Check the displayed values are correct, and then click the Next button. The setup will commence.
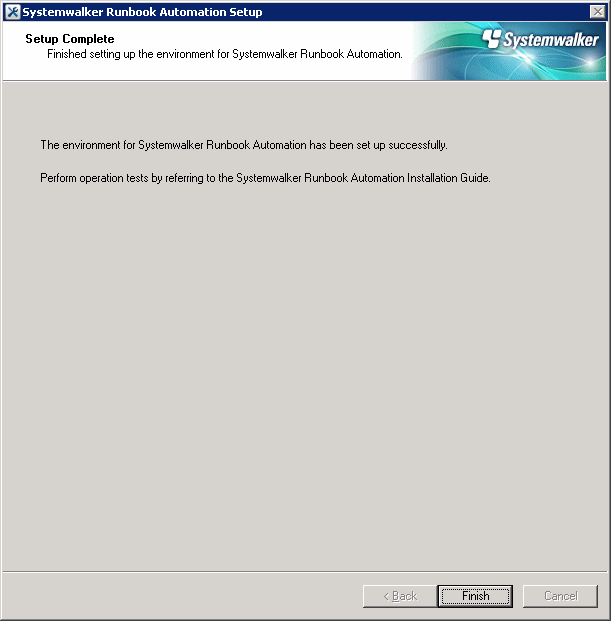
If the setup completes normally, the settings will be displayed. Check the settings that are displayed, and then click the Finish button.
Note
If the setup fails for any reason, be sure to cancel the setup.
Set up Systemwalker Runbook Automation.
Information
Input [!!] after ENTER==> to stop, except entering password and confirming setting up information. Setting up command is abort
Log in to the Admin Server as a superuser.
Start Systemwalker Runbook Automation setup:
# /opt/FJSVswrbam/bin/swrba_setup -s |
A message will be displayed indicating that the setup is about to start.
================================================================================
       Systemwalker Runbook Automation Setup Tool
                                   V15.1.3
                                   Copyright FUJITSU LIMITED 2010-2014
================================================================================
Starting to set up Systemwalker Runbook Automation.
Please input [!!] after ENTER==> to stop the setup.
Specify the full path of the Process Management Database directory.
After "ENTER==>" will be displayed, input specified directory within 100-byte absolute path.
Specify directory name with one byte alphanumeric characters. Not specify it with relative path.
If only enter key is input, set default value "/var/opt/FJSVswrbam/SWRBADB".
[Settings for the Process Management Database directory]
Specify the Process Management Database directory.
Note 1: The maximum length of the path that can be specified is 100 bytes.
If Enter is pressed, the default value will be used.
( default : /var/opt/FJSVswrbam/SWRBADB )
ENTER==>
Enter the port number that the Process Management Database will use.
[Settings for the communication port for Process Management Database]
Enter the port number used by the Process Management Database.
If Enter is pressed, the default value will be used.
( default : 9657 )
ENTER==>
Enter the account name and password for accessing the Process Management Database.
[Enter the account for accessing the Process Management Database]
Register a new account,
which will be required for Systemwalker Runbook Automation
to access the Process Management Database.
The value can contain up to 18 alphanumeric characters.
If Enter is pressed, the default value will be used.
( default : swrbadb )
ENTER==>

[Enter the account password]
The value can contain up to 18 alphanumeric characters,
spaces and symbols (!#%=~:,_)
Account will be registered with the specified password.
ENTER==>
Re-enter the password.
ENTER==>
Specify "3" to select "ServerView Operations Manager Single Sign-On Authentication Server" as the type of authentication server to be used by the admin server.
[Authentication server type settings]
Select the type of the authentication server to be used:
1. Authentication server for Interstage Single Sign-On
2. LDAP server
3. ServerView Operations Manager Single Sign-On Authentication Server
If Enter is pressed, the default value will be used.
( default : 1 )
ENTER==>
Specify the type of LDAP directory to be used.
Specify "1" to select "OpenDJ/OpenDS" as the type of LDAP directory to be used.
[Settings for the LDAP used]
Select the LDAP that is used:
1. OpenDJ/OpenDS
2. Active Directory
If Enter is pressed, the default value will be used.
( default : 1 )
ENTER==>
Specify the host name or IP address for the LDAP directory.
[Settings for the host name]
Enter the host name or IP address of LDAP server.
ENTER==>
Note
If an LDAP environment has been created on the Admin Server, an IP address in the IPv6 format cannot be specified for this item. In this case, specify a host name or an IP address in the IPv4 format.
Specify the port number for the LDAP directory.
[Settings for the port]
Enter the LDAP port number.
If Enter is pressed, the default value will be used.
( default : 1474 )
ENTER==>
Specify the key name for the LDAP directory.
Specify "dc=fujitsu,dc=com".
[Settings for the key]
Enter a public directory.
If Enter is pressed, the default value will be used.
( default : dc=fujitsu,dc=com )
ENTER==>
Specify the organizational unit name for the LDAP directory.
Specify "ou=Group".
[Settings for the organizational unit]
Enter the organizational unit name.
(Format : ou=organizational unit name)
(Example: If the organizational unit name is Group, [ou=Group])
If Enter is pressed, the default value will be used.
( default : ou=Group )
ENTER==>
Specify the account storage unit name for the LDAP directory.
Specify "ou=users".
[Settings for the account storage unit]
Enter the account storage unit name.
(Format : ou=account storage unit name)
(Example: If the organizational unit name is User, [ou=User])
If Enter is pressed, the default value will be used.
( default : ou=users )
ENTER==>
Specify the administrator DN for the LDAP directory.
Specify "cn=Directory Manager,cn=Root DNs,cn=config".
[Enter administrator DN]
Enter the administrator DN.
(Example: cn=manager,ou=interstage,o=fujitsu,dc=com)
If Enter is pressed, the default value will be used.
( default : cn=Directory Manager,cn=Root DNs,cn=config )
ENTER==>
Enter the password for the LDAP administrator DN.
The password cannot contain halfwidth spaces, fullwidth characters, or $ \ " = | [ ] : * ; + , < > ? /. The default value is "admin".
[Enter password for administrator DN]
Enter the password for administrator DN.
ENTER==>
The system will then check with the LDAP server whether the administrator DN exists.
Checking LDAP server authentication...
If LDAP server authentication has been confirmed normally, the following message will be displayed.
Authentication the information on LDAP server completed.
If LDAP server authentication has not been confirmed, the following message will be displayed.
Error:Failure in authentication to the LDAP server. Administrator DN information does not match the information on the LDAP server.
Re-enter the user name and password for the administrator DN.
If authentication has failed because the LDAP information is incorrect, enter "*" to change the information on the LDAP server.
[Enter administrator DN]
Enter the administrator DN.
(Example: cn=manager,ou=interstage,o=fujitsu,dc=com)
If Enter is pressed, the default value will be used.
Or enter "*" to change the information on the LDAP server.
( default : cn=Directory Manager,cn=Root DNs,cn=config )
ENTER==>

[Enter password for administrator DN]
Enter the password for administrator DN.
ENTER==>
If administrator DN and password are not incorrect, Review them with the following viewpoint.
Confirm if the connection information is correct.
Confirm if the LDAP server has been started.
Review user and group definition information registered on LDAP are correct.
Confirm if the network to LDAP is down,
Enter the account name for the user for process control that has been registered with the LDAP directory.
Specify the account name for the user for process control that you registered (refer to "3.1.2.3 Registering Users, Groups and Organizational Units" for details).
[Enter account for the user for process control]
Enter the account for the user for process control.
If Enter is pressed, the default value will be used.
( default : swrbaadmin )
ENTER==>
Enter the password for the user for process control.
Specify the password for the user for process control that you registered (refer to "3.1.2.3 Registering Users, Groups and Organizational Units" for details).
[Enter password for the user for process control]
Enter the password for the user for process control.
ENTER==>
The system will then check with the LDAP server whether the user for process control exists.
Checking LDAP server authentication...
If LDAP server authentication has been confirmed normally, the following message will be displayed.
Authentication the information on LDAP server completed.
If LDAP server authentication has not been confirmed, the following message will be displayed.
Error:Failure in authentication to the LDAP server. Process control user information does not match the information on the LDAP server.
Re-enter the user name and password for the user for process control.
If authentication has failed because the LDAP information is incorrect, enter "*" to change the information on the LDAP server.
[Enter account for the user for process control]
Enter the account for the user for process control.
If Enter is pressed, the default value will be used.
Or enter "*" to change the information on the LDAP server.
( default : swrbaadmin )
ENTER==>

[Enter password for the user for process control]
Enter the password for the user for process control.
ENTER==>
If the user and password for process control are not incorrect, Review them with the following viewpoint.
Confirm if the connection information is correct.
Confirm if the LDAP server has been started.
Review user and group definition information registered on LDAP are correct.
Confirm if the network to LDAP is down,
Enter the account name for the user for schedule startup that has been registered with the LDAP directory.
Specify the account name for the user for schedule startup that you registered (refer to "3.1.2.3 Registering Users, Groups and Organizational Units" for details).
[Enter account for the user for schedule startup]
Enter the account for the user for schedule startup.
If Enter is pressed, the default value will be used.
( default : swrbasch )
ENTER==>
Enter the password for the user for schedule startup.
Specify the password of the user for schedule startup that you registered (refer to "3.1.2.3 Registering Users, Groups and Organizational Units" for details).
[Enter password for the user for schedule startup]
Enter the password for the user for schedule startup.
ENTER==>
The system will then check with the LDAP server whether the user for process control exists.
Checking LDAP server authentication...
If LDAP server authentication has been confirmed normally, the following message will be displayed.
Authentication the information on LDAP server completed.
If LDAP server authentication has not been confirmed, the following message will be displayed.
Error:Failed to authenticate with the LDAP server. There is an error with either the user for starting schedules or the information on the LDAP server.
Re-enter the user name and password for schedule startup.
If authentication has failed because the LDAP information is incorrect, enter "*" to change the information on the LDAP server.
[Enter account for the user for schedule startup]
Enter the account for the user for schedule startup.
If Enter is pressed, the default value will be used.
Or enter "*" to change the information on the LDAP server.
( default : swrbasch )
ENTER==>

[Enter password for the user for schedule startup]
Enter the password for the user for schedule startup.
ENTER==>
If the user and password for schedule startup are not incorrect, Review them with the following viewpoint.
Confirm if the connection information is correct.
Confirm if the LDAP server has been started.
Review user and group definition information registered on LDAP are correct.
Confirm if the network to LDAP is down,
Set either the host name or IP address of the SMTP server.
Specify the host name or IP address for the SMTP server for sending emails.
It is not necessary to change the value from the default. Press Enter.
[SMTP server host name settings]
Enter the SMTP server host name or IP address.
If Enter is pressed, the default value will be used.
( default : localhost )
ENTER==>
Note
Systemwalker Software Configuration Manager does not use the email function of Systemwalker Runbook Automation. However, you must set values for the following items in accordance with the table above, because item are required for Systemwalker Runbook Automation setup.
Host Name or IP Address
Port Number
Mail sender
Web console URL host name
Specify the port number for the SMTP server.
It is not necessary to change the value from the default. Press Enter.
[SMTP server port settings]
Enter the SMTP server port number.
If Enter is pressed, the default value will be used.
( default : 25 )
ENTER==>
Enter the user name for the SMTP server.
Specify the name of the user that is used to authenticate with the SMTP server when emails are sent.
It is not necessary to set a value. Press Enter.
[Enter SMTP server user name]
Enter the SMTP server user name.
If only the Enter key is pressed, the value will not be set.
ENTER==>
Enter the sender for emails.
Specify the sender (the "from" address) that will be assigned to the emails that are sent, using email address format.
Specify the email address of the infrastructure administrator.
[Enter mail sender]
Enter the mail sender.
ENTER==>
Specify the host name of the Admin Server, which will be embedded into the URL for the Web console.
Specify the host name of the admin server in FQDN format.
[Enter Web console URL host name]
Enter the Web console URL host name.
ENTER==>
Type the message broker port number.
Specify the port number required by Systemwalker Runbook Automation to use the Java EE feature.
[Port number for message broker settings]
Enter the port number for the message broker.
If Enter is pressed, the default value will be used.
( default : 7676 )
ENTER==>
Type the port number used by the server feature.
Specify the port number required to run the Systemwalker Runbook Automation server feature.
[Port number for server function]
Enter the port number for the server function.
If Enter is pressed, the default value will be used.
( default : 23700 )
ENTER==>
Check the setup information.
Check the information entered in the settings window, and then enter "y" to start the setup processing.
If "n" is entered, the setup processing will be terminated and the display will return to the prompt.
If "r" is entered, the setup processing will be executed again from step 3.
[Confirm setup information]
Check the specified values.
================================================================
Systemwalker Runbook Automation operation model
Process Management Database directory              : /var/opt/FJSVswrbam/SWRBADB
Port number for Process Management Database        : 9657
Account for Process Management Database            : swrbadb
Authentication server kind                         : ServerView Operations Manager Single Sign-On Authentication Server
LDAP used                                          : OpenDJ/OpenDS
LDAP Host Name                                     : swrba
LDAP Port                                          : 1474
LDAP public directory                              : dc=fujitsu,dc=com
LDAP organizational unit name                      : ou=Group
LDAP account storage unit name                     : ou=users
LDAP administrator DN                              : cn=Directory Manager,cn=Root DNs,cn=config
Account for the user for process control           : swrbaadmin
Account for the user for schedule startup          : swrbasch
SMTP server host name                              : localhost
SMTP server port                                   : 25
SMTP server user name                              : Do not use SMTP server authentication.
Mail sender                                        : cfmgmailuser@swrba.mail.server
Web console URL host name                          : cfmgserver.example.com
Message broker port                                : 7676
Server function port                               : 23700
================================================================
OK? [Start (y), Cancel (n), Rectify (r)]
ENTER==>
The setup will start.
Messages about the setup processing will be displayed, with a message indicating the completion of the setup being displayed at the end.
Starting to create an environment for Systemwalker Runbook Automation on the management server.
Starting the Process Management Database build...
Creating the Process Management Database has completed.
Starting to set up the environment for Systemwalker Runbook Automation.
Setting up the environment for Systemwalker Runbook Automation has completed.
Starting the CMDB environment setup...
The CMDB environment setup is now complete.
Creating an environment for Systemwalker Runbook Automation on the management server has completed.
Note
If an error occurs during the Systemwalker Runbook Automation setup process, check the following items.
If the setup processing terminates abnormally, execute the processing for canceling the setup, and then execute the setup processing again.
If the setup processing terminates abnormally and then the processing for canceling the setup also produces an error, restart the system. If the error still persists, contact Fujitsu technical support.