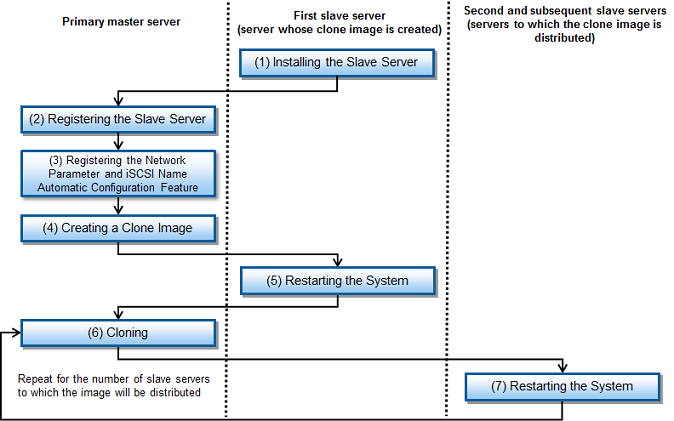
The procedure for adding a slave server to a physical environment is shown below.
The procedure for installing a slave server is shown below.
Create the clone image of the first slave server (one that is already installed) and clone as many times as the number of slave servers to be installed.
All installation tasks must be performed with root permissions.
Note
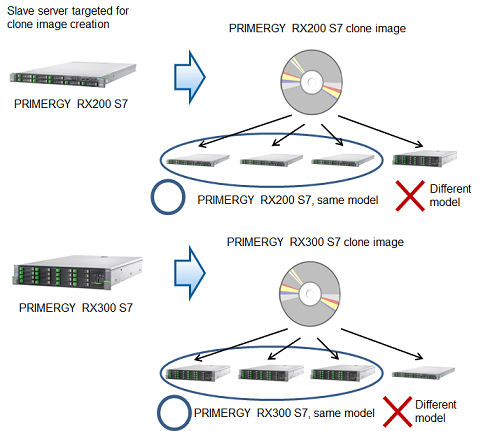
The server for which the clone image is to be created and the server to be cloned must meet the following conditions. If the conditions differ, it is necessary to create groups for the clone images where the conditions are the same.
The model name must be identical.
The hardware conditions must be the same (the same option cards and expansion boards and their locations).
The BIOS settings must be the same, according to the settings described in "5.1 Server BIOS Settings".
The LAN and SAN connections use the same redundancy method, have the same number of redundant paths, and have access to the same network devices and storage devices.
LAN switches and FC Switches that are cascade connected will be treated as one device.
Refer to "6.2 Installing to a Slave Server" for information on how to install the first additional slave server (the slave server whose clone image is created).
To perform the cloning tasks, register all the slave servers that are expected to be installed in the master server.
Create a cloning server definition file (clone.conf).
In the cloning server definition file, specify the slave server whose clone image is to be created and all the slave servers to which the clone image is to be distributed for installation.
Example
Example cloning server definition file (clone.conf):
RCXCSV,V3.4
[Server]
operation,chassis_name,slot_no,server_name,ip_address,mac_address,second_mac_address,snmp_community_name,ipmi_ip_address,ipmi_user_name,ipmi_passwd,ipmi_passwd_enc,admin_lan1_nic_number,admin_lan2_nic_number,admin_lan_nic_redundancy
new,,,slave1, 10.10.10.13,A0:A0:A0:A0:A0:A1,,public,192.168.1.13,admin,admin,plain,,,OFF <--Server to be registered
new,,,slave2, 10.10.10.14,A0:A0:A0:A0:A0:A2,,public,192.168.1.14,admin,admin,plain,,,OFF <--Server to be registered
new,,,slave3, 10.10.10.15,A0:A0:A0:A0:A0:A3,,public,192.168.1.15,admin,admin,plain,,,OFF <--Server to be registered
new,,,slave4, 10.10.10.16,A0:A0:A0:A0:A0:A4,,public,192.168.1.16,admin,admin,plain,,,OFF <--Server to be registered
new,,,slave5, 10.10.10.17,A0:A0:A0:A0:A0:A5,,public,192.168.1.17,admin,admin,plain,,,OFF <--Server to be registered
[ServerAgent]
operation,server_name
new,slave1 <-- Server whose clone image is to be created
Execute the bdpp_addserver command to register the slave server.
# /opt/FJSVbdpp/bin/bdpp_addserver clone.confFileDirectory/clone.conf <Enter>
Use the bdpp_listserver command to check that the slave server has been registered successfully.
# /opt/FJSVbdpp/bin/bdpp_listserver <Enter>
Example
Example of checking slave server registration:
# /opt/FJSVbdpp/bin/bdpp_listserver <Enter>
PHYSICAL_SERVER  SERVER                   ADMIN_IP        STATUS  MAINTENANCE
---------------  ------                   --------        ------  -----------
slave1           slave1                   192.168.1.21    normal  OFF
slave2           -                        192.168.1.22    stop    -
slave3           -                        192.168.1.23    stop    -
slave4           -                        192.168.1.24    stop    -
slave5           -                        192.168.1.25    stop    -
See
Refer to "B.3 clone.conf" for information on the cloning server definition file.
Refer to "A.1 bdpp_addserver" for information on the bdpp_addserevr command.
Refer to "A.9 bdpp_listserver" for information on the bdpp_listserver command.
This section explains how to register the network parameter and iSCSI initiator name automatic configuration feature.
By setting the network parameters for the public LAN and iSCSI-LAN and the iSCSI initiator for the slave server beforehand and then creating the clone image, it is possible to automatically set the network and iSCSI initiator names for all slave servers when distributing the clone images.
Create the network parameter automatic configuration feature definition file (FJSVrcx.conf and ipaddr.conf).
Specify the admin LAN information for the slave server from which the clone image is to be created in the FJSVrcx.conf definition file.
Specify the public LAN and iSCSI-LAN information for all slave servers in the ipaddr.conf definition file.
Create the initiator.conf iSCSI initiator configuration file.
Specify the iSCSI initiator names corresponding to all slave servers that will receive images.
Specify the IP address of the admin LAN of the slave server from which the clone image is to be created, the FJSVrcx.conf, ipaddr.conf, and initiator.conf definition files in the bdpp_prepareserver command.
# /opt/FJSVbdpp/bin/bdpp_prepareserver -m adminLanIpAddress -o FJSVrcx.confFile -i ipaddr.confFile -f initiator.confFile <Enter>
See
Refer to "B.4 FJSVrcx.conf" and "B.5 ipaddr.conf" for information on the definition file used for network parameter automatic configuration.
Refer to "B.6 initiator.conf" for information on the iSCSI initiator configuration file.
Refer to "A.10 bdpp_prepareserver" for information on the bdpp_prepareserver command.
Create a clone image from a slave server that is already installed.
To change the image storage directory, execute the bdpp_changeimagedir command.
# /opt/FJSVbdpp/bin/bdpp_changeimagedir imageDirectory <Enter>
Execute the df command and confirm the amount of disk space available (Avail) in the image storage directory.
Refer to "Clone image file storage area" for information on how to confirm whether there is enough space to store the clone image.
Example
When confirming the disk usage of the file system in /data/imagedir (image storage directory):
# df -h /data/imagedir <Enter>
Filesystem            Size  Used Avail Use% mount point
/dev/sda3             1.9T   62G  1.8T   4% /
The free space on disk is 1.8TB in this example.
Specify the name of the slave server for creating the clone image and the name of the clone image in the bdpp_getimage command.
# /opt/FJSVbdpp/bin/bdpp_getimage serverName cloneImageName <Enter>
Use the bdpp_listimage command to check that the clone image could be created successfully.
# /opt/FJSVbdpp/bin/bdpp_listimage <Enter>
Example
Checking the clone image creation status:
# /opt/FJSVbdpp/bin/bdpp_listimage <Enter>
IMAGEDIRECTORY
--------------
imagedir:  /data/imagedir

NAME                             VERSION CREATIONDATE        COMMENT
----                             ------- ------------        -------
RX200img                         1       2012/04/20-22:39:59 -
RX300img                         1       2012/04/20-22:41:13 -
See
Refer to "A.3 bdpp_changeimagedir" for information on the bdpp_changeimagedir command.
Refer to "A.6 bdpp_getimage" for information on the bdpp_getimage command.
Refer to "A.8 bdpp_listimage" for information on the bdpp_listimage command.
Restart the slave server from which the image was gathered.
# shutdown -r now <Enter>
Clone as many times as the number of slave servers where the image is to be distributed.
Specify the image distribution destination server and the name of the clone image and execute the bdpp_deployimage command.
# /opt/FJSVbdpp/bin/bdpp_deployimage serverName cloneImageName <Enter>
See
Refer to "A.5 bdpp_deployimage" for information on the bdpp_deployimage command.
Restart slave server to which the image was distributed.
# shutdown -r now <Enter>