This section explains how to install Interstage Studio when the selected installation type is "Custom installation".
1. Stop all applications
Confirm that all applications are stopped.
2. Insert product DVD-ROM into the drive
Insert product DVD-ROM into the DVD-ROM drive of your computer.
The installer is automatically activated, and it opens the following window.
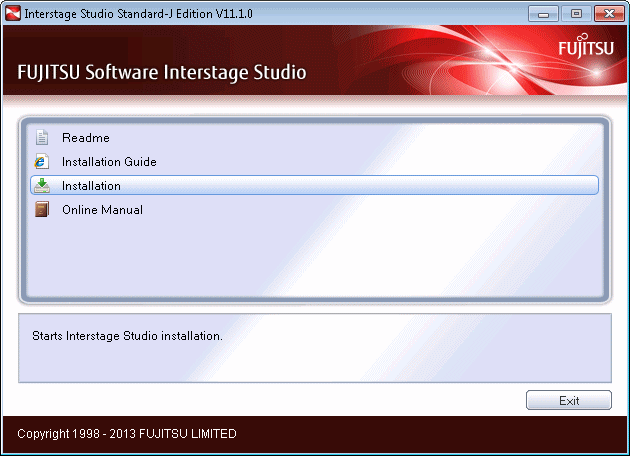
Click the [Installation] button to start installation.
The "User Account Control" dialog box may be displayed, depending on the operating system that is being used. When the dialog box is displayed, click [Continue] and continue with the installation.
Point
If autorun on the DVD drive is not enabled, execute the following command:
<DVD drive name>:\autorun.exe
Information
Explanation of buttons
|
Button |
Outline |
|---|---|
|
Readme |
Displays the Interstage Studio software release guide. |
|
Installation Guide |
Displays this manual. |
|
Installation |
Starts Interstage Studio installation. |
|
Online Manual |
Displays the online manual. |
|
Exit |
Ends Interstage Studio installation. |
3. Select [Custom]
In the [Installation Type Selection] window, select [Custom] as the installation type, and click the [Next] button.
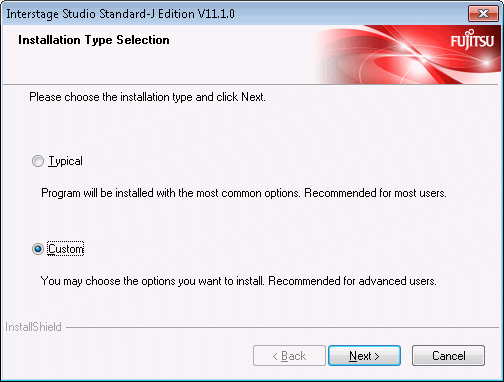
To cancel installation, click the [Cancel] button.
4. Select the installation folder
The [Choose Destination Location] window is displayed so that you can select the Interstage Studio installation folder.
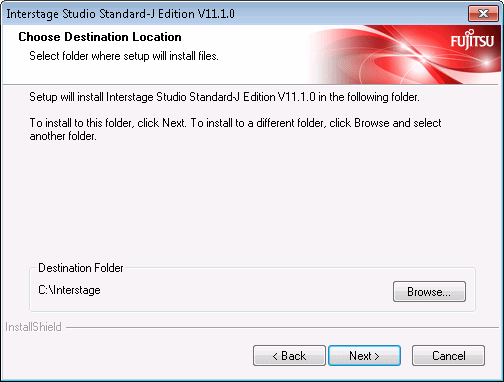
The Interstage Studio installation folder is displayed as [Destination Folder].
To install Interstage Studio in the displayed folder
Click the [Next] button.
To change the installation folder
Click the [Browse] button to open the [Choose Folder] dialog box.
In the [Choose Folder] dialog box, select the installation folder, and click the [OK] button.
Confirm that the new installation folder is displayed as [Destination Folder] in the [Choose Destination Location] window, and click the [Next] button.
Note
Notes on the installation folder name
If the folder specified as the installation destination for this product is the same as that of another product, check the documentation of each product before installation to ensure that subfolders and files do not coincide. Refer to "Folder Structure and Files" in the "Interstage Studio Standard-J Edition Software Release Guide" to check the folder configuration of this product.
The following characters cannot be used in the installation folder name:
":", ";", "/", "*", "?", "<", ">", "(", ")", "|", "#", "%", "^", "!", """, "." and double-byte characters
The specifiable length of the installation destination folder name is up to 58 characters.
When installing application server, you can use the following characters to specify the installation folder name:
Alphanumeric characters (a to z; A to Z; 0 to 9)
Spaces " "
Hyphens "-"
Underscores "_"
If a character other than the above is used, service registration or activation may fail and the installation process may hang. If the installation process hangs, refer to "Action to be taken in the event that the installation process hangs" and take the necessary action.
If the folder that has been set as the installation folder is changed to a different folder, it might cause folders that have already been created to remain. If necessary, delete these folders.
5. Select the functions to be installed
In the [Select Components to Install] window, select (check) the functions (components) to be installed.
Checked: Each selected component will be installed.
Unchecked: A component that is not selected will not be installed.
A shaded component indicates one that is required by a selected component. When the component that requires a shaded component is unchecked, the shading is removed from the shaded component so that it can also be unchecked.
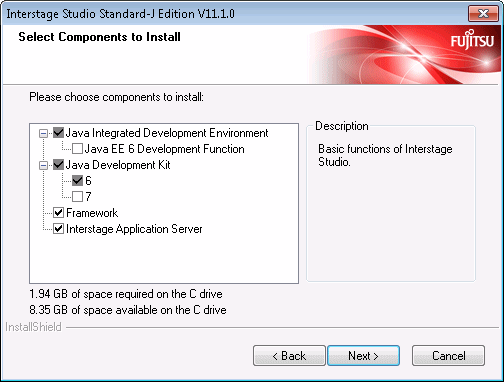
The table below lists components that can be selected in custom installation.
|
Component |
Outline |
Initial state |
|---|---|---|
|
Java EE 6 Development Function |
One of the components that make up the Java Integrated Development Environment. Select it when Java EE 6 application or Java application that uses JDK 7 is used for development. |
Not selected |
|
Java Development Kit |
Component required for using Interstage Studio Select the version (6 or 7) of Java Development Kit to be installed. |
[6] is selected. |
|
Framework |
One of the components composing the operation test environment |
Selected |
|
Interstage Application Server |
One of the components composing the operation test environment Select if performing server application operation tests in a standalone environment. |
Selected |
Select the components to be installed, and click the [Next] button.
6. Set the port numbers
If [Interstage Application Server] is selected as the function to be installed, then the [Port number setting] window will be displayed. In this window, specify the port numbers to be used by the application server function. The initial values are predefined. Check the values and overwrite them if changes are required.
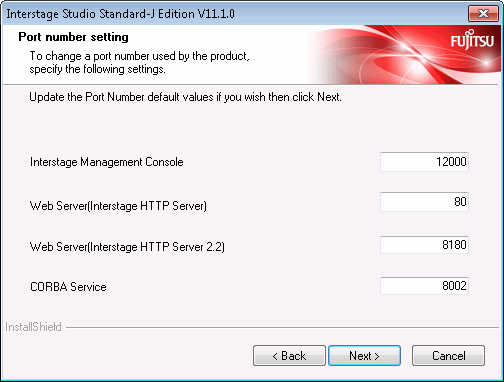
The table below lists the initial values that are set for the respective ports.
|
Function |
Initial value of port number |
|---|---|
|
Interstage Management Console |
12000 |
|
Web Server (Interstage HTTP Server) |
80 |
|
Web Server (Interstage HTTP Server 2.2) |
8180 |
|
CORBA Service |
8002 |
Note
Note on the port number
In the port number, specify an unused value between 1 and 65535.
If the specified port number is outside the range or already being used, the [Re-enter Port Numbers] window is displayed.
When the [Re-enter Port Numbers] window is displayed, enter an unused port number and click the [OK] button.
When the port number is not changed, click the [Ignore] button. In this case, please stop the application that uses the same port number after installing this product, and change the port number that the application uses.
As the port numbers in the range below are always set as ephemeral ports, be careful when using them.
For Windows XP and Windows Server 2003: 1024 to 5000
For Windows Vista, Windows Server 2008 and later: 49152 to 65535
Click the [Next] button.
7. Set the port numbers to be used by the Java EE function
If "Interstage Application Server" is selected as the functions to be installed, then the [Java EE Function Port Number Settings] window will be displayed.
In this window, specify the port numbers to be used by the Java EE function. The default value is set in advance. Check this value and modify if necessary.
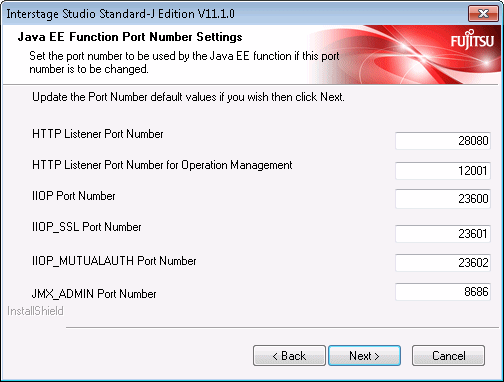
The port numbers below are set as initial values:
|
Function |
Initial value of port number |
|---|---|
|
HTTP Listener Port Number |
28080 |
|
HTTP Listener Port Number for Operation Management |
12001 |
|
IIOP Port Number |
23600 |
|
IIOP_SSL Port Number |
23601 |
|
IIOP_MUTUALAUTH Port Number |
23602 |
|
JMX_ADMIN Port Number |
8686 |
Note
Note on the port number
In the port number, specify an unused value between 1 and 65535.
If the specified port number is outside the range or already being used, the [Re-enter Port Numbers] window is displayed.
When the [Re-enter Port Numbers] window is displayed, enter an unused port number and click the [OK] button.
When the port number is not changed, click the [Ignore] button. In this case, please stop the application that uses the same port number after installing this product, and change the port number that the application uses.
As the port numbers in the range below are always set as ephemeral ports, be careful when using them.
For Windows XP and Windows Server 2003: 1024 to 5000
For Windows Vista, Windows Server 2008 and later: 49152 to 65535
Click the [Next] button.
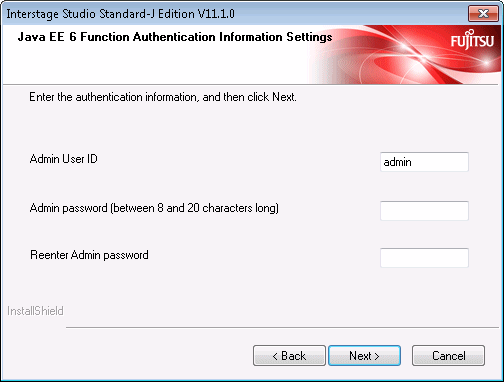
8. Set the authentication information of the Java EE 6 function
If "Interstage Application Server" and "Java EE 6 Development Function" are selected as the functions to be installed, then the [Java EE 6 Function Authentication Information Settings] window will be displayed.
In this window, specify the admin user ID and password. In [Reenter Admin password], enter the same character string as in [Admin password].
Note
Notes at Entry Time
[Admin User ID]
Specify a value between 1 and 255 characters long.
Single-byte alphanumeric characters, "_", "-" and "." can be used.
[Admin password]
Specify a value between 8 and 20 characters long.
Single-byte alphanumeric characters, "_", "-", "'", ".", "@" and "+" can be used.
Click the [Next] button.
9. Set the port numbers to be used by the Java EE 6 function
If "Interstage Application Server" and "Java EE 6 Development Function" are selected as the functions to be installed, then the [Java EE 6 Function Port Number Settings] window will be displayed.
In this window, specify the port numbers to be used by the Java EE 6 function. The default value is set in advance. Check this value and modify if necessary.
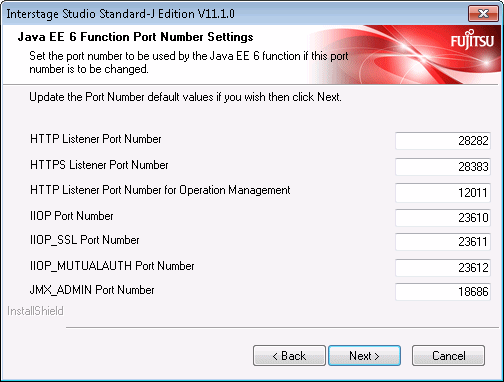
The port numbers below are set as initial values:
|
Function |
Initial value of port number |
|---|---|
|
HTTP Listener Port Number |
28282 |
|
HTTPS Listener Port Number |
28383 |
|
HTTP Listener Port Number for Operation Management |
12011 |
|
IIOP Port Number |
23610 |
|
IIOP_SSL Port Number |
23611 |
|
IIOP_MUTUALAUTH Port Number |
23612 |
|
JMX_ADMIN Port Number |
18686 |
Note
Note on the port number
In the port number, specify an unused value between 1 and 65535.
If the specified port number is outside the range or already being used, the [Re-enter Port Numbers] window is displayed.
When the [Re-enter Port Numbers] window is displayed, enter an unused port number and click the [OK] button.
When the port number is not changed, click the [Ignore] button. In this case, please stop the application that uses the same port number after installing this product, and change the port number that the application uses.
As the port numbers in the range below are always set as ephemeral ports, be careful when using them.
For Windows XP and Windows Server 2003: 1024 to 5000
For Windows Vista, Windows Server 2008 or later: 49152 to 65535
Click the [Next] button.
10. Select the JDK to be used by the Java EE 6 function
If "Interstage Application Server" and "Java EE 6 Development Function" are selected as functions to install, the [Select the JDK to be used in the Java EE 6 function] window is displayed.
Select the JDK version to use with the Java EE 6 function in this window. There is no need to change this if the Java EE 6 function is not going to be used.
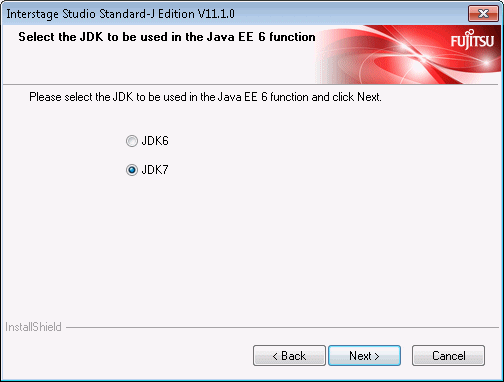
Point
The value set in this window is only effective with the Java EE 6 function.
Click the [Next] button.
11. Select whether or not the Java environment information of this product is to be registered in the system
If the Interstage Application Server product is already installed on the computer, the [Registration of Java environment information in the system] window is displayed. Use this window to select whether or not the environment information of the Java installed by this product is to be registered in the system.
Note that [Unregister] is displayed only if the Java environment information of this product is already registered in the system.

If registering the Java environment information of this product in the system:
Select [Register], and then click [Next].
If not registering the Java environment information of this product in the system:
Select [Do not register], and then click [Next].
If cancelling the Java environment information of this product that is already registered in the system:
Select [Unregister], and then click [Next].
Note
If [Register] is selected, the processing below is performed. The following points must be noted if JDK or JRE have already been installed by other products.
Register in the system the information of the JDK and JBK plug-ins installed by this product.
Set the system environment variables PATH, CLASSPATH, and JAVA_HOME.
Refer to "Checking the environment" for the path to add to the PATH and CLASSPATH environment variables and ensure that the variable lengths do not exceed the permitted length.
Click [Next].
12. Verify the installation configuration
In the [Check Installation Settings] window, verify the installation configuration.
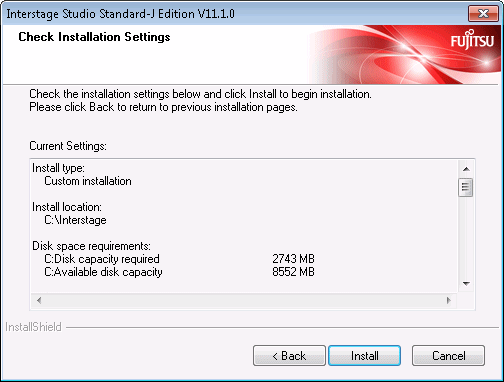
When no problem is found
Click the [Install] button to start installation.
To change the installation configuration
Click the [Back] button, and change the configuration.
13. Installation begins
The setup program begins to install the components required for application development and the operation test environment.
The [Setup Status] window displays the progress of installation.
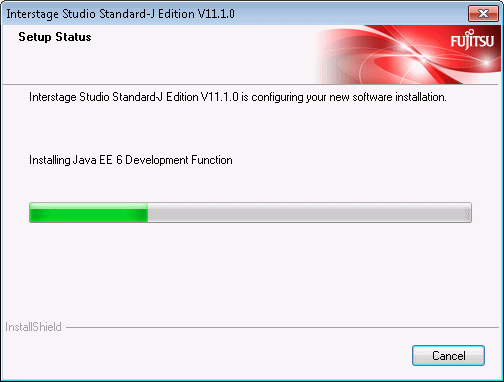
Note
Cancellation
While the [Setup Status] window is displayed, do not click [Cancel] or press the Alt and C keys at the same time. Otherwise, such cancellation causes the installation process to hang. In this event, refer to "Action to be taken in the event that the installation process hangs" and take the necessary action.
14. Installation is completed
When Interstage Studio installation is completed, the following window is displayed.
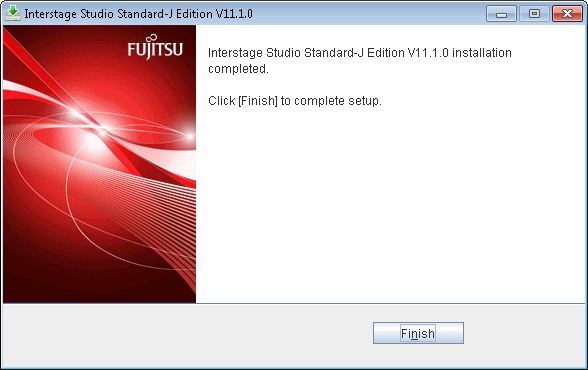
Click the [Finish] button. This ends Interstage Studio installation.
After clicking the [Finish] button, confirm that the installer icon disappears from the taskbar before beginning to use your computer.
Note
A dialog box shows you to restart the computer
If a file copy error occurs during installation, a dialog box will open to show about restarting the computer. In such cases, click the [Finish] button, and restart the computer.
If a file copy error occurs during installation, installation processing is completed when the computer is restarted.
Besides, when fast startup is enabled due to the use of Windows 8, please make sure the system is restarted by selecting [Restart] from the [Power] menu of [Settings] charm.