This section explains the tasks required after setup for the admin server.
Start ServerView Resource Orchestrator by executing the following command:
[Windows]
<ServerView Resource Orchestrator installation directory>\SVROR\Manager\bin\rcxmgrctl start |
[Linux]
/opt/FJSVrcvmr/bin/rcxmgrctl start |
Use the following command to start Systemwalker Software Configuration Manager:
[Windows]
<Systemwalker Software Configuration Manager installation directory>\SWCFMGM\bin\swcfmg_start |
[Linux]
/opt/FJSVcfmgm/bin/swcfmg_start |
Establish the following environment before performing the initial discovery:
Discovering Windows patch information
Create linkage servers
Refer to "1.1.3 Creating Linkage Servers (Repository Servers)".
Set up business servers
Refer to "2.3.1 Settings for Managing Windows Patches".
Discovering Linux patch information
Create linkage servers
Refer to "1.1.3 Creating Linkage Servers (Repository Servers)".
Set up business servers
Refer to "2.3.2 Settings for Managing Linux Patches".
Discovering Fujitsu middleware patch information and Fujitsu middleware product information
Set up business servers
Refer to "2.3.3 Settings for UpdateAdvisor (Middleware)".
Configure settings on the admin server
Register the update application management registry configuration file.
Refer to Step 1 and Step 2 under "Fujitsu Middleware Patch Management" in "Operation Flow" in the Operation Guide.
Perform the initial discovery by executing the following command:
[Windows]
<Systemwalker Software Configuration Manager installation directory>\SWCFMGM\bin\swcfmg_patch_updateinfo.exe -repository |
[Linux]
/opt/FJSVcfmgm/bin/swcfmg_patch_updateinfo -repository |
To discover only particular information, execute the following command:
Windows patch information
[Windows]
<Systemwalker Software Configuration Manager installation directory>\SWCFMGM\bin\swcfmg_patch_updateinfo.exe -t windows -repository |
[Linux]
/opt/FJSVcfmgm/bin/swcfmg_patch_updateinfo -t windows -repository |
Linux patch information
[Windows]
<Systemwalker Software Configuration Manager installation directory>\SWCFMGM\bin\swcfmg_patch_updateinfo.exe -t linux |
[Linux]
/opt/FJSVcfmgm/bin/swcfmg_patch_updateinfo -t linux |
Fujitsu middleware patch information and Fujitsu middleware product information
[Windows]
<Systemwalker Software Configuration Manager installation directory>\SWCFMGM\bin\swcfmg_patch_updateinfo.exe -t middleware |
[Linux]
/opt/FJSVcfmgm/bin/swcfmg_patch_updateinfo -t middleware |
Register newly released Fujitsu middleware patches after the initial discovery has been performed.
Refer to Step 5 to Step 7 under "Fujitsu Middleware Patch Management" in "Operation Flow" in the Operation Guide for information on how to register newly released Fujitsu middleware patches.
Note
Perform the procedure in "2.1.3.4 Registering Discovery Schedules" after the initial discovery is complete. The initial discovery can take quite a long time, so if the execution of a discovery registered using the procedure in "2.1.3.4 Registering Discovery Schedules" coincides with the execution of the initial discovery, then the regular discovery will fail to execute.
Perform the procedure in "2.1.3.5 Registering a Configuration Baseline Creation Schedule" after the initial discovery is complete. The initial discovery can take quite a long time, so if a configuration baseline creation registered using the procedure in "2.1.3.5 Registering a Configuration Baseline Creation Schedule" coincides with the execution of the initial discovery, then the configuration baseline will not be created correctly.
Point
Guide to the time required for the initial discovery
It is recommended that the initial discovery be executed before operations commence.
The following tables show an approximate indication of the time required for the initial discovery:
Windows patch information
Number of business servers | Number of WSUS servers (*1) | Time required for the initial discovery |
|---|---|---|
500 | 1 | 240 minutes or more |
1,000 | 2 | 330 minutes or more |
1,500 | 3 | 420 minutes or more |
*1: The "Number of WSUS servers" refers to the recommended number of WSUS servers when business servers are managed by distributing them to multiple WSUS servers in order to balance the load on WSUS servers. It is recommended that each WSUS server manage no more than 500 business servers.
Linux patch information
Number of business servers | Time required for the initial discovery |
|---|---|
500 | 240 minutes or more |
1,000 | 420 minutes or more |
1,500 | 600 minutes or more |
Fujitsu middleware patch information and Fujitsu middleware product information
Number of business servers | Time required for the initial discovery |
|---|---|
500 | 90 minutes or more |
1,000 | 120 minutes or more |
1,500 | 150 minutes or more |
All information
To discover all information, estimate the time required for discovery based on the following conditions:
The time required for the initial discovery for all information is either of the following, whichever is longer:
|
Example:
To discover OS patch information and Fujitsu middleware patch information for 1,500 business servers (1,000 Windows business servers + 500 Linux business servers), the time required for the initial discovery is as follows:
Time required for the initial discovery for Windows patch information (1,000 business servers): At least 330 minutes
Time required for the initial discovery for Linux patch information (500 business servers): At least 240 minutes
Processing time for the initial discovery for Fujitsu middleware patch information and Fujitsu middleware product information (1,500 business servers): At least 150 minutes
The time required for the initial discovery will be at least 390 minutes (i.e., 240 + 150 minutes).
Register schedules for regular discoveries.
For Windows, register the following program with the Task Scheduler:
For Linux, add the following program to cron. Refer to the cron manuals for information on cron.
[Program]
[Windows]
<Systemwalker Software Configuration Manager installation directory>\SWCFMGM\bin\swcfmg_patch_updateinfo.exe |
[Linux]
/opt/FJSVcmdbm/bin/swcfmg_patch_updateinfo |
[Options]
-repository |
To perform regular discovery for only particular information, register the following program:
Windows patch information
[Program]
[Windows]
<Systemwalker Software Configuration Manager installation directory>\SWCFMGM\bin\swcfmg_patch_updateinfo.exe |
[Linux]
/opt/FJSVcmdbm/bin/swcfmg_patch_updateinfo |
[Options]
-t windows -repository |
Linux patch information
[Program]
[Windows]
<Systemwalker Software Configuration Manager installation directory>\SWCFMGM\bin\swcfmg_patch_updateinfo.exe |
[Linux]
/opt/FJSVcmdbm/bin/swcfmg_patch_updateinfo |
[Options]
-t linux |
Fujitsu middleware patch information and Fujitsu middleware product information
[Program]
[Windows]
<Systemwalker Software Configuration Manager installation directory>\SWCFMGM\bin\swcfmg_patch_updateinfo.exe |
[Linux]
/opt/FJSVcmdbm/bin/swcfmg_patch_updateinfo |
[Options]
-t middleware |
Note
To perform regular discovery for only particular information, discovery for only the following combinations of information can be executed simultaneously:
Information collected by regular discovery | Windows patch information | Linux patch information | Fujitsu middleware patch information and Fujitsu middleware product information |
|---|---|---|---|
Windows patch information | - | Y | Y |
Linux patch information | Y | - | - |
Fujitsu middleware patch information and Fujitsu middleware product information | Y | - | - |
Y: Can be executed simultaneously
-: Cannot be executed simultaneously
[Windows]
The following example shows how to register a schedule with the Task Scheduler:
Log in to Windows using an account that belongs to the Administrators group.
Select Start >> Administrative Tools >> Task Scheduler.
The Task Scheduler window will be displayed.
Select Action >> Create Task.
The Create New window will be displayed.
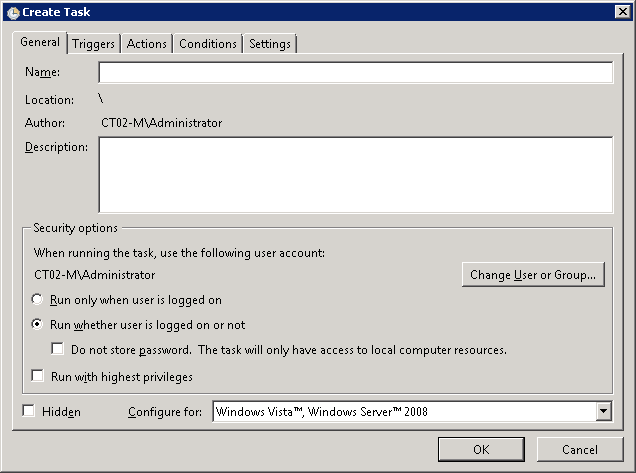
Enter a task name in the Name field in the General tab, and then select Run whether user is logged on or not.
Select the Triggers tab, and then click the New button.
The New Trigger window will be displayed.
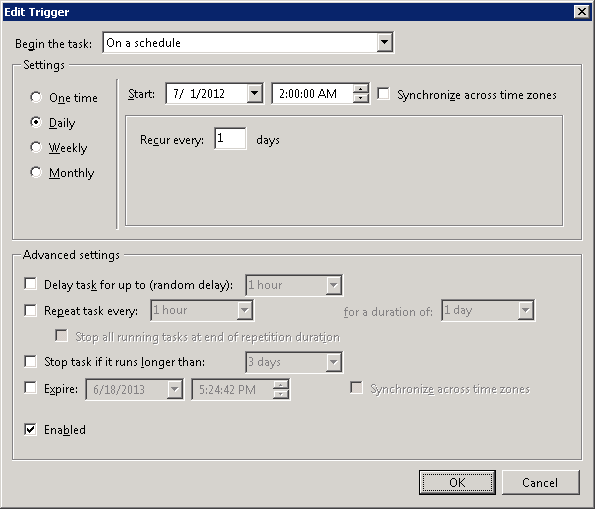
Register the discovery schedule.
Select the Actions tab, and then click the New button.
The New Action window will be displayed.
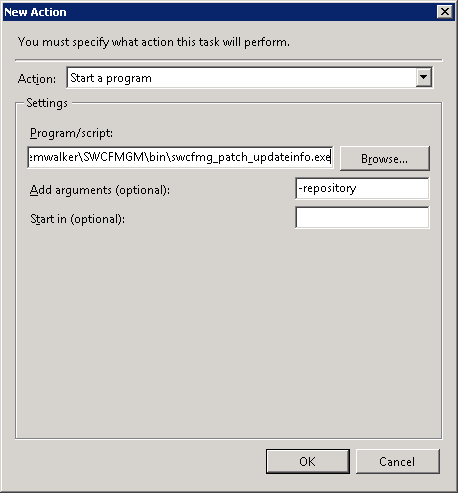
Configure the following settings:
Select Start a program from the Action pull-down menu.
Add the following command to the Program/script field:
<Systemwalker Software Configuration Manager installation directory>\SWCFMGM\bin\swcfmg_patch_updateinfo.exe |
Add the following argument to the Add arguments (optional) field:
-repository |
Click the OK button in the Create Task window.
The following window will be displayed:
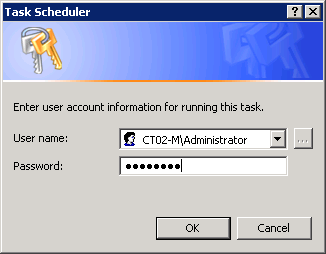
Enter the user name for an account belonging to the Administrators group and the corresponding password, and then click the OK button.
[Linux]
The following example shows how to register the program with cron:
Perform the following procedure as the root user:
Check that the cron service has started
>/etc/rc.d/init.d/crond status
crond (pid  xxx) is running...
If the cron service is not running, use the following command to start the cron service:
>/etc/rc.d/init.d/crond start
Starting crond:
Point
The cron service normally starts when the operating system starts.
By executing the following command, it is possible to check whether the cron service has been set to start when the operating system starts:
>chkconfig --list crond
crond           0:off   1:off   2:on    3:on    4:on    5:on    6:off
If the cron service has been set to start when the operating system starts, the numbers 2, 3, 4 and 5 above are set to "on" as shown above.
To set the cron service to start when the operating system starts, execute the following command:
>chkconfig --level 2345 crond on
Execute the following command to edit the schedule definitions:
>crontab -e
Executing the "crontab -e" command starts the vi editor. Refer to the vi editor manuals for information on the vi editor.
Example: Discovering all information everyday at 2:00
0 2 * * * /opt/FJSVcfmgm/bin/swcfmg_patch_updateinfo -repository > /dev/null 2>&1
Point
Guide to the execution interval for regular discovery
It is recommended that regular discovery be executed once a day, outside business hours (such as late at night).
Take the following guide into account when setting an execution interval:
Windows patch information
Number of business servers | Number of WSUS servers (*1) | Execution interval |
|---|---|---|
500 | 1 | 30 minutes or more |
1,000 | 2 | 60 minutes or more |
1,500 | 3 | 60 minutes or more |
*1: The "Number of WSUS servers" refers to the recommended number of WSUS servers when business servers are managed by distributing them to multiple WSUS servers in order to balance the load on WSUS servers. It is recommended that each WSUS server manage no more than 500 business servers.
Linux patch information
Number of business servers | Execution interval |
|---|---|
500 | 90 minutes or more |
1,000 | 150 minutes or more |
1,500 | 210 minutes or more |
Fujitsu middleware patch information and Fujitsu middleware product information
Number of business servers | Execution interval |
|---|---|
500 | 60 minutes or more |
1,000 | 90 minutes or more |
1,500 | 120 minutes or more |
All information
To perform regular discovery for all information, estimate the discovery execution interval based on the following conditions:
The execution interval for regular discovery for all information is either of the following, whichever is longer:
|
Example:
To discover OS patch information and Fujitsu middleware information for 1,500 business servers (1,000 Windows business servers + 500 Linux business servers), the discovery execution interval is as follows:
Discovery execution interval for Windows patch information (1,000 business servers): At least 60 minutes
Discovery execution interval for Linux patch information (500 business servers): At least 90 minutes
Discovery execution interval for Fujitsu middleware patch information and Fujitsu middleware product information (1,500 business servers): At least 120 minutes
The execution interval for regular discovery will be at least 210 minutes (i.e., 90 + 120 minutes).
Note
If the system is stopped at the specified discovery start time (due to maintenance, for example), discovery will be performed at the next scheduled time.
Register the configuration baseline creation.schedule
For Windows, register the following program with the Task Scheduler:
For Linux, add the following program to cron. Refer to the cron manuals for information on cron.
[Program]
[Windows]
<ServerView Resource Orchestrator installation directory>\SWRBAM\CMDB\FJSVcmdbm\bin\snapcreate.exe |
[Linux]
/opt/FJSVcmdbm/bin/snapcreate.sh |
[Options]
-q |
[Windows]
The following example shows how to register a schedule with the Task Scheduler:
Log in to Windows using an account that belongs to the Administrators group.
Select Start >> Administrative Tools >> Task Scheduler.
The Task Scheduler window will be displayed.
Select Action >> Create Task.
The Create New window will be displayed.

Enter a task name in the Name field in the General tab, and then select Run whether user is logged on or not.
Select the Triggers tab, and then click the New button.
The New Trigger window will be displayed.
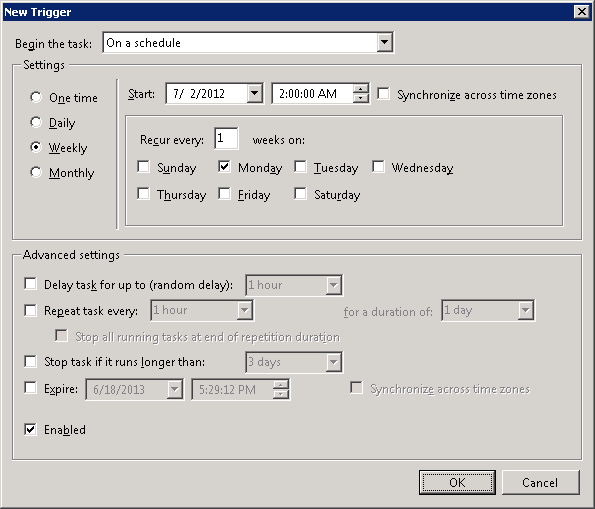
Register the configuration baseline creation schedule.
Select the Actions tab, and then click the New button.
The New Action window will be displayed.
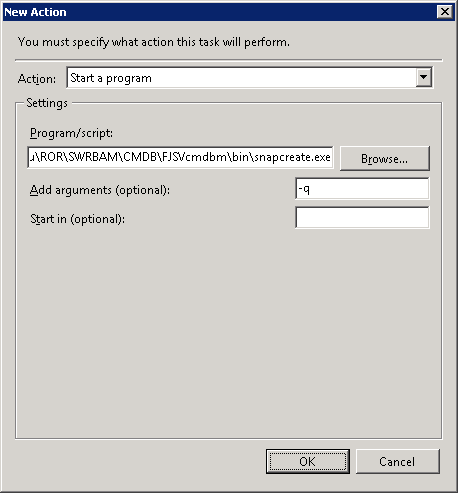
Configure the following settings:
Select Start a program from the Action pull-down menu.
Add the following command to the Program/script field:
<ServerView Resource Orchestrator installation directory>\SWRBAM\CMDB\FJSVcmdbm\bin\snapcreate.exe |
Add the following argument to the Add arguments (optional) field:
-q |
Click the OK button in the Create Task window.
The following window will be displayed:

Enter the user name for an account belonging to the Administrators group and the corresponding password, and then click the OK button.
[Linux]
The following example shows how to register the program with cron:
Perform the following procedure as the root user:
Check that the cron service has started
>/etc/rc.d/init.d/crond status
crond (pid  xxx) is running...
If the cron service is not running, use the following command to start the cron service:
>/etc/rc.d/init.d/crond start
Starting crond:
Point
The cron service normally starts when the operating system starts.
By executing the following command, it is possible to check whether the cron service has been set to start when the operating system starts:
>chkconfig --list crond
crond           0:off   1:off   2:on    3:on    4:on    5:on    6:off
If the cron service has been set to start when the operating system starts, the numbers 2, 3, 4 and 5 above are set to "on" as shown above.
To set the cron service to start when the operating system starts, execute the following command:
>chkconfig --level 2345 crond on
Execute the following command to edit the schedule definitions:
>crontab -e
Executing the "crontab -e" command starts the vi editor. Refer to the vi editor manuals for information on the vi editor.
Example: Creating a configuration baseline every Monday at 6:00
0 6 * * 1 /opt/FJSVcmdbm/bin/snapcreate.sh -q> /dev/null 2>&1
Note
Set up a schedule so that configuration baselines are created no more than once a week.
Take care that the configuration baseline creation schedule does not conflict with the regular discovery schedule. If the creation of a configuration baseline conflicts with the execution of regular discovery, the configuration baseline will not be created correctly.