When a report is specified, the following target setting items are displayed. Items displayed depend on the report specified.
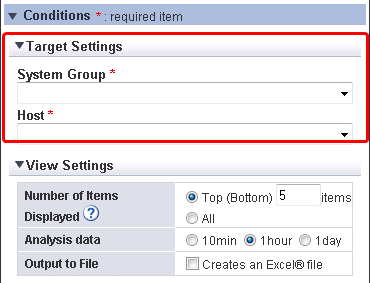
The following is an example of the window where you can specify the system group and host.
The items that are specified are explained below for the different types.
Specify System Group
Item | Description |
|---|---|
System Group | Select the system group to be analyzed from the list. |
Specify System Group and Host
Item | Description |
|---|---|
System Group | Select the system group to be analyzed from the list. |
Host | Select the host to be analyzed from the list. The list displays the hosts that have been registered with the selected system group. |
Specify System Group, Host, and Resource ID
Item | Description |
|---|---|
System Group | Select the system group to be analyzed from the list. |
Host | Select the host to be analyzed from the list. The list displays the hosts that have been registered in the selected system group. |
Resource ID | The content specified for Resource ID depends on the type. Refer to the "4.3.2.1.1 Resource ID specification" for more information. Note that only alphanumeric characters and symbols (except for \,<>"$'[]=&%) can be used. |
Specifications for displays that include future predictions
Item | Description |
|---|---|
System Group | Select the system group to be analyzed from the list. |
Host | Select the host to be analyzed from the list. The list displays the hosts that have been registered in the selected system group. When ALL_SERVER is selected, all hosts in the system group are analyzed. |
Record ID | Specify the record ID and field name of the analysis target. For the record ID, only the options corresponding to the selected host are displayed. For the field name, only the options corresponding to the selected record ID are displayed. If the Display by difference checkbox is selected, information for cumulative values can be displayed incrementally. Refer to "Drilled-Down/Report Information" in the Reference Guide for information on the record IDs and field names that can be specified. |
Field name | |
Display by difference | |
Resource ID | Specify the resource ID to be targeted for analysis. All resource IDs are analyzed if this is omitted. Point Resource IDs can be retrieved by right-truncating the resource ID according to a specified search string. Example: If the two resource IDs "AAA123" and "AAA456" exist, both can be targeted by specifying "AAA". |
Specify detailed items
Item | Description |
|---|---|
System Group | Select the system group to be analyzed from the list. |
Host | Select the host to be analyzed from the list. The list displays the hosts that have been registered in the selected system group. When ALL_SERVER is selected, all hosts in the system group are analyzed. |
Record ID | Specify the record ID and field name of the analysis target. For the record ID, only the options corresponding to the selected host are displayed. For the field name, only the options corresponding to the selected record ID are displayed. If the Display by difference checkbox is selected, information for cumulative values can be displayed incrementally. Refer to "Drilled-Down/Report Information" in the Reference Guide for information on the record IDs and field names that can be specified. |
Field name | |
Display by difference | |
Resource ID | Specify the resource ID to be targeted for analysis. All resource IDs are analyzed if this is omitted. Point Resource IDs can be retrieved by right-truncating the resource ID according to a specified search string. Example: If the two resource IDs "AAA123" and "AAA456" exist, both can be targeted by specifying "AAA". |
In the summary data time-series display, when Agents that have different collection intervals are in the same system group, the graph display will be affected if ALL_SERVER is selected. If the Display by difference checkbox is selected, some servers will not be displayed. Create system groups of Agents that have the same collection intervals.
Specifications for displays that include correlations/compositions
Item | Description | |
|---|---|---|
System Group | Select the system group to be analyzed from the list. | |
Data 1 specification Data 2 specification | Host 1 Host 2 | Select a host containing one part of the data to be displayed from the list. The list displays the hosts that have been registered in the selected system group. When ALL_SERVER is selected, all hosts in the system group are analyzed. |
Record ID 1 Record ID 2 | Specify the record ID and field name of one of the pair to be displayed. For the record ID, only the options corresponding to the selected host are displayed. For the field name, only the options corresponding to the selected record ID are displayed. If the Display by difference checkbox is selected, information for cumulative values can be displayed incrementally. Refer to "Drilled-Down/Report Information" in the Reference Guide for information on the record IDs and field names that can be specified. | |
Field name 1 Field name 2 | ||
Display by difference | ||
Resource ID 1 Resource ID 2 | Specify one of the resource IDs to be displayed. All resource IDs are analyzed if this is omitted. Point Resource IDs can be retrieved by right-truncating the resource ID according to a specified search string. Example: If the two resource IDs "AAA123" and "AAA456" exist, both can be targeted by specifying "AAA". | |
Specifications for displays that include contours
Item | Description |
|---|---|
System Group | Select the system group to be analyzed from the list. |
Host | Select the host to be analyzed from the list. The list displays the hosts that have been registered in the selected system group. When ALL_SERVER is selected, all hosts in the system group are analyzed. |
Record ID | Specify the record ID and field name of the analysis target. For the field name, only the options corresponding to the selected record ID are displayed. If the Display by difference checkbox is selected, information for cumulative values can be displayed incrementally. Refer to "Drilled-Down/Report Information" in the Reference Guide for information on the record IDs and field names that can be specified. |
Field name | |
Display by difference | |
Resource ID | Specify the resource ID to be targeted for analysis. All resource IDs are analyzed if this is omitted. Point Resource IDs can be retrieved by right-truncating the resource ID according to a specified search string. Example: If the two resource IDs "AAA123" and "AAA456" exist, both can be targeted by specifying "AAA". |
Specifications for displays that include past comparisons
Item | Description |
|---|---|
System Group | Select the system group to be analyzed from the list. |
Host | Select the host to be analyzed from the list. The list displays the hosts that have been registered in the selected system group. When ALL_SERVER is selected, all hosts in the system group are analyzed. |
Record ID | Specify the record ID and field name of the analysis target. For the field name, only the options corresponding to the selected record ID are displayed. If the Display by difference checkbox is selected, information for cumulative values can be displayed incrementally. Refer to "Drilled-Down/Report Information" in the Reference Guide for information on the record IDs and field names that can be specified. |
Field name | |
Display by difference | |
Resource ID | Specify the resource ID to be targeted for analysis. All resource IDs are analyzed if this is omitted. Point Resource IDs can be retrieved by right-truncating the resource ID according to a specified search string. Example: If the two resource IDs "AAA123" and "AAA456" exist, both can be targeted by specifying "AAA". |
Base day | Specify the base day used for comparison in the analysis. |
Specifications for displays that include daily transition comparisons
Item | Description |
|---|---|
System Group | Select the system group to be analyzed from the list. |
Host | Select the host to be analyzed from the list. The list displays the hosts that have been registered in the selected system group. When ALL_SERVER is selected, all hosts in the system group are analyzed. |
Record ID | Specify the record ID and field name of the analysis target. For the field name, only the options corresponding to the selected record ID are displayed. If the Display by difference checkbox is selected, information for cumulative values can be displayed incrementally. Refer to "Drilled-Down/Report Information" in the Reference Guide for information on the record IDs and field names that can be specified. |
Field name | |
Display by difference | |
Resource ID | Specify the resource ID to be targeted for analysis. All resource IDs are analyzed if this is omitted. Point Resource IDs can be retrieved by right-truncating the resource ID according to a specified search string. Example: If the two resource IDs "AAA123" and "AAA456" exist, both can be targeted by specifying "AAA". |
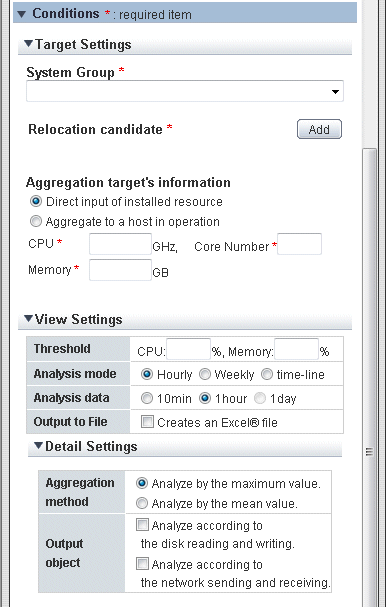
Specifications for displays that include P2V simulations
Item | Description | |
|---|---|---|
System Group | Select the system group to be used in the P2V simulation from the list. | |
Aggregation candidate | Click the Add button to display the Add Candidate window. Select the host for the aggregation candidate and click OK. Multiple aggregation candidates can be selected. The selected hosts are displayed in a list. A maximum of 50 aggregation candidates can be specified. To remove a host that has been selected as a consolidation candidate, click Delete next to that host. | |
Aggregation target's information | Direct input of installed resource/Aggregate to a host in operation | If the aggregation target host has already been registered in the system group, select Specify the aggregation target's Host. The number of CPUs and amount of memory in the specified host are shown as black lines in the displayed graph. Select Direct input of installed resource if not registered. |
CPU | When Direct input of installed resource is selected, enter numbers to specify the CPU (in GHz), the Core Number and Memory (in GB) of the aggregation target:
The number of CPUs and amount of memory in the specified host are shown as black lines in the displayed graph as hardware capacity. | |
Host | If you selected Aggregate to a host in operation, select the aggregation target host from the list. The same hosts cannot be selected as aggregation candidates. | |
Note
When a system is monitored with an Agent from V13.5.0 or earlier, these systems are not displayed in the list as aggregation candidates or aggregation target hosts.
When a virtual machine is to be an aggregation candidate, monitor the server performance (OS) of the virtual machine using either an installed agent or an Agent for agentless monitoring.
Specifications for displays that include simulations of VMware Virtual machine relocation
Item | Description | |
|---|---|---|
System Group | Select the system group to be used in the virtual machine relocation simulation from the list. | |
Relocation candidate | Host Virtual machine | Click the Add button to display the Add Candidate window. Select the migration source host from the Host list. Select the virtual machine that is the candidate for reallocation from the Virtual machine list and click OK. More than one virtual machine can be selected. When virtual machine aggregation candidates are added from multiple virtual hosts, repeat the above procedure. |
Relocation candidate | The relocation candidate(s) selected above is displayed. The display format is "host name: virtual machine name". A maximum of 50 relocation candidates can be specified. You can select up to five hosts that have virtual machines that are possible relocation candidates. To remove a host that has been selected as a consolidation candidate, click Delete next to that host. | |
Aggregation target's information | Direct input of installed resource/Aggregate to a host in operation | If the aggregation target host has already been registered in the system group, select Specify the aggregation target's Host. The number of CPUs and amount of memory in the specified host are shown as black lines in the displayed graph. Select Direct input of installed resource if not registered. |
Host | If you selected Aggregate to a host in operation, select the aggregation target host from the menu. The same hosts cannot be selected as aggregation candidates. | |
CPU | When Direct input of installed resource is selected, enter numbers to specify the CPU (in GHz), the Core Number and Memory (in GB) of the aggregation target:
The number of CPUs and amount of memory in the specified host are shown as black lines in the displayed graph as hardware capacity. | |
Note
Only VMware can be the target of virtual machine relocation simulation.
When a system is monitored with an Agent from V13.5.0 or earlier, these systems are not displayed in the relocation candidate or aggregation target's information lists.
Virtual hosts that have been stopped for five hours or more are not displayed in the list of relocation candidate virtual machines.
Select the virtual machine from the host name before migration if this procedure is performed immediately after migration. The list of virtual machines is updated every hour.
Specifications for displays that include request count future predictions
Item | Description |
|---|---|
System Group | Select the system group to be analyzed from the list. |
Host | Select the host to be analyzed from the list. The list displays the hosts that have been registered in the selected system group. When ALL_SERVER is selected, all hosts in the system group are analyzed. |
Service name | Specify the name (resource ID) of the service set to manage Web transaction volume. If omitted, all services will be extracted. Resource IDs can be retrieved by right-truncating the resource ID according to a specified search string. |
Specifications for displays that include response simulations (requests or adding servers)
Item | Description |
|---|---|
System Group | Select the system group to be analyzed from the list. |
Server Groups (layer 1) | Divide hosts registered to the system group into web servers (layer 1), applications servers (layer 2), and database servers (layer 3). Click the Add button to display the Add Server window. Select the host from the Add Host list and click OK. Specify a host where there is an Agent managing Web transaction volume in the server group (layer 1). Server group (layer 2) and server group (layer 3) do not have to be specified. A maximum of 50 hosts can be added across the three layers. Point The performance information that is used by the application server and the database server is CPU information. It is not intended to set up performance management for linkage middleware such as Interstage Application Server or Symfoware Server. |
Server Groups (layer 2) | |
Server Groups (layer 3) | |
Service name | Specify the name (resource ID) of the service set to manage Web transaction volume. If omitted, all services will be extracted. Resource IDs can be retrieved by right-truncating the resource ID according to a specified search string. |
Request coefficient | Specify the expected request volume (as a rate of the current volume). Use "Request count (future prediction)" to predict the rate of increase, and specify that value. The current request count is used if you specify 1. Range: 0.1 to 9999.9 |
Adding servers | This is displayed for Response simulation (Adding servers). Specify the number of servers to be added to each server group. Range: 0 to 99 |
Times other than service time | Specify periods when the service is not running (night, days off, scheduled maintenance times, etc), or periods when the number of requests is extremely low. The precision of the simulation is improved by excluding those periods when processes that have no direct bearing on requests are being performed. Select the days of the week, hours, and minutes to specify the periods to designate as "times other than service time". A maximum of ten conditions can be specified. Point When "Daily" is specified for a period, the values for response (request increase) and response (add server) in the table will be replaced with a hyphen. |
Specifications for displays that include service operational information
Item | Description |
|---|---|
System Group | Select the system group to be analyzed from the list. |
The following table lists the content to be specified for resource IDs for each report type:
Report type | Resource ID |
|---|---|
Web transaction Request | The following specified content depends on the category: Specify the service name for the reports on the left. When using generic reports, connect the service names and URLs with colons (:). Example: imagine:/SSQC/console.html If only the service name is specified, all the data for that service name will be targeted for reporting. Note For the URL, specify the one specified in Inclusion in the transaction log definition file (tlawatch.ini). Refer to "Transaction Log Definitions" in the User's Guide for information on the transaction log definition file (tlawatch.ini). |
Web transaction hitserver | |
Web transaction hitclient | |
Web transaction hitremote | |
Web transaction Traffic | |
Web transaction Error | |
Interstage EJB application | Specify the name of an EJB application. To monitor the performance of an EJB container, specify the name of the EJB container. |
Interstage CORBA application | Specify the implementation repository ID. |
Interstage transaction application | Specify the object name. |
Interstage IJServer JVM | Specify the object name. |
Interstage IJServer JTA | |
Interstage IJServer JDBC | |
Interstage IJServer SERVLET WebModule | |
Interstage IJServer EVENT SERVICE | |
Symfoware shared buffer | Specify the RDB system name. Point Alphanumeric characters are recommended. |
Symfoware log area | |
Symfoware disk I/O | |
Oracle SGA | Specify the instance name. Point Alphanumeric characters are recommended. |
Oracle PGA | |
Oracle disk I/O | |
Oracle resource conflict | |
Operation Manager Subsystem | Specify the subsystem name. Example: subsystem00 |
Operation Manager Queue | Specify the subsystem name and the queue name connected by a colon (:). Example: subsystem00:queue1 |
Operation Manager Project | Specify the subsystem name and the project name connected by a colon (:). Example: subsystem00:project5 |
Network Manager network traffic | Specify the node name and the host name connected by a colon (:). Example: node1:interface1 |
Network Manager CPU load | Specify the node name. |
Network Manager collision | Specify the node name and the host name connected by a colon (:). Example: node1:interface1 |
Network Manager CRC error | |
Network Manager drop packet | |
Network Manager transfer packet | |
Network Manager discard packet | |
Network Manager error packet | |
Network Manager IP operating rates | Specify the node name. |
Network Manager RTT | Specify the node name. |
TcpNetwork | Specify the interface name. |
Storage CM CPU usage rate | Specify the Storage ID and the CM ID connected by a colon (:). Example: 00GR730#######GR73E02U####IA000003######:0x30000 Point This string is displayed in the resource ID column by selecting "CM" under "Storage" with the Drilled-down display view. |
Storage Disk busy | Specify the Storage ID and the Disk ID connected by a colon (:). Example: 00GR730#######GR73E02U####IA000003######:0x0 Point This string is displayed in the "Resource ID" column by selecting "Disk" under "Storage" with the Drilled-down display view. |
Storage throughput | Specify the Storage ID and the RAIDGroup ID connected by a colon (:). Example: 00GR730#######GR73E02U####IA000003######:0x0 Point This string is displayed in the "Resource ID" column by selecting "RAIDGroup" under "Storage" with the Drilled-down display view. |
Storage IOPS | |
Workload | Specify resource module names separated by a colon (:). Example 1: When specifying one resource module: Example 2: When specifying multiple resource modules: If no name is specified, all modules will be targeted. |
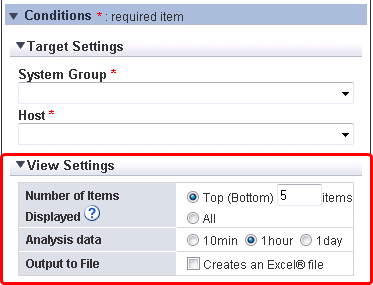
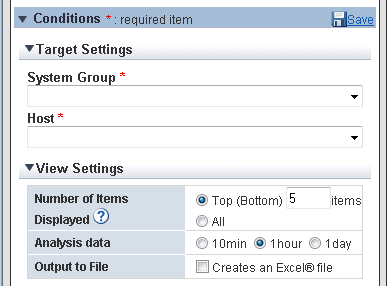
When a report is specified, the following display settings are displayed. Items displayed depend on the type of report specified.
The following is an example of the window where you can specify the number of items displayed, the analysis data, and the file output.
Item | Description |
|---|---|
Number of Items Displayed | Select the number of data items that will be displayed for analysis. The number of data items can be selected as follows:
|
Analysis data | Select the data interval to be used for analysis. The following data intervals can be selected:
This is not available with some report types. Note If a period prior to the data retention period is specified, no data will be displayed. |
Output to File | Content is output in Excel(R) format. When the Creates an Excel(R) file checkbox is selected, the Save as Excel(R) button becomes active at the bottom of the analysis and report content area. Click this button to download the displayed content in Excel format. Note Disable clipboard redirection if the operation is to be performed using a remote desktop connection. Note A file is downloaded with an xlsx or xlsm extension when Save as Excel(R) is used. Enable macros when opening files with the xlsm extension. Information If an XML file is downloaded with Save as Excel(R), change the following in Internet Explorer: Go to Internet Options, Security, select the appropriate zone and click Custom level, then in the Miscellaneous section click Open files based on content, not file extension to disable it. |
Operation time | Specify the time period to be displayed. Specify the starting time (hour/minute) and the finishing time (hour/minute) for operations. |
Threshold value (Optional): | Specify the CPU and memory usage rates that will be tolerated on the aggregation target server. (Optional) If this is specified, it is shown as a red line in the graph. [CPU]: Enter a number between 10 and 100. (Units: %) |
Analysis mode | Specify the way the simulation is to be performed:
|
A Detail Settings area is displayed for some report types. Items displayed depend on the type of report that has been specified.
The Detail Settings area is shown collapsed when a report is selected. Click the title bar of the Detail Settings area to specify detailed settings.
Figure 4.1 Detail Settings area collapsed (example)
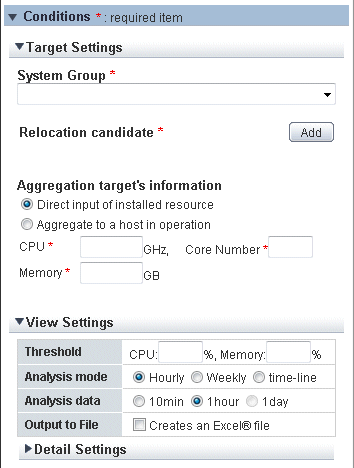
Figure 4.2 Detail Settings area expanded (example)
Generic report
Item | Description |
|---|---|
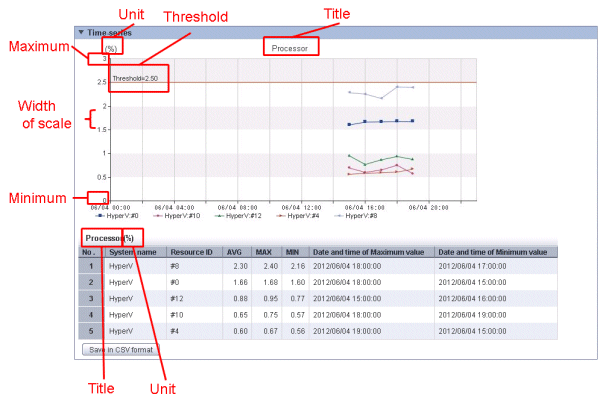
Title | Specify the title to be used for the graph and table. For an example of what is displayed when this is specified, refer to the illustration below (Example of a graph when Detail Settings have been specified). The following characters can be used for titles:
Platform-dependent characters are not allowed. The registered report name can be no longer than 24 characters. If a title is not specified, the field name is used for the title of the graph and the record ID is used for the title of the table. |
Unit | Specify the unit used on the Y axis. For an example of what is displayed when this is specified, refer to the illustration below (Example of a graph when Detail Settings have been specified). The following characters can be used for units:
Platform-dependent characters are not allowed The registered report name can be no longer than 8 characters. Units are not displayed if this is omitted. |
Graph size | Specify the size of the graph in pixels. Specify an integer between 200 and 1500. The default width is 700 pixels and height is 300 pixels. (For the contour display width is 750 pixels and height is 500 pixels). Specify a value that is equal to or greater than the default value. |
Graph range (Y axis) |
|
Threshold | Specify the threshold. For an example of what is displayed when this is specified, refer to the illustration below (Example of a graph when Detail Settings have been specified). Specify a number between -10000000000000 and 10000000000000. This may not be displayed within the graph due to the range of the Y axis, even if you do specify it. |
Figure 4.3 Example of a graph when Detail Settings have been specified
Miscellaneous
Item | Description | |
|---|---|---|
Output object | Analyze according to the disk reading and writing | Select to display a distribution graph and table showing reads and writes. |
Analyze according to the network sending and receiving | Select to display a distribution graph and table showing sends and receives. | |
Graph settings | CPU usage rate | Select to configure graphs. The default maximum for the markings is 100% and the number of markings is 10. |
Memory usage rate | Select to configure graphs. The default maximum for the markings is 100% and the number of markings is 10. | |
Disk I/O Count | Select to configure graphs. This setting is used to draw graphs for reading and writing (combined), and to draw separate graphs for reading and writing. The default number of markings is 10. | |
Disk Throughput | Select to configure graphs. This setting is used to draw graphs for transfers, and to draw separate graphs for sending and receiving. The default number of markings is 10. | |
Count for data sent/received over network | Select to configure graphs. This setting is used to draw graphs for reading and writing (combined), and to draw separate graphs for reading and writing. The default number of markings is 10. | |
Network throughput | Select to configure graphs. This setting is used to draw graphs for transfers, and to draw separate graphs for sending and receiving. The default number of markings is 10. | |
Aggregation method | Use maximum | Select whether to analyze using the maximum or the average. |
Use average | ||
Threshold | Specify the threshold with a percentage. Threshold: Enter an integer between 1 and 100. (Units: %) | |
Server group name (layer 1) | Specify the display name for the server group. The following characters can be used for display names:
Platform-dependent characters are not allowed The name can be no longer than 36 characters. | |
Server group name (layer 2) | ||
Server group name (layer 3) | ||
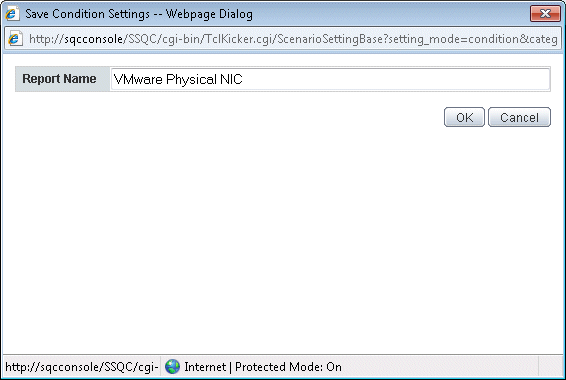
With My Category, you can save the conditions set in the Conditions area by clicking Save.
Either save by overwriting the selected report, or save using another name.
Item | Description |
|---|---|
Report Name | The name of the report selected in the Scenario area is displayed. The selected report is overwritten if you do not change the report name. When you change the report name, the report is added to the category selected in the Scenario area. The following characters can be used for report names:
Platform-dependent characters are not allowed The registered report name can be no longer than 50 characters. |