This section explains the procedure for defining simulation properties for scenarios.
Prerequisite:
You have created a scenario in the Simulation Scenarios project or a Workflow Application project. Refer to 12.2.1 Creating a Simulation Scenario for details.
The Scenario editor is either opened automatically after clicking Finish in the New Scenario dialog or by double-clicking a scenario name in the Navigator view.
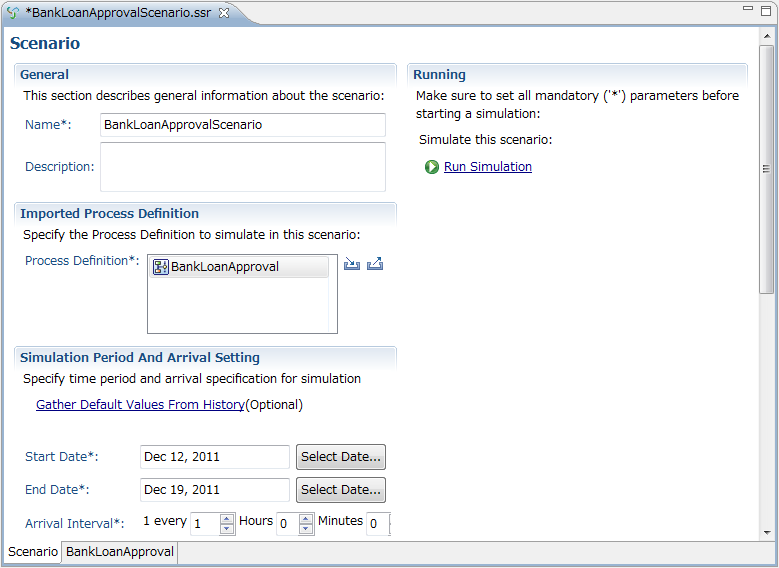
Figure 12.8 The Scenario Editor
To define the simulation properties for a scenario:
Open the Scenario editor as described above.
In the General area, define the following information for the scenario:
Name: Name of the scenario. By default, this is the name you entered when creating the scenario.
2. Description: Additional information about the scenario. For example, enter text describing the purpose of the simulation. By default, this is the description you entered when creating the scenario.
In the Imported Process Definition area, perform the following actions:
Process Definition: To import the process definition that is to be used for this scenario, click the Import button (![]() ). The Import Process Definition dialog is opened and lists all available projects with their process definition(s). Select the respective one from the list and click OK.
). The Import Process Definition dialog is opened and lists all available projects with their process definition(s). Select the respective one from the list and click OK.
Note
The process definition that you select in Import Process Definition dialog is treated as the primary process definition for the simulation.
If there are two or more process definitions which have the same name, the process definition selection dialog will be displayed so that you can select a process definition which will be included in the process definition list to be simulated.
If you select a process definition having Subprocess Nodes or Chained-Process Nodes for simulating its execution, the list of all its subprocess definitions or chained-process definitions is automatically imported, and then displayed in the Process Definition field. These subprocess or chained-process definitions are retrieved from the application project to which the scenario belongs.
A process definition with subprocess or chained-process definitions cannot be simulated in the Simulation Scenarios project.
You can also export a process definition used by the current scenario by clicking the Export button (![]() ). This will open the Export Process Definition dialog and you can select a project in which the process definition is to be stored.
). This will open the Export Process Definition dialog and you can select a project in which the process definition is to be stored.
Note
When storing a process definition in a server project, its application ID is set to 'System'.
When the importing of the process definition is finished, it is opened in a separate page that becomes active. You can then change or define the simulation properties for the individual nodes contained in the process definition. Proceed as described in section 12.2.4 Defining Simulation Properties for Nodes.
Note
When you import a parent process definition that contains subprocesses, the parent process definition is displayed at the top in Process Definition field. The subprocess are automatically displayed below the parent process definition. For each subprocess definition, a separate Process Definition tab is opened in the Scenario Editor. You can then change or define the simulation properties for the individual nodes contained in the subprocess definitions. The process definition list is updated if you edit process definitions and add or delete or change the subprocesses.
To return to the scenario and continue with the definition of the simulation properties for the scenario, click the tab labeled with the name of the scenario at the bottom of the Scenario Editor.
In the Simulation Period and Arrival Setting area, you can perform the following actions:
Start Date: Date when the simulation is to start. The date format depends on the locale installed on your machine. You may click the Select Date button to choose a date from the popup calendar.
End Date: Date when the simulation is to finish. The date format depends on the locale installed on your machine. You may click the Select Date button to choose a date from the popup calendar.
Gather Default Values from History: Click this link to gather default values from history in order to run a simulation using these values. For more information, see the chapter 12.2.2 Using Simulation Values From History.
Arrival Interval: Arrivals define how often a process instance will be triggered in the course of the simulation. Define this flow of process instances by specifying the interval as a specific period in time.
Arrival Type: You can choose between Regular and Random arrivals. Regular arrivals specify that process instances will be triggered always at exactly the interval you specified as arrival interval. Random arrivals specify that the process instances will be triggered some time in the interval you specified. For example, if six process instances per hour are to be triggered, the amount of time between each trigger is not necessarily the same.
Note
Arrival settings are used only for the primary process definition, because subprocesses will be started appropriately when the subprocess nodes are activated in the parent process instances.
Business Calendar: Business calendars are very important when simulating processes because they allow you to consider only working days and hours in your simulation. A default business calendar is included with your installation of Systemwalker Runbook Automation. The default calendar defines business hours as 8:30 AM to 6:00 PM. The default calendar is stored at the following location:
<Systemwalker Runbook Automation Installation Directory>\ibpm\Data\calendar
You may create as many Business Calendars as necessary to meet the needs of your organization and use a different Business Calendar for every process definition or process instance. Your Business Calendars are stored in the Workflow Application project directory in the Calendar folder.
To specify a global business calendar for your simulation scenario, select it from the Business Calendar drop-down list. You can additionally specify individual business calendars for each human resource allocated in your process definition (see below).
In the Resources area, define the allocation of resources at scenario level. Human and "non-human" (additional) resources are displayed in a separate table. Human resources are defined based on the roles defined in the imported process definition. Additional resources are defined based on node-level simulation properties defined in the imported process definition.
The area contains the following information on Human Resources:
Currency: Currency used by this scenario for calculating the cost of resources. Supported currency units are Dollars, Euros, British Pounds, and Japanese Yen. Select the desired currency from the drop-down list.
Role Name: Role assigned to a particular node in the process definition. You cannot change the role names listed in this area. If required, you need to change the process definition.
Unit of Measurement: Time unit for calculating the cost of a particular resource. Supported values are "Minute", and "Hour".
Cost Per Unit: Cost of the resource per unit of measurement.
Count: Number of allocated resources with this role.
Except for the Role Name, you can change the displayed values by clicking the table cell and entering a value for the corresponding resource parameter.
The area contains the following information on Additional Resources:
Resource Name: Name of the resource as defined with a node in the process definition. You cannot change the resource names listed in this area. If required, you need to change the process definition.
Unit of Measurement: Time unit for calculating the cost of a particular resource.
Cost Per Unit: Cost of the resource per unit of measurement.
Except for the Resource Name, you can change the displayed values by clicking the table cell and entering a value for the corresponding resource parameter.
Note
Resources tables show resources of subprocess definitions as well as the parent process definitions.