Modify User Group Policy
When updating policy in the Management Console, the policy of all tabs will be updated (for the part where the setting is not modified, it will be updated with the same value).
It is unable to update only the tabs or items with modified settings.
The following describes the procedure of modifying user group policy:
Start [Management Console].
Select the [User Policy Settings] from the [User Settings] menu.
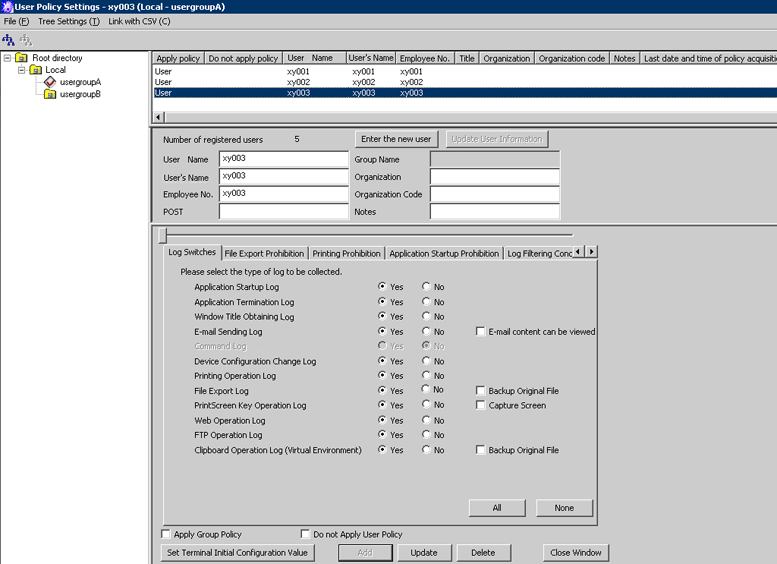
→ The [User Policy Settings] window is displayed.
For details of content displayed in the [User Policy Settings] window, please refer to “Content Displayed in Window”.

Select the user group that requires policy modification from the user group tree.
Modify policy in each tab of the user policy list.
For description of policy setting items, please refer to “2.4.1 Perform Terminal Initial Settings”.
Click the [Update] button.
→ The set policy will be updated into the user group at next time of logon.
The following describes the items displayed in the [User Policy Settings] window.
The user group information imported through Active Directory Linkage and the created user group is displayed.
When confirming the information of the latest user group tree, select [Refresh Tree] from the [Tree Settings] menu.
When [Unfold All Trees] is selected from the [Tree Settings] menu, all user groups will be displayed.
When [Fold All Trees] is selected from the [Tree Settings] menu, only the user group under the Root directory (under the domain when domain is displayed).
After a user group has been selected, the latest user policy that is set in user group unit will be displayed.
The users belong to the user group will be displayed. The items displayed in the user list are shown as follows.
Item Name | Displayed Content |
|---|---|
[Apply policy] | Which one among user policy and user group policy is applied will be displayed.
|
[Do not apply policy] | Whether the user policy is applied will be displayed.
|
[User Name] | The user name that logs on Windows (different from the “Full Name” that can be set in user name). |
[User’s Name] (Note) | This refers to the name of the user that uses the user name. |
[Employee No.] (Note) | This refers to the employee number of the user that uses the user name. |
[Title] (Note) | This refers to the title of the user that uses the user name. |
[Organization] (Note) | This refers to the organization to which the user that uses the user name belongs. |
[Organization code] (Note) | This refers to the organization code to which the user that uses the user name belongs. |
[Notes] | This refers to the notes of the user that uses the user name. |
[Last date and time of policy acquisition] | This refers to the date on which the latest policy is set. |
[Date and time of Server(DB) update] | This refers to the date on which the Master Management Server or Management Server updates the policy of the client (CT) and policy is updated in database (including immediate update). |
[Registration date and time] | This refers to the date on which the user is registered. |
Note: Users imported through Active Directory Linkage cannot be modified in The Management Console.
The properties of the user selected in tree configuration information part can be input. The displayed [Number of Registered User] does not include the number of user groups. The input information is as follows.
Item Name | Input Content |
|---|---|
[User Name] | Enter the user name for logging on Windows (different from the “Full Name” that can be set in user name).
|
[User’s Name] | Enter the name of the user that uses the user name. |
[Employee No.] | Enter the employee number of the user that uses the user name. |
[Title] | Enter the title of the user that uses the user name. |
[Group Name] | Enter the group name of the user group. |
[Organization] | Enter the organization to which the user that uses the user name belongs. |
[Organization Code] | Enter the organization code to which the user that uses the user name belongs. |
[Notes] | Enter the notes of the user that uses the user name. |
Note 1: It must be entered when adding a user.
Note 2: It cannot be entered when updating user information.
The policy set for the user selected in tree configuration information part can be specified.
For details of the settings, please refer to “2.4.1 Perform Terminal Initial Settings”.
The following describes the menu bar and tool bar of the [User Policy Settings] window.
Menu Bar | Tool Bar | Function Summary | |
|---|---|---|---|
[File] | [Search User/User Group] | - | → Display the [Search User/User Group] window. |
[Create User Group] | - | Display the [Create User Group] window. | |
[Delete user group] | - | Display the [Delete User Group] window. | |
[Set Department Administrator of User Group] | - | → Display the [Set the Department Administrator of User Group] window. This menu cannot be selected when the department administrator logs on. | |
[Import Department Administrator of User Group in CSV Format] | - | Display the [Specify a file for importing department administrator of user group in CSV format] window. | |
[Export Department Administrator of User Group in CSV Format] | - | Display the [Specify a file to export department administrator of user group in CSV format] window. | |
[Close] | - | Close the [User Policy Settings] window. | |
[Tree Settings] | [Refresh Tree] |
| Display the latest information of level status of user group tree. |
[Unfold All Trees] | - | Display all user groups. | |
[Fold All Trees] | - | Display only the user group under the Root directory (display only the one under domain when domain is displayed). | |
[Do not Display Empty Group] | - | Do not display the user group under which no user or user group is registered. | |
[Reflect User Group Structure] |
| Save the level status of user group tree. | |
[Link with CSV] | [Import User Information in CSV Format] | - | Display the [Specify a File for Importing User Information in CSV Format] |
[Export User Information in CSV Format] | - | Display the [Specify a File for Exporting User Information in CSV Format] window. | |
Copy User Group Policy or User Policy
This section describes the method for copying the user group policy or user policy that has been set to another user group or user.
The procedure is as follows:
Start [Management Console].
Select [User Policy Settings] from the [User Settings] menu.
→ The [User Policy Settings] window is displayed.
Select user or user group as the copy source
When user is selected
Select the user group with user registered as copy source from the user group tree.
Select the user as the copy source from [User List].
When user group is selected
Select the user group as the copy source from the user group tree.
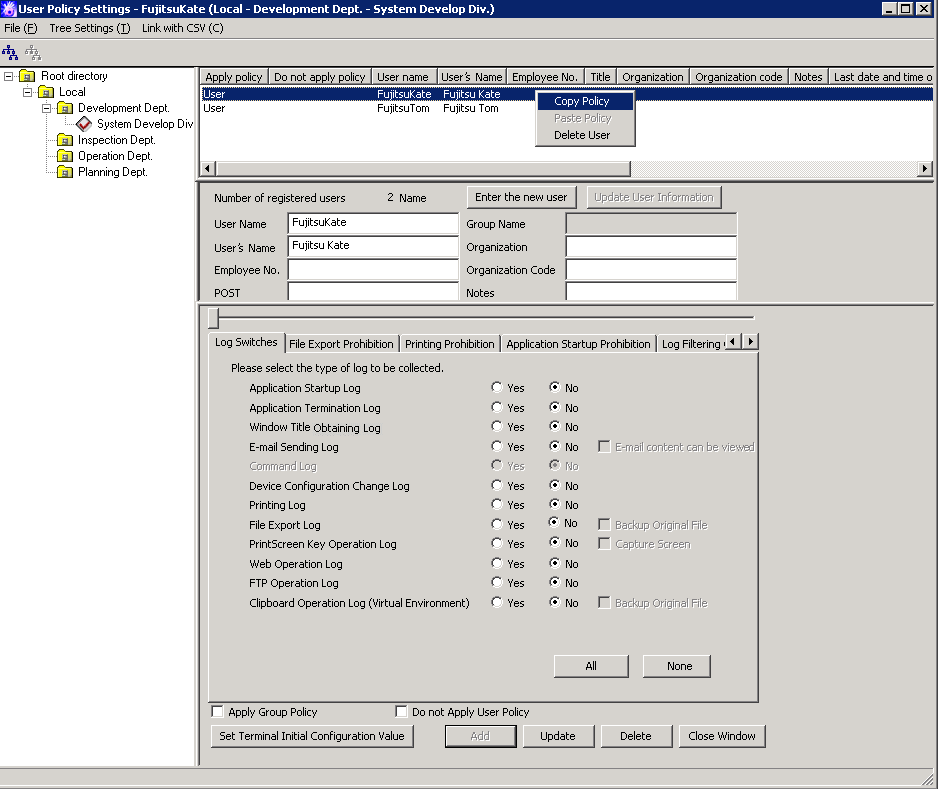
Right-click the selected user or user group.
→ The pop-up menu is displayed. (The following image shows the situation of copying user policy.)

Select [Copy Policy] from the displayed pop-up menu.
Select user or user group as the copy target.
When user is selected
Select the user group with user registered as the copy target from the user group tree.
Select the user as copy target from [User List].
When user group is selected
Select the user group as the copy target from the CT group tree.
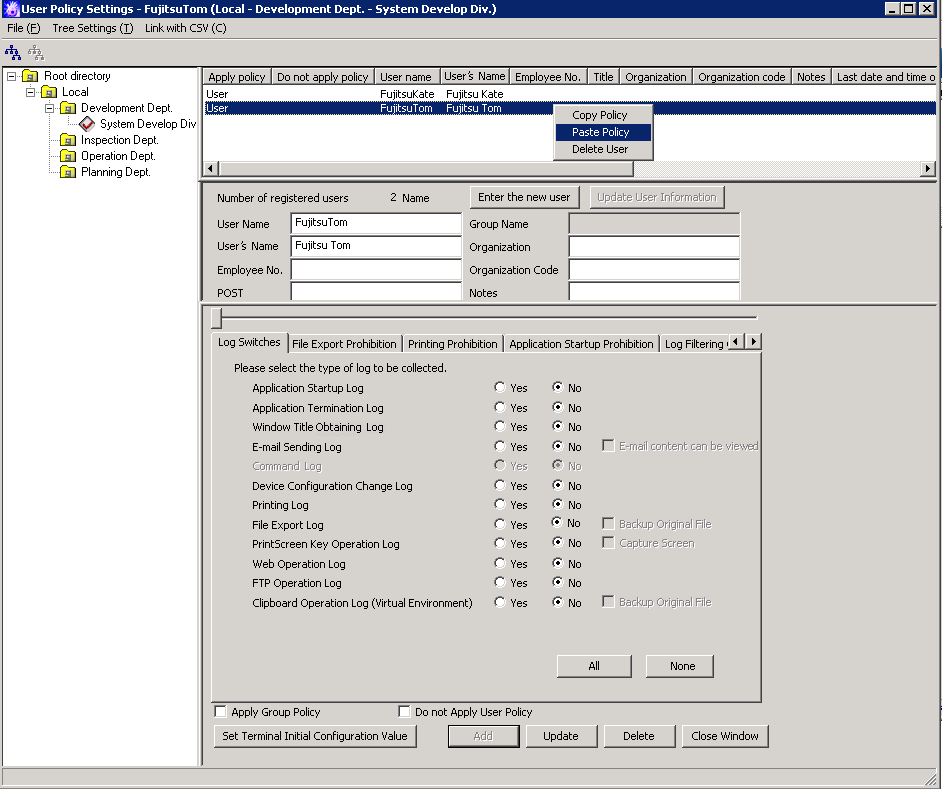
Right-click on the selected user or user group.
→The pop-up menu is displayed. (The following image shows the situation of copying to user)

Select [Paste Policy] from the displayed pop-up menu.
→The confirmation window for policy copying is displayed.
Click the [Yes] button.
→ The copied policy will be updated during the next logon.
In addition, when the user of copy target logs on the client (CT), if the client (CT) policy is updated immediately, the copied user policy will be updated immediately.