Set the conditions of prohibiting client (CT) operation and collected logs in the terminal initial settings.
In a 3-level system structure, please perform terminal initial settings in each the Management Server (even if the terminal initial settings is performed in the Master Management Server, it cannot be reflected to a Management Server).
The procedure is as follows:
Start [Management Console]
Select [Terminal Initial Settings] from the [Operation Settings]menu.
→The [Terminal Initial Settings] window is displayed.
Item Name | Description |
|---|---|
[Apply Group Policy] | When registering a new CT or creating a user, set whether to apply the policy of the group to which it belongs as its CT policy or user policy . When it is selected: When it is not selected: (Initial Value) For the CT or user under the Root directory, the settings are invalid. |
After setting policy for each tab, click the [Set] button.
When modifying the set terminal initial settings value (when setting the policy item added because of version upgrade/edition upgrade, or modifying the terminal initial settings value in the operation process), the policy should be updated for the CT after clicking the [Set] button.
Please refer to “Modify CT Policy” or “3.4.2 Modify User Policy” for the policy reflection operation.
The following Department describes the settings in each tab.
Whether to collect various logs can be set in the [Log Switches] tab. When it is set to “Yes”, the operation logs in the client (CT) will be collected.
The settings in [Log Switches] tab are described.
Item Name | Description | |
|---|---|---|
[Application Startup Log] | Application startup logs will be collected. | |
[Application Termination Log] | Application termination logs will be collected. | |
[Window Title Obtaining Log] | Window title logs at startup of window application will be collected. | |
[E-mail Sending Log] | E-mail sending logs will be collected. | |
[E-mail content can be viewed] | This can be set when [E-mail Sending Log] is “Yes”. When it is selected: When it is not selected: (Initial Value) | |
[Command Log] (This function is not available) | The logs of command and command result input in the command prompt will be collected. | |
[Device Configuration Change Log] | Device configuration change logs will be collected. | |
[Printing Operation Log] | Printing logs will be collected. When “Yes” is selected, input can be performed in the following tab:
| |
[File Export Log] | Logs during file export with File Export Utility will be collected. | |
[Backup Original File] | This can be set when the [File Export Utility] option is “Yes”. When it is selected: When it is not selected: (Initial Value) | |
[PrintScreen Key Operation Log] | PrintScreen key operation logs will be collected. | |
[Screen Capture] | This can be set when [PrintScreen Key Operation Log] is “Yes”. When it is selected: When it is not selected: (Initial Value) | |
[Web Operation Log] | The following log will be collected:
Initial Value: [No] is selected. | |
[FTP Operation Log] | The following logs will be collected:
Initial Value: [No] is selected. | |
[Clipboard Operation Log(Virtual Environment)]] | Clipboard operation logs will be collected.
| |
[Backup Original File | This can be set when the [Clipboard Operation Log (Virtual Environment)] is set to "Yes". When it is selected: When it is not selected: (Initial Value) | |
[File Operation Log] | File operation logs will be collected. When “Yes” is selected, input can be performed in the following tabs:
| |
[Logon,Logoff Log] | The following logs will be collected:
Initial Value: “Yes” is selected, and it cannot be modified. In the Server Settings Tool, when [Not Manage] is selected in the [Connection information between Terminals] of [System Settings], the item can be Modified to [Yes] or [No]. | |
[Linkage Application Log] | External application logs will be collected. | |
[All] | Select to collect all logs. | |
[None] | Select not to collect all logs. | |
Note
About settings of [Printing Operation Log]
During the installation of the client (CT), when [Monitoring the printing of local printer only] is selected, it is assumed that the printing operation of the client (CT) is performed via the printer servers that are registered to the same Master Management Server or Management Server. (The client (CT) should also be installed on the printer sever.)
At the moment, printing logs will be collected from the printer server. Therefore, in the client (CT) that is not the printer server, even if the [Printing Operation Log] is set to [Yes], the printing log will not be collected. However, if [Printing Operation log] in the print sever is set to [Yes], the printing operation log can be collected.
In the [File Export Prohibition] tab, the conditions of prohibiting the export and reading of files or folders from disk drive, removable device, DVD/CD drive or network drive of the client (CT) PC will be set.
Though the reading prohibition is effective when the Explorer is used, it will become invalid while the File Export Utility is being used.
In addition, the limiting conditions for export to the allowed USB device will be set by the administrator.
The following section describes the settings of the [File Export Prohibition] tab.
Item Name | Description | |
|---|---|---|
[Export using File Export Utility] | [Not Allowed] (Initial Value) | The File Export Utility cannot be used. |
[Allowed] | The File Export Utility can be used. | |
[Only encryption export is allowed] | This function is not available. When it is selected: When it is not selected: | |
[File Export Utility function setting] | The [Setting of File Export Utility function] is displayed. | |
Set the control when operation is performed via Explorer .etc.
Item Name | Description | |||
|---|---|---|---|---|
[File access control] | [Yes] | [Reading Prohibition] and [Export Prohibition] can be set. The [Display message when prohibition] checkbox can be selected when this item is selected. After it is selected, messages will be displayed when the prohibition operation is performed. | ||
[No] | Reading of removable drive and export of files can be performed freely (files can be accessed in the same way as if Systemwalker Desktop Keeper is not installed). | |||
[Display message when prohibited] | After setting this item, the following message will be displayed when inserting the prohibited device into the client (CT).
The above message will be displayed when “Violation” of device configuration change log occurs. Initial Value: Not selected Please refer to “8.2.7 Device Configuration Change Log” for ”Violation” of device configuration change log. | |||
Detailed Settings | Settings can be performed when the [File Access Control] is "Yes". | |||
[Reading Prohibition] | Set the targets for reading prohibition. | |||
[Removable] | Reading of the following devices that are identified as drive letter are prohibited.
Compact flash memory | |||
[DVD/CD] | Reading of DVD/CD is prohibited. Initial Value: Not selected | |||
[Network] | Reading of network drive is prohibited. Initial Value: Not selected | |||
[Export Prohibition] | Set the targets for exporting prohibition. | |||
Please select the drive to be prohibited(export destination). | Select the drive that is the target for export prohibition. The drive that becomes the prohibited target by specifying the drive letter should satisfy all the following conditions.
When F drive is a removable drive, even if the [Removable] (not regarded as the prohibited target) is not selected, when [F] (regarded as prohibited target) is selected, F drive will also be prohibited. Note About network drive The network drive cannot be prohibited by specifying the drive letter. Please prohibit it by selecting the [Network] checkbox. | |||
[Specify drive type] | [Removable] | Export to the following devices that are identified as drive letter is prohibited.
| ||
[DVD/CD] | Export to DVD/CD is prohibited. | |||
[Network] | Export to network drive is prohibited. Initial Value: Not selected | |||
[Clear All] | Clear all the selections for the settings of the prohibited drive (export destination) and [Specify drive type]. | |||
[Select All] | Select all for the settings of the prohibited drive (export destination) and [Specify drive type]. | |||
Note
Please do not set the target drive for saving log files.
If the target drive for saving log files set during the installation of the client (CT) is regarded as the prohibited target, logs cannot be collected from the client (CT).
This function is not available.
Item Name | Description |
|---|---|
[Use] | When exporting files and folders using File Export Utility, they can only be exported to the USB device specified by the administrator among the USB devices registered in the [USB Device Registration] window of the Management Control. |
[Do not Use] | When exporting files and folders using File Export Utility, follow the policies set in [File Export Utility]. |
[Detailed Settings] | The [File Export Prohibition - Individual Identification Function of USB Device - Detailed Settings] window window will be displayed. |
[File Export Utility function setting] window
The conditions of using File Export Utility can be set.
Item Name | Description |
|---|---|
[Unable to start the format function] | When this is selected:
When it is not selected: (Initial Value) |
[Display only removable device and DVD/CD as export destination] | When this is selected: When it is not selected: (Initial Value) |
[IEnter the reason for export] | When this is selected: When it is not selected: (Initial Value) |
Item Name | Description | |
|---|---|---|
[Limit period for use] | When this is selected:
When it is not selected: (Initial Value): | |
[Limit time for use] | When this is selected: When it is not selected: (Initial Value): | |
[The day of a week on which it can be used] | The day in a week when the startup is allowed will be set. | |
[Date and Time Confirmation Method] | [Inquire Management Server] | The date and time when the File Export Utility can be started is based on the date and time of the Management Server. In addition, set the operations when the client is offline or the Management Server gives no response.
|
[Date and Time when CT is used] | The date and time when the File Export Utility can be started is based on the date and time of the CT. | |
This function is not available.
Item Name | Instruction | |
|---|---|---|
[Password Length] | [Minumum number of characters] | This is the minimum number of characters for a password when the encrypted file export is set. |
[Maximum number of characters] | This is the maximum number of characters for a password when the encrypted file export is set. | |
[Decryption Restriction] | [Number of Password Attempts ] | When this is selected:
When it is not selected (Initial Value); |
[Nubmer of day to decrypt] | When this is selected:
When it is not selected: (Initial Value): | |
[Extension of encrypted file] | [exe] | The “exe” will be automatically added as the extension of encrypted files. The relationship between the [Encrypted File Name] of the [Settings of Encrypted Files] window and the file name after encryption is shown as follows:
The encrypted file can be presented by the private icon for an encrypted file of File Export Utility. |
[Specify an extension] | The extension of encrypted file can be set. Even if the extensions of compressed files such as “zip”, “lzh”, etc. have been set, they will not be compressed. Initial Value: “ex_” The relationship between the [Encrypted File Name] of the [Settings of Encrypted Files] window and the file name after encryption is shown as follows: The specified extension is “ex_”.
When the extension relating to the file has been specified for the encrypted file, it will be displayed with the icon of the related file. | |
[Set] | Confirm the input contents and return to the “File Export” tab. | |
[Cancel] | Do not save the settings and close the window. | |
[File access control - Detailed Settings] window
Item Name | Description | |
|---|---|---|
[Set excluded folder for network drive access prohibition] | The folder excluded from network drive access prohibition can be set. | |
[Folder Name] | The folder excluded from network drive access prohibition can be set. In addition, “\” cannot be specified at the end of path. Initial Value: No specification | |
[View] | The dialog for selecting the excluded folder can be displayed. | |
[Notes] | Enter the information such as memo. | |
[Add/Update] | Add an excluded folder. After modifying the selected [Notes] in the folder list, the information will updated ([Folder Name] cannot be updated). | |
[Delete] | Delete the selected lines in the folder list. | |
[Set] | Confirm the input contents and return to the “File Export” tab. | |
[Cancel] | Do not save the settings and close the window. | |
[File Export Prohibition - Individual Identification Function of USB Device - Detailed Settings] window
Item Name | Description | ||
|---|---|---|---|
[Allow to Use All USB Devices Registered in Management Server] | Select whether the used of all USB devices registered in the Management Server is allowed. Yes: No: (Initial Value) When Management Server cannot communicate with the client (CT), the USB device used before can be used. | ||
[List of Available USB Devices] | The USB device that is allowed to be used by the administrator will be displayed. | ||
[Access Settings] | Set the conditions for accessing to the USB device allowed to be used. | ||
[Read Only] | The selected USB device in [List of Available USB Devices] can be read only. | ||
[Read and Write] | The selected USB device in [List of Available USB Devices can be read and written. Only one can be selected among the [Read and Write by File Export Utility Only] checkbox and the [Write by File Export Utility Only] checkbox. | ||
[Read and Write by File Export Utility Only] | When it is selected: | ||
[Write by File Export Utility Only] | When it is selected: | ||
[Update] | The settings can be displayed in [List of Available USB Devices]. | ||
[Add Device] | The [File Export Prohibition - Detailed Settings of USB Device Individual Identification Function - Select a USB Device] window window can be displayed and the available USB devices can be added. | ||
[Delete Device] | The usage permission of the selected USB device can be canceled in [List of Available USB Devices] and the USB device can be deleted from [List of Available USB Devices]. | ||
[Close] | Shutdown the window. | ||
Select the line corresponding to the USB device in [List of Available USB Devices].
Set conditions in [Access Settings].
Click the [Update] button.
Select the line corresponding to the USB device in [List of Available USB Devices].
Click the [Delete Device] button.
Click the [Add Device] button.
[File Export Prohibition - Detailed Settings of USB Device Individual Identification Function - Select a USB Device] window
The content registered in the [USB Device Registration] window of the Management Console can be displayed.
The line of the available USB device can be selected. After clicking the [OK] button, the corresponding USB Device will be added to the [List of Available USB Devices] in the [File Export Prohibition - Individual Identification Function of USB Device - Detailed Settings] window window.
The conditions for prohibiting printing on the PC with the client (CT) installed (specify the application allowed to print) and the prohibition of using PrintScreen key to collect screen hard copy can be set in the [Printing Prohibition] tab.
The following section describes the settings of the [Printing Prohibition] tab.
Item Name | Description | |
|---|---|---|
[Printing Prohibition] | [Yes] | Printing that uses applications apart from the [EXE Name of application] displayed in the [List of Applications that Allow Printing] is prohibited. |
[No] | Printing is not prohibited. | |
[List of Applications that Allow Printing] | The set [EXE Name of Application that Allow Printing] will be displayed. | |
[List of EXE names of Applications that Allow Printing ] | Enter the EXE names including the extensions of Applications allowed to print. Up to 254 single-byte characters (127 double-byte characters) can be entered. (For alphabets, it is case-sensitive.) However, if the following symbols are used, error will occur. Initial Value: No specification will be made. | |
[Notes] | Enter the application name and memo information. | |
[Add/Update] | Add the EXE name of application allowed to print. After modifying the [Notes] of selected lines in the [List of Applications Allowed to Print], the information will be updated (The [EXE Name of Application that Allow Printing] cannot be updated.). | |
[Delete] | The selected lines in the [List of Applications that Allow Printing] can be deleted. | |
Item Name | Description | |
|---|---|---|
[Disabling PrintScreen Key] | When the [PrintScreen Key Operation Log] option in the [Log Switches] tab is [No], settings can be performed. | |
[Yes] | The use of PrintScreen key is prohibited. | |
[No] | The use of PrintScreen key is not prohibited. | |
[Capture Screen] | When the option of [PrintScreen Key Prohibition] is “Yes”, settings can be performed When it is selected: When it is not selected: | |
[When adding the EXE name of applications that Allow Printing ]
Enter the above settings items and click the [Add/Update] button.
Up to 100 cases can be added.
[When updating the existing information]
Select the lines to be updated from the [List of Applications that Allow Printing], modify the [Notes] information and click the [Add/Update] button.
The [EXE Name of Application that Allow Printing] cannot be updated.
[When deleting information]
Select the lines to be deleted from the [List of Applications that Allow Printing], and click the [Delete] button.
This function is not available.
The group prohibited from logon can be set in the [Logon Prohibition] tab. After setting the [Logon Prohibition], logon with the user name that belongs to the set group can be prohibited when logging on to the PC with the client (CT) installed.
The groups for which logon prohibition can be set are as follows:
Administrators
Backup Operators
Debugger Users
Power Users
Guests
Replicator
Users
Domain Admins
Domain Guests
Domain Users
Enterprise Admins
Group Policy Creator Owners
In addition, when one user name belongs to multiple groups, it will become an target of logon prohibition when it satisfies all the following conditions:
The user name entered during logon to the Windows PC belongs to multiple groups.
Logon prohibition is set for any one group in the multiple groups to which the user name belongs.
Note
About the creation of system administrator user under the Windows® XP system
Under Microsoft® Windows® XP Home Edition, the user names belong to the Administrators group and the Users group will be created automatically when the system administrator user is created. If either the Administrators group or the Users group is prohibited, the policy set in Systemwalker Desktop Keeper will prohibited logon.
The set contents will be operated as CT policy.
When only one person logs on to the PC, prohibition can be performed through the settings in the [Logon Prohibition] tab.
When 2 or more users log on to the same PC, it will have nothing to do with the settings in the [Logon Prohibition] tab and it will be logged off.
The following section describes the settings of the [Log Filtering Condition] tab.
Item Name | Description |
|---|---|
[List of Logon Prohibition Groups] | The set logon prohibition group will be displayed. |
[Logon Prohibition Group] | Select the logon prohibition group from the pull-down menu. |
[Set] | When prohibiting the target group from logon, the processing in the client (CT) can be specified.
The time from logon prohibition being detected from the client (CT) to logoff or shutdown can be set in the “Terminal Operation Settings”. Please refer to “2.4.2 Perform Terminal Operation Settings” for “Terminal Operation Settings”. |
[Add/Update] | The name of group that is prohibited from logon and the processing during logon will be added. After modifying the [Set] of selected lines in the [List of Logon Prohibition Groups], the information will be updated (The [Logon Prohibition Group] cannot be updated.). |
[Delete] | The selected lines in the [List of Logon Prohibition Groups] will be deleted. |
[When adding a logon prohibition group]
After entering the above set items, click the [Add/Update] button.
[When updating the existing information]
Select the lines to be updated from the [List of Logon Prohibition Groups], modify the [Settings] information and click the [Add/Update] button.
The [Group Name] cannot be updated.
[When deleting information]
Select the lines to be deleted from the [List of Logon Prohibition Groups] and click the [Delete] button.
In the [Application Startup Prohibition] tab, the name of the application that is prohibited from startup in the PC with the client (CT) installed can be set.
The following section describes the settings of the [Application Startup Prohibition] tab.
Item Name | Description |
|---|---|
[List of Applications of startup prohibition] | The set EXE name of the application prohibited from startup will be displayed. |
[EXE name of application of startup prohibition] | Enter the EXE name including extension of the application prohibited from startup. Up to 254 single-byte characters (127 double-byte characters) can be entered. (Alphabets are not case-sensitive) However, error will occur if the following symbols are used. Initial Value: Not specified. |
[Notes] | Enter the application name and memo information. |
[Add/Update] | The EXE name of the application prohibited from startup will be added. After modifying the [Notes] of the selected lines in the [List of Applications Prohibited from Startup], the information will be updated (The [EXE Name of Application Prohibited from Startup] cannot be updated.). |
[Delete] | The lines selected in the [List of applications of startup prohibited] will be deleted. |
[When adding an EXE name of the application prohibited from startup]
Enter the above set items and click the [Add/Update] button.
Up to 100 cases can be added.
[When updating the existing information]
Select the lines to be updated from the [List of applications of startup prohibited], modify the [Notes] information and click the [Add/Update] button.
The [EXE Name of application of startup prohibited] cannot be updated.
[When deleting information]
Select the lines to be deleted from the [List of applications of startup prohibited ], and click the [Delete] button.
The screening conditions for obtaining file operation logs can be set in the [File Operation Process] tab. Set the file location for log collection during access, and the process of log collection during startup. As the file operation logs can be selected and collected according to objectives, the search efficiency after collection can be improved.
When the [File Operation Log] option in the [Log Switches] tab is [Yes], the set items of the [File Operation Process] tab can be set.
Note
Please do not register the software with many disk accesses.
Since the output of a large amount of logs will cause insufficient database capacity, please do not register software that has significant access to disks such as antivirus software, disk check and repair software, etc.
In addition, as the software related to the OS may also output too many logs, please register after confirming the performance and OS operation state on the test machine.
EXE Name of Process | Select Record Operation | Select based on extension | Is it OK to delete? | Notes |
|---|---|---|---|---|
[Cmd.exe] | [Except view] | [Get all extensions] | [Not Allowed] | [Command Prompt] |
[Explorer.exe] | [Except view] | [Get all extensions] | [Not Allowed] | [Explorer] |
[fsw00ej2.exe] | [Except view] | [Get all extensions] | [Not Allowed] | [Command Prompt (DTK)] |
[xcopy.exe] | [Except view] | [Get all extensions] | [Not Allowed] | [Copy Command] |
[dllhost.exe] | [Except view] | [Get all extensions] | [Not Allowed] | [Explorer] |
Item Name | Description | |
|---|---|---|
[File Operation Log Filter Operation Settings] | Select the drive type as the targets for collection of file and folder operation logs can be selected. | |
[Get All] | Record the operations of all drives. | |
[Get file access on removable drives only.] | Record the operation for the drive, the drive type of which is removable disk. | |
[Get file access on network and removable drive only] | Record the operation for the drive, the drive type of which is network and removable disk. | |
[Detailed Settings] | The [File Operation Process - Detailed Settings] window window will be displayed. (When [No] is selected in [File Operation Log] of the [Log Switches] tab, it cannot be selected.) | |
Item Name | Description |
|---|---|
[List of File Operation Log Obtaining Process] | The processes and conditions during the obtaining of file operation logs are displayed in lists. |
[Process EXE Name] | Enter the EXE name of a process regarded as the target for the collection of file and folder operation logs. Up to 254 single-byte characters can be entered. In addition, [.com] or [.exe] can be entered in the extension of a process. However, if double-byte characters or the following symbols are used, error will occur. Initial Value: Not Specified. |
[Select Record Operation] | Select the operation that is recorded as a log.
|
[Select according to Extension] | Select the extension of the file name that is recorded as a log.
* When operating the process (application of files or folders in the similar way as Explorer and [Get all extensions] is selected, a large amount of [View] logs will be collected. |
[Notes] | Enter the memo information of process name. |
[Add/Update] | Add the entered information to the list. In addition, the changed information shall also be set. |
[Delete] | Delete the selected information of [List of File Operation Log Obtaining Processes]. |
[When adding a process]
Enter the above set items and click the [Add/Update] button.
Up to 30 cases of information can be registered including the number of processes that are preset in the system.
[When updating the existing information]
Select the lines to be updated from the [List of File Operation Log Obtaining Processes], modify the following information and click the [Add/Update] button.
The [EXE Name of Process] cannot be updated. If the [Can be Deleted or Not] of a certain line is set to [No], the [Select Record Operation] cannot be set to [Get All].
[Select Record Operation]
[Select according to Extension]
[Notes]
[When deleting information]
Select the lines to be deleted from the [List of File Operation Log Obtaining Processes], and click the [Delete] button.
But If the [Is it OK to delete?] of a certain line is set to [No], the line cannot be deleted.
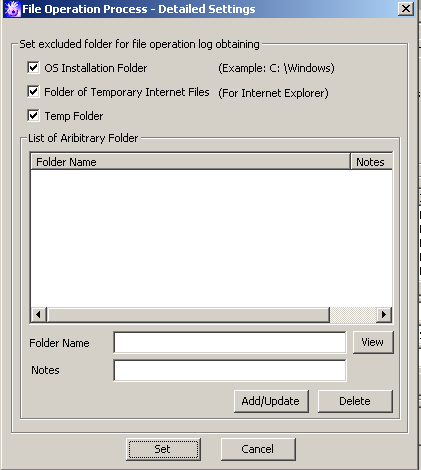
[File Operation Process - Detailed Settings] window
Item Name | Description | |
|---|---|---|
[OS Installation Folder] | Select this checkbox when accessing the files on the OS installation folder but when the file operation logs are not to be obtained. | |
[Folder of Temporary Internet Files] | Select this checkbox when accessing the files on the folder of Temporary Internet Files, but when the file operation logs are not to be obtained. | |
[Temp Folder] | Select this checkbox when accessing to the files on the following folders, but the file operation logs are not to be collected.
(Initial Value): Selected (*) | |
[List of Arbitrary Folder] | The fixed disk folder excluded from the acquisition of file operation logs can be set and deleted. | |
[Folder Name] | Specify the fixed disk folder excluded from the acquisition of file operation logs with full path. Up to 254 bytes can be specified. Specify the folder by adding “\” or “/” after the drive’s name + colon (:), When the drive specified in this window is the network drive or removable drive in the client (CT), it cannot become an excluded folder for obtaining file operation log. [Example]
The same folder name cannot be registered more than once (“D:\aaa” and “D:\aaa\bbb” can be registered at the same time.). The folder with an extension should be distinguished from the folder without extension. (When “d:\data” is specified as the excluded folder, “d:\data.tmp” will not become the excluded folder.) To make “d:\data.tmp” into the excluded folder, please register “d:\data.tmp”. Initial Value: Not Specified. | |
[Notes] | Enter the memo information, etc. | |
[View] | The folder structure of the PC with the Management Console installed can be viewed. | |
[Add/Update] | Add the folder excluding the acquisition of file operation log to the list. In addition, update the notes of the registered folder (The folder name cannot be updated.). | |
[Delete] | Delete the folder excluding the acquisition of the file operation log from the list. | |
[Set] | Confirm the input content and return to the “File Operation Process” tab. | |
[Cancel] | Do not save the set information and close the window. | |
*)When it is upgraded from the version earlier than Systemwalker Desktop Keeper V13.2.0, all the items are unselected.
For the file (extension) accessed by the process set in the [File Operation Process] tab, when the file operation log is collected, the extension can be set in the [File Operation Extension] tab.
When [File Operation Log] in the [Log Switches] tab is [Yes], the set items in the [File Operation Extension] tab can be set.
Item Name | Description |
|---|---|
[List of File Operation Log Obtaining Extension] | Display the extension of the registered and obtained file operation log. Initial Value: Not Specified. |
[Extension] | Enter the extension as the target for the collection of file and folder operation logs. The “.” of extension is not required. (It cannot be entered.) Up to 16 single-byte characters (Alphabets are not case-sensitive) can be entered. If the wildcard (*) is used, “*” should be put at the beginning or at the end of the extension.
The wildcard “*” cannot be entered in other locations. Initial Value: Not Specified. |
[Notes] | Enter the extension and memo information. |
[Add/Update] | Add the entered information to the list. In addition, the modified information should be set. |
[Delete] | Delete the information selected in the [List of File Operation Log Obtaining Processes]. |
[When adding an extension]
Enter the above set items and click the [Add/Update] button.
Up to 20 cases can be registered.
[When updating the existing information]
Select the lines to be updated from [List of File Operation Log Obtaining Extension], modify the [Notes] information and click the [Add/Update] button.
The [Extension] cannot be updated.
[When deleting information]
Select the lines to be deleted from [List of File Operation Log Obtaining Extension], and click the [Delete] button.
This function is not available.
The following settings can be performed in the [E-mail Sending] tab:
Allow or prohibit to add E-mail file attachment
Whether or not to confirm the recipient address for E-mail sending.
Settings of the exclusion domain of file attachment prohibition and recipient address confirmation.
According to the set conditions, the message for confirming the recipient address will be displayed when an E-mail is being sent. Attaching permitted or prohibited files to an E-mail for sending can be permitted or prohibited.
The following section describes the settings of the [E-mail Sending] tab.
This item has nothing to do with the acquisition policy of [E-mail Sending Log] in the [Log Switches] tab.
Item Name | Description |
|---|---|
[Unconfirmed] | It has nothing to do with the recipient address at E-mail sending and the warning message will not be displayed. |
[Confirmed] | When the user is sending an E-mail to the domain apart from the domains set in the [List Exclusion Domains], the warning message will be displayed. |
This item has nothing to do with the acquisition policy of [E-mail Sending Log] in the [Log Switches] tab.
In addition, even if there is only one prohibited file in the attachment, the E-mail (E-mail text and all file attachments) cannot be sent.
Item Name | Description |
|---|---|
[Do not Prohibit] | Sending or saving the E-mail after adding the file attachment is prohibited. |
[Prohibit (Prohibit the specified extension only)] | Sending or saving the E-mail after adding the file with the specified extension is prohibited. The following describes the E-mail software:
|
[Prohibit (Permit the encrypted files only)] | Only the files encrypted by the following software can be added to E-mail for sending and saving:
|
[Prohibit (Permit the specified extension only)] | Sending or saving the E-mail after adding the file with the specified extension is permitted. The settings are valid when all the following conditions are satisfied:
When the version of the client (CT) is V13.0.0 or later, or [12.0L20-V13.0.0 Compatible Mode], the specified extension that is permitted to be added will become invalid and any file can be added as the E-mail attachment. |
[Extension Settings] | The [E-mail Sending - Set E-mail Attachment Prohibition Extension] window window will be displayed. |
Item Name | Description |
|---|---|
[List of Exclusion Domains] | It is not necessary to confirm the recipient address when sending an E-mail to the domain displayed in the list, and file attachment will not be prohibited. |
[Domain] | Enter the domain that allows E-mail sending. Up to 254 single-byte characters (Alphabets are not case-sensitive) can be entered. Initial Value: Not Specified. |
[Notes] | Enter the memo information related to the domain. |
[Add/Update] | Add the domain that allows E-mail sending. After modifying the [Notes] of selected lines in [List of Exclusion Domains], the information will be updated (The domain name cannot be updated). |
[Delete] | The selected lines in [List of Exclusion Domains], will be deleted. |
[E-mail Sending - Set E-mail Attachment Prohibition Extension] window
Set the file extension permitted or prohibited to be added.
Item Name | Description |
|---|---|
[List of Extensions] | The extension name of the file that is permitted or prohibited in E-mail file attachment will be displayed in a list. |
[Extension] | Enter the extension name of the file that is permitted or prohibited in E-mail file attachment. The “.” of extension is not required. (It cannot be entered) A maximum of 16 single-byte characters (Alphabets are not case-sensitive) can be entered. Initial Value: Not Specified. |
[Notes] | Enter the extension and memo information. |
[Add/Update] | Add the permitted or prohibited extension of E-mail file attachment. After modifying the [Notes] of selected lines in the [List of Extensions], the information will be updated (The [Extension] cannot be updated). |
[Delete] | Delete the lines selected in the [List of Extensions]. |
[OK] | Confirm the input content and return to the [E-mail Sending] tab. |
[Cancel] | Do not save the set information and close the window. |
The conditions for collecting the window title obtaining log can be set in the [Log Filtering Condition] tab.
Though a large number of window title obtaining logs can be collected in order to record all operations on the PC, there will be many repeated logs. Therefore, to avoid collecting the repeated logs, the filtering condition should be set.
The log filtering condition involves two aspects, and two conditions can be specified at the same time.
Settings of Repeated Log Screening:
Only the first log will be collected for the same process and same window title.
Keyword Screening:
By specifying the process names and keywords, the window title logs including the specified process names and keywords can be collected or excluded.
When [Yes] is selected in [Window Title Obtaining Log] of the [Log Switches] tab, the [Log Filtering Condition] tab can be set.
The following describes the settings in the [Log Filtering Condition] tab.
Item Name | Description |
|---|---|
[Repeated Log Screening Settings] | Select the method of obtaining repeated logs.
|
Item Name | Description |
|---|---|
[Screening condition is not set] (Initial Value) | The window title logs will not be screened according to process name and keyword. |
[Obtain matched logs only] | Only the logs belong to the specified process name and the window title log partially matches with the keyword specified in screening conditions will be collected. |
[Exclude matched Logs] | The logs belong to the specified process name, and the window title log that partially matches with the keyword specified in screening conditions will not be collected. |
[Screening Condition] | Display the set conditions in a list. |
[Process EXE Name] | Enter the EXE name of process that collects window title logs. Up to 254 single-byte characters (127 double-byte characters) can be entered. When it is not specified, logs of all processes will be collected (or excluded). Initial Value: Not Specified. |
[Keyword] | Enter the keyword for collecting window title obtaining logs. (When the window title includes(partially match)/does not include (partially match) the keyword specified here, window title logs will be collected.)
Up to 254 single-byte characters (127 double-byte characters) can be entered. When [Keyword] is not specified, all window title obtaining logs of processes specified in [Process EXE Name] will be collected (will not be collected). Initial Value: Not Specified. |
[Add] | Add conditions in [Screening Conditions]. |
[Update] | After modifying the information of lines selected in the [Screening Condition], the information will be updated. |
[Delete] | Delete the lines selected in the [Screening Condition]. |
In [Filtering Condition], when [Process EXE Name] and [Keyword] are specified at the same time, the AND condition is used.
When [Process EXE Name] and [Keyword] are specified separately in lines, the OR condition is used.
[When adding a condition]
Enter the above set items and click the [Add] button.
Up to 30 cases can be registered.
[When updating the existing information]
Select the lines to be updated from the [Screening Condition], modify the information and click the [Update] button.
[When deleting information]
Select the lines to be deleted from the [Screening Condition], and click the [Delete] button.
The condition of collecting the screen capture can be set in the [Screen Capture Condition] tab.
Set the conditions for collecting the window title obtaining logs in the [Screen Capture Condition] tab.
When [Yes] is selected in [Window Title Obtaining Log] of the [Log Switches] tab, the [Screen Capture Condition] tab can be set.
The settings related to screen capture can be performed in the [Terminal Operation Settings] window (Settings item: [Attached data condition settings]). Please refer to “2.4.2 Perform Terminal Operation Settings” for details.
Note
Please backup or delete the screen capture data regularly.
According to the screen capture condition, storing a large amount of screen capture data on the server (the client (CT) according to terminal operation settings) will cause insufficient disk capacity. Therefore, please regularly confirm the capacity and backup and delete.
The following describes the settings in the [Screen Capture Condition].
Item Name | Description |
|---|---|
[Screen capture function] | Select whether to obtain screen capture.
|
[List of screen capture object of window title log] | The conditions for obtaining screen capture are displayed in a list. Initial Value: Not Specified. |
[Process EXE Name] | Enter the EXE name of screen capture. Up to 254 single-byte characters (127 double-byte characters) can be entered. [.com] or [.exe] can be input in the process extension. Initial Value: Not Specified. |
[Keyword] | Enter the keyword for collecting screen capture. (When the window title includes (partially match)/does not include ((partially match) the keyword specified here, screen capture can be obtained.)
Up to 254 single-byte characters (127 double-byte characters) can be entered. (Alphabets are not case-sensitive) When the EXE name of process is entered in the [EXE Name of Process], please make sure to input in [Keyword]. Initial Value: Not Specified. |
[Obtain for second time after 5 seconds] | Set the second acquisition 5 seconds later after the screen capture has been obtained. When it is expected to obtain screen capture continuously to get further knowledge of operation status, please select [Yes].
When selecting [Yes], the screen capture will be collected for the second time after 5 seconds. However, in the 5 seconds from the first collection to the second collection, even if a new window that satisfies the condition of screen capture collection exists, that screen capture will not be collected. As it is the second screen capture of the initial window, “2” which indicates two screen capture collections will be displayed in the [Additional] in the log list of Log Viewer. |
[Add] | After selecting [Use] in the [Screen Capture Function], the condition of screen capture collection will be added to the list. |
[Update] | After modifying the information of lines selected in the [List of screen capture object of window title Log], the information will be updated. |
[Delete] | Delete the lines selected in the [List of screen capture object of window title]. |
In [List of screen capture object of window title], when [Process EXE Name] and [Keyword] are specified at the same time, it is the AND condition.
When [Process EXE Name] and [Keyword] are specified separately in lines, the OR condition is used.
The settings in the [Screen Capture Condition] tab and [Log Filtering Condition] tab are set using the AND condition. Therefore, even if the policy of obtaining screen capture is set, the log screening condition will be considered as not set when screen capture cannot be obtained.
[When adding a condition]
Enter the above settings items and click the [Add] button.
Maximum10 cases can be registered.
[When updating the existing information]
Select the lines to be updated from the [List of screen capture object of window title], modify the information and click the [Update] button.
[When deleting information]
Select the lines to be deleted from the [List of screen capture object of window title], and click the [Delete] button.
By monitoring the printed pages, the conditions can be set in the [Eco Monitoring Settings] tab to reduce unnecessary printing.
In the [Settings of Printing Monitoring Mode] during the installation of CT, this function is effective when [Monitor the printing of all printers set in the terminal (Recommended)] is selected.
When [Yes] is selected in [Printing Operation log] of the [Log Switches] tab, the monitoring condition can be set.
When the set number of pages is reached and the printing is prohibited, a warning message will be displayed to the user of the client (CT), and the printing can be prohibited. At the same time, it will be recorded as a violation to the printing prohibition log.
The settings of the [Eco Monitoring Settings] tab will be processed as CT policy.
Item Name | Instruction | |
|---|---|---|
[Warning] (*) |
| |
[Prohibit Printing](*) |
| |
[Unit for aggregating number of printed pages] | [Daily] | Monitor the number of printed pages in 24 hours. |
[Weekly(Mon~Sun)] | Monitor the number of printed pages in a week. | |
[Month] | Monitor the number of printed pages in a month | |
*) When both [Warning] and [Prohibit Printing] are selected,
please input the set number of pages in [Warning] ≦ the set number of pages in [Prohibit Printing].
The clipboard operation prohibition can be set in the [Virtual Environment setup] tab.
Item Name | Description | |
|---|---|---|
[Prohibition of clipboard operation between different environments] | When the [Clipboard Operation Log (Virtual Environment)] option in the [Log Switches] tab is [No], settings can be performed. | |
[Prohibit] | The clipboard operation is prohibited. | |
[Do not Prohibit] | The clipboard can be used to copy from the virtual environment to the physical environment or from the physical environment to the virtual environment. | |
[Backup Original File] | When the option of [Prohibition of clipboard operation between different environments] is [Prohibit], the item can be set. When this is selected: When this is not selected: (Initial Value) | |
The URL prohibited from being accessed can be set in the [URL Access Prohibition] tab.
Item Name | Description | ||
|---|---|---|---|
[URL access] | [Prohibit] | Access to URL is prohibited. | |
[Prohibit access to registered sites] | Access to the URL specified in [List of Registered Sites] is prohibited. | ||
[Prohibit access to non-registered sites] | Access to the URL other than the one specified in the [List of Registered Sites] is prohibited. | ||
[Do not Prohibit] | Any URL can be accessed. | ||
[List of Registered Sites] | The URL that is prohibited or allowed to be accessed and the memo related to the URL will be displayed. | ||
[URL string] | Enter the character string that contains part of the domain name of the prohibited or allowed to be accessed URL. Up to 254 single-byte alphanumeric characters and symbols (*) (127 double-byte characters) can be entered (Alphabets are not case-sensitive) A multi-byte character domain name cannot be used. Up to 100 cases can be registered. Initial Value: Not Specified. | ||
[Notes] | Enter the information such as the memo of URL. | ||
[Add/Update] | URL will be added. After modifying [Notes] the lines selected in [List of Registered Sites], the information can be updated (The [URL string] cannot be updated.) | ||
[Delete] | The lines selected in [List of Registered Sites] will be deleted. | ||
Prohibition of the connection to the FTP server which is not permitted by the administrator can be set in the [FTP Server Connection Prohibition] tab.
To prohibit the connection to FTP server from Internet Explorer®, please set in the [URL Access Prohibition] tab.
Item Name | Description | |
|---|---|---|
[FTP Server Connection] | [Prohibit] | Prohibit the access to the servers that is not specified in the [List of servers allowed be connected]. |
[Do not Prohibit] | Any FTP server can be connected. | |
[List of servers allowed to be connected] | The IP address of FTP server allowed to be connected and the memo related to the server to be connected are displayed. | |
[IP address] | Enter the IP address (IPV4 format) of the server to be connected. | |
[Notes] | Enter the memo information of the server allowed to be connected .etc. | |
[Add/Update] | The server allowed to be connected will be added. After modifying the [Notes] of lines selected in the [List of servers allowed to be connected ], the information will be updated (The [IP Address] and [Connecting Target port] cannot be updated.) | |
[Delete] | The lines selected in [List of servers allowed to be connected] will be deleted. | |
The Web upload and download operations permitted by the administrator can be set in the [Web Upload and Download Prohibition] tab.
Iten Name | Description | |
|---|---|---|
[Upload and Download] | [Prohibit] | The Web upload and download operations that are not in the [List of Sites Allow Upload and Download] tab will be prohibited. |
[Do not Prohibit] | The upload and download operations can be performed on any website. | |
[List of sites allow uploading and downloading] | The URL of a Web site that allows upload and download, as well as the memo information related to the URL will be displayed. | |
[URL string] | Enter the URL of the Web site that allows upload and download. Up to 254 single-byte alphanumeric characters and symbols (*) (127 double-byte characters) can be entered. (Alphabets are not case-sensitive) A multi-byte character domain name cannot be used. Up to 100 cases can be registered. Initial Value: Not Specified. | |
[Notes] | Enter the memo information of the URL that allows upload and download. | |
[Add/Update] | The URL of the Web site that allows upload and download will be added. After modifying the [Notes] information of lines selected in the [List of sites allow uploading and downloading], the information can be updated (The [URL Character String] cannot be updated.). | |
[Delete] | The lines selected in the [List of sites allow uploading and downloading] will be deleted. | |
The method of sending operation logs from the client (CT) to the Management Server can be set in the [Other Settings] tab. The sent logs are operation logs, prohibition logs and attached data.
Note
About sending command operation log to the server
Command logs are always sent immediately after collection (not affected by this setting).
The method of sending can be set according to the following cases:
When the client (CT) is always connected to the server and network
When connecting to the server, the logs accumulated in the client (CT) due to the reasons such as a mobile application will be sent immediately.
Item Name | Description | ||
|---|---|---|---|
[Send immediately when operation logs occur] | Logs will be sent to the server immediately when they are generated. | ||
[Processing of logs accumulated in CT] | Set the method of sending the logs accumulated in the client (CT) due to reasons such as a mobile application immediately when the network connects to the server. | ||
[Send accumulated logs immediately after connection] | When changing from the network disconnection environment to the network connection environment (when the communication with the Management Server and Master Management Server is started), the accumulated logs will be sent to the server immediately from the client (CT). | ||
[Send operation logs accumulated in certain amount collectively after connection] | When changing from the network disconnection environment to the connection environment (when the communication with the Management Server and Master Management Server is started), the accumulated logs will be sent collectively to the Management Server after reaching to certain amount. The amount of logs to be sent at one time and the interval for sending are set in the [Terminal Operation Settings] window. Please refer to “2.4.2 Perform Terminal Operation Settings” for details. | ||
[Send after collectiong logs for a certain period] | The logs accumulated in a period of time will be sent to the server. The number of logs to be sent at one time and the interval for sending are set in the [Terminal Operation Settings] window. Please refer to “2.4.2 Perform Terminal Operation Settings” for details. | ||
[Send all logs in specified time] | Send logs to server in the specified time. The standards are as follows. The number of clients (CT number of sets) and amount of logs are basically in proportion to the time required for log sending. Example 1
Example 2
The number of logs to be sent at one time and the interval for sending are set in the [Terminal Operation Settings] window. Please refer to “2.4.2 Perform Terminal Operation Settings” for details. | ||