This describes how to upgrade the version based on the version upgrade by using self version management function as Systemwalker Desktop Keeper function.
Note
Notes before using Self Version Management Function
The correspondent PC should be logged onto when operating the self version management function. If not, it cannot operate.
In the case of operating version upgrade through self version management, after enabling the Windows firewall function, the window for confirming version upgrade cannot be displayed in the Client. After disabling the Windows firewall function on the Client terminal temporarily and rebooting Windows, the window for confirming version upgrade will be displayed. Please enable the Windows firewall function after completing version upgrade.
Through the self version management function, the initial value of the number of terminals that can be applied simultaneously is 5. When modify this number of terminals, please modify it in [Simultaneous Downloading Number (Maximum)] in the "Folder/CT Version auto-upgrade Settings" window of server settings tool. The terminal that exceeded this configuration value will execute the self version management function again when starting up next time.
When using the self version management function in the environment of Windows Vista® and Windows® 7, please do not use the remote logon through Windows terminal service such as Windows "Remote Desktop Connection".
Note
Notes when installing Client (CT) on (Master) Management Server
In the case of installing the Client (CT) on a (Master) Management Server, when setting version upgrade based on the self version management function of the Client (CT), whether to perform self-version upgrade through common self version management function will be requested. Because the server is required to restart after self-version upgrade, please consider the application status of other Clients(CTs) such as connection status and determine whether to apply.
Point
By specifying IP address, self-version upgrade can be performed to the specified Client (CT).
Not all Clients (CTs) should perform self-version upgrade collectively; only the specified Client (CT) should perform the upgrade.
For example, please use in the following cases:
When trying to test the specific section before performing version upgrade completely
When trying to perform according to the section and working place
When trying to perform according to certain number of sets (CTs) in order to disperse the load
This function can be performed by creating "CT file (SWCTVerUpIP.txt) that can perform self-version upgrade".
The setting method is as follows: please perform this procedure before performing the after-mentioned procedures for version upgrade.
Please copy (or rename) "SWCTVerUpIP_sample.txt" as "SWCTVerUpIP.txt". Save "SWCTVerUpIP_sample.txt" to the following folder.
In the case of any server other than Windows Server® 2008:
[OS Installation Drive] \Document and Settings\All Users\Application Data\Fujitsu\Systemwalker Desktop Keeper
In the case of Windows Server® 2008:
[OS Installation Drive] \ProgramData\Fujitsu\Systemwalker Desktop Keeper
Please open "SWCTVerUpIP.txt" through text editors such as Notepad.
Record IP address of CT that can be performed self-version upgrade.
Save "SWCTVerUpIP.txt". (Please do not move from the folder above.)
For file details and how to specify IP address, please refer to "CT settings file that can perform self-version upgrade " of "Systemwalker Desktop Keeper Reference Manual".
The procedures for version upgrade based on the self version management function are as follows. The file saving target indicated in the following procedures is different from the installation target when modifying the OS.
Perform the following settings on the subordinate Management Server and Master Management Server to the Client (CT).
In the Master Management Server and Management Server, select [Control Panel]-[Network Connection] from the [Start] menu.
Select "Local Area Connection" and disable the local area connection. Please wait for 1 minute after disabling before performing the following procedures.
The Windows service window is displayed on Management Server and Master Management Server. Select each of the following services and select "Stop" from the "Operation" menu". It will takes 30 seconds to 1 minute to stop. In addition, after starting SWServerService or during date change (12am), confirmation of available database capacity will be performed. In the 15 minutes till the confirmation operation has completed, service may not be able to be stopped, please confirm later.
SWLevelControlService
SWServerService
After the above services are stopped, enable "Local Connection".
On the Master Management Server and Management Server, save the file "SWCTVerSettings2.ini" under Setup folder "win32\DTKUpdate" to the following folder:
In Windows Server® 2008: "C:\Windows\System32"
In Windows Server® 2003: "C:\Windows\system32"
In Windows Server® 2003, 2003 R2 x64 Edition, Windows Server® 2008 64-bit Edition, Windows Server® 2008 R2: "C:\Windows\SYSWOW64"
For the file "SWCTVerSettings2.ini", open the file properties, cancel the selection of "Read Only" checkbox, click the [OK] button.
On the Master Management Server and Management Server, save the following folder under Setup folder "win32\DTKUpdate" to the location recorded in [DistModuleDir] of file "SWCTVerSettings.ini".
“Ver3.14.0.1”
Save the file "SWCTVerSettings.ini" to the following folder:
In Windows Server® 2008: "C:\Windows\System32"
In Windows Server® 2003: "C:\Windows\system32"
In Windows Server® 2003, 2003 R2 x64 Edition, Windows Server® 2008 64-bit Edition, Windows Server® 2008 R2: "C:\Windows\SYSWOW64"
Perform the CT self-version upgrade settings by using the server settings tool.
Click the [Folder/CT self-version upgrade settings] button in the server settings tool menu.
→ The [Folder/CT Self Version Upgrade Settings] window is displayed.
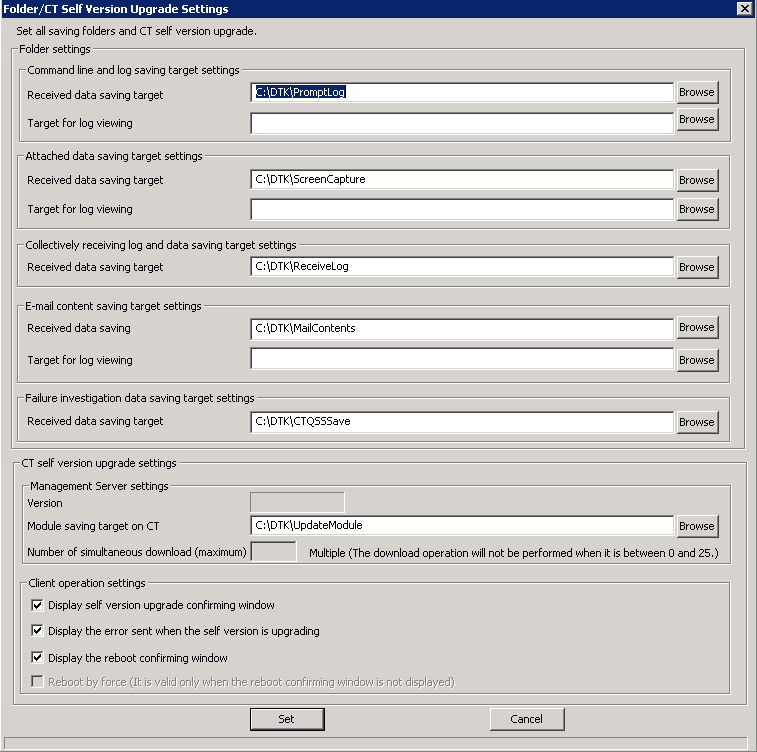
Perform "Management Server settings" and "Client Operation Settings" displayed in [CT self-version upgrade settings].
(No need to set [Folder settings] here. For the settings, please refer to "2.2.5.9 Set Saving Target Folder ".)
Item Name | Descriptions |
[Version] | When the ini file (SWCTVerSettings2.ini) for CT self-version upgrade exists, the version specified in the ini file for CT self-version upgrade is displayed. It is not displayed when the ini file for CT self-version upgrade does not exist. |
[Module saving target on CT] | The target folder for saving Client (CT) self-version upgrade module is specified. The specifying method is as follows:
A maximum of 96 single-byte characters can be entered in the specified full path. The followings symbols are not allowed in the folder name: |
[Number of simultaneous download (Maximum)] | Multiplicity of Client (CT) self-version upgrade is set. The value that can be set is within 0-25. When specified as 0, self-version upgrade processing cannot be performed. When INI file for CT self-version upgrade does not exist, it cannot be displayed and set. |
Item Name | Descriptions |
[Display self version upgrade confirming window] | Settings to confirm whether to perform self-version upgrade in Client (CT) with the user. However, when performing self-version upgrade from V13.2.0 or earlier, no matter whether [Display the Window for Confirming Version Auto-upgrade] is selected or not, the window for confirming self-version upgrade will be displayed. (This will be valid if selected when executing Edition upgrading of the same version) When the selecting button is ON, the following information will be displayed after starting the Client (CT) terminal, and the user can select whether to execute self-version upgrade. (Operation in V13.2.0 or earlier). ---------------------------------------------------------------------- S101-ASK002 provides with the latest version. When updating to the latest module, please click “Yes”. Not to update, please click “No”. Reboot OS after selecting “Yes” and completing the update, thus please end the application. ---------------------------------------------------------------------- Selecting "Yes" will execute self-version upgrade. Selecting "No” will not execute self-version upgrade. |
[Display the error sent when the self version is upgrading] | Settings whether to display the error window if errors occurred when performing self-version upgrade in the Client (CT). When the selecting button is ON, if errors occur during self-version upgrade, the following error information will be displayed and the processing will be cancelled. The user needs to close the error window manually, or self-version upgrade will not stop (up to the action of V13.2.0 or earlier). ----------------------------------------------------------------------
[I401-ERR011] Failed to install Systemwalker Desktop Keeper Client.
Please confirm the errors in the installation log file.
Installation log file:[Name of Installation Log File].
Cancel installation
---------------------------------------------------------------------- |
[Display the reboot confirming window] | Settings whether to display the restart window after performing self-version upgrading in the client (CT). This item is valid only when the selecting button of “Reboot by force” is OFF. When the selecting button of "Reboot by force" is ON, this button cannot be selected. When the selecting button is ON, after the installation based on self-version upgrade is completed, the restart window is displayed. Please select either "Yes, restart the computer immediately." or "No, restart the computer later". When the selecting button is OFF, after the installation based on self-version upgrade, no window will be displayed. Restart after completing modification through “Reboot by force” settings of the following item. Also, operate the Client (CT) of the version before applying self-version upgrade before rebooting. |
[Reboot by force] | Settings whether to restart by force after performing self-version upgrade in Client (CT). This item is valid only when the selecting button of "Reboot confirming window" is OFF. When the selecting button of "Reboot confirming window" is ON, this button cannot be selected. When the selecting button is ON, reboot automatically after the installation based on self-version upgrade has been completed. When the file is opened, because it will be ended without being saved, content might be lost. When the selecting button is OFF, the processing will be ended after the installation based on self-version upgrade has been completed. When the selecting button of [Display the reboot confirming window] is OFF, the restart confirmation window will be neither displayed nor restarted. User should restart it manually. |
Note
In case of Windows Vista®, Windows Server 2008®, Windows® 7, the window for reboot confirmation will not be displayed
When the OS is Windows Vista®, Windows Server 2008® or Windows® 7 and the environment self-version upgrade of V13.2.0/V13.2.1 Client (CT) has been installed, even if "Display Reboot Confirmation Window" is selected, the window for reboot confirmation will not be displayed. Although the window for reboot confirmation is not displayed, the version upgrade will take effect after PC is rebooted because the installation has been completed. If the installation version is V13.3.0 Client (CT), this case will not occur.
Create the CT silent installation file by using server settings tool. For details on how to use the setting tool, please refer to "Create installation settings file ".
Point
Items viewed during version upgrade by using self version management function
When performing version upgrade by using self version management function, only the settings of [Printing monitoring mode], [E-mail file attachment prohibition] and [OS reboot settings after specifying installation] specified when creating CT silent installation folder can be viewed. Other items cannot be viewed.
Save the CT silent installation folder created in Procedure 10) to the following folder of the recorded location in [DistModuleDir] confirmed in Procedure 7).
"Ver3.14.0.1"
On the Master Management Server and Management Server, the Windows service window is displayed, select the services to be cancelled ("SWLevelControlService" and "SWServerService") and select [Start] from the [Operation] menu.
Start and log on to the Client (CT) of version upgrade.
→ The following message is displayed:
[S101-ASK002] provides with the latest module.
When updating to the latest version, please click “Yes".
When not to update, please click “No”. If selecting “Yes” and OS should be restarted after the update is completed, please end the application.
Note
Please select [Yes].
Please make sure to click the [Yes] button in the message window above. When clicking the [No] button, the "E-mail sending log obtaining " and "E-mail file attachment prohibition" cannot be operated before rebooting.
After clicking the [Yes] button, the "Update Completed" window will be displayed.
Note
Prohibition and log collection cannot be operated well if the system is not rebooted
Please make sure to restart in the following window. If not, the "E-mail Sending Log Acquisition Function" and "E-mail Attachment Prohibition Function" cannot operate.
Notes when setting E-mail attachment prohibition mode
When using Windows Vista®, Windows Server 2008® or Windows® 7, only the port monitoring mode can be selected as E-mail attachment prohibition mode.
For the port for E-mail attachment prohibition, please make sure to specify a port not used in other processing and communication.
When performing version/edition upgrade from the following versions to V14.2.0, after installing "E-mail sending log obtaining" and "E-mail file attachment prohibition ", these functions cannot operate before rebooting.
・BEV12.0L10
・BEV12.0L20
・SEV12.0L20
・BEV13.0.0 /SEV13.0.0
When upgrading from the following versions to V14.2.0, before rebooting, the version before upgrade operates well.
・BEV13.2.0 /SEV13.2.0
・SEV13.2.1
・BEV13.3.0 /SEV13.3.0
・V14.0.0 /V14.0.1/V14.1.0
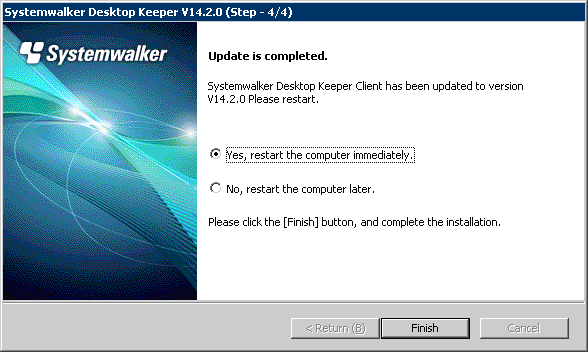
Click the [Finish] button.
→ Client (CT) is restarted.