After installing a Management Server/Master Management Server and creating the database, construct the server environment to use the Sever Setting Tool.
Functions of Sever Setting Tool
The Sever Setting Tool has the following functions:
This is the function of setting during the initial environment construction of a Management Server and Master Management Server.
System setting
Active Directory linkage setting
Server information setting
Other system linkage setting
This is the function of registering an administrator and setting the content and the operation for notifying the administrator during the process of operation. Please set at initial environment construction.
Administrator information setting
Administrator notification setting
For Administrator information setting, please register the user of “Management Console and Log Viewer” with access authority at the time of installation.
This is the function used at the communication environment setup and maintenance of the Management Server.
Management Server setting
Trace setting
Folder/CT self version upgrade settings
For the setting of target folder in the folder/CT self version upgrade settings
, please confirm there is no problem in the initial setting at the time of installation.
This is the function used during silent installation of the client (CT).
Generate CT silent installation file
For CT silent installation file generation function, please refer to “2.5.1.2 Execute Silent Installation ”.
Start method of the Server Settings Tool
The startup method of the Sever Setting Tool is as follows:
Log in Windows with the user that belongs to the Administrators group or the user that belongs to the Domain Admins group.
Select [All Programs] - [Systemwalker Desktop Keeper] - [Server] - [Sever Settings Tool] from the [Start] menu, the following window will be displayed.
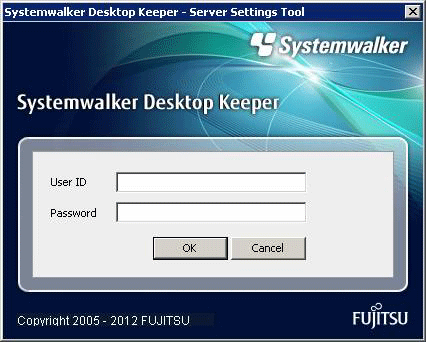
Log in with the primary administrator’s account, which is:
User ID: secureadmin
Password: the password specified during the installation of Management Server/Master Management Server.
In addition, a user registered in the Sever Settings Tool (requesting access authority executable by the Management Console) can be used to log in, but the functions that can be used are limited to [Administrator notification settings].
Click the [OK] button. The following window will be displayed.
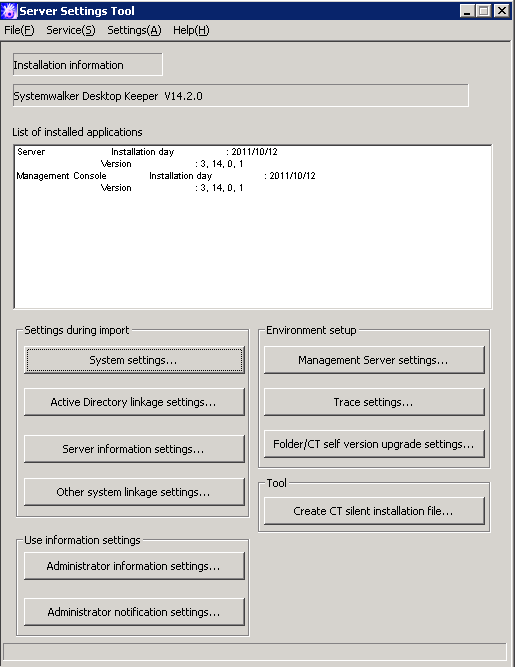
The following describes the menu bar in the [Sever settings] window.
Menu bar | Function summary | ||
|---|---|---|---|
[File] | [End] | To exit Sever Setting Tool. | |
[Service] | [Confirm Service Status] | To display the operation status of [Level Control Service] and [Server Service] on the target server. | |
[Start Service] | To start [Level Control Service] and [Server Service] on the target server. | ||
[Stop Service] | To stop [Level Control Service] and [Server Service] on the target server. | ||
[Settings] | [Execute Active Directory Linkage] | To execute the processing of Active Directory Linkage. | |
[Execute Systemwalker Desktop Patrol Linkage] | To execute the processing of linking with Systemwalker Desktop Patrol. | ||
[Change Password] | To modify the password of primary administrator; Please specify the password within 32 single-bytes alphanumeric characters and symbols. Symbols that are not allowed include “&”“<”“>”“|”“\”“"”“~”“'”“?”“:”“^”. | ||
[Trace Server Settings Tool] | [OFF] | Trace of Sever Setting Tool will not be collected. | |
[Summary] | Trace of Sever Setting Tool will be collected in summary mode. | ||
[Details] | Trace of Sever Setting Tool will be collected in details mode. | ||
[Help] | [Online Help] | To display the online manual of Systemwalker Desktop Keeper. | |
[Version Information] | To display copyright information and version information. | ||
To close the Sever settings , please select [End] of the [File] menu.
The steps for constructing server environment after the installation of a Management Server/Master Management Server and database construction are as follows:
Note
When using after the operation has been started, the service should be stopped.
If the service is not started in the settings at installation, it is not needed to stop the service. However, if the Sever Setting Tool is used to perform settings after the operation has been started, the services of the Management Server and Master Management Server should be stopped. There is no need to stop service when performing the following settings:
Administrator information setting
Administrator notification setting
Generate CT silent installation file
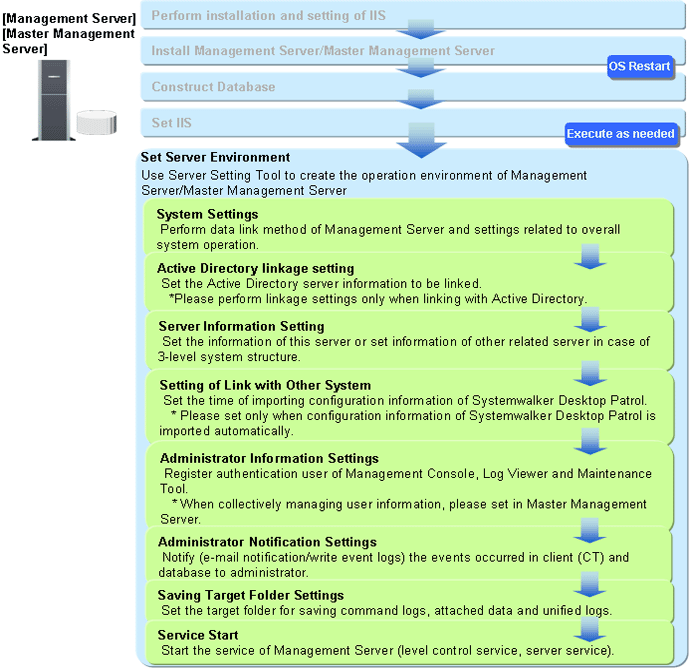
The method to start service of the Management Server is as follows:
Select [Start Service] from the [Service] menu of the [Sever Settings Tool] window.
After the service startup confirmation window is displayed, click the [OK] button.
In addition, select [Confirm Service Status] from the [Service] menu of the [Sever Settings Tool] window to check if the service has been started.
Note
Please Logon to the Web Console after the service has been started.
After starting the service of Management Server, please logon to the Web Console and display the status window after executing “Preparation on PC that uses Web Browser”. When not logged on, the following error may be output in event log.
Event ID : 3403
Type : Error
Source : SWDTK_LC
Message : "Relevant setting of status is not initialized or has been damaged. Please logon to the Web Console first, or perform the relevant setting of status again."
For how to logon to the Web Console, please refer to "Display Status Window" of "Systemwalker Desktop Keeper User’s Guide: For Administrators".
Perform the settings related to overall system operation of Systemwalker Desktop Keeper Management Server.
Note
Please perform the same setting in all Management Servers
In 3-level system structure, please perform the same settings in all Management Servers.
The system setting procedure is as follows:
Click the [System settings] button from the menu of Sever Setting Tool.
→The following window is displayed.
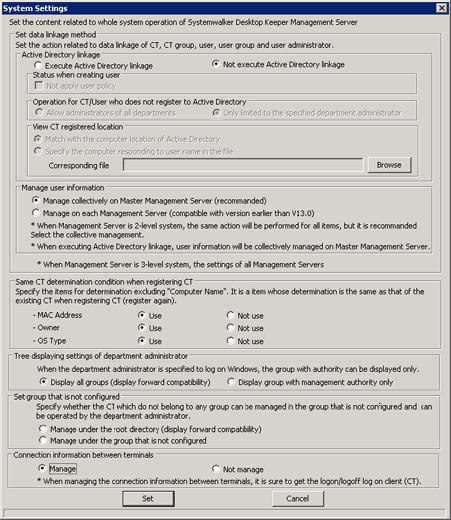
Item Name | Description | |
|---|---|---|
[Active Directory linkage] | To set whether to perform Active Directory Linkage or not.
When “Not execute Active Directory linkage” is selected, the configuration information of Systemwalker Desktop Patrol cannot be imported. In addition, the information of the product cannot be output to Systemwalker Desktop Patrol. After using Systemwalker Desktop Keeper and when changing the setting of active directory linkage, please refer to the “Change Import Method of Configuration information” in the “Systemwalker Desktop Keeper User's Guide: for Administrator”. | |
[Status when creating user] | For a new user of Active Directory, please select the [Not apply user policy] check box when importing under the [Not apply user policy] status. | |
[Operation for CT/User who does not register to Active Directory] | Setting of client (CT) and user ID not registered to Active Directory is to be made. (Processing of client (CT)/user ID under local management.) This setting has been specified at the installation of the Management Server. Therefore, please set when changing the setting at the installation of the Management Server.
| |
[View CT registered location] | To set CT location acquisition information through Active Directory corresponding files.
| |
[Manage user information] | In a 3-level system structure, the setting of whether to perform collective management of the user policy information in the Master Management Server or not will be executed. Because this setting has been specified when the Management Server is installed, please perform the setting when changing the setting at the time of Management Server installation.
| |
Item Name | Description |
|---|---|
[MAC Address] | Set whether the MAC address will also be taken as the judgment item for client (CT) consistency at client (CT) registration (re-registration) apart from computer name.
|
[Owner] | Set whether the owner information will also be taken as the judgment item for client (CT) consistency at client (CT) registration (re-registration) apart from the computer name.
|
[OS Type] | Set whether the OS type will also be taken as the judgment item for client (CT) consistency at client (CT) registration (re-registration) apart from computer name. In addition, Service Pack or version type will not be taken as consistency judgment condition.
|
Item Name | Description |
|---|---|
[Display all groups (display forward compatibility)] | To display the group tree that is displayed when Management Console or Log Viewer is started. |
[Display group with management authority only] | To display only the group that has administrator authority when Management Console or Log Viewer is started. |
Item Name | Description |
|---|---|
[Manage under the Root directory (display forward compatibility)] | To directly manage the client (CT) that is newly registered to Management Server and the client (CT) that does not belong to any group under the Root directory group. |
[Manage under the group that is not configured] | To directly manage the client (CT) that is newly registered to Management Server and the client (CT) that does not belong to any group under the unconfigured group. Please perform the settings when the following operations are performed:
Note About the status window and Log Viewer Department administrator cannot view the group that is not configured. Only the system administrator can view the group that is not configured. About Log Analyzer or Report Output Tool Even this setting has been performed in Log Analyzer or Report Output Tool, client (CT) will not be managed in the “Unconfigured” group, but in the “root” group instead. |
Item Name | Description |
|---|---|
[Manage] | To manage the information of remote connection to physical PC and virtual PC. |
[Not manage] | Not manage the information of remote connection to physical PC and virtual PC. |
Confirm the content of settings and change according to the needs. Click the [Set] button.
When linking with Active Directory, set the server information of the Active Directory to be linked.
The steps for Active Directory linkage setting are as follows.
Click [Active Directory linkage settings] in the menu of the Sever Settings Tool.
→The following window is displayed.
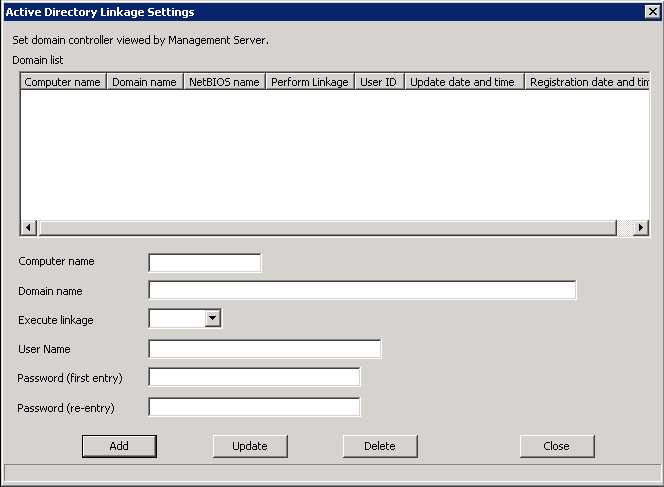
Item Name | Description |
|---|---|
[Computer Name] | Enter the computer name of the Active Directory to be linked. Up to 15 single-byte characters can be entered. Only single-byte alphanumeric characters, space and hyphen “-” can be entered (Hyphen “-” should not be specified at the beginning or the end). When computer name has been omitted, NetBIOS name will be acquired according to the domain address and registered to DB. “(Automatic Judgment)” will be displayed on the window. |
[Domain name] (required) | Enter the domain name of the Active Directory to be linked. Up to 155 single-byte characters can be entered as maximum. However, IP address and NetBIOS domain name cannot be entered. Specification example: desktopkeeper.domain.com In addition, there is only 1 Active Directory server (domain) that can be linked. |
[Execute linkage] (required) | Set to execute or stop Active Directory linkage.
|
[User Name] (required) | Enter the user name registered in Active Directory for viewing the information of Active Directory (before @ of the logon name of user in Active Directory). Up to 40 single-byte characters can be entered. Characters that can be entered include single-byte alphanumeric characters, spaces and the following symbols: (! # $ % & ’ ( ) - . ^ _ ` { }) |
[Password (first entry)] (required when adding) | Enter the password of the above user name. Up to 32 single-byte characters can be entered. Characters that can be entered include single-byte alphanumeric characters, spaces and the following symbols. ( ` ~ ! @ # $ % ^ & * ( ) _ + - = { } | [ ] \ : " ; ' < > ? , . /) |
[Password (re-entry)] (required when adding) | In order to avoid wrong registration, enter the password again. |
Enter the required setting items, and click the [Add] button.
Click the [Close] button.
Information of the server will be registered during initial installation. In a 3-level system structure, information of other relevant servers will be set.
Steps to set server information are as follows:
Click the [Server information settings] button in the menu of Sever Settings Tool.
→The following window is displayed.
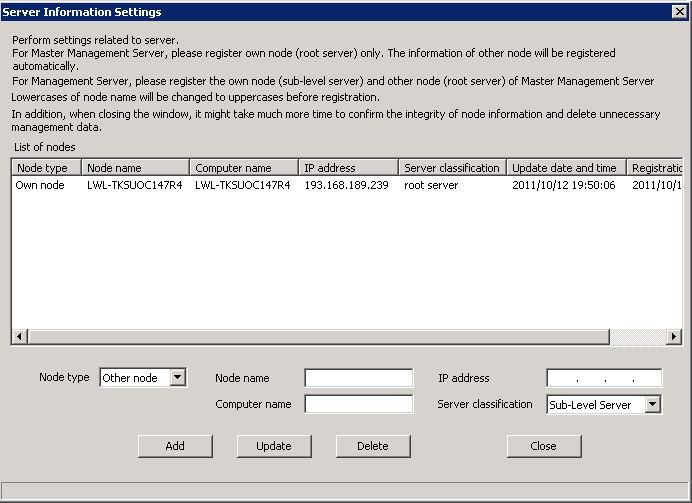
Item Name | Description |
|---|---|
[Node type] | Select the classification of the server node to be set.
In a 3-level Master Management Server: In a 2-level the Management Server: |
[Node name] | Enter the node name of the server being set. Up to 36 single-byte characters can be entered. Only single-byte alphanumeric characters and hyphen “-” can be entered (hyphen “-” should not be specified at the beginning or the end). Single-byte lower-case letter will be automatically converted to single-byte upper-case letter. In addition, it will automatically set as the local computer name under local node, but will set to “NODE” when it is unable to acquire from the system or the computer name exceeds 16 bytes. Please set again at this time if necessary. |
[Computer name] | When the node is classified as local node, enter the computer name of the server. When the node is classified as other node, enter the computer name of Master Management Server. Up to 15 single-byte characters can be entered. Only single-byte letters, numbers and hyphen “-” can be entered (hyphen “-” should not be specified at the beginning or the end). In addition, under local node, the computer name will be set automatically. However, when it is unable to acquire from the system or the computer name exceeds 16 bytes, it will be set to “COMPUTER”. Please set again at this time if necessary. The computer name set here will be displayed in the CT group of the Management Console. |
[IP address] | When the node is classified as local node, enter the IP address of the server. When the node is classified as other node, enter the IP address of the Master Management Server. In addition, under local node, the IP address of the computer will be set automatically. However, when it is unable to acquire from the system or the IP address has not been set at the time of registration, it will be set to loop back address “127.0.0.1”. Please reset at this time. |
[Server classification] | Enter the classification of server.
In initial status, it will be set to “Root Server” (not relying on construction options). |
[Update date and time] | To display the date on which the server information is updated. The date of updating other nodes (Master Management Server) in a Management Server of a 3-level system is blank. In initial status, the date of database construction will be displayed in the list. |
[Registration date and time] | To display the date on which the server information is registered. In initial status, the date of database construction will be displayed in the list. |
Enter the required setting items and click the [Add] button.
Click the [Close] button.
Perform the setting when Systemwalker Desktop Patrol configuration information is imported automatically.
Click the [Other system linkage settings] button in the menu of Sever Setting Tool.
→The following window is displayed.
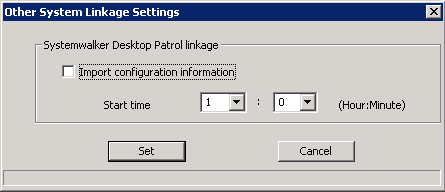
Item Name | Description |
|---|---|
[Import configuration information] | Please select this when the configuration information of Systemwalker Desktop Patrol is imported automatically. |
[Start time] | Please set when to start the automatic import if the [Import configuration information] is selected as ON. Note Please do not make settings during the time frame when the Management Server service is stopped. |
Register the authenticated user of the Management Console, Log Viewer, Log Analyzer, status window, environment setup, report output tool, backup tool and restoration tool. In addition, when department management mode is used, register the department administrator. During installation, please make sure to register the administrator whose access authority is “Management Console and Log Viewer”.
However, in case of collectively managing user policy (user information) in the Master Management Server with a 3-level structure, if setting has been performed in the Master Management Server, then it is no need to set in the Management Servers. After the operation has been started, it will be reflected to all Management Servers automatically.
There are following two methods for the procedure of administrator information settings:
Register administrators one by one;
Use CSV file to register administrators collectively
Register administrators one by one
Click the [Administrator information settings] button in the menu of Sever Setting Tool.
→The following window is displayed.
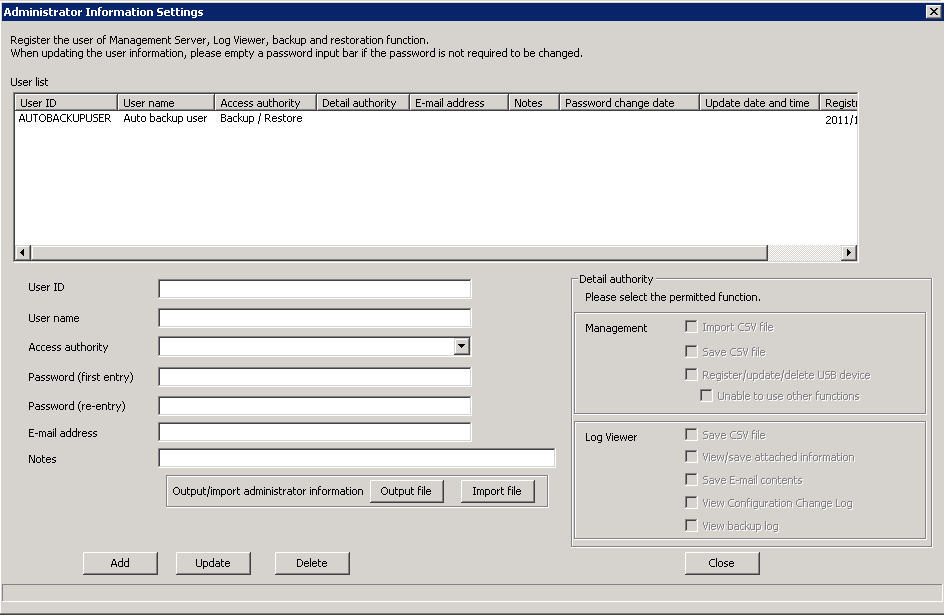
Item Name | Description | |||
|---|---|---|---|---|
[User ID] | Up to 40 single-byte characters (20 double-byte characters) of alphanumeric characters, Chinese characters and symbols (except the following symbols) can be entered. Symbols that cannot be entered are: “&”“<”“>”“|”“\”“"”“~”“'”“?”“:”“^”. In addition, double-byte or single-byte spaces should not be entered. It is not case-sensitive. | |||
[User name] | Up to 40 single-byte characters (20 double-byte characters) of alphanumeric characters, Chinese characters and symbols can be entered. | |||
[Access authority] | Select the following authority.
| |||
[Password (first entry)] | Up to 32 single-byte alphanumeric characters and content except the following symbols can be entered. Symbols that cannot be entered are: “&”“<”“>”“|”“\”“"”“~”“'”“?”“:”“^”. In addition, double-byte or single-byte spaces cannot be entered. | |||
[Password (re-entry)] | In order to avoid wrong registrations, re-enter the password. | |||
[E-mail address] | Enter the E-mail address of registered user. | |||
[Notes] | Up to 256 single-byte characters (128 double-byte characters) of alphanumeric characters, Chinese characters and symbols can be entered. | |||
[Detailed authority] | [Management] | [Import CSV file] | Select when granting the following execution authority in the Management Console to the registered users (selected).
| |
[Save CSV file] | Select when granting the following execution authority in Management Console to the registered user (selected).
| |||
[Register/update/delete USB device | Select when granting the operation authority of the USB device individual identification function in the Management Console to the registered user (selected). | |||
| [Unable to use other functions] | Select when granting registration/modification/deletion authorities to USB device through Management Console (selected). This can only be set when the setting of [Access Authority] is [(Department Administrator) Management Console]. | ||
[Log Viewer] | [Save CSV file] | Select when granting the execution authority of CSV export log in the Log Viewer to the registered user (selected). | ||
[View/save attached information] | Select when granting the following execution authorities in the Log Viewer to the registered user (selected):
| |||
[Save E-mail contents] | Select when granting the following execution authorities in the Log Viewer to registered user (selected):
| |||
[View Configuration Change Log] | Select when granting the view authorities of configuration change logs in the Log Viewer to the registered user (selected). | |||
[View backup log] | Select when granting the view authorities of backup log logs in the Log Viewer to the registered user (selected). | |||
[Password change date] | Display the last date on which the password is changed. | |||
[Update date and time] | Display the date on which the user information is updated. | |||
[Registration date and time] | Display the date on which the user information is registered. | |||
Enter necessary setting items and click [Add].
Repeated the Step 2 for continuous setting.
Click [Close].
Point
When modifying administrator information
When it is not necessary to change the password when modifying administrator information, please leave the password input field blank (Password (first entry), Password (re-enter)).
When it is expected to change the user ID only instead of changing other conditions such as user and authority, please add a new administrator. Please set the same conditions for other input items.
Point
About automatic backup and deletion of user
Register the following information during database construction, database migration and restoration for the administrator to perform automatic backup and deletion.
[User ID]: AUTOBACKUPUSER
[User Name]: Auto backup user
[Access Authority]: Backup / Restore
Only password can be changed for automatic backup and deletion user. When the initial value of the password is changed, please change the password.
Method to register administrators collectively
The following describes how to register administrators collectively by using the administrator information file.
For administrator information file, please refer to “Administrator Information File” in the “Systemwalker Desktop Keeper Reference Manual”.
Click the [Administrator information settings] button in the menu of Sever Setting Tool.
Select [Import file]. The following window will be displayed.
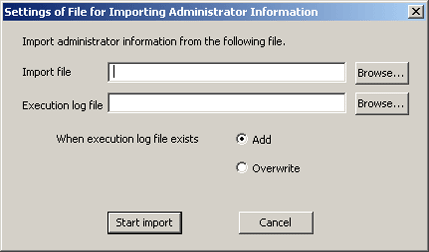
Item Name | Description |
Import file (required) | Specify the created CSV file. The specification method is as follows.
|
Execution log file (required) | Specify the file to output execution result when importing CSV file. The error during import will also be output in this file. The specification method is as follows.
|
When execution log file exists (required) | In [Execution log file], select the exporting method when the file for log output has been already specified.
|
Enter all the items and click the [Start Import] button. The [Display the import status of administrator information] window will be displayed, and processing will be started.
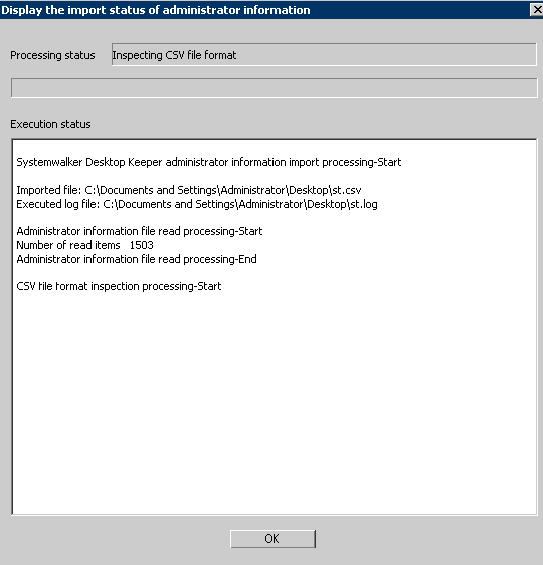
Confirm the information displayed in the execution status, and click the [OK] button.
This section describes how to output administrator information.
For administrator information file, please refer to “Administrator Information File” in “Systemwalker Desktop Keeper Reference Manual”.
Click the [Administrator information settings] button in the menu of Sever Setting Tool.
Select [Output file]. The following window will be displayed.
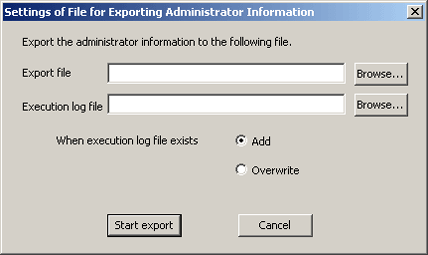
Item Name | Description |
Output file (required) | Specify the CSV file to be output. The specification method is as follows.
|
Execution log file (required) | Specify the file to output execution result when importing CSV file. The error during import will also be output in this file. The specification method is as follows.
|
When execution log file exists (required) | In [Execution log file], select the exporting method when the file for log output has been already specified.
|
Enter all the items and click the [Start Output] button.
Events occurred in the client (CT) and database can be notified to the administrator (E-mail notification, writing to event log).
Events that can be notified and timing of notification are as follows:
Notification of prohibition operation and violation operation in client (CT).
Notify immediately after prohibition logs are collected.
System administrator and department administrator can be notified by E-mail.
Notification of database exception
Notify when the threshold of database space and disk space is reached.
Notify immediately when there is no available database space and it is unable to write information into the database.
Only notification to the system administrator by E-mail is allowed.
Notification of client (CT) information
When client (CT) is started, notify immediately when Management Server detects modification of client (CT) information.
System administrator and department administrator of CT group can be notified by E-mail.
When notifying the department administrator, please refer to “Allocate Department Administrator” in “Systemwalker Desktop Keeper User’s Guide: for Administrator”.
The steps to set administrator notification are as follows:
Click the [Administrator notification settings] button in the menu of Sever Settings Tool.
→The following window is displayed.
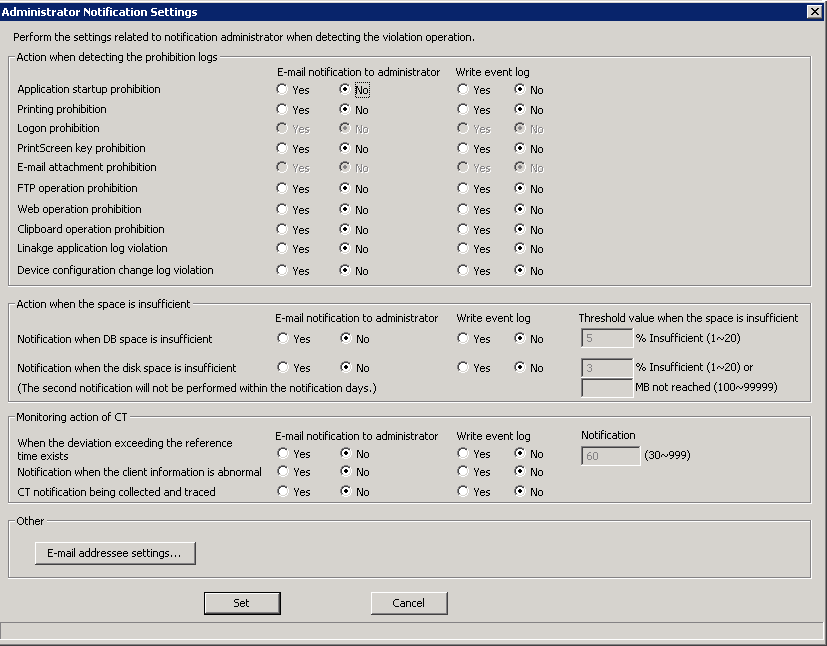
Set whether the E-mail notification to administrator or writing to event log exists when each prohibition log is detected.
The following types of logs can be set:
[Application startup prohibition]
[Printing prohibition]
[Logon prohibition]
[PrintScreen key prohibition]
[E-mail attachment prohibition]
[FTP operation prohibition]
When FTP server connection prohibition log is detected.
[Web operation prohibition]
When URL access prohibition log, Web upload prohibition log and Web download prohibition log are detected.
[Clipboard operation prohibition]
When clipboard operation prohibition log is detected.
[Linkage application log violation]
* In case of linkage application log (classified as violation)
[Device configuration change log violation]
As actions when all logs are detected, the contents that can be set are as follows:
Item Name | Description |
|---|---|
[E-mail notification to administrator] |
|
[Write event log] |
|
Set whether to notify the administrator by E-mail or write to event log when the disk for writing collected log is insufficient.
Types of space that can be set are as follows:
[Notification when DB space is insufficient]
1. When available space in database becomes insufficient, information cannot be written to the database.
2. When available space in database is lower than the domain value set if the [Domain value when the space is insufficient].
* The check of 2. is performed at the following timing.
・When the service of Systemwalker Desktop Keeper is started (including when server is started)
・During date change (12am)
[Notification when the disk space is insufficient]
Disk space is insufficient, i.e. the available space of the disk in which the following specified folders are located is lower than the domain value set in [Domain value when the space is insufficient].
- Attached data saving folder
- E-mail content folder
- Command log folder
- Collective log sending folder
- Trace log folder
- Trouble investigation data saving target folder
When space is insufficient, the contents that can be set are as follows:
Item Name | Description |
|---|---|
[E-mail notification to administrator] |
|
[Write event log] |
|
[Threshold value when the space is insufficient] *When DB space is insufficient | Set the value for domain value of notification at insufficiency by specifying % (unit: insufficiency %). Positive integer within 1-20 can be set. Enter when at least one item of [E-mail notification to administrator] and [Write event log] is set to [Yes]. Initial value is less than 5%. |
[Threshold value when the space is insufficient] *When disk space is insufficient | Set the value for domain value of notification at insufficiency by specifying % (unit: insufficiency %) or capacity (unit: insufficiency MB). Enter when at least one item of E-mail Notification to Administrator] and [Write event log] is set to [Yes]. When both domain value values of notification have been set for both % and capacity specification at the time of insufficiency, the domain value of smaller capacity will be effective. Positive integer within 1-20 can be set in % specification. Initial value is less than 3%. Positive integer within 1-999999 can be set in capacity specification. There is no initial value. In addition, when entering 100MB, the value calculated by the following calculation formula can be set. |
Set this to notify the administrator by E-mail and write to the event log when the disk for writing collected logs is insufficient.
Types of space that can be set are as follows:
[When the deviation exceeding the reference time exists]
System time of client (CT) and the system time of the Management Server have deviation that exceeds the standard time.
[Notification when the client information is abnormal]
When intrinsic information “CTID” is detected on client (CT) repeatedly.
Notify administrator and event log about the event described as “MAC Address Modification”.
Repetition of “CTID” may occur when the master PC is used to extend CT.
[CT notification being collected and traced]
When client (CT) that is collecting and tracking is detected.
By notifying the administrator the client (CT) in the status of trace and collection, this can be set as trace not collected by administrator.
The setting will be valid within 1 month after the last logon date. Therefore, no notification will be issued after it exists in the environment that has not been cancelled by the file server for more than one month.
As CT monitoring action, the contents that can be set are as follows:
Item Name | Description |
|---|---|
[E-mail notification to administrator] |
|
[Write event log] |
|
[Notification] (note) | Taking minute as unit, specify the time difference between the system time of client (CT) and the system time of the Management Server. Positive integer within 30-999 can be set. Enter when at least one between [E-mail notification to administrator] and [Write event log] is set to [Yes]. Initial value is 60 minutes. |
Note) setting items when [Deviation that Exceeds Standard Time Exists].
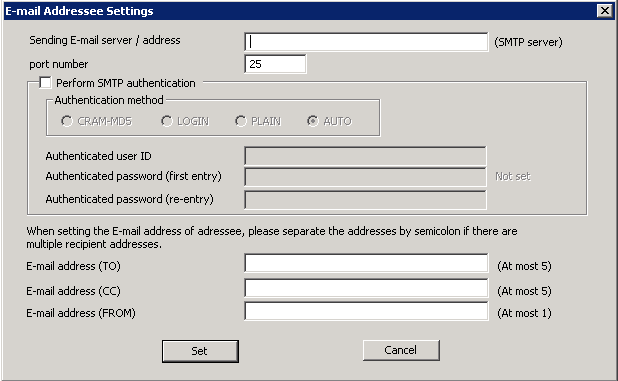
Click [E-mail addressee settings]. The [E-mail addressee settings] window will be displayed.
Item Name | Description | |
|---|---|---|
[Sending E-mail server / address] | When notifying the administrator by E-mail, enter the SMTP server name. Up to 255 characters can be entered. Symbols apart from “-” cannot be specified. When SMTP server name shall be restricted, please use IP address to specify. | |
[port number] | Enter the port number used for sending E-mail. Initial value is 25. | |
[Perform SMTP authentication] | Set whether to perform SMTP authentication in the communication with the E-mail sending server.
| |
| [Authentication method] | Select authentication method when [Perform SMTP authentication] is set to “Yes”. The methods that can be selected are as follows:
When AUTO is selected, authentication method will be automatically determined according to the following sequence. The initial value is AUTO. 1) CRAM-MD5 |
[Authentication user ID] | Enter the user ID when carrying out SMTP authentication in the communication with the E-mail sending server. | |
[Authentication password (first entry)] | Enter the password of SMTP authentication user ID. | |
[Authentication password (re-entry)] | Re-enter the password in order to avoid wrong registration. | |
[E-mail address (TO)] | Enter the address of E-mail recipient (To) when notifying the system administrator by E-mail. Up to 255 characters or 5 E-mail addresses can be entered. When entering multiple E-mail addresses, use semicolon “;” between the E-mail addresses. | |
[E-mail address (CC)] | Enter the address of E-mail recipient (CC) when notifying the system administrator by E-mail. It is not required to enter when not sending to CC. Up to 255 characters or 5 E-mail addresses can be entered. When several E-mail addresses are entered, use semicolon “;” in between the E-mail addresses. | |
[E-mail address (FROM)] | Enter the address of the E-mail sender when notifying the system administrator by E-mail. Up to 255 characters can be entered. | |
Enter the required setting items and click the [Set] button.
E-mail notification format
Format of notifying events occurred in the client (CT) and database to administrator by E-mail is as follows:
Item Name | Format |
|---|---|
E-mail Title | Systemwalker Desktop Keeper WARNING Report at [yyyy/mm/dd hh:mm:ss] |
Text (Subject) |
|
Event log display format
This describes the format of the event occurred in the client (CT) and database displayed in the event viewer of Windows.
The notified information is displayed in “Application Log” of the event log of Windows. The displayed contents are describes as follows:
Item Name | Description |
|---|---|
Category | [Warning] will be displayed. |
Date | It is the date of notification information displayed in event viewer. |
Time | It is the time of notification information displayed in event viewer. |
User | It is user ID. |
Computer Name | It is computer name. |
Source | [SWDTK] will be displayed. |
Category | [None] will be displayed. |
Event ID | →The following serial numbers will be displayed.
For details, please refer to “Message Output with Event Log” in “Systemwalker Desktop Keeper Reference Manual”. |
Explanations | The following information will be displayed.
|
Set all kinds of folders in the Systemwalker Desktop Keeper Management Server.
The steps of setting the saving target folder are as follows:
Click the [Folder/CT self version upgrade settings] button in the menu of Sever Setting Tool.
→The [Folder/CT self version upgrade settings] window is displayed.
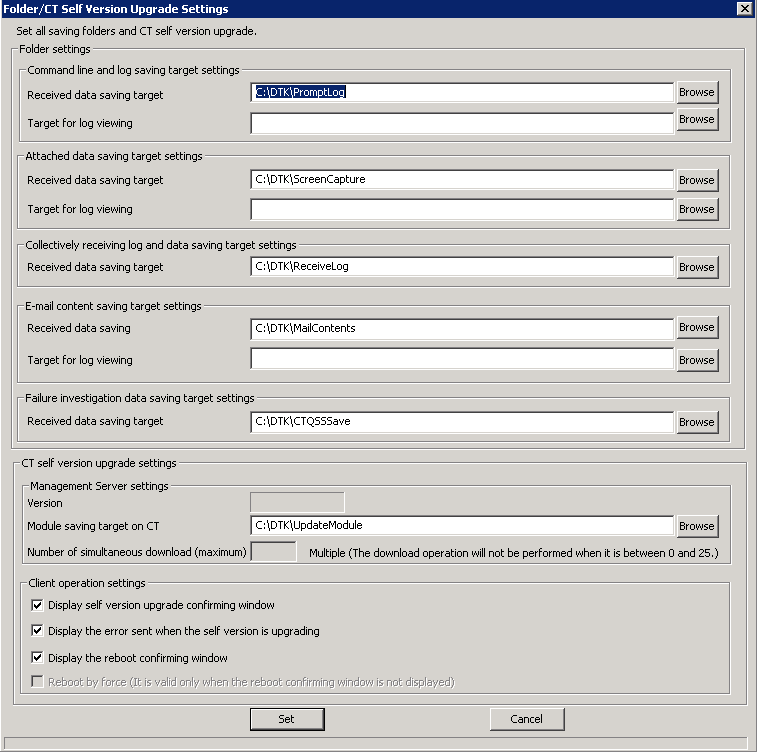
Confirm the initial value of saving target of the following information displayed in [Folder settings]. Click the [Browse] button to modify the saving target.
(It is not necessary to set [CT self-version upgrade settings] here. For the setting content, please refer to “4.7 Version Upgrade of CT”.)
Item Name | Description | |
|---|---|---|
[Command line and log saving target settings] | The method to specify the saving target folder of command log in Management Server is as follows:
The length of the full path that can be specified is no more than 96 single-byte characters. However, the following symbols are not allowed in the folder name. | |
| [Received data saving target] | Specify the folder to save the data in operation. |
[Target for log viewing] | Specify the folder to save data for log viewing. Specify when creating the log viewing database and restoring operation logs. | |
[Attached data saving target settings] | Specify the saving target folder of additional data (screen capture data, original backup file, and clipboard operation original backup file) in the Management Server. The specification method is as follows:
| |
| [Received data saving target] | Specify the folder to save the data in operation. |
[Target for log viewing] | Specify the folder to save data for log viewing. Specify when creating the log viewing database and restoring operation logs. | |
[Collectively receiving log and data saving target settings] | Specify the saving target folder of collective log data in the Management Server. The specification method is as follows:
The length of the full path that can be specified is no more than 96 single-byte characters. However, the following symbols are not allowed in the folder name. | |
[E-mail content saving target settings] | Specify the saving target folder of E-mail contents data (E-mail text and attachment) in the Management Server. The specification method is as follows:
The length of the full path that can be specified is no more than 96 single-byte characters. However, the following symbols are not allowed in the folder name. | |
| [Received data saving target] | Specify the folder to save the data in operation. |
[Target for log viewing] | Specify the folder to save data for log viewing. Specify when creating the log viewing database and restoring operation logs. | |
[Failure investigation data saving target settings] | Specify the saving target folder of QSS (Trouble Investigation Data) collected remotely in the Management Server. The specification method is as follows:
The length of the full path that can be specified is no more than 96 single-byte characters. However, the following symbols are not allowed in the folder name. | |