For the method for confirming the registered contract information as “By Section” and “By Classification”, it describes the following items in the operation procedure.
The procedure for confirming various contract information of “By Section” and “By Category” is as follows:
Log onto the main menu, click [Management Ledger].
The [Management Ledger] window will be displayed
Click [Contract Management].
The following window will be displayed
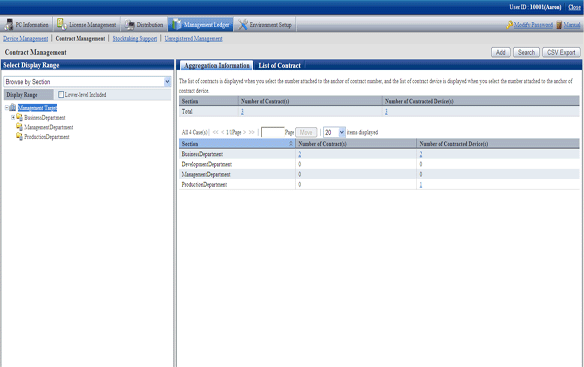
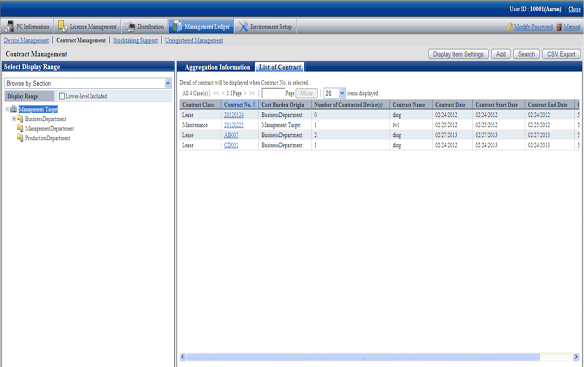
Confirm the contract information by section.
According to the drop-down menu on the left side of the window, select [Browse By Section] from the list.
The following window will be displayed
The meaning of each item is as follows:
Besides, it describes the situation of all visible column(s).
Item Name | Descriptions |
|---|---|
[Section] | Section information. |
[Number of Contract(s)] | Number of contract managed in the section. |
[Number of Contracted Device(s)] | Number of device distributed to the contract among the device managed in the section. |
Remarks.
When the system administrator selects the management target, in the total [Number of Contract(s)], the number of contract with the defrayal party as the management target will also be aggregated.
Besides, when selecting the management target, in the total [Number of Section Contracted Device(s)], number of device of the not configured section will also be aggregated.
Besides, the action of each button is as follows:
Item Name | Descriptions |
|---|---|
[Add] | Register the contract information. For details, please refer to “9.4.2 Register/Modify Contract Information”. |
[Search] | Filter to display the contract displayed in the window. For details, please refer to “Screen contract”. |
[CSV Export] | Save the information displayed in the window as ledger. For details, please refer to “9.4.4 Save Contract Information as Ledger”. |
Confirm the contract information by classification.
According to the drop-down menu on the left side of the window, select [Browse By Class] from the list.
The following window will be displayed
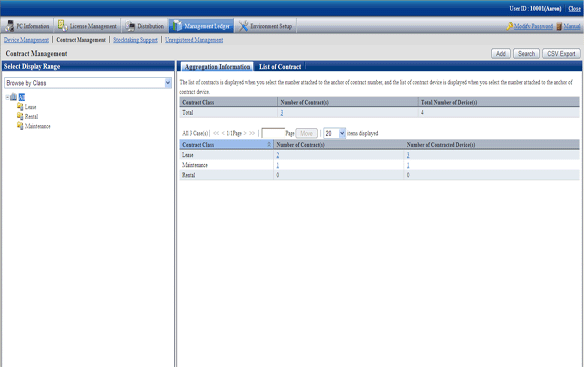
The meaning of each item is as follows:
Besides, it describes the situation of all visible column(s). And the action of the button is the same as that of the window above for contract confirmation by section.
Item Name | Descriptions |
|---|---|
[Contract Class] | Information of contract classification. [Contract Class] information registered as the contract information. |
[Number of Contract(s)] | Number of contracts of contract classification unit. |
[Total Number of Device(s)] | Total number of contract device of lease/rent/maintenance contract. When the lease contract and maintenance contract are distributed in one machine, it is aggregated as 2. |
[Number of Contract Device(s)] | Number of device distributed in the contract of the contract classification unit. |
Set visible column(s)
It describes how to set the items displayed in the window.
Click the [Display Item Settings] button.
The following window will be displayed
Besides, the window when clicking the [Display Item Settings] button in the window for contract confirmation by section will be displayed.
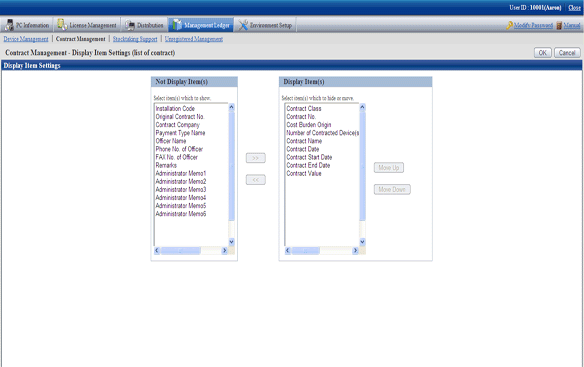
Set the visible column(s) according to the following procedure.
Select the items displayed in the PC list from the [Items That Can be Displayed] list on the left side of the window, and click the [>>] button in the center of the window. Multiple items can be selected.
The selected items are added to [Visible Column(s)] on the right side of the window.
Select the items not displayed in the PC list from the [Items That Can be Displayed] list on the left side of the window, and click the [<<] button in the center of the window. Multiple items can be selected.
The selected items are deleted from [Visible Column(s)] on the right side of the window.
When modifying the order of [Visible Column(s)], select the items from [Visible Column(s)] on the right side of the window and click the [Move Up] or [Move Down] button.
After completing the setting of visible column(s), click the [OK] button.
The visible column(s) of contract list are added to the set items.
Screen contract
It describes how to screen the contract displayed in the window.
Click the [Search] button.
The following window will be displayed
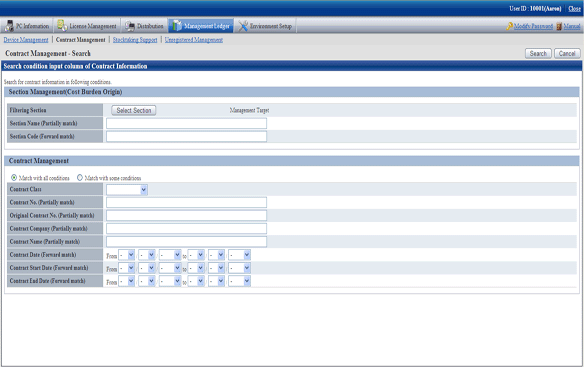
Set the screening aggregation.
Set the following information and click the [Search] button.
Item Name | Descriptions | |
|---|---|---|
Section Management (Cost Burden Origin) | [Filtering Section] | Set conditions when screening defrayal party by section. |
[Section Name] | Set conditions when screening defrayal party by section name. | |
[Section Code] | Set conditions when screening defrayal party by section code. | |
[Contract Management] | [Match with all conditions] or [Match with some conditions] | For conditions set in the [Contract Management] bar, select [All Conditions Match] with all containing multiple conditions or [Any Condition Match] containing one or more conditions. |
[Contract Class] | Set conditions when screening by contract classification. | |
[Contract No.] | Set conditions when screening by contract number. | |
[Original Contract No.] | Set conditions when screening by original contract number. | |
[Contract Company] | Set conditions when screening by contract company name. | |
[Contract Name] | Set conditions when screening by item name. | |
[Contract Date] | Set conditions when screening by contract date. | |
[Contract Start Date] | Set conditions when screening by contract start date. | |
[Contract End Date] | Set conditions when screening by contract expiry date. | |
Only the items matching the search will be displayed in the window.
The procedure for confirming the various lists of contract of “In Section” and “In Classification” are as follow:
Besides, it will be the procedure after “9.4.1.1 Confirm Various Contract Information”. Or the following describes according to the window “In Section”. The order of items displayed “In Location” is different, but it can be confirmed according to the same procedure.
Click the value of [Number of Contract(s)].
The following window will be displayed
Confirm the contract list of the selected items.
Confirm the following information.
Besides, it describes the situation of all visible column(s).
Item Name | Descriptions |
|---|---|
[Costract Class] | Information of the contract defrayal party, [Payment Bearing Party] information registered as the contract information. |
[Contract No.] | Contract No. information. [[Contract No.] information registered as the contract information. |
[Original Contract No.] | Contract number information before contract extension. [Original Contract No.] information registered as the contract information. |
[Contract Category] | Contract classification information. [Contract Category] information registered as the contract information. |
[Number of Contract Device(s)] | The number of distributed device in the contract. Number of device distributed in the contract managed by the section. |
[Contract Company] | Name of company signing the contract. [Contract Company] information registered as the contract information. |
[Contract Name] | Name of items in the signed contract. [Item Name] information registered as the contract information. |
[Contract Date] | The contract date for signing the contract. [Contract Date] information registered as the contract information. |
[Contract Start Date] | The contract start date in the signed contract. [Contract Start Date] information registered as the contract information. |
[Contract End Date] | The contract expiry date in the signed contract. [Contract Expiry Date]information registered as the contract information. |
[Contract Value] | The contract amount in the signed contract. [Contract amount] information registered as the contract information. |
[Installation Code] | The contract No. when signing the contract managed by the company. [Installation Code] registered as the contract information. |
[Payment Type Name] | Method of payment such as monthly payment and yearly payment. [Payment Classification Name] information registered as the contract information. |
[Officer Name] | Name of the contract principal. [Contract Principal] information registered as the contract information. |
[Phone No. of Officer] | Telephone number of the contract principle. [Telephone of Contract Principal] information registered as the contract information. |
[Fax No. of Officer] | Fax number of the contract principal. [Fax number of Contract Principal] information registered as the contract information. |
[Remarks] | Remarks information of the contract, [Remarks] information registered as the contract information. |
[Administrator Memo 1~6] | Remarks information of the contract. [Administrator Memo 1~6] information registered as the contract information. |
Besides, the action of each button is as follows:
Item Name | Descriptions |
|---|---|
[Back] | Display the previous window. |
[Display Item Settings] | Set the items displayed in the window. For the details, please refer to “Set visible column(s)”. |
[CSV Export] | Save the information displayed in the window as ledger. For details, please refer to “9.4.4 Save Contract Information as Ledger”. |
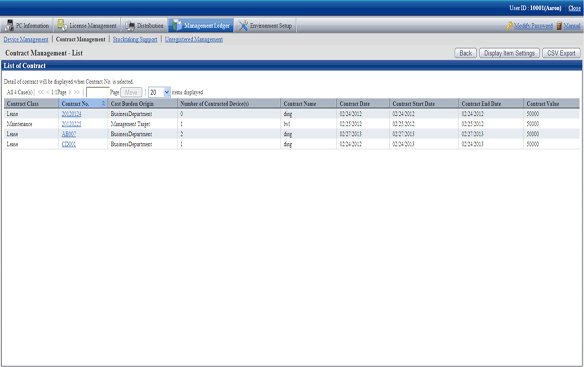
Besides, the list of contract can also be confirmed according to the following procedure. Please operate when confirming in the unit of section.
Click the [List of Contract] tab.
The following window will be displayed
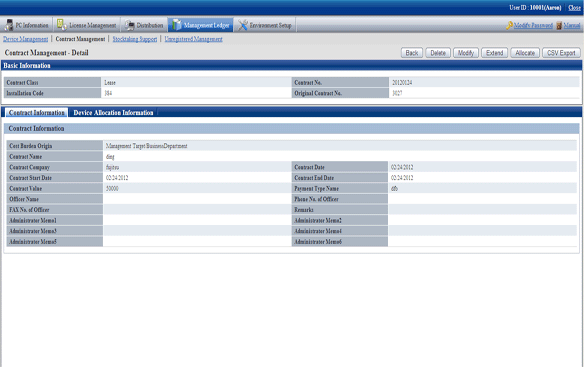
The procedure for confirming the details of contract are as follows.
Besides, the unnecessary contract information can be deleted during confirmation.
And it will be the procedure after “9.4.1.2 Confirm List of Contract” or “9.3.1.3 Confirm Device Details”.
Click the [Contract No.] link for confirming the contract information.
The following window will be displayed
The action of each button is as follows:
Item Name | Descriptions |
|---|---|
[Back] | Display the previous window. |
[Displayed Item Setting] | This button is displayed when selecting the [Device Allocation Information] tab. Set the items displayed in the window. For details, please refer to “Set visible column(s)”. |
[Delete] | Delete the contract information. For details, please refer to “9.4.1.4 Delete Contract Information”. |
[Modify] | Modify the contract information. For details, please refer to “9.4.2 Register/Modify Contract Information”. |
[Extend] | Extend the contract. For details, please refer to “9.4.5 Extend Contract”. |
[Allocate] | Distribute the device information to the contract. For details, please refer to “9.4.3 Distribute Contract Information”. |
[CSV Export] | Save the information displayed in the window as ledger. For details, please refer to “9.4.4 Save Contract Information as Ledger”. |
Confirm the details of contract of the selected contract.
When selecting the [Contract Information] tab, the contract information will be displayed.
When selecting the [Device Allocation Information] tab, the allocation device information will be displayed.
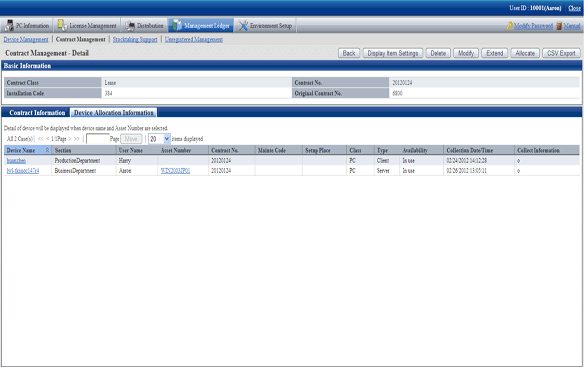
Remarks.In case of section administrator, for device out of the range of Subordinate section, only the following information can be confirmed.
[Asset Number]
[Related Asset Number]
[User ID]
[User Name]
[Device Name]
[Section]
[Class]
[Type]
[Contract No.]
[Mainte Code]
The procedure for deleting the contract information are as follows. The deletion of the contract information is the procedure after “9.3.1.3 Confirm Device Details”.
Start the window for confirming the details of contract.
Click the [Delete] button in the window above.
The following window will be displayed
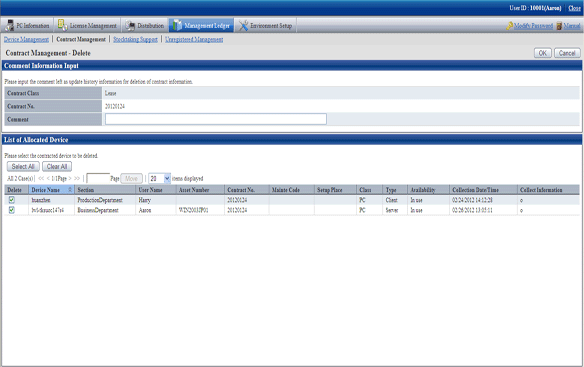
Input the annotation for the operation of deleting the contract information.
Including single-byte alphanumeric characters, single-byte symbols and multi-byte characters, 64 characters at most can be set for the annotation. The input annotation is valid only when deleting the contract information with the device information distributed.
The information input as the annotation can be confirmed in the update history window. For the update history window, please refer to “9.3.1.4 Confirm History Information”.
Besides, please select the list of distributed device list to be deleted.
Click the [OK] button.
The contract information is deleted.