This section explains the tasks to be performed after the Manager has been set up.
After setting up the Manager, perform the following tasks:
Starting the Web servers
Setting up mail and accounting information
Setting up information for Interstage Single Sign-On
Registering application processes
Start the Web servers for Interstage Application Server.
Use the following procedure to start the Web servers.
Start the Interstage Management Console.
Use the following procedure to start the Interstage Management Console.
Select the [All Programs] - [ Interstage] - [Application Server], and then [Interstage Management Console] from the [Start] menu.
Start the Web servers.
Select [Interstage Management Console] - [Interstage Application Server] - [System] - [Service] - [Web Server] - [List].
If any of the following Web servers have stopped, start them.
FJapache
ctmg-http-int
ctmg-https-ext
This section explains how to set up mail and accounting information.
Mail settings
The operating environment files for this product must be modified in order to send emails to users in the user departments to notify that processing has completed or failed when they use MyPortal to apply to use a service, change service specifications or cancel a service contract.
The following operating environment files need to be modified:
vsys_config.xml
mail_config.xml
These two files are stored on the server where this product has been installed. The modification procedure is explained below.
Open the following operating environment file.
<CIMS installation folder>\Systemwalker\SWCFMG\config\vsys_config.xml
Set the following items in the operating environment file.
Item | Description |
|---|---|
ctmg-host | Specify the FQDN for the server where this product has been installed. |
ctmg-port | Specify the port number of the API for linking to this product (fixed as 3551). |
A setting example is shown below.
<?xml version="1.0" encoding="UTF-8"?>
<!DOCTYPE properties SYSTEM "http://java.sun.com/dtd/properties.dtd">
<properties>
	<entry key="super-org-id">cfmgadm</entry>
	... (Omitted) ...
	<entry key="ctmg-host">aaa.bbb.fujitsu.co.jp</entry>
	<entry key="ctmg-port">3551</entry>
	<entry key="mail-config-file">/etc/opt/FJSVcfmg/config/mail_config.xml</entry>
	<entry key="locale">ja</entry>
</properties>
Note
When editing the "vsys_config.xml" file, do not change any settings other than ctmg-host and ctmg-port.
Back up the "vsys_config.xml" file before editing it. If any settings other than ctmg-host and ctmg-port have been changed, restore the file from the backup.
Specifying settings in "mail_config.xml"
If environment setup for the mail transmission function was not performed when this product was installed, the host name (or IP address), port number and email address that were entered with the mail settings specified during installation on Windows or Linux systems must be reflected to the operating environment files for this product. The procedure is explained below.
Open the following operating environment file.
<CIMS installation folder>\Systemwalker\SWCFMG\config\mail_config.xml
Change the following items in the operating environment file in accordance with the settings for this product.
Item | Description |
|---|---|
enable-email | Set this item to "true". |
smtp-host | Specify the host name or IP address of the SMTP server. |
smtp-port | Specify the port number of the SMTP server. |
from-email | Set the source (sender) email address. |
from-name | Set the name of the sender. |
A setting example is shown below.
<?xml version="1.0" encoding="UTF-8"?>
<!DOCTYPE properties SYSTEM "http://java.sun.com/dtd/properties.dtd">
<properties>
	<entry key="enable-email">true</entry>
	... (Omitted) ...
	<entry key="smtp-host">smtp.example.com</entry>
	<entry key="smtp-port">25</entry>
	... (Omitted) ...
	<entry key="from-email">cloud-master@example.com</entry>
	<entry key="from-name">Support Office</entry>
</properties>
Note
When editing the "mail_config.xml" file, do not change any settings other than smtp-host, smtp-port, from-email, and from-name.
Back up the "mail_config.xml" file before editing it. If any settings other than smtp-host, smtp-port, from-email, and from-name have been changed, restore the file from the backup.
Accounting information settings
The operating environment files must be modified so that the user of the user department can display accounting information on the service specification list displayed on the service specification search window using MyPortal.
The following operating environment files need to be modified:
vsys_config.xml
custom_config.xml
These two files are stored on the server where this product has been installed. The modification procedure is explained below.
Open the following operating environment file.
<CIMS installation folder>\Systemwalker\SWCFMG\config\vsys_config.xmlSet the following items in the operating environment file.
Item | Description |
|---|---|
use-charge | Set this item to "yes" to use the accounting information display function, or "no" otherwise. |
use-charge-log | Set "yes" to use the accounting information display function. Set "no" not to use the function. |
A setting example is shown below.
<?xml version="1.0" encoding="UTF-8"?>
<!DOCTYPE properties SYSTEM "http://java.sun.com/dtd/properties.dtd">
<properties>
	<entry key="super-org-id">cfmgadm</entry>
	... (Omitted) ...
	<entry key="use-charge">yes</entry>
	<entry key="charge-host">localhost</entry>
	<entry key="charge-port">3550</entry>
	<entry key="charge-uri">/resource/ver1.0</entry>
	<entry key="use-charge-log">yes</entry>
	<entry key="charge-log-host">localhost</entry>
	<entry key="charge-log-port">3550</entry>
	<entry key="charge-log-uri">/resource/ver1.1</entry>
	... (Omitted) ...
</properties>
Note
When editing the vsys_config.xml file, do not modify setting items other than use-charge, and use-charge-log.
Backup the vsys_config.xml file before editing it. If setting items other than use-charge, and use-charge-log are modified, restore the backup file.
Open the following operating environment file.
<CIMS installation folder>\Systemwalker\SWCTMG\MyPortal\config\custom_config.xmlSet the following items in the operating environment file.
Item | Description |
|---|---|
estimation-mode | Set "3" to display the Monthly Charges (Approximate) applicable to that subscription. Set "0" not to display it. If "yes" was specified for "use-charge" of "vsys_config.xml settings", set "3". If "no" was specified, set "0". |
A setting example is shown below.
<?xml version="1.0" encoding="UTF-8"?>
<properties>
	<entry key="estimation-mode">3</entry>
	... (Omitted) ...
	<entry key="custom-01">false</entry>
</properties>
Note
When editing the "custom_config.xml" file, do not change any settings other than estimation-mode.
Back up the "custom_config.xml" file before editing it. If any settings other than estimation-mode have been changed, restore the file from the backup.
Start the Interstage Management Console.
Refer to "3.1.5.1 Starting the Web Servers" for information on the procedure for starting the Interstage Management Console.
Re-start the [CFMG_VSYS] WorkUnit by specifying [System] - [WorkUnit] - [View WorkUnit Status].
Registering site definitions
Use the Interstage Management Console to specify the public URL for the Admin Server, as described below.
Start the Interstage Management Console.
Follow the steps below to start the Interstage Management Console:
From the [Start] menu, select [All programs] - [Interstage] - [Application Server] - [Interstage Management Console].
Specify the public URL of the Admin Server.
Select the [System] - [Security] - [Single Sign-on] - [Authentication infrastructure] - [Repository server] - [Protection resource] - [Create a New Site configuration] tab. Enter FQDN and the port number of the admin server in [Site Configuration Settings] - [FQDN and Port number:3500(The port number of the Cloud Portal)]. Click the <Create> button.
Register Protection Path
Use the Interstage Management Console and follow the steps below to register the protection path:
Start the Interstage Management Console.
Refer to "Registering site definitions" for the procedure to start the Interstage Management Console.
Register protected resource.
Select the [System] - [Security] - [Single Sign-on] - [Authentication infrastructure] - [Repository server] - [Protection resource] - [<Admin server FQDN>:<Admin server port number>] - [Protection path] - [Create a New Path configuration] tab.
Set as follows and click the <Create> button.
Path definition | Role / role set (select the following items) | |
|---|---|---|
Protected path | Notification of extended user information | |
/portala/ctrl/ | - | sop_delegated_manager |
/portala/personalInfo/ | - | sop_delegated_manager |
/portala/rManagerInfo/ | - | sop_delegated_manager |
/portala/userManagerMenu/ | - | sop_delegated_manager |
Create the Business system setup file
Use the Interstage Management Console and follow the steps below to create the Business system setup file:
Start the Interstage Management Console.
Refer to "Registering site definitions" for the procedure to start the Interstage Management Console.
Set the Public URL and the password in the business system setup file.
Select the [System] - [Security] - [Single Sign-on] - [Authentication infrastructure] - [Business system setup file] tab.
Set the Business system Information as follows. Enter the password (6 or more characters), and click <Download>.
Item | Description |
|---|---|
Public URL | http://<Host name of the Admin Server>:<3500(Port number of the Cloud Portal)>/ |
Linkage with Interstage Portalworks? | No |
Save the downloaded business system setup file.
Registering the Admin Server
Use the Interstage Management Console and follow the steps below to register the admin server:
Start the Interstage Management Console.
Refer to "Registering site definitions" for the procedure to start the Interstage Management Console.
Stop the Web server.
Select the [System] - [Services] - [Web Server] - [ctmg-https-ext]. Display [ctmg-https-ext:Web Server Status], and click the <Stop> button.
Set the business system setup file and the password.
Select the [System] - [Security] - [Single Sign-on] - [Business system] - [Addition of Business server] tab.
Set the "Business system setup file" downloaded as directed in Create the "Business system setup file" and the password in "Business system setup file" and Password of file, and then click the <Next> button.
Add a Admin Server.
Set the following values in General Settings, and click the <Add> button.
Item | Settings |
|---|---|
Business system Name | Business system name (any name) |
Web server name to Web Server used | ctmg-https-ext |
Host to Web Server used | <Host name of the Admin Server>:<3500 (Port number of the Cloud Portal)> |
When Updating Access Control Information? | Execute manually as needed (Execute when Business server is added) |
Use Single Sign-on JavaAPI? | Yes |
Modify the configuration.
Select [System] - [Security] - [Single Sign-on] - [Business system] - [Business system Name]. Enter the business system name specified in step 4 in "Business system Name".
Select the [Settings] tab and click [Detailed settings] - [Show]. Modify the configuration as follows and then click the <Update> button.
Item | Settings |
|---|---|
Access Log Settings | Maximum size: 1024 |
Enable Client IP address Check? | No |
Notify User Information? | Yes |
Cache size | 2 |
Cache count | 100 |
Start the Web server.
Select the [System] - [Services] - [Web Server] - [ctmg-https-ext]. Display [ctmg-https-ext:Web Server Status], and click the <Start> button.
Prevention of Caching of Contents
Follow the steps below to enable the Web browser cache settings.
Start the Interstage Management Console
Refer to "Registering site definitions" for the procedure to start the Interstage Management Console.
Stop the Web server
Select the [System] - [Services] - [Web Server] - [ctmg-https-ext]. Display [ctmg-https-ext:Web Server Status], and click the <Stop> button.
Update the Environment Configuration File of the business server.
Update the Environment Configuration File of the business server using the Editor.
The location and file name of the Environment Configuration File for the business server is shown below:
<CIMS installation folder>\Systemwalker\IAPS\F3FMsso\ssoatzag\conf\ssoatzag.conf
Edit the above file as shown below:
Add http-cache-cntl=NO to the line following the business system name business-system-name = <Business system name specified in "Register the Admin Server"> of the business server that inhibits cache.
An example using the business name of Business001 is shown below:
ServerPort=80
...<Omitted>...
business-system-name=Gyomu001
http-cache-cntl=NO
Start the Web server.
Select the [System] - [Services] - [Web Server] - [ctmg-https-ext]. Display [ctmg-https-ext:Web Server Status], and click the <Start> button.
Update Access Control Information
Use the Interstage Management Console and follow the steps below to update the access control information:
Start the Interstage Management Console.
Refer to "Registering site definitions" for the procedure to start the Interstage Management Console.
Select [System] - [Security] - [Single Sign-on] - [Business system] - [<Business system Name>]. Click the <Update> button on the [Update access control information] tab.
Note
Continue working because there is no operational problem though the message of sso04718 might be output when you update access control information.
To use application processes with this product, a mail server must be registered and a BAR file must be registered with the server for this product.
Information
Refer to the "Systemwalker Runbook Automation V14g Operation Guide" for details on how to register application processes.
Note
If emails are not sent from the application process function during operations, check whether the mail server for this product has been registered correctly.
Change the following settings to match the settings specified when the mail server for this product was registered.
Item | Description |
|---|---|
SMTPServerHost | Specify the host name or IP address that was verified in "Checking the SMTP server". |
SMTPServerPort | Specify "25" (the port number of the mail server). |
ServerEmailAddress | Specify the source (sender) email address. The source (sender) email address is the email address in Item 6 of "Parameters specified during installation". |
Use the following procedure to use application processes by registering BAR files with the server for this product.
Use a Web browser to access the following URL, and log in as a user with system administrator privileges.
http://<Host name of the Admin Server>:<80 (Port number of the Web Console))>/console/Default/
Create the process group.
On the process group selection window, select System from [Process Group Name] and click the <OK> button.

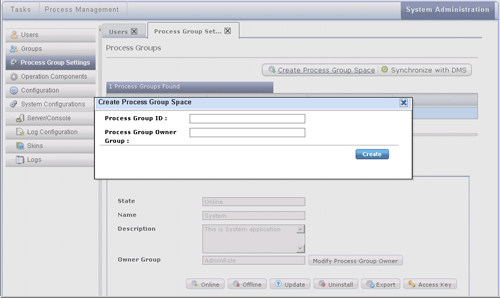
Select [Process Group Settings] on the System Administration tab window, and display the process group setting window. Then, select [Create Process Group Space].

Enter the process group ID.
Enter ctmgApplication in [Process Group ID] on the [Create Process Group Space] dialog box, and click the <Create> button.

Update the process group.
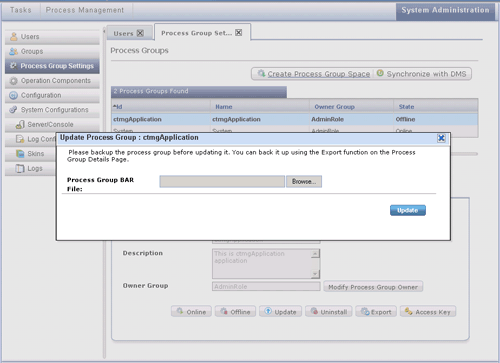
Select the application ctmgApplication created in step 3, and click the <Update> button on the lower pane.

Copy the ctmgApplication.bar file below in the Admin Server onto the environment in which the browser has been opened.
<CIMS installation folder>\Systemwalker\SWCTMG\MyPortal\pkg\ctmgApplication.bar
Click the <Browse> button on the [Update Process Group] dialog box. Select the ctmgApplication.bar file that was copied, and click the <Update> button.

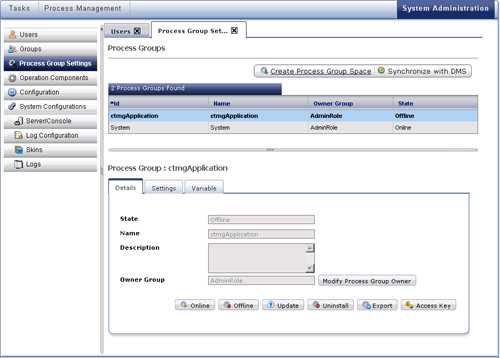
Change the process group to an online status.
Select the created process group ctmgApplication, and click the <Online> button on the lower pane.
Select the process definition and enable it.
Refresh the window by selecting [System Administration] tab, and display the ctmgApplication in [Process Group].
Select ctmgApplication from [Process Group].

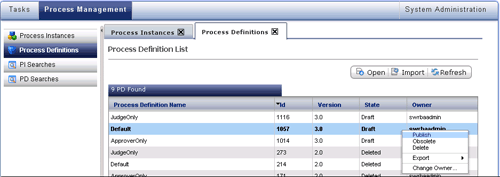
Select [Process Definitions] on the [Process Management] tab window.
Select from the process definition list the process definition to be used. Select Publish on the context menu.

To use the cloud infrastructure administrator dashboard with this product, the Managed Servers to be monitored with the dashboard must be registered.
Refer to "Appendix I Registering and Deregistering Managed Servers" for information on how to register Managed Servers.