This section explains how to set up the Manager.
When registering users to the Interstage Single Sign-on authentication infrastructure, refer to "F.1 Creating and Setting up Interstage Single Sign-On Environments" for information on how to first create and set up the Interstage Single Sign-on environment.
See
Refer to the "Interstage Application Server Single sign-on Operator's Guide" for details on Interstage Single Sign-On.
Register the organizational units and users that are required to use this product. Register these organizational units and users with either the authentication infrastructure or an LDAP environment. Register user information according to the directory service being used.
Note
The step where users, groups and organizational units are registered with the LDAP directory only needs to be performed for the initial setup after installation. This step is not required when the setup is canceled and then performed again.
There is no need to create organizational units if operations are to be performed using organizational units that have already been created.
The users and groups created in this chapter are the users and groups that are required for Cloud Infrastructure Management Software to run. Be sure to create these users and groups.
It is not recommended to create LDIF files by copying samples from this manual. This is because linefeed characters may be skipped or duplicated, depending on the Web browser or display program being used. It is recommended that you use the samples in accordance with the procedures in this manual.
If you have to copy the samples from this manual for particular reasons, carefully check to see that the linefeed characters appear exactly as shown in this manual before creating LDIF files.
This section explains the procedure for registering users with the Interstage Directory Service.
It explains how to register users by using LDIF files, as one of the user registration methods.
Note
Refer to the "Interstage Application Server Directory Service Operator's Guide" for details on LDIF files.
Information
User information can also be registered by using the GUI-based "Entry Management Tool". Refer to the "Interstage Application Server Directory Service Operator's Guide" for details.
Registering users for service providers (automatic operation function)
Sample LDIF files are stored in the following location.
<CIMS installation folder>\Systemwalker\swrbam\etc\sample\ldifLDIF file | Description |
|---|---|
swrba_sso_sample.ldif | This LDIF file creates organizational units, users and groups, and adds users to groups. Use this sample file if the Interstage Single Sign-On authentication infrastructure is used. |
swrba_no_sso_sample.ldif | This LDIF file creates organizational units, users and groups, and adds users to groups. Use this sample file if the Interstage Single Sign-On authentication infrastructure is not used. |
This sample file assumes the following LDAP configuration.
Edit this sample file to match the LDAP environment for the actual operation. Be sure to change the password for the process control user.
Public directory | Note: The value is fixed as below. ou=interstage,o=fujitsu,dc=com |
Organizational unit for storing users | ou=User |
Organizational unit for storing groups | ou=Group |
Process control user | swrbaadmin |
Password for the process control user | systemwalker#1 |
Use the ldapmodify command to register the definition information contained in an LDIF file with the LDAP directory.
Example
Administrator DN: cn=manager
Public directory: ou=interstage,o=fujitsu,dc=com
Password for the administrator DN: password
Host name of the repository: The host name of the Admin Server (Interstage Directory Service)
Port number: 389
> ldapmodify -H ldap://< }Host name of the Admin Server>:389 -D "cn=manager,ou=interstage,o=fujitsu,dc=com" -w password -a -f <Name of the edited LDIF file>
For the detail ldapmodify command, Refer to the "Interstage directory service operation command" in the "Interstage Application Server/Interstage Web Server Reference (Command)".
This section explains how to create LDIF files to register the user information (shown below) with the LDAP directory.
Note that three separate LDIF files are created here, but it is also possible to group all three files into a single LDIF file and register that file with the LDAP directory.
This section explains the definitions for registering the organizational units shown in the following table with the LDAP directory.
Name of the organizational unit to be created | Whether an arbitrary name can be specified |
|---|---|
Group | Yes |
User | Yes |
Point
Organizational units (OUs) can be layered.
Create an LDIF file to register organizational units according to the setting examples.
The "User" group is created automatically when the repository is created.
To use the "User" group as the group for managing users, prepare an LDIF file that registers only "Group", as follows:
dn: ou=Group,%DOMAIN%
changetype: add
objectclass: organizationalUnit
ou: Group
To use a group with a name other than "User" as the group for managing users, prepare an LDIF file that registers two groups (a group for managing groups and a group for managing users) as follows:
dn: ou=Group,%DOMAIN%
changetype: add
objectclass: organizationalUnit
ou: Group

dn: ou=User,%DOMAIN%
changetype: add
objectclass: organizationalUnit
ou: User
Note that the %...% parts of the file should be replaced with the elements in the table below.
Replacement symbol | Setting after replacement |
|---|---|
%DOMAIN% | Public directory: ou=interstage,o=fujitsu,dc=com Note: To execute the setup after creating an LDAP directory, this setting must be specified for the LDAP key name when the setup is executed. |
Point
For the detail of object class and attribute which specified on setting example, Refer to the "Object Class List" and "Attribute List" in the "Interstage Application Server Directory Service Operation Guide".
This section explains the definitions for registering the users shown in the following table with the LDAP directory.
User name | Password | Description |
|---|---|---|
swrbaadmin | systemwalker#1 | This user is required for Cloud Infrastructure Management Software to control processes internally. (Mandatory user.) |
*1: This is the recommended user name, but any name can be specified.
*2: "systemwalker#1" is the default value. This password can be changed to any password.
Create an LDIF file to register users according to the setting example.
dn: uid=swrbaadmin ,ou=%USER%,%DOMAIN%
changetype: add
objectclass: inetOrgPerson
objectclass: organizationalPerson
objectclass: person
objectclass: top
objectclass: ssouser
cn: swrbaadmin
sn: swrbaadmin
givenName: swrbaadmin
userPassword: systemwalker#1
uid: swrbaadmin
Note that the %...% parts of the file should be replaced with the elements in the table below.
Replacement symbol | Setting after replacement |
|---|---|
%DOMAIN% | Public directory: ou=interstage,o=fujitsu,dc=com Note: To execute the setup after creating an LDAP directory, this setting must be specified for the LDAP key name when the setup is executed. |
%USER% | The "User" organizational unit (OU). (If the name of the OU has been changed, specify the new name.) Example: User. Note: To execute the setup after creating an LDAP directory, specify ou=<Value of %USER%> for the organizational unit settings for storing the LDAP user account when the setup is executed. |
Point
For the detail of object class and attribute which specified on setting example, Refer to the "Object Class List" and "Attribute List" in the "Interstage Application Server Directory Service Operation Guide".
This section explains the definitions for registering the groups shown in the following table.
Group name | Members |
|---|---|
AdminRole(*1) |
|
IflowUsers |
|
IflowGroups(*1) |
|
swrba_Exe(*1) |
|
Role(*1) |
|
*1: These are the recommended group names. Arbitrary prefixes can be added to the front of the group names, without actually changing the group name itself.
Note
Do not assign users other than the swrbaadmin user to the swrba_Exe group.
Otherwise, problems may occur with the behavior of Automated Operation Processes.
Create an LDIF file for registering groups and adding users in accordance with the setting example below.
dn: cn=AdminRole,ou=%GROUP%,%DOMAIN%
changetype: add
objectclass: groupOfNames
objectclass: top
cn: AdminRole
member: uid=swrbaadmin ,ou=%USER%,%DOMAIN%

dn: cn=IflowUsers,ou=%GROUP%,%DOMAIN%
changetype: add
objectclass: groupOfNames
objectclass: top
cn: IflowUsers
member: uid=swrbaadmin ,ou=%USER%,%DOMAIN%

dn: cn=IflowGroups,ou=%GROUP%,%DOMAIN%
changetype: add
objectclass: groupOfNames
objectclass: top
cn: IflowGroups
member: cn=AdminRole,ou=%GROUP%,%DOMAIN%
member: cn=swrba_Exe,ou=%GROUP%,%DOMAIN%
member: cn=Role,ou=%GROUP%,%DOMAIN%

dn: cn=swrba_Exe,ou=%GROUP%,%DOMAIN%
changetype: add
objectclass: groupOfNames
objectclass: top
cn: swrba_Exe
member: uid=swrbaadmin,ou=%USER%,%DOMAIN%

dn: cn=Role,ou=%GROUP%,%DOMAIN%
changetype: add
objectclass: groupOfNames
objectclass: top
cn: Role
member: uid=swrbaadmin,ou=%USER%,%DOMAIN%
Note that the %...% parts of the file should be replaced with the elements in the table below.
Replacement symbol | Setting after replacement |
|---|---|
%DOMAIN% | Public directory Example: ou=interstage,o=fujitsu,dc=com Note: To execute the setup after creating an LDAP directory, this setting must be specified for the LDAP key name when the setup is executed. |
%USER% | The "User" organizational unit (OU) (If the name of the OU has been changed, specify the new name.) Example: User. Note: To execute the setup after creating an LDAP directory, ou=<Value of %USER%> must be specified for the organizational unit settings for storing the LDAP user account when the setup is executed. |
%GROUP% | The "Group" organizational unit (OU) (If the name of the OU has been changed, specify the new name.) Example: Group. Note: To execute the setup after creating an LDAP directory, ou=<Value of %GROUP%> must be specified for the LDAP organizational unit settings when the setup is executed. |
Point
For the detail of object class and attribute which specified on setting example, Refer to the "Object Class List" and "Attribute List" in the "Interstage Application Server Directory Service Operation Guide".
The following example shows how to register entry data using the ldapmodify command and an LDIF file.
Example
Administrator DN: cn=manager
Public directory: ou=interstage,o=fujitsu,dc=com
Password for the administrator DN: password
Host name of the repository: The host name of the Admin Server (Interstage Directory Service)
Port number: 389
[Windows]
> ldapmodify -H ldap://<Host name of the Admin Server>:389 -D "cn=manager,ou=interstage,o=fujitsu,dc=com" -w password -a -f <Name of the created LDIF file>
For the detail ldapmodify command, Refer to the "Interstage directory service operation command" in the "Interstage Application Server Reference (Command)".
Register the following organizational unit user (required to use this product) with the Interstage Directory Service.
Organizational unit | Parent object |
|---|---|
Operators | User |
Prepare the following LDIF file.
dn: ou=Operators, ou=User, ou=interstage, o=fujitsu, dc=com (*1)
changetype: add
objectClass: organizationalUnit
ou: Operators
*1: For the underlined section, make changes according to the domain name specified in the public directory for the repository created in "F.1 Creating and Setting up Interstage Single Sign-On Environments".
Open a command prompt with Administrator privileges.
Register the organizational unit by executing the following command.
> ldapmodify -H ldap://<Host name of the Admin Server>:389 -D "<Administrator DN>" -w <Password for the administrator DN> -a -f <Name of the created LDIF file>
Register the following user (required to use this product) with the Interstage Directory Service.
User ID | Role | Organization name | Password |
|---|---|---|---|
cfmgadm | System administrator | cfmgadm | Required |
Prepare the following LDIF file.
dn: cn=cfmgadm, ou=Operators, ou=User, ou=interstage, o=fujitsu, dc=com (*1)
changetype: add
objectClass: ssoUser
objectClass: inetOrgPerson
cn: cfmgadm
sn: cfmgadm
uid: cfmgadm
userPassword: <Password>
ssoRoleName: CFMGSystemAdmin
mail: <Email address>
*1: For the underlined section, make changes according to the domain name specified in the public directory for the repository created in "F.1 Creating and Setting up Interstage Single Sign-On Environments".
Open a command prompt with Administrator privileges.
Register the user by executing the following command.
> ldapmodify -H ldap://<Host name of the Admin Server>:389 -D "<Administrator DN>" -w <Password for the administrator DN> -a -f <Name of the created LDIF file>
Authentication for the Operation Portal is performed using Interstage Single Sign-On. Provider department administrators who will use the Operation Portal must be registered with the repository for Interstage Single Sign-On using an LDIF file. Use the following procedure to register provider department administrators.
Create provider department administrators.
Add provider department administrators as members of the "IflowUsers" group.
Note
Provider department administrators who have not been registered in the "IflowUsers" group cannot conduct assessment in application processes.
Also, if no provider department administrators have been registered in the "IflowUsers" group, the following error message will be displayed after users forward applications from the forward destination selection window when they apply to use a service.
PCS1002
An error occurred while processing application.
Please contact the system operation manager
Each of these registration procedures is explained below.
The procedure for creating provider department administrators is as follows:
Create an LDIF file
Create an LDIF file by editing a sample LDIF file. A sample LDIF file is shown below.
# Entry: User: ctmg_provider001
dn: cn=ctmg_provider001,ou=Operators,ou=User,ou=interstage,o=fujitsu,dc=com
objectClass: top
objectClass: person
objectClass: organizationalPerson
objectClass: inetOrgPerson
objectClass: ssoUser
uid: ctmg_provider001
userPassword: ctmg_provider001
mail: ctmgprovider001@example.com
ssoRoleName: CTMGProviderAdmin
ssoAuthType: basicAuth
sn: 001
givenName: provider
cn: ctmg_provider001
Execute the ldapmodify command
Execute the ldapmodify command specifying the LDIF file that has been created.
> ldapmodify -H ldap://<Host name of the Admin Server>:389 -D "<Administrator DN>" -w <Password for the administrator DN> -a -f <Name of the created LDIF file>
An execution example is shown below.
c:\> ldapmodify -H ldap://hostname:389 -D "cn=manager,ou=interstage,o=fujitsu,dc=com" -w admin -a -f c:\ldif\adduser.ldif
adding new entry "cn=ctmg_provider001,ou=Operators,ou=User,ou=interstage,o=fujitsu,dc=com"
Note
Enter the command on a single line without inserting any line breaks midway through.
For the host name of the Interstage Directory Service, the port number, the administrator DN, and the password for the administrator DN, enter the values that were specified during installation. Refer to the "Systemwalker Service Catalog Manager V14g Installation Guide" for details.
Use the following procedure to add provider department administrators as members of the "IflowUsers" group.
Create an LDIF file
Create an LDIF file by editing a sample LDIF file. A sample LDIF file is shown below.
# Add ctmg_provider001 to IflowUsers
dn: cn=IflowUsers,ou=group,ou=interstage,o=fujitsu,dc=com
changetype: modify
add: member
member: cn=ctmg_provider001,ou=Operators,ou=User,ou=interstage,o=fujitsu,dc=com
Execute the ldapmodify command
Execute the ldapmodify command specifying the LDIF file that has been created.
> ldapmodify -H ldap://<Host name of the Admin Server>:389 -D "<Administrator DN>" -w <Password for the administrator DN> -f <Name of the created LDIF file>
An execution example is shown below.
c:\> ldapmodify -H ldap://hostname:389 -D "cn=manager,ou=interstage,o=fujitsu,dc=com" -w admin -f c:\ldif\adduser2group.ldif
modifying entry "cn=IflowUsers,ou=group,ou=interstage,o=fujitsu,dc=com"
Note
Enter the command on a single line without inserting any line breaks midway through.
For the host name of the Interstage Directory Service, the port number, the administrator DN, and the password for the administrator DN, enter the values that were specified during installation. Refer to the "Systemwalker Service Catalog Manager V14g Installation Guide" for details.
Set up the connection to the LDAP server by checking and modifying the content of the following file.
<CIMS installation folder>\Systemwalker\SWCFMG\config\vsys_config.xml
Check the following properties, and make modifications if necessary.
Property | Value | Can this be omitted? | Default value |
|---|---|---|---|
ldap-server | Host name of the directory server | No | ldap://localhost:389 |
ldap-admin-password | Password for the administrator DN specified in "F.1 Creating and Setting up Interstage Single Sign-On Environments" | No | (Blank) |
Use the following procedure to set up the CMDB.
Stop the CMDB.
<CIMS installation folder>\Systemwalker\SWRBAM\CMDB\FJSVcmdbm\bin\cmdbstop.bat
Set up the CMDB.
<CIMS installation folder>\Systemwalker\SWRBAM\CMDB\FJSVcmdbm\bin\cmdbsetupenv.bat -k MGR
<CIMS installation folder>\Systemwalker\SWRBAM\CMDB\FJSVcmdbm\bin\cmdbsetupenv.bat -k AGT_CFMG
Start the CMDB.
<CIMS installation folder>\Systemwalker\SWRBAM\CMDB\FJSVcmdbm\bin\cmdbstart.bat
The user (cfmgdb) and group (cfmgdb) for starting the database process are added during installation.
Use this user to access and manage the database.
Note
Do not delete this user while this product is being used.
Changing the password
The following password is registered immediately after installation:
cfmg14db! (for Windows)
Because it is insecure to use the default password, use the following procedure to change the password.
Change the password using the following procedure:
Select [Start] - [Control Panel] to open [Control Panel].
Click User Accounts.
Click Manage another account.
Click the cfmgdb user.
Click Reset the password.
Enter the new password, and then click the <OK> button.
Alternatively, set it on the command line as follows:
> net user cfmgdb <New password>
The database service is started as the DB startup user (cfmgdb).
Upon starting the login password is required, which is set to service.
When the DB startup user (cfmgdb) password is changed, the service settings must also be changed. Use the following procedure:
Select [Start] - [Control Panel] - [Administrative Tools], then open [Services].
Select Systemwalker Software Configuration Manager DB Service from the list of services, then open that property.
Click the [Log on] tab.
In [Password] and [Confirm password] fields, set a string that matches the password set in "How to Change the Operating System User Password", and then click the <OK> button.
This password will be effective the next time the service is started.
Log in to the Admin Server as a user with Administrator privileges.
Execute the following command to start the setup:
> <CIMS installation folder>\Systemwalker\SWRBAM\bin\swrba_setup -s
Note
If the operating system is Windows Server 2008, execute the command above as an administrator.
The setup tool for the automatic operation function will start.
Check the settings that are displayed, and then click the <Next> button.
Specify the server type settings.
Enter each setting, and then click the <Next> button.
Item name | Input value |
|---|---|
Select the build server type | Select the operating type of the Admin Server from the following options:
|
Set up the process management database.
Enter each setting, and then click the <Next> button.
Item name | Input value |
|---|---|
Port number for Process Management Database | Specify the port number for accessing the Process Management Database. |
Process Management Database Storage Directory | Specify the directory for storing the database. The value can be up to 100 characters long. In this specified directory, It is necessary to add readable and writable authority to User Group. |
Account for Process Management Database | Register a new account, which will be required for Systemwalker Runbook Automation to access the Process Management Database. The value can contain up to 18 initial alphanumeric characters. Note that the value specified for this item is required to directly manipulate the Process Management Database. |
Account Password for Process Management Database | Specify the password for the account for accessing the Process Management Database. The value can contain up to 18 alphanumeric characters and symbols (*). Note that the value specified for this item is required to directly manipulate the Process Management Database. *: The following symbols can be used: !#%=~:,_ |
Re-enter Password | Re-enter the password for the account for accessing the Process Management Database. |
Set up the environment for the authentication server.
Enter each setting, and then click the <Next> button.
Item name | Input value |
|---|---|
Type of The Authentication Server to Use | Specify the type of the authentication server to be used.
|
LDAP Used | Specify the type of LDAP directory to be used.
|
Interstage Single Sign-On environment setting Business system name | Specify the business system name of the Interstage Single Sign-On environment. default: Business001 |
Set up the environment for user authentication.
Enter each setting, and then click the <Next> button.
Item name | Input value |
|---|---|
Host Name or IP address | Specify the host name or IP address for the LDAP server. The value can contain up to 64 characters. |
Port Number | Specify the port number for the LDAP server. The value must be between 1 and 65535. Default: 389 |
Key Name | Specify the public directory. ou=interstage,o=fujitsu,dc=com Note Separate public directory levels with commas(,). Example: If the public directory is ou=interstage,o=fujitsu,dc=com itcm.com, specify ou=interstage,o=fujitsu,dc=com |
Organizational Unit | Specify the name of the organizational unit using the following format: ou=<Name of the organizational unit> The value can contain up to 255 characters. Default: ou=Group |
Account Storage Unit | Specify the name of the account storage unit using the following format: ou=<Name of the account storage unit> The value can contain up to 255 characters. Default: ou=User |
Administrator DN | Specify the distinguished name (DN) for the LDAP repository administrator. Format: cn=<Administrator DN> Note: The value is fixed as below. cn=manager |
Password for Administrator DN | Specify the password for the LDAP repository administrator. |
Note
After performing the procedure above, check whether this user can authenticate with the LDAP server.
If the LDAP authentication test fails, an error message will be displayed. In this case, review the settings.
Set up user information.
Enter each setting, and then click the <Next> button.
Item name | Input value |
|---|---|
User for Process Control | Specify the user that is required for Cloud Infrastructure Management Software to control processes internally. "swrbaadmin" is the recommended value, but any value can be specified. This user must have been registered in the LDAP directory beforehand. |
Password for the User for Process Control | Specify the password for the user for process control. |
Note
After performing the procedure above, check whether this user can authenticate with the LDAP server.
If the LDAP authentication test fails, an error message will be displayed. In this case, review the settings. Check the following as well:
There may be a problem with the settings for the LDAP server, so return to the previous window and check whether the information has been set up correctly.
Check for any problems with the user or group information registered with the LDAP server.
The settings will be displayed.
Check that the displayed values are correct, and then click the <Next> button. The setup will commence.
A window will be displayed indicating the setup progress.
If the setup completes normally, the settings will be displayed. Check the settings that are displayed, and then click the <Finish> button.
Note
If the setup command for the automatic operation function fails for any reason, be sure to cancel the setup.
To send email notifications when tasks are allocated during operations that use Automated Operation Processes, mail server information must be registered on the Admin Server.
Note
In the initial state following the setup, the automatic operation function runs on the assumption that a mail server has been created on the Admin Server. Email notifications will not be performed if a mail server has not been created on the Admin Server.
List of setting items
The following table lists the items that can be set up as mail server information.
Item name | Description | Default value |
SMTPServerHost | Specify the host name or IP address of the SMTP server that is used to send emails. | Localhost |
SMTPServerPort | Specify the port number of the SMTP server that is used to send emails. | 25 |
SMTPUserName | Specify the user name that is used to authenticate with the SMTP server when emails are sent. If the user name is not to authenticate with the SMTP server when emails are sent, specify "\ " (the backslashcharacter followed by a space). | None |
SMTPPassword | Specify the password for the user that is used to authenticate with the SMTP server when emails are sent. If the user name is not to authenticate with the SMTP server when emails are sent, specify "\ " (the backslash character followed by a space). | None |
ServerEmailAddress | Specify the email address that is assigned as the "sender" (the "from" address). Note that the email address specified by this item will also be the destination for emails that are returned when the destination is unknown. Specify the address of a person who can rapidly respond to problems. | postmaster@example.com |
ServerEmailBaseURL | Specify the URL of the Admin Server (which will appear in emails) using the following format:
Be sure to specify a URL that can be accessed externally. For environments that use Interstage Single Sign-On, in particular, be sure to specify the host name in FQDN format. | http://< Host name of the Admin Server>:<80 (Port number of the Web server)>/console/ |
Setup procedure
Log in as a system administrator and register mail server information on the Admin Server using the following procedure.
It is recommended that a backup be taken before you perform this procedure, in case something goes wrong.
Check the startup status of the automatic operation function.
Use the swrba_status command to check the startup status of the automatic operation function. If the automatic operation function is not running, start it using the swrba_start command.
To authenticate with the SMTP server when emails are sent, encrypt the password for the user that is used to authenticate with the SMTP server. Use the following command to encrypt the password.
This step can be skipped if authentication with the SMTP server is not performed when email is sent.
> <CIMS installation folder>\Systemwalker\IBPM\client\samples\configuration\EncryptPassword.bat -e "<Password>"
-------ENCRYPTED PASSWORD-------
<Encrypted password>
Prepare a mail server definition file and a mail sender definition file.
Create the following two types of file. These files can be created in any desired location.
SMTP server configuration file (smtpserver.conf)
Sample configuration file for authenticating with the SMTP server when email is sent.
SMTPServerHost=swrba.mail.server
SMTPServerPort=25
SMTPUserName=swrbamailuser
SMTPPassword=<Encrypted password>
ServerBaseURL=http://ssoserver.example.com:80/console/
ServerEmailBaseURL=http://ssoserver.example.com:80/console/
Sample configuration file for not authenticating with the SMTP server when email is sent.
SMTPServerHost=swrba.mail.server
SMTPServerPort=25
SMTPUserName=\ (*1)
SMTPPassword=\ (*1)
ServerBaseURL=http://ssoserver.example.com:80/console/
ServerEmailBaseURL=http://ssoserver.example.com:80/console/
*1: Be sure to insert a space after the backslash character("\ ").
Mail sender configuration file (emailaddress.conf)
ServerEmailAddress=swrbamailuser@swrba.mail.server
Register the information for the mail server and the mail sender with the automatic operation function. Register the mail server definition and the mail sender definition.
Register the SMTP server.
> <CIMS installation folder>\Systemwalker\IBPM\server\deployment\bin\importProperties.bat smtpserver.conf <Account for accessing the process management database> <Password for the account for accessing the process management database>
Register the mail sender.
> <CIMS installation folder>\Systemwalker\IBPM\server\deployment\bin\importProperties.bat emailaddress.conf <Account for accessing the process management database> <Password for the account for accessing the process management database> Default
Be sure to specify the "Default" option at the end.
Restart the automatic operation function.
To reflect the information that has been set up, first use the swrba_stop command to stop the automatic operation function, and then use the swrba_start command to start it.
Stop the automatic operation function.
> <CIMS installation folder>\Systemwalker\SWRBAM\bin\swrba_stop
Start the automatic operation function.
> <CIMS installation folder>\Systemwalker\SWRBAM\bin\swrba_start
This section explains how to set up the catalog function.
Log in to the Admin Server as a superuser.
Execute the following command to start the setup for the automatic operation function.
> <CIMS installation folder>\Systemwalker\SWCTMG\bin\setup\swctmg_service_setup /s
Use the following procedure to tune the desktop heap.
Note
Edit the registry as a user with Administrator privileges.
When editing the registry, be sure to take a backup first, and be very careful when making the changes.
If the value of the SharedSection registry key has been changed, restart the system for the changes to take effect.
Open the registry editor.
Select [Run] from the [Start] menu. Enter "regedt32", and then click the <OK> button.
Move to the SubSystems key.
Move to the following key from the HKEY_LOCAL_MACHINE subtree.
\System\CurrentControlSet\Control\Session Manager\SubSystems
Select the value for the [Windows] key.
Select [Modify] from the [Edit] menu to display the [Edit String] dialog box.
Increase the desktop heap by changing the value of the SharedSection parameter.
Increase the value of the third item ("zzzz")to 3072.
SharedSection=xxxx,yyyy,zzzz
Note: There is no need to change the first and second values ("xxxx" and "yyyy").
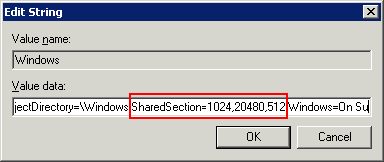
Example: Before change.
SharedSection=1024,20480,512
Example: After change.
SharedSection=1024,20480,3072
Information
For details on how to expand the desktop heap by modifying the registry, refer to document number 126962 on the "Microsoft Support Online" website published by Microsoft for details. Refer to Article 184802 on the Microsoft Support website for information on the desktop heap.
Restart the operating system.
Restart the operating system from the Start menu.