This section explains how to set up the Systemwalker Single Sign-On Agent.
Note that if a Systemwalker product uses a cluster configuration, the Systemwalker Single Sign-On Agent should be set up by downloading the business system setup file to both the active node and the standby node.
The setup method for the Systemwalker Single Sign-On Agent depends on which Systemwalker products are used, and the type of HTTP server where the Web console for Systemwalker products runs.
For Systemwalker Centric Manager and Systemwalker Service Quality Coordinator
Set up the Systemwalker Single Sign-On Agent by referring to the following sections:
When Interstage HTTP Server is used
Use the following procedure to set up the Systemwalker Single Sign-On Agent.
Start the Interstage Management Console.
Refer to "How to start the Interstage Management Console" for details on how to start the Interstage Management Console.
In the Interstage Management Console window, select System >> Security >> Single Sign-on >> Business system, and then click the Addition of Business server tab.
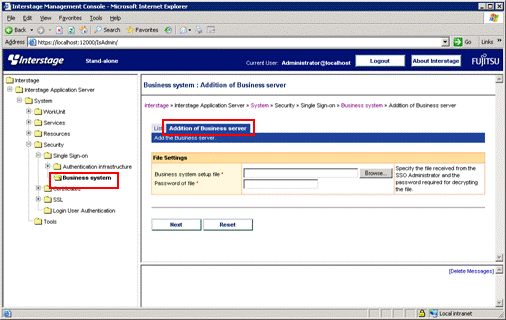
Specify each item as below, and then click the Next button.
File Settings
Business system setup file
Specify the business system setup file that was downloaded and copied when the environment for the authentication server was created.
Password of file
Specify the password that was specified when the business system setup file was downloaded.
Specify each item as below, and then click the Add button.
General Settings
Business system Name
Specify an arbitrary name for the business system. Be sure to specify this item.
The name of the business system can be specified using between 1 and 32 bytes of the following characters:
Alphanumeric characters
Symbols (- _ ( ) [ ])
The default value is "Businessnnn" (where nnn is a number).
Web Server used
Specify the Interstage HTTP Server to use with the Systemwalker products.
When updating Access Control Information?
Select Execute when Business server is started.
In the Interstage Management Console window, select System >> Security >> Single Sign-on >> Business system >> <Business system name>, and then click the Settings tab.
<Business system name> is the business system name that was specified in step 4.
Click the Show link for Detailed Settings.
Select Yes for Notify User Information? and then click the Update button.
Restart the Interstage HTTP Server to use with the Systemwalker products.
When Microsoft(R) Internet Information Service is used
The setup procedure varies depending on whether the Systemwalker product is located on the same server as the Systemwalker Single Sign-On Server or Interstage Application Server.
Use the following procedure to set up the Systemwalker Single Sign-On Agent.
Specify environment settings using the following command on the servers where the Web consoles for the Systemwalker products are installed. Specify the business system setup file that was downloaded and copied when the environment for the authentication server for the Systemwalker Single Sign-On Server was created.
swidmg_set_ssoagent SET -f <business system setup file> -p <password> -f <business system setup file> -p <password>...] |
The command execution location and storage location are as follows:
[Command execution location]
Systemwalker product name | Installation type |
|---|---|
Systemwalker Centric Manager | Operation Management Server |
Systemwalker Service Quality Coordinator | Operation Management Client |
[Storage location]
OS | Location |
|---|---|
Windows | %F4AM_INSTALL_PATH%\F4AMidmg\client |
UNIX | /opt/FJSVswaic/client |
Refer to the "swidmg_set_ssoagent (Systemwalker Single Sign-On Agent Setup Command)" for details on the swidmg_set_ssoagent command.
Point
If there are multiple business system setup files, specify multiple command options.
Include the Systemwalker Single Sign-On Agent into Microsoft(R) Internet Information Service.
Use the following procedure to include the Systemwalker Single Sign-On Agent.
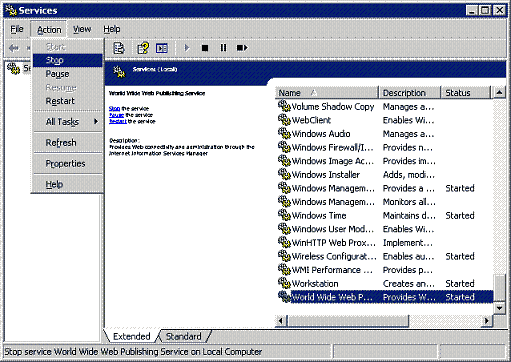
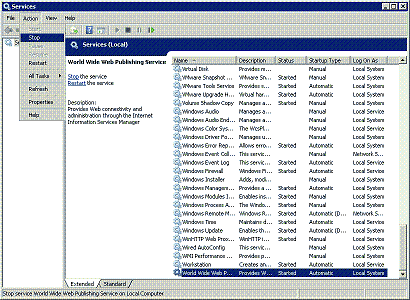
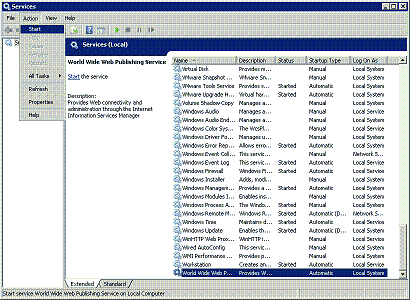
Open the Services dialog box by selecting Programs, Administrative Tools and then Services from the Start menu, and check whether the World Wide Web Publishing Service is running.
If World Wide Web Publishing Service is already running, select the World Wide Web Publishing Service, and then select Stop from the Action menu.
From the Start menu, select Programs >> Administrative Tools >> Internet Information Services (IIS) Manager.
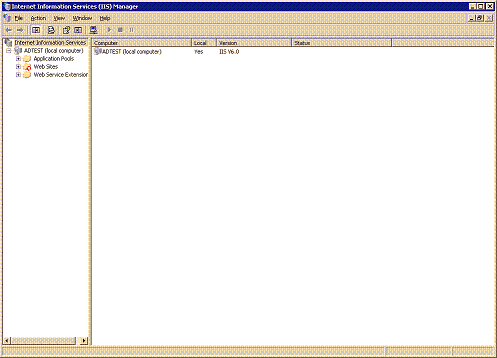
Select the Web site where the Systemwalker Single Sign-On Agent is to be included.
In the following example, the Systemwalker Single Sign-On Agent will be included in a Web site called "Default Web Site".
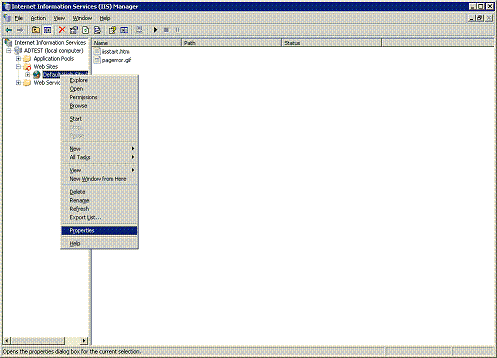
Open the Properties sheet by selecting Properties from the pop-up menu. Select the ISAPI Filters tab on the Properties sheet and then click the Add button.
If any ISAPI filters are already set up, after adding the business server program to the ISAPI filters in step b, change the order so that the Systemwalker Single Sign-On Agent program appears at the top.
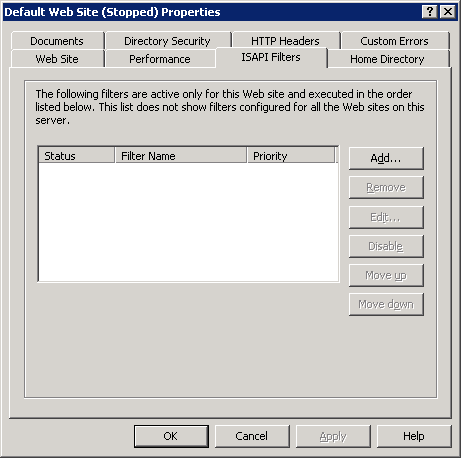
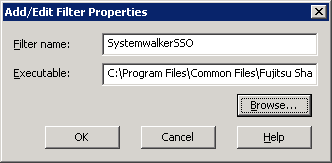
Enter the filter name, and specify the absolute path to the Systemwalker Single Sign-On Agent program in the Executable field.
In the following example, "SystemwalkerSSO" is specified as the filter name, and "%F4AM_INSTALL_PATH%\F4AMidmg\client\F3FMsso\ssoatzag\lib\F3FMSSOatziis.dll" is specified as the executable file. Click the OK button after specifying these settings.
Select the Web site where the Systemwalker Single Sign-On Agent is to be included.
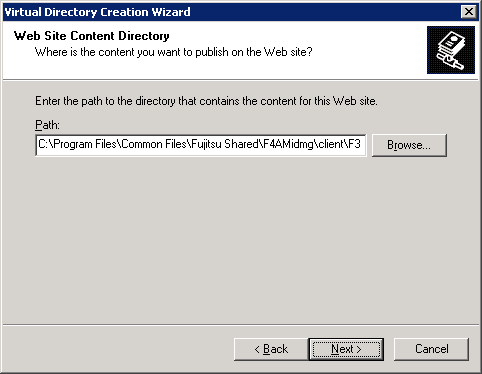
Start the Virtual Directory Creation Wizard by selecting New and then Virtual Directory from the pop-up menu.

Specify "SystemwalkerSSO" as the virtual directory alias.

Specify the directory containing the Systemwalker Single Sign-On Agent program in the Web Site Content Directory window. In the following example, "%F4AM_INSTALL_PATH%\F4AMidmg\client\F3FMsso\ssoatzag\lib" is specified as the path.
Select Read and Execute (such as ISAPI applications or CGI) as the access permissions for the virtual directory.

Click Next to close the Virtual Directory Creation Wizard.
Add the Systemwalker Single Sign-On Agent file to the Web service extensions.
Select Web Service Extension and then select Add a new Web service extension from the pop-up menu.
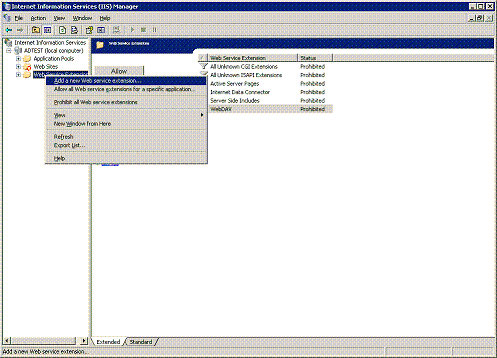
Specify the extension name.
In the following example, "SystemwalkerSSO" is specified as the extension name.
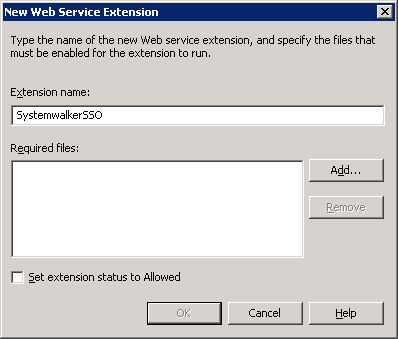
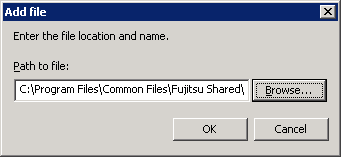
Specify the absolute path to the Systemwalker Single Sign-On Agent program in the Add file window that is displayed by clicking the Add button.
In the following example, "%F4AM_INSTALL_PATH%\F4AMidmg\client\F3FMsso\ssoatzag\lib\F3FMssoatziis.dll" is specified as the path.
Click the OK button after specifying these settings.
Select the Set extension status to Allowed check box.

Select Application Pools.
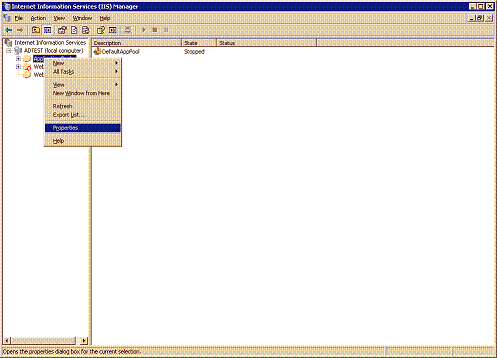
Open the Properties sheet by selecting Properties from the pop-up menu. Select the Recycling tab, and then deselect all of the check boxes.
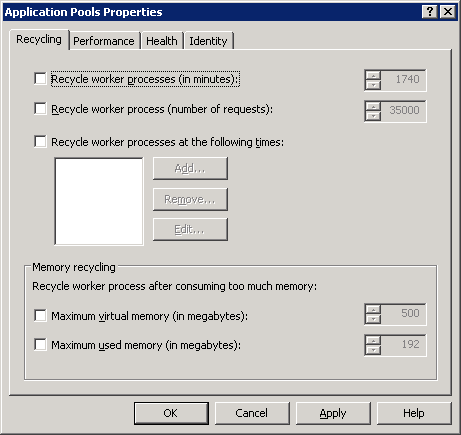
Click the Performance tab in the Application Pools Properties window, and set the value of the Maximum number of worker processes field in the Web garden frame to "1".
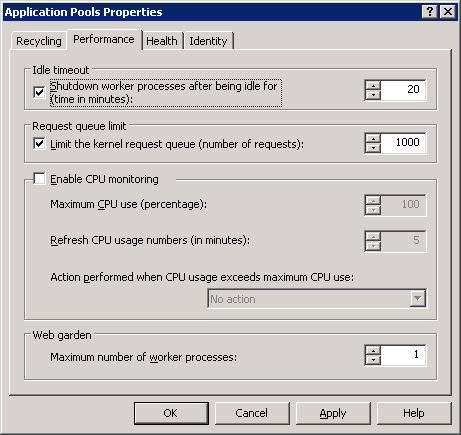
Select the Identity tab, and then specify either "Network Service" or "Local System" for the Application pool identity. In the following example, "Network Service" is selected. Click the OK button after specifying these settings.

Specify access permissions so that the selected security account has full control for the following folder.
%F4AM_INSATLL_PATH\F4AMidmg\client\conf\SSLENV |
If an x86 version of a Systemwalker product has been installed on the following operating systems, execute the cscript command to import the 32-bit ISAPI filter.
[Operating systems]
Windows Server 2003 STD x64 Edition
Windows Server 2003 DTC x64 Edition
Windows Server 2003 EE x64 Edition
[Command to execute]
cscript %SystemDrive%\inetpub\AdminScripts\adsutil.vbs set w3svc/AppPools/Enable32bitAppOnWin64 1 |
Start World Wide Web Publishing Services when the above tasks have been completed.
From the Start menu, select Programs >> Administrative Tools >> Services. Select World Wide Web Publishing Service, and then select Start from the Action menu.

Use the following procedure to include the Systemwalker Single Sign-On Agent.
Open the Services dialog box by selecting Programs, Administrative Tools and then Services from the Start menu, and check whether the World Wide Web Publishing Service is running.
If World Wide Web Publishing Service is already running, select the World Wide Web Publishing Service, and then select Stop from the Action menu.
Start the Server Manager window by selecting Programs >> Administrative Tools >> Server Manager from the Start menu, and then select Roles >> Web Server (IIS). Check whether the following role services have been installed on the Web server, and install them if they have not been installed yet.
ISAPI Extensions
ISAPI Filters

Select Administrative Tools and then Internet Information Service (IIS) Manager from the Start menu.
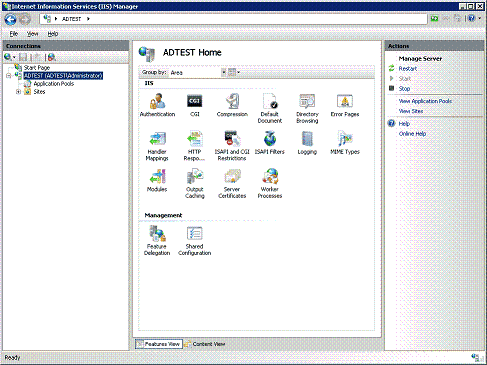
Select the host name and then double-click on ISAPI and CGI Restrictions in the Features View.
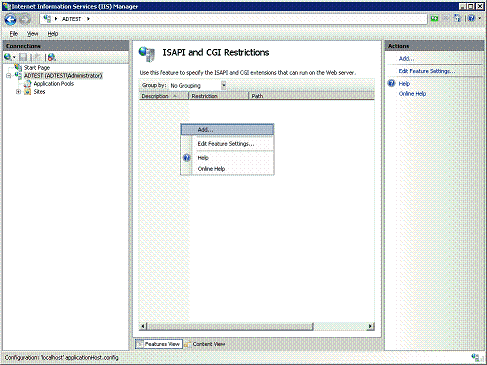
Add a restriction to the list of ISAPI and CGI Restrictions. Right-click on the list in the ISAPI and CGI Restrictions window and then select Add from the pop-up menu.
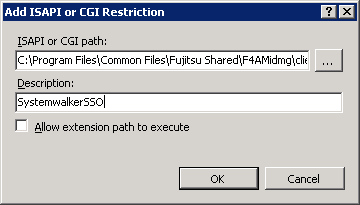
Specify the absolute path to the Systemwalker Single Sign-On Agent program in the ISAPI or CGI path field, and enter a description in the Description field.
Click the OK button after specifying these settings.
In the following example, "%F4AM_INSTALL_PATH%\F4AMidmg\client\F3FMsso\ssoatzag\lib\F3FMssoatziis.dll" is set in the ISAPI or CGI path field, and "SystemwalkerSSO" is set in the Description field.
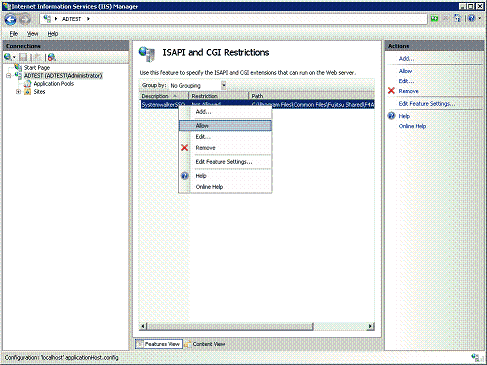
Change the settings to allow the added ISAPI, as shown below.
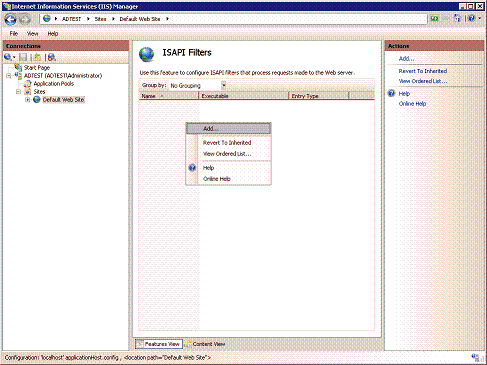
Select the site where the Systemwalker Single Sign-On Agent is to be included, and then double-click on ISAPI Filters in the Features View.
Add an ISAPI filter. Right-click on the list in the ISAPI Filters window and then select Add from the pop-up menu.
In the following example, the Systemwalker Single Sign-On Agent will be included in a site called "Default Web Site".
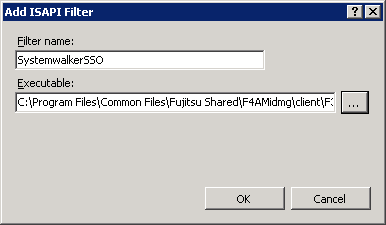
Specify the absolute path to the Systemwalker Single Sign-On Agent program in the Add ISAPI Filter window.
In the following example, "SystemwalkerSSO" is specified as the filter name, and "%F4AM_INSTALL_PATH%\F4AMidmg\client\F3FMsso\ssoatzag\lib\F3FMssoatziis.dll" is specified as the executable file.
Click the OK button after specifying these settings.
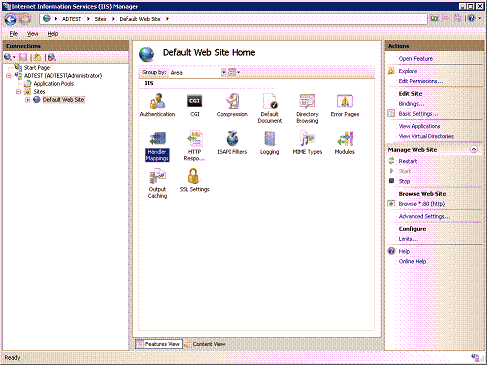
Select the site where the Systemwalker Single Sign-On Agent is to be included, and then double-click on Handler Mappings in the Features View.
Add a module mapping. Right-click on the list in the Handler Mappings window and then select Add Module Mapping from the pop-up menu.
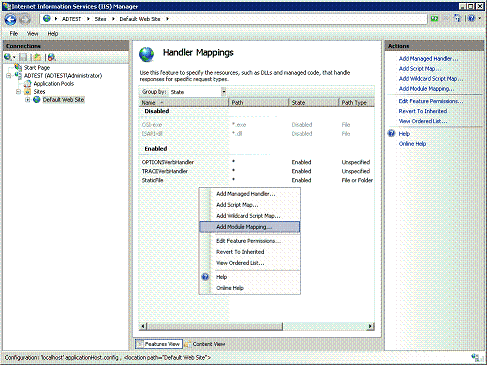
Specify "F3FMssoatziis.dll" in the Request path field, "IsapiModule" in the Module field, and the absolute path to the Systemwalker Single Sign-On Agent program in the Executable (optional) field.
In the following example, "%F4AM_INSTALL_PATH%\F4AMidmg\client\F3FMsso\ssoatzag\lib\F3FMssoatziis.dll" is set in the Executable field, and "SystemwalkerSSO" is set in the Name field.
Click the OK button after specifying these settings.

After the OK button is clicked, the Add Module Mapping dialog box is displayed.
Select the Yes button.
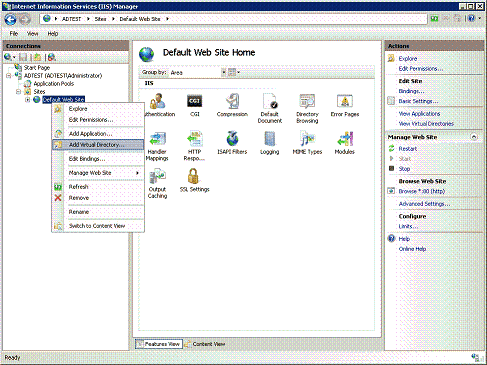
Select the Web site where the Systemwalker Single Sign-On Agent is to be included.
Right-click on the Default Web Site folder in the Connections tree of the Internet Information Services (IIS) Manager window, and then select Add Virtual Directory from the pop-up menu.
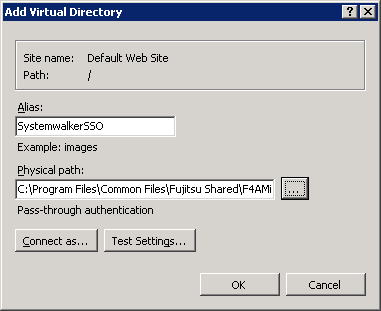
Specify "SystemwalkerSSO" as the alias for the virtual directory in the Alias field, and specify the absolute path to the Systemwalker Single Sign-On Agent program in the Physical path field. In the following example, "%F4AM_INSTALL_PATH%\F4AMidmg\client\F3FMsso\ssoatzag\lib" is specified as the physical path. Click the OK button after specifying these settings.
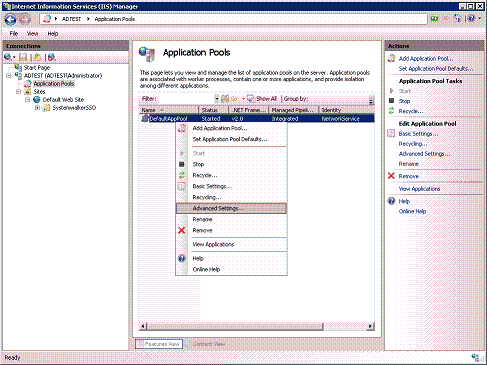
Select Application Pools in the Connections tree and then right-click on the application pool to be used and select Advanced Settings from the pop-up menu.
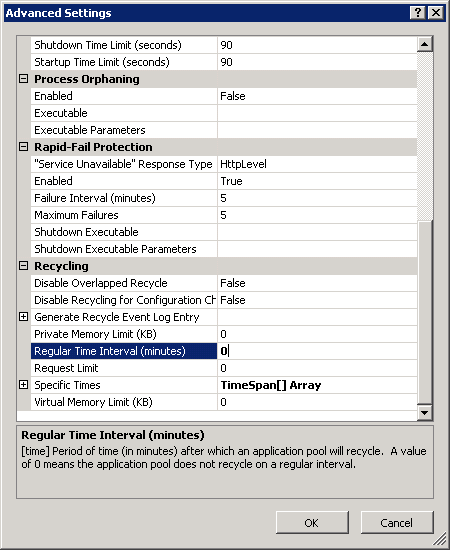
In the Advanced Settings window, set Idle Time-out under Process Model to "0", Maximum Worker Processes under Process Model to "1", Identity to "NetworkService" or "LocalSystem", and Regular Time Interval (minutes) under Recycling to "0", then click the OK button.
Use the security account selected using Identity under Process Model to set up access permissions so that the following folder can be accessed using full control.
%F4AM_INSATLL_PATH\F4AMidmg\client\conf\SSLENV |
If an x86 version of a Systemwalker product has been installed on the following operating systems, set Enable 32-Bit Applications under General to "True".
[Operating systems]
Windows Server 2008 Server Core x64 Edition
Windows Server 2008 STD x64 Edition
Windows Server 2008 DTC x64 Edition
Windows Server 2008 EE x64 Edition
Windows Server 2008 Foundation
Windows Server 2008 R2 x64 Edition
Start Microsoft(R) Internet Information Services after the above tasks have been completed.
From the Start menu, select Programs >> Administrative Tools >> Services. Select World Wide Web Publishing Service, and then select Start from the Action menu.
Use the following procedure to set up the Systemwalker Single Sign-On Agent.
Start the Interstage Management Console.
Refer to "How to start the Interstage Management Console" for details on how to start the Interstage Management Console.
In the Interstage Management Console window, select System >> Security >> Single Sign-on >> Business system, and then click the Addition of Business server tab.
Specify each item as below, and then click the Next button.
File Settings
Business system setup file
Specify the business system setup file that was downloaded and copied when the environment for the authentication server was created.
Password of file
Specify the password that was specified when the business system setup file was downloaded.
Specify each item as below, and then click the Add button.
General Settings
Business system Name
Specify an arbitrary name for the business system. Be sure to specify this item.
The name of the business system can be specified using between 1 and 32 bytes of the following characters:
Alphanumeric characters
Symbols (- _ ( ) [ ])
The default value is "Businessnnn" (where nnn is a number).
Web Server used
Select Others (Excluding Interstage HTTP Server), and then specify the port number used by the Microsoft(R) Internet Information Service.
When updating Access Control Information?
Select Execute when Business server is started.
In the Interstage Management Console window, select System >> Security >> Single Sign-on >> Business system >> <Business system name>, and then click the Settings tab.
<Business system name> is the business system name that was specified in step 4.
Click the Show link for Detailed Settings.
Select Yes for Notify User Information? and then click the Update button.
Include the business server by referring to either "When Microsoft(R) Internet Information Service 6.0 is used" or "When Microsoft(R) Internet Information Service 7.0 is used".
Here, replace the "%F4AM_INSTALL_PATH%\F4AMidmg\client" part of the path to the files and directories specified in each step with the Interstage installation directory.
However, do not make this replacement for the following folder:
%F4AM_INSATLL_PATH%\F4AMidmg\client\conf\SSLENV
When Apache 2.0.x is used
Note
To use Apache 2.0.x, download the source program published by Apache Software Foundation, and use an Apache Web server that has been built by specifying the following "configure" option:
#./configure --prefix=<Installation directory>
# make
# make install |
The setup procedure varies depending on whether the Systemwalker product is located on the same server as the Systemwalker Single Sign-On Server or Interstage Application Server.
Use the following procedure to set up the Systemwalker Single Sign-On Agent.
Specify environment settings using the following command on the servers where the Web consoles for the Systemwalker products are installed.
Specify the business system setup file that was downloaded and copied when the environment for the authentication server for the Systemwalker Single Sign-On Server was created.
swidmg_set_ssoagent SET -f <business system setup file> -p <password> [-f <business system setup file> -p <password>...] |
[Command location]
OS | Installation directory |
|---|---|
Windows | %F4AM_INSTALL_PATH%\F4AMidmg\client |
UNIX | /opt/FJSVswaic/client |
Refer to the "swidmg_set_ssoagent (Systemwalker Single Sign-On Agent Setup Command)" for details on the swidmg_set_ssoagent command.
Add the following entry to "httpd.conf".
[Windows]
LoadModule ssoatzihs_module "%F4AM_INSTALL_PATH%\F4AMidmg\client\F3FMsso\ssoatzag\lib\F3FMssoatzihs.dll" |
[UNIX]
LoadModule ssoatzihs_module "/opt/FJSVssoaz/lib/ssoatzihs.so" |
The "system name" is displayed in the execution results for the swidmg_set_ssoagent command, which was executed in step 1. Check the protected paths for the products that use Apache, and also check the system names.
The protected paths for each Systemwalker product are as follows:
Product name | Protected path |
|---|---|
Systemwalker Centric Manager | /Systemwalker/ |
Systemwalker Service Quality Coordinator | /SSQC/ |
Example:
When Apache is used as the Web server for the Web console for Systemwalker Centric Manager and the execution result of the swidmg_set_ssoagent command is as follows:
//////////////////////////////////////////////////////////////
The following systems were registered.
[Setting-1]
System Name: Systemwalker001
Protected paths: /Systemwalker/
[Windows]
Add the following entry to "httpd.conf".
LoadModule ssoatzihs_module "%F4AM_INSTALL_PATH%\F4AMidmg\client\F3FMsso\ssoatzag\lib\F3FMssoatzihs.dll" |
[UNIX]
Add the following entry to "httpd.conf".
LoadModule ssoatzihs_module "/opt/FJSVssoaz/lib/ssoatzihs.so" |
Restart the Web server.
Note
For Linux server
If the Systemwalker product is located on the same server as the Systemwalker Single Sign-On Server or Interstage Application Server, set up the Systemwalker Single Sign-On Agent by referencing "If the Systemwalker product is not located on the same server" after execute the following procedure:
Log in as superuser.
Copy the swidmg_set_ssoagent command (Systemwalker Single Sign-On Agent setup command) using the following command:
cp /opt/FJSVswaic/client/setup/pkg/swidmg_set_ssoagent /opt/FJSVswaic/client/ |
Set up execution permissions for the swidmg_set_ssoagent command (Systemwalker Single Sign-On Agent setup command) using the following command:
chmod u+x /opt/FJSVswaic/client/swidmg_set_ssoagent |
Use the following procedure to set up the Systemwalker Single Sign-On Agent.
Start the Interstage Management Console.
Refer to "How to start the Interstage Management Console" for details on how to start the Interstage Management Console.
In the Interstage Management Console window, select System >> Security >> Single Sign-on >> Business system, and then click the Addition of Business server tab.
Specify each item as below, and then click the Next button.
File Settings
Business system setup file
Specify the business system setup file that was downloaded and copied when the environment for the authentication server was created.
Password of file
Specify the password that was specified when the business system setup file was downloaded.
Specify each item as below, and then click the Add button.
General Settings
Business system Name
Specify an arbitrary name for the business system. Be sure to specify this item.
The name of the business system can be specified using between 1 and 32 bytes of the following characters:
Alphanumeric characters
Symbols (- _ ( ) [ ])
The default value is "Businessnnn" (where nnn is a number).
Web Server used
Select Others (Excluding Interstage HTTP Server), and then specify the port number used by the Web server for the Systemwalker products.
When updating Access Control Information?
Select Execute when Business server is started.
In the Interstage Management Console window, select System >> Security >> Single Sign-on >> Business system >> <Business system name>, and then click the Settings tab.
<Business system name> is the business system name that was specified in step 4.
Click the Show link for Detailed Settings.
Select Yes for Notify User Information? and then click the Update button.
Add the following entry to "httpd.conf".
For "system name", specify the business system name that was specified in step 4.
[Windows]
LoadModule ssoatzihs_module "Interstage<Interstage installation directory>\F3FMsso\ssoatzag\lib\F3FMssoatzihs.dll" |
[UNIX]
LoadModule ssoatzihs_module "/opt/FJSVssoaz/lib/ssoatzihs.so" |
Restart the Web server.