You can create a virtual disk in the virtual storage pool as follows:
When a virtual disk is created, the VTOC of the physical disks that configure the virtual disk must be initialized.
Create a virtual disk automatically, or
Create a virtual disk while checking the physical disks that configure the virtual disk, or
Select (manually) the physical disks that configure the virtual disk.
Note
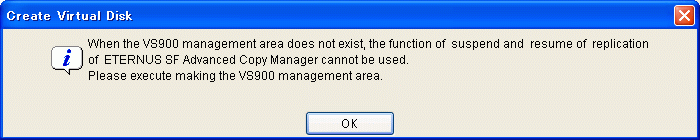
If there is no VS900 management area, the replication suspend/resume function of ETERNUS SF AdvancedCopy Manager cannot be used.
Before creating a virtual disk, check the "VS900 Management Area (Create)" dialog box and confirm that a VS900 management area has been allocated.
If there is no VS900 management area, the following confirmation dialog box appears.
For details of VS900 management areas, refer to "5.1.9 VS900 management area".
A virtual disk can be created automatically based on the status information you have entered as described below.
Start up the "Create Virtual Disk" dialog box as follows:
Select the virtual storage pool to create a virtual disk from the Composition Data tree area and click the <Create Virtual Disk> button, or
Select the virtual storage pool to create a virtual disk and then [Operations] - [Virtual Disk] - [Create], or
Right-click on the virtual storage pool to create a virtual disk and select [Create Virtual Disk].
The "Create Virtual Disk" dialog box then appears.
Enter the status information necessary to create a virtual disk.
Enter a string consisting of 1 to 32 alphanumeric characters.
However, if 2 or a greater number is entered for the quantity, no virtual disk name needs to be specified. In this instance, the name of the virtual disk created automatically will be "virtual storage pool name + V + an additional number".
Enter the capacity (numeric value) of the virtual disk you want to create.
Select the unit from the [MB] (default)/[GB] pull-down menu.
Specify a number ranging from 1 to 4096 as the number of virtual disks to be created.
However, if 2 or a greater number is entered for the quantity, no virtual disk name needs to be specified.
Select the RAID level of the physical disk that constitutes the virtual disk from the pull-down menu.
The pull-down menu lists [No specification](default)/[1+0], [1], [5], [6] and [0] but the RAID levels that cannot be selected for the physical disks are not displayed.
When multiple physical disks constitute the virtual disk, use the physical disks in the same storage or select from the pull-down menu.
Only the storage devices registered in the virtual storage pool are displayed in [Storage name].
The pull-down menu lists [No specification] (default)/[Storage name] but the storage names that cannot be selected for the physical disks are not displayed.
Select the encryption attribute of a physical disk that configures the virtual disk from the pull-down menu.
The pull-down menu lists [Encryption] and [Non-encryption] but the encryption attribute that cannot be selected for the physical disk is not displayed.
Use the pull-down menu to select the "disk type" for the physical disks that make up the virtual disk.
The pull-down menu includes "Online" and "Nearline" disk types, but only the options that can be selected for that particular physical disk will be displayed.
Click the <Automatic creation> button.
After a virtual disk is created, the "Create Virtual Disk" message dialog box shows the results. Click the <Close> button.
Check the "View and Create" window, then confirm that the virtual disk was created.
All virtual disks are now successfully created.
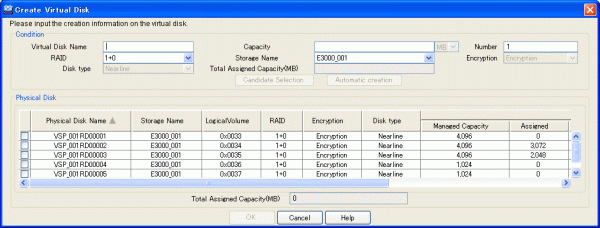
The user can create a virtual disk while checking information of the physical disk selected automatically based on the status information entered as described below.
Start up the "Create Virtual Disk" dialog box as follows:
Select the virtual storage pool to create a virtual disk from the Composition Data tree area and click the <Create Virtual Disk> button, or
Select the virtual storage pool to create a virtual disk and then [Operations] - [Virtual Disk] - [Create], or
Right-click on the virtual storage pool to create a virtual disk and select [Create Virtual Disk].
The "Create Virtual Disk" dialog box then appears.
Enter the following status information necessary for creating a virtual disk.
Enter a string consisting of 1 to 32 alphanumeric characters.
Enter the capacity (numeric value) of the virtual disk you want to create.
Select the unit from the [MB] (default)/[GB] pull-down menu.
Enter the number of virtual disks to be created. "Candidate Selection" is fixed to 1.
Select the RAID level of the physical disk that constitutes the virtual disk from the pull-down menu.
The pull-down menu lists [No specification](default)/ [1+0], [1], [5], [6] and [0] but the RAID levels that cannot be selected for the physical disks are not displayed.
When multiple physical disks constitute the virtual disk, use the physical disks in the same storage or select from the pull-down menu.
Only the storage devices registered in the virtual storage pool are displayed in [Storage name].
The pull-down menu lists [No specification] (default)/[Storage name] but the storage names that cannot be selected for the physical disks are not displayed. Only the storage devices registered in the virtual storage pool are displayed in [Storage name].
Select the encryption attribute of a physical disk that configures the virtual disk from the pull-down menu. Select the encryption attribute of a physical disk that configures the virtual disk from the pull-down menu.
The pull-down menu lists [Encryption] and [Non-encryption] but an encryption attribute that cannot be selected for the physical disk is not displayed.
Use the pull-down menu to select the "disk type" for the physical disks that make up the virtual disk.
The pull-down menu includes "Online" and "Nearline" disk types, but only the options that can be selected for that particular physical disk are displayed.
Click the <Candidate Selection> button.
The "Create Virtual Disk" dialog shows the automatically selected physical disks with their checkboxes checked.
Click the <OK> button.
Remove the check mark from the automatically selected physical disk.
Select and check the physical disk you want to constitute the virtual disk.
Click the <OK> button.
Click the <Assigned Capacity> button for the physical disk whose quota capacity you want to change.
The "Assigned Capacity" dialog box then appears.
Enter the changed quota capacity.
Enter the capacity you want to assign from the physical disk selected to the virtual disk in [MB].
1. Click the <OK> button in the "Assigned Capacity" dialog box.
2. Click the <OK> button in the "Create Virtual Disk" dialog box.
After a virtual disk is created, the "Create Virtual Disk" message dialog box shows the results. Click the <Close> button.
Check the "View and Create" window, then confirm that the virtual disk was created
All virtual disks are now successfully created.
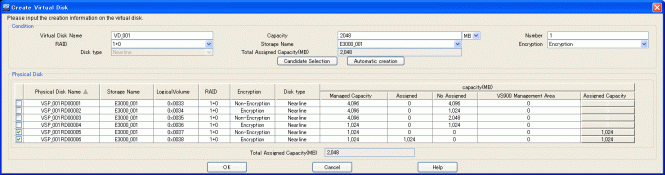
The user selects and creates all physical disks to constitute a virtual disk as described below.
Note
The number of virtual disks that can be created from the physical disks selected by the user is fixed at 1.
Start up the "Create Virtual Disk" dialog box as follows:
Select the virtual storage pool to create a virtual disk from the Composition Data tree area and click the <Create Virtual Disk> button, or
Select the virtual storage pool to create a virtual disk and then [Operations] - [Virtual Disk] - [Create], or
Right-click on the virtual storage pool to create a virtual disk and select [Create Virtual Disk].
The "Create Virtual Disk" dialog box then appears.
Enter the following status information necessary for creating a virtual disk.
Enter a string consisting of 1 to 32 alphanumeric characters.
Enter the number of virtual disks to be created. In this case, it is always 1.
Select and check the physical disk in which you want to constitute the virtual disk.
Click the <Assigned Capacity> button for the physical disk selected.
The "Assigned Capacity" dialog box then appears.
Enter the capacity assigned to the virtual disk.

Enter the capacity assigned from the physical disk selected to the virtual disk in [MB]. Note that checking the physical disk sets non-assigned capacity as the quota capacity. Removing the check mark from the physical disk sets the quota capacity to 0.
Click the <OK> button in the "Assigned Capacity" dialog box.
Click the <OK> button in the "Create Virtual Disk" dialog box.
After a virtual disk is created, the "Create Virtual Disk" message dialog box shows the results. Click the <Close> button.
Check the "View and Create" window and confirm that the virtual disk was created.
All virtual disks are now successfully created.