You can register physical disks in the virtual storage pool in any of the following ranges:
Register all physical disks under a given storage.
Register physical disks in the range of AffinityGroup (Zoning).
Register individual physical disks.
Note
If the disk configuration has been modified, the physical disk information may be different.
Before registering physical disks, look at the disk device information in the window used for relationship management and confirm that the latest device information is displayed.
The following confirmation dialog box opens when [Register Physical Disk] is selected.

To hide this message, select the appropriate check box and click the <OK> button.
Information
The user cannot assign a name to a physical disk. A name is automatically assigned to a physical disk when it is registered.
Start up the "Register Physical Disk" dialog box as follows:
Select the virtual storage pool to register physical disks from the Composition Data tree area and click the <Register Physical Disk> button, or
Select the virtual storage pool to register physical disks and then [Operations] - [Physical Disk] - [Register], or
Right-click on the virtual storage pool to register physical disks and select [Register Physical Disk].
The "Register Physical Disk" dialog box then appears.
Select a prefix for the physical disk name. The created physical disk name is as follows:
If you select "From the virtual storage pool name", the physical disk name will be virtual-storage-pool-name + R + additional-number.
If you select "From the storage name", the physical disk name will be storage-name + R + additional-number.
If you select "Other", the physical disk name will be entered-characters (any string consisting of 1 to 26 single-byte alphanumeric characters) + R + additional-number.
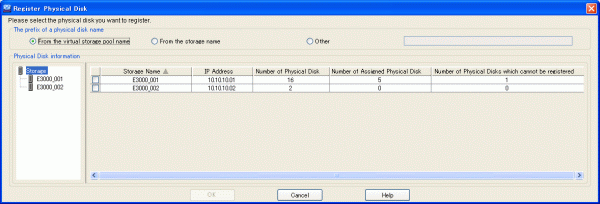
The physical disk selection table lists the names of storage.

The information displayed is as follows:
Name of the disk device where physical disks are located
IP address for the disk device name
The number of physical disks that can be registered + number of physical disks registered + number of physical disks that cannot be registered
Number of physical disks registered for the virtual storage pool
Number of physical disks that cannot be registered for the virtual storage pool (displayed only when there are physical disks that cannot be registered for the storage device)
Select a storage name (or storage names) from the table and click the <OK> button. You cannot select a storage name if none of the physical disks in the storage device can be registered.
After the physical disks are registered, the "Register Physical Disk" message dialog box shows the results. Confirm that the physical disks have been successfully registered, then click the <Close> button.
Check the "View and Create" window and confirm that the physical disks are registered in the virtual storage pool.
All physical disks under the storage are now successfully registered in the virtual storage pool.
Start up the "Register Physical Disk" dialog box as follows:
Select the virtual storage pool to register physical disks from the Composition Data tree area and click the <Register Physical Disk> button, or
Select the virtual storage pool to register physical disks and then [Operations] - [Physical Disk] - [Register], or
Right-click on the virtual storage pool to register physical disks and select [Register Physical Disk].
The "Register Physical Disk" dialog box then appears.
Select a prefix for the physical disk name. The created physical disk name is as follows:
If you select "From the virtual storage pool name", the physical disk name will be virtual-storage-pool-name + R + additional-number.
If you select "From the storage name", the physical disk name will be storage-name + R + additional-number.
If you select "Other", the physical disk name will be entered-characters (any string consisting of 1 to 26 single-byte alphanumeric characters) + R + additional-number.
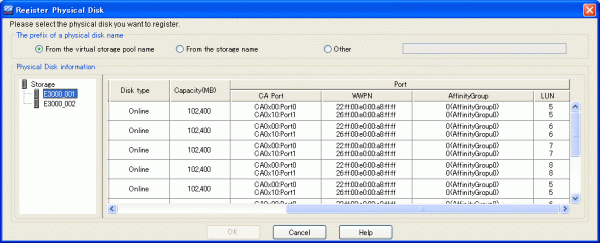
Select a storage name from the physical disk composition data tree area.
The physical disk selection table lists the physical disks set for said storage. Sort the physical disks by AffinityGroup. Select all physical disks of AffinityGroup and click the <OK> button.

After the physical disks are registered, the "Register Physical Disk" message dialog box shows the results. Click the <Close> button.
Check the "View and Create" window, then confirm that the physical disks are registered in the virtual storage pool.
All physical disks in the range of AffinityGroup (Zoning) are now successfully registered in the virtual storage pool.
Start up the "Register Physical Disk" dialog box as follows:
Select the virtual storage pool to register physical disks from the Composition Data tree area and click the <Register Physical Disk> button, or
Select the virtual storage pool to register physical disks and then [Operations] - [Physical Disk] - [Register], or
Right-click on the virtual storage pool to register physical disks and select [Register Physical Disk].
The "Register Physical Disk" dialog box then appears.
Select a prefix for the physical disk name. The created physical disk name is as follows:
If you select "From the virtual storage pool name", the physical disk name will be virtual-storage-pool-name + R + additional-number.
If you select "From the storage name", the physical disk name will be storage-name + R + additional-number.
If you select "Other", the physical disk name will be entered-characters (any string consisting of 1 to 26 single-byte alphanumeric characters) + R + additional-number.
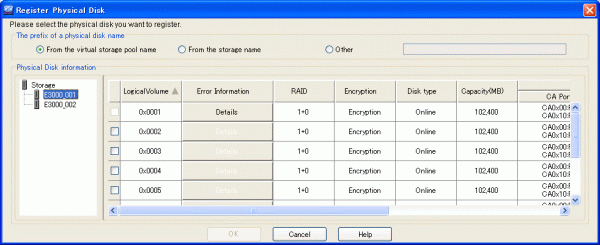
Select a storage name from the physical disk composition data tree area.
The physical disk selection table lists the physical disks set for said storage.

You cannot select physical disks that cannot be registered. Click on the <Details Information> button and check the message ID displayed in the error details information dialog box to identify why the disk cannot be registered. For details, refer to "Appendix E Error Messages".

Select a physical disk (or physical disks) and click the <OK> button.
After the physical disks are registered, the "Register Physical Disk" message dialog box shows the results. Click the <Close> button.
Check the "View and Create" window, then confirm that the physical disks are registered in the virtual storage pool.
All physical disks are now successfully registered in the virtual storage pool.