Create the necessary virtual storage pool for storing resources and creating a virtual disk as described below.
Start up the "Create Virtual Storage Pool" dialog box as follows:
Select "Virtual Storage Pool" in the Composition Data tree area and click the <Create Virtual Storage Pool> button, or
Select "Virtual Storage Pool" in the Composition Data tree area and then [Operations] - [Virtual Storage Pool] - [Create], or
Right-click on "Virtual Storage Pool" in the Composition Data tree area and select [Create Virtual Storage Pool].
The "Create Virtual Storage Pool" dialog box then appears.
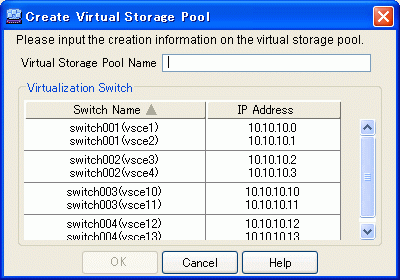
Enter the following information on the "Create Virtual Storage Pool" dialog box:
Enter a string consisting of 1 to 26 alphanumeric characters.
The dialog box shows each pair of virtualization switches in a redundant configuration as a virtualization switch group. Select the virtualization switch group that you want to associate with the virtual storage pool. Physical disks under the virtualization switch group selected are recognized as physical disks that can be registered in the virtual storage pool.
You can only select one virtualization switch group.
For the VS900 Model 300 and Virtualization Blade, switch device names are displayed as "virtualization switch name (host name)".
Click the <OK> button.
After a virtual storage pool is created, the "Create Virtual Storage Pool" message dialog box shows the results. Click the <Close> button.
Check the "View and Create" window and confirm that the virtual storage pool was created.
A virtual storage pool is now successfully created.