
| ETERNUS SF Storage Cruiser Install Guide 13.2 - Solaris (TM) Operating System / Linux / Microsoft(R) Windows(R) - |
|
Contents
|
This appendix explains the Manager and the Client.
The explanation does not refer to the Agent (because the SSC Agent can be managed by the ESC Manager).
The explanation applies to the upgrade of any version of SSC to ESC.
After the upgrade to ESC, the Manager retains the pre-upgrade registration device information. You can, therefore, continue to use the administrative devices, such as the server (SSC Agent) or storage devices, with the ESC Manager after the upgrade. It is not necessary to re-register them.
Note, however, that the range of supported devices will be as follows after the upgrade:
- Server (SSC Agent): a range of SSC supported devices/platforms
- Non-server: a range of ESC supported devices
Of the SSC Client settings, only the maximum memory usage setting can be upgraded (RAID group integration mode, maximum memory usage, application element information etc.). The rest of settings must be reset after installing the ESC Client.
For the functional differences, refer to Chapter 1.5 "Function comparison of ESC and SSC" in the ETERNUS SF Storage Cruiser Users Guide. Differences in the operation design from SSC are explained as follows:
Supported OS
The ESC Manager supports operation in the Windows 2003, Windows 2000, Solaris 8, 9, or 10 or RHEL5 environments only. It does not support operation in the Solaris 2.6/7 environment.
The ESC Client supports operation in the Windows 2003, Windows 2000, or Windows XP or Windows Vista environments only. It does not support operation in the Windows NT environment.
Supported cluster software
The ESC Manager does not support operation in the SafeCLUSTER environment.
Network requirements
Communication between the Manager and the Client will change as described in the following table. You must review the network settings, such as that of the firewall, as required.
|
Product |
Port/Protocol |
Direction of communication |
|---|---|---|
|
SSC |
Invariant/tcp |
Both directions |
|
ESC |
23456/tcp |
From the Client to the Manager |
Systemwalker Centric Manager link function
The link function does not support linkage to Centric Manager versions earlier than V11.
To use the link function to Centric Manager, you must reset the administrative client after the upgrade to ESC. Refer to D.3.11 Resetting Systemwalker Centric Manager Link Function After Upgrade for details. When ESC is called from the node popup menu of the Centric Manager administrative client, the ESC user authentication cannot be omitted.
The upgrade tool is stored in the following directory on the CD-ROM "ETERNUS SF Storage Cruiser 13.2 No.1"supplied with this product.
|
Directory location CD-ROM drive name\manager\upgrade directory + upgrade.exe |
The following directory files will be extracted by executing upgrade.exe (self-extract format) on a Windows operating system:
|
upgrade directory + solupgrade.tar (upgrade tool for Solaris) + winupgrade.exe (upgrade tool for Windows) |
Copy the upgrade tool applicable to the platform in use to the work directory of the server for upgrade (where the SSC Manager is installed). Delete it after the upgrade is complete.
The process for upgrading from SSC to ESC and the estimated time required for each task is as follows. For the detailed procedure for each step, refer to the referenced section.
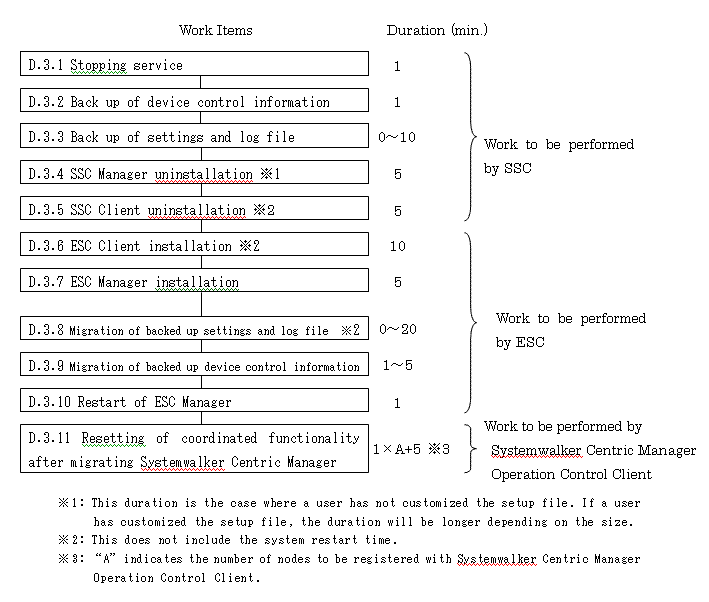

Before upgrading, be sure to backup the system beforehand and be prepared for recovery in the event of failure.
If upgrading with the Windows Manager, log on as an Administrator. If upgrading with the Solaris Manager, log on at the root (supervisor). To copy files using the cp (copy) command, be sure to specify the -p (retain) option with the command. To copy directory by directory, specify the -R (recursion) option with the command.
The following services will be stopped.
- Softek StorageCruiser CIMOM
- SystemWalker MpWksttr
However, if other software uses the SystemWalker MpWksttr service, stop the Softek StorageCruiser CIMOM service only.
You must stop the Daemon of the SSC Manager by referring to "6.1.1 Unsetup" of the "Softek Storage Cruiser Installation Guide".
For a cluster environment, refer to "4.3 Stopping a Daemon" of the "Softek Storage Cruiser Operator's Guide for cluster environment" to stop the Daemon of the SSC Manager.
The device management information of the SSC Manager must be saved.
In the place of "save destination" referred to in the following procedure, specify a directory in which the information will be saved.
Copy the upgrade tool, winupgrade.exe, to the work directory (for more information, refer to "D.2 FILES SUPPLIED"). The work directory is referred to as "D:\tmp\upgrade" in the following steps.
Execute the winupgrade.exe file in the work directory.
The following files will be extracted:
D:\tmp\upgrade
- cimbackup.bat
- cimrestore.bat
- sscreg.exe
- dbkit.jar
- perfkit.jar
Start the command prompt, and move to the work directory.
|
C:\Document and Settings\Administrator> D: D:\> cd D:\tmp\upgrade D:\tmp\upgrade> |
Execute cimbackup.bat at the command prompt.
|
D:\tmp\upgrade> cimbackup [/all]save destination |
When executed without specifying /all option, a performance information CSV file will not be backed up. When migrating performance information that has already been acquired, specify the /all option. When the /all option is specified, execution of the command may take longer, as it depends on the size of the performance information CSV file.
When the command is executed successfully, the following message will be displayed on the last line.
|
INFO: cimbackup has been completed. |
For the cluster environment, mount the shared disk for the administrative server shared data.
Copy the upgrade tool, solupgrade.exe, to the work directory (for more information, refer to "D.2 FILES SUPPLIED"). The work directory is referred to as "/tmp/upgrade" in the following explanation.
Move to the work directory, and extract solupgrade.tar.
|
# cd /tmp/upgrade # tar xvf solupgrade.tar |
The following files will be extracted.
/tmp/upgrade
- cimbackup.sh
- cimrestore.sh
- dbkit.jar
- perfkit.jarExecute cimbackup.sh.
|
# ./cimbackup.sh [-all] save destination |
When executed without specifying -all option, a performance information CSV file will not be backed up. When migrating performance information that has already been acquired, specify the -all option. When the -all option is specified, execution of the command may take longer, as it depends on the size of the performance information CSV file.
When the command is executed successfully, the following message will be displayed on the last line.
|
INFO: cimbackup has been completed. |
If the cimbackup command is executed without stopping the Daemon/service of the SSC Manager, the following message is output and execution of the cimbackup command is terminated.
Solaris
WARNING: Unable to backup, while the FJSVssmgr is running.
Windows
WARNING: Unable to backup, while the Softek StorageCruiser CIMOM is running.
If the save-destination directory is not specified in the cimbackup command, the following message is output and execution of the cimbackup command is terminated.
Solaris
Usage: cimbackup.sh save-directory
Windows
Usage: cimbackup.bat save-directory
If the directory specified in the cimbackup command does not exist, the following message is output and execution of the cimbackup command is terminated.
ERROR: The specified directory [directory-name] is not found.
If Softek Storage Cruiser has not been installed, the following message is output and execution of the cimbackup command is terminated.
WARNING: The old package is not installed.
If the cimbackup command cannot create the directory, the following message is output and execution of the cimbackup command is terminated.
ERROR: Unable to copy file-name to directory-name
If the file to copy from cannot be found with the cimbackup command, the following message is output and execution of the cimbackup command is terminated.
ERROR: Unable to find file-name
If the directory specified in the cimbackup command already contains a backup created using the same command, the following message is output and execution of the cimbackup command is terminated.
WARNING: The backup files are found in directory-name
You must save the following files on the SSC Manager client.
The default location for the SSC Manager program directory, environment setup directory, and work directory referred to in the following explanation is:
C:\Program Files\Softek_StorageCruiser
Setup files
The following files must be saved. It is not necessary to save other files if no changes have been made since installing SSC.
SSC-manager-environment-setup-directory\Manager\etc\san\engine
- bcm.conf
- sanma.conf
- ssmgr.conf
SSC-manager-program-directory\Manager\bin
- manager.ini
bat files
You must save the following files, unless they have not been changed since installing SSC. You must also save the files related to the processing of the current batch.
SSC-manager-environment-setup-directory\Manager\etc\san\engine
- trapop.bat
Error monitor XML files
If the user has customized any of the error monitor XML files, you must save those files in the following directory. It is not necessary to save files to which this does not apply.
SSC-manager-environment-setup-directory\Manager\etc\san\engine\snmpth
Device polling setting XML files
If the user has customized any of the device polling setting XML files, you must save those files in the following directory. It is not necessary to save files to which this does not apply.
SSC-manager-environment-setup-directory\Manager\etc\san\engine\devicepolling
Event log files
You must save the following event log file.
SSC manager work directory\Manager\var\san\engine
- systemevent.csv
In the place of "save destination", referred to in the following procedure, specify a directory in which the information will be saved. For a cluster environment, mount the shared disk for the administrative server shared data.
Setup files
The following files must be saved. It is not necessary to save other files if no changes have been made since installing SSC.
/etc/opt/FJSVssmgr/
- bcm.conf
- sanma.conf
- ssmgr.conf
/opt/FJSVssmgr/bin/
- manager.ini
Copy the file to the save destination using the following command:
|
# cp -p file-to-be-saved save-destination |
sh files
You must save the following files, unless they have not been changed since installing SSC. You must also save the files related to the processing of the current script.
/etc/opt/FJSVssmgr/
- trapop.sh
Copy the files to the save destination using the following command:
|
# cp -p /etc/opt/FJSVssmgr/trapop.sh save-destination |
Error monitor XML files
If the user has defined or customized any of the error monitor XML files, you must save those files in the following directory. It is not necessary to save files to which this does not apply.
/etc/opt/FJSVssmgr/snmpth
Copy the files to the save destination using the following command:
|
# cp -p /etc/opt/FJSVssmgr/snmpth/relevant-files save-destination |
Device polling setting XML files
If the user has defined or customized any of the device polling setting XML files, you must save those files in the following directory. It is not necessary to save files to which this does not apply.
/etc/opt/FJSVssmgr/devicepolling
Copy the files to the save destination using the following command:
|
# cp -p /etc/opt/FJSVssmgr/devicepolling/ relevant-files save-destination |
Event log files
You must save the following file:
/var/opt/FJSVssmgr/
- systemevent.csv
Copy the file to the save destination using the following command:
|
# cp -p /var/opt/FJSVssmgr/systemevent.csv save-destination |
The default location of the SSC Client program directory referred to in the following explanation is:
C:\Program Files\Softek_StorageCruiser
You must save the following file, unless it has not been changed since installing SSC.
SSC Client program directory\Client\bin
- client.ini
Uninstall the SSC Manager by referring to "Chapter 6 Uninstalling the Manager" in the "Softek Storage Cruiser Installation Guide".
If the SSC Manager is the Solaris OS version and is in a cluster environment, install and set up the SSC Manager by referring to "Chapter 6 Deleting the Cluster Environment" in the "Softek Storage Cruiser Operator's Guide for cluster environment".
Uninstall the SSC Client by referring to "Chapter 5 Uninstalling the Client" in the "Softek Storage Cruiser Installation Guide".
Install and set up the ESC Client by referring to "Chapter 5 Client installation and setup".
Install and set up the ESC Manager by referring to "Chapter 4 Manager installation and setup".
If the ESC Manager is the Solaris OS version and is in a cluster environment, you must install and set up the ESC Manager by referring to "Appendix A.3 Manager installation" and "Appendix A.4 Manager operation setup".
You must upgrade the saved files in the ESC Manager/Client environment that has been reactivated as a part of the setup procedure.
The default location of the ESC Manager program directory, environment setup directory, and work directory referred to in the following explanation is:
C:\Program Files\ETERNUS-SSC
Stop the ESC Manager and the Client.
Stop the ESC Manager by referring to the "9.3.1 Stopping manager". The ESC Client must be closed if already activated.
Upgrade the files that were saved as directed in "D.3.3. Setting and Saving Log Files".
Copy the files to the following directory:
ESC-manager-environment-setup-directory\Manager\etc\opt\FJSVssmgr\current
sanma.conf
Reflect the saved parameter settings for sanma.conf in the ESC sanma.conf file.
ESC-manager-environment-setup-directory\Manager\etc\opt\FJSVssmgr\current\sanma.conf
For details of parameters in the sanma.conf file, refer to "D.2 sanma.conf Parameter" in the "ETERNUS SF Storage Cruiser Users Guide".
ssmgr.conf
Reflect the saved parameter settings for ssmgr.conf in the ESC ssmgr.conf file.
ESC-manager-environment-setup-directory\Manager\etc\opt\FJSVssmgr\current\ssmgr.conf
For details of parameters in the ssmgr.conf file, refer to "D.3 ssmgr.conf Parameter" in the "ETERNUS SF Storage Cruiser Users Guide".
manager.ini
Reflect the saved parameter settings for manager.ini in the ESC manager.ini file.
ESC-manager-program-directory \Manager\opt\FJSVssmgr\bin
Reflect the difference between the changed value and the default value as follows:
changed-value - SSC-default-value = value-difference
ESC-default-value + value-difference = value-to-reflect
The SSC default value is 140, and that of ESC is 512.
Example: If the value in SSC was changed to 300
changed-value(300) - SSC-default-value(140) = value-difference(160)
ESC-default-value(512) + value-difference(160) = value-to-reflect(672)
Therefore, the following must reflected:
MAXMEMORY=672
For details of parameters in the ssmgr.conf file, refer to "D.5 Change in the Maximum Memory Used " in the "ETERNUS SF Storage Cruiser Users Guide".
trapop.bat
The current batch processing must be modified as required. For example, processing that recognizes the installation directory must be modified because the installation directories of SSC and ESC are different. Copy the file to the following directory.
ESC-manager-environment-setup-directory\Manager\etc\opt\FJSVssmgr\current
Error monitor XML files
Copy the XML files with the same names as the saved XML files onto the directory for customized XML (ESC-manager-environment-setup-directory \Manager \etc \opt \FJSVssmgr\current\snmpth) from the default XML directory (ESC-manager-program-directory \Manager\opt\FJSVssmgr\lib\snmpth).
Reflect the contents of the saved XML files in the copied files.
For details of error monitor XML files, refer to "D.6 SNMP Trap XML Definition File " in the "ETERNUS SF Storage Cruiser Users Guide".
Device polling setting XML files
Copy the files with the same names as the saved XML files onto the directory for customized XML (ESC-manager-environment-setup-directory \Manager \etc \opt \FJSVssmgr\current\devicepolling) from the default XML directory (ESC-manager-program-directory \Manager\opt\FJSVssmgr\lib\devicepolling).
Reflect the contents of the saved XML files in the copied files.
For details of device polling setting XML files, refer to "D.10 Device Polling Setting File" in the "ETERNUS SF Storage Cruiser Users Guide".
Event log files
Copy the systemevent.csv file that has been saved to the following directory:
ESC-manager-work-directory\Manager\var\opt\FJSVssmgr\current
Stop the ESC Manager and the Client.
Stop the ESC Manager by referring to the "9.1.1 Stopping manager". The ESC Client must be closed if already activated.
For a Manager in a cluster environment, mount the shared disk for the administrative server shared data after closing the manager task cluster service (cluster application).
Upgrade the files that were saved as directed in "D.3.3 Setting and Saving Log Files".
bcm.conf
Copy the files to the following directory:
/etc/opt/FJSVssmgr/current
Copy from the save destination using the following command:
|
# cp -p save-destination bcm.conf /etc/opt/FJSVssmgr/current |
sanma.conf
Reflect the saved parameter settings for sanma.conf in the ESC sanma.conf file.
/etc/opt/FJSVssmgr/current/sanma.conf
For details of parameters in the sanma.conf file, refer to "D.2 sanma.conf Parameter" in the "ETERNUS SF Storage Cruiser Users Guide".
ssmgr.conf
Reflect the saved parameter settings for ssmgr.conf in the ESC ssmgr.conf file.
/etc/opt/FJSVssmgr/current/ssmgr.conf
For details of parameters in the ssmgr.conf file, refer to "D.3 ssmgr.conf Parameter" in the "ETERNUS SF Storage Cruiser Users Guide".
manager.ini
Reflect the saved parameter settings for manager.ini in the ESC manager.ini file. In a cluster environment, reflect the settings for each cluster node saved.
/opt/FJSVssmgr/bin
Reflect the difference between the changed value and the default value as follows:
changed-value - SSC-default-value = value-difference
ESC-default-value + value-difference = value-to-reflect
The SSC default value is 140, and that of ESC is 512.
Example: If the value in SSC was changed to 300
changed-value(300) - SSC-default-value(140) = value-difference(160)
ESC-default-value(512) + value-difference(160) = value-to-reflect(672)
Therefore, the following must be reflected:
MAXMEMORY=672
For details of parameters in the ssmgr.conf file, refer to "D.5 Change in the Maximum Memory Used" in the "ETERNUS SF Storage Cruiser Users Guide".
trapop.sh
The current script processing must be modified as required. Copy the file to the following directory.
/etc/opt/FJSVssmgr/current
Copy from the save destination using the following command:
|
# cp -p save-destination/trapop.sh /etc/opt/FJSVssmgr/current |
Error monitor XML files
Copy the XML files with the same names as the saved XML files onto the directory for customized XML (/etc/opt/FJSVssmgr/current/snmpth) from the default XML directory (/opt/FJSVssmgr/lib/snmpth).
|
# cd /opt/FJSVssmgr/lib/snmpth # cp -p relevant-file /etc/opt/FJSVssmgr/current/snmpth |
Reflect the contents of the saved XML files in the copied files.
For details of error monitor XML files, refer to "D.6 SNMP Trap XML Definition File" in the "ETERNUS SF Storage Cruiser Users Guide".
Device polling setting XML files
Copy the files with the same names as the saved XML files onto the directory for customized XML (/etc/opt/FJSVssmgr/current/devicepolling) from the default XML directory (/opt/FJSVssmgr/lib/devicepolling).
|
# cd /opt/FJSVssmgr/lib/devicepolling # cp -p relevant-file /etc/opt/FJSVssmgr/current/devicepolling |
Reflect the contents of the saved XML files in the copied files.
For details of error monitor XML files, refer to "D.10 Device Polling Setting File" in the "ETERNUS SF Storage Cruiser Users Guide".
Event log files
Copy the saved systemevent.csv file to the following directory:
/var/opt/FJSVssmgr/current
Copy from the save destination using the following command:
|
# cp -p save-destination/systemevent.csv /var/opt/FJSVssmgr/current |
The default directory of the ESC Client program directory referred to in the following explanation is:
C:\Program Files\ETERNUS-SSC
The ESC Client must be closed if already activated.
If client.ini has been saved as directed in "D.3.3. Setting and Saving Log Files", reflect the parameter settings in the ESC client.ini file (ESC-client-program-directory \Client\bin\ client.ini).
client.ini
Reflect the difference between the changed value and the default value as follows:
changed-value - SSC-default-value = value-difference
ESC-default-value + value-difference = value-to-reflect
The SSC default value is 192, and that of ESC is 256.
Example: If the value in SSC was changed to 320
changed-value(320) - SSC-default-value(192) = value-difference(128)
ESC-default-value(256) + value-difference(128) = value-to-reflect(384)
Therefore, the following must be reflected:
MAXMEMORY=384
For details of parameters in the ssmgr.conf file, refer to "D.5 Change in the Maximum Memory Used" in the "ETERNUS SF Storage Cruiser Users Guide".
You must upgrade the saved device management information to the ESC Manager.
The following explanation assumes the work directory to be the same as that in "D.3.2 Saving Device Management Information" and that the upgrade tool has been extracted in the same way.
Start the command prompt and move to the work directory.
|
C:\Document and Settings\Administrator> D: D:\> cd D:\tmp\upgrade D:\tmp\upgrade> |
Execute cimrestore.bat at the command prompt.
|
D:\tmp\upgrade> cimrestore [/all] save destination |
When executed without specifying the /all option, a performance information CSV file will not be restored. When migrating performance information that has already been acquired, specify the /all option. When the /all option is specified, execution of the command may take longer, as it depends on the size of the performance information CSV file.
When the command is executed successfully, the following message will be displayed on the last line.
|
INFO: cimrestore has been completed. |
Move to the work directory.
|
# cd /tmp/upgrade |
Execute cimrestore.sh.
|
# ./cimrestore.sh [-all] save destination |
When executed without specifying the -all option, a performance information CSV file will not be restored. When migrating performance information that has already been acquired, specify the -all option. When the -all option is specified, execution of the command may take longer, as it depends on the size of the performance information CSV file.
When the command is executed successfully, the following message will be displayed on the last line.
|
INFO: cimrestore has been completed. |
If the cimrestore command is executed without stopping the Daemon/services of the ESC Manager, the following message is output and execution of the cimrestore command is terminated.
Solaris
WARNING: Unable to restore, while the FJSVssmgr is running.
Windows
WARNING: Unable to restore, while the ETERNUS SF Storage Cruiser Manager is running.
If the save-destination directory is not specified in the cimrestore command, the following message is output and execution of the cimrestore command is terminated.
Solaris
Usage: cimerstore.sh save-directory
Windows
Usage: cimrestore.bat save-directory
If the backup files created by the cimbackup command do not exist in the directory specified, the following message is output and execution of the cimrestore command is terminated.
ERROR: The backup files are not found in directory-name.
If ETERNUS SF Storage Cruiser has not been installed, the following message is output and execution of the cimrestore command is terminated.
Solaris
ERROR: Is the FJSVssmgr installed?
Windows
ERROR: Is the ETERNUS SF Storage Cruiser Manager installed?
If the repository could not be upgraded successfully using the cimrestore command, the following message is output and execution of the cimrestore command is terminated. Restore the system from the system backup.
Solaris
ERROR: Unable to convert the Repository <Directory where backup is created>/repository
Windows
ERROR: Unable to convert the Repository.
If the repository could not be initiated successfully using the cimrestore command, the following message is output and execution of the cimrestore command is terminated. Restore the system from the system backup.
Solaris
ERROR: Unable to initialize the Repository /var/opt/FJSVssmgr/current/opencimom/logr
Windows
ERROR: Unable to initialize the Repository.
If the repository could not be rebuilt successfully using the cimrestore command, the following message is output and execution of the cimrestore command is terminated. Restore the system from the system backup.
Solaris
ERROR: Unable to reconstruct the Repository /var/opt/FJSVssmgr/current/opencimom/logr
Windows
ERROR: Unable to reconstruct the Repository.
If the cimrestore command fails to reconstruct perf.conf (Setting file for performance administration), the following message will be displayed and the execution of the cimrestore command will be terminated. Restore the system from the system backup.
Solaris
ERROR: Unable to convert the perf.conf /etc/opt/FJSVssmgr/current/
Windows
ERROR: Unable to convert the perf.conf.
If the cimrestore command fails to reconstruct perf.conf (Setting file for performance administration) , the following message will be displayed and the execution of the cimrestore command will be terminated. Restore the system from the system backup.
Solaris
ERROR: Unable to convert the perfenv.conf /opt/etc/FJSVssmgr/current/
Windows
ERROR: Unable to convert the perfenv.conf.
If the cimrestore command fails to reconstruct perf.conf (Setting file for performance administration), the following message will be displayed and the execution of the cimrestore command will be terminated. Restore the system from the system backup.
Solaris
ERROR: Unable to convert the configuration XML File /var/opt/FJSVssmgr/current/perf/xml
Windows
ERROR: Unable to convert the configuration XML File.
You must activate the following services:
- ETERNUS SF Storage Cruiser Manager
- SystemWalker MpWksttr
If Systemwalker MpWksttr has already been activated, only the ETERNUS SF Storage Manager must be started.
When executing performance monitoring/threshold monitoring before migrating to SSC, performance monitoring will be restarted automatically when the manager is restarted.
You must start the Daemon for the ESC Manager using the following command:
|
# /opt/FJSVssmgr/sbin/managerctl start |
In a cluster environment, the manager task cluster service (cluster application) must be started using the administrative view (Cluster Admin) of the cluster system.
When executing performance monitoring/threshold monitoring before migrating to SSC, performance monitoring will be restarted automatically when the manager is restarted.
When the Systemwalker Centric Manager link function was used with SSC, the Storage Cruiser activation method that was selected on the node popup menu and registered with the Centric Manager administrative client must be reset after the upgrade to ESC.
The mpaplreg command of Centric Manager is used for resetting. Refer to the following sections in the manuals for details.
Chapter 11.2.4.2 of the Softek Storage Cruiser User's Guide
Chapter 10.2.4.1 of the ETERNUS SF Storage Cruiser User's Guide
"Setup from a Systemwalker Centric Manager administrative client"
You must reset the function by performing the following procedure on the Centric Manager Administrative client:
Confirm the node where the node popup menu is registered.
Input as follows on the command line (assuming the menu name is "SSC").
|
mpaplreg -v -m SSC |
Save the node name from the output result, an example of which is shown below.
|
Management domain name: melba Application name: SSC Command line: "C:\Program Files\Softek_StorageCruiser\Client\bin\client.exe" -sCMGR -c%PAC -a1.2.3.4 -p4916 Node: tama |
Delete the SSC activation method on the node popup menu.
Input the following on the command line (assuming the menu name is "SSC").
|
mpaplreg -d -m SSC |
Register the ESC activation method on the node popup menu.
Input the command line as follows for each node name saved as directed in Item 1. Make changes appropriate to the environment if required. (The example assumes the menu name is "ESC", node name is "tama", and the ESC Client is installed in the directory "C:\ProgramFiles\ETERNUS-SSC".)
|
Mpaplreg -a -m ESC -p tama -c "\"C:\ProgramFiles\ETERNUS-SSC\Client\bin\rcxclient.exe\"" |
Check the popup menu for the node.
Restart the Systemwalker Centric Manager service on the administrative client, and re-execute [Detect Node] in the monitored area. The ESC icon will be displayed on the node popup menu.
If the icon of this product is not displayed on the node popup menu, check the registration using the following command (assuming the menu name is "ESC").
|
mpaplreg -v -m ESC |
|
Contents
|