

| ETERNUS SF AdvancedCopy Manager Operator's Guide for cluster environment 13.0 -Microsoft(R) Windows(R) 2000/Microsoft(R) Windows Sever(TM) 2003-, -Solaris-, -HP-UX-, -Linux-, -AIX- |
|
Contents
Index
|
This chapter explains how to customize Storage management server transactions and Storage server transactions.

Each execution of the Storage management server transaction and the Storage server transaction creates the settings for one cluster transaction. To build a mutual standby system, execute the procedure for customize as many times as necessary.
For the Storage management server transaction, the database environment is created with the cluster setup command. Do not create a database environment before executing the cluster setup command.
Before starting customization, add to an existing cluster transaction or decide whether to create a new cluster transaction.
Do not move the resource used by Storage management server transactions and Storage server transactions from a cluster transaction after setup to another cluster transaction.
For Solaris-version SynfinityCluster/PRIMECLUSTER, see "Customization for Solaris-version SynfinityCluster/PRIMECLUSTER" in this manual.
For Solaris-version VERITAS Cluster Server, see "Customization for Solaris-version VERITAS Cluster Server" in this manual.
For Linux-version PRIMECLUSTER, see "Customization for Linux-version PRIMECLUSTER" in this manual.
For Windows-version MSCS, see "Customization for Windows-version MSCS" in this manual.
For HP-version MC/ServiceGuard, see "Customization for HP-version MC/ServiceGuard" in this manual.
For HP-version VERITAS Cluster Server, see "Customization for HP-version VERITAS Cluster Server" in this manual.
For AIX-version VERITAS Cluster Server, see "Customization for AIX-version VERITAS Cluster Server" in this manual.
For AIX-version High Availability Cluster Multi-Processing, see "Customization for AIX-version High Availability Cluster Multi-Processing" in this manual.
This chapter explains how to customize Solaris-version SynfinityCluster/PRIMECLSTER.
Throughout this chapter, the primary node is an active node in a cluster service (userApplication) performing Storage management server transactions and Storage server transaction, and the secondary node is the standby node in the same cluster service (userApplication).
The secondary node A shows the node which creates the environment of Storage management server transactions first in the secondary nodes in this cluster service (userApplication). The secondary node B shows the remaining secondary nodes in this cluster service (userApplication).
The customizing work of primary node and secondary node A is executed at 1:1 standby system, mutual standby system, and n:1 standby system.
The customizing work of primary node, secondary node A and secondary node B is executed at cascade topology system and priority transfer system.
Example:
When creating a cascade by three sets of nodes, one set is a primary node, one set is the secondary node A, and one set is the secondary node B. When creating a cascade by four sets of nodes, one set is a primary node, one set is the secondary node A, and two sets are the secondary node B.
This Chapter describes the flow of setup.
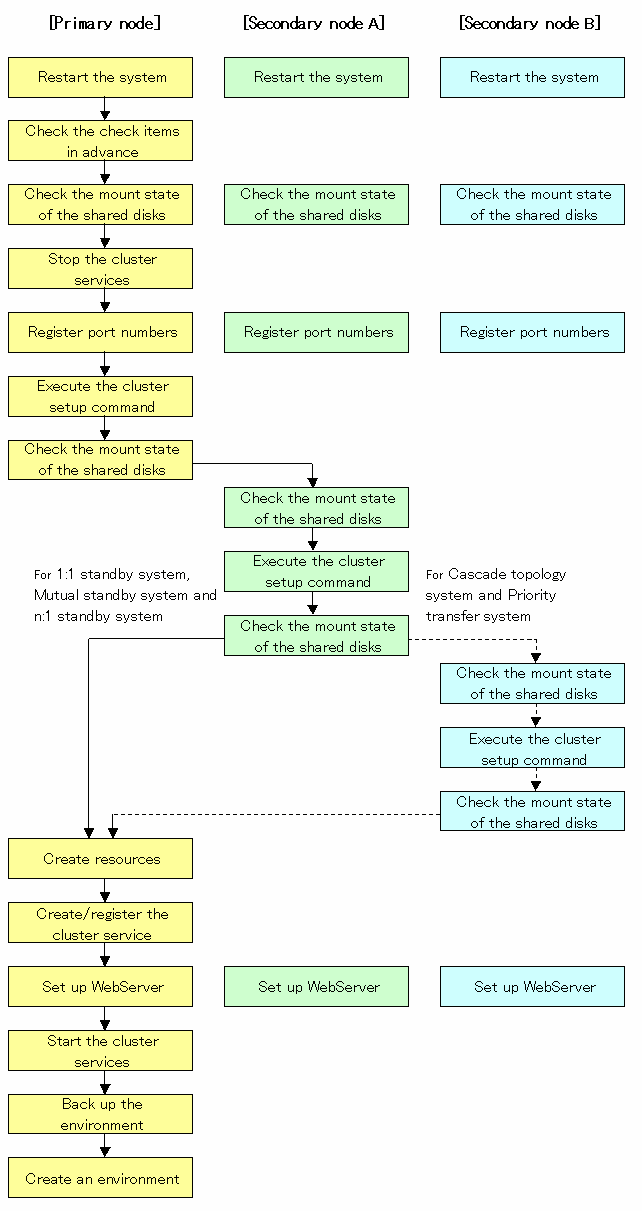
To set up a Storage management server transaction and a Storage server transaction, use the procedure below.
Restart the system.
Restart the primary node and secondary node.
If the system is restarted in an extension of the installation process of AdvancedCopy Manager, proceed to step 2.
Check the preparations.
Check each item of "Confirmation of items," for the cluster service (userApplication) to be set up.
Mount the shared disk on the primary node.
For Storage management server transaction, mount the shared disk for AdvancedCopy Manager shared data and that for the AdvancedCopy Manager repository on the primary node.
For Storage server transaction, mount the shared disk for AdvancedCopy Manager shared data on the primary node.
Stop the cluster services (userApplication).
To add a Storage management server transaction and a Storage server transaction to an existing cluster service (userApplication), stop the cluster service (userApplication) from the SynfinityCluster Operation Management view or PRIMECLUSTER RMS main window.
Register the port number for the transaction communication in /etc/services. Use the OS command such as vi to register it in /etc/services.
Transaction communication daemon: stgxfws_Logical-Node-Name

Register the same port number on the primary node and all secondary nodes.
Execute the cluster setup command on the primary node.
On the primary node, execute the cluster setup command shown below after blocking other users from accessing the shared disk for AdvancedCopy Manager shared data and that for the AdvancedCopy Manager repository. When this command is executed, a repository is created in addition to the cluster being set up. For more information, see the chapter on database creation.
# /opt/swstorage/bin/stgclset_safe -k Primary | Pri -m AdvancedCopy-Manager-Shared-Data-Mount-Point -n Logical-Node-Name -s Service-Name -i IP-Address -f mgr |
Example
# /opt/swstorage/bin/stgclset_safe -k Primary -m /STGMGRDISK -n nodeMGR -s manager_service -i 10.10.10.10 -f mgr |
or
# /opt/swstorage/bin/stgclset_safe -k Pri -m /STGMGRDISK -n nodeMGR -s manager_service -i 10.10.10.10 -f mgr |

For a Storage management server transaction to be performed, use the locale that is specified when the Storage management server is installed. (If Symfoware is installed in advance, use the locale that is specified when Symfoware is installed.)
In combined operation with the scalable class, the IP address for a Storage management server transaction specified with the -i option must be the "takeover IP address for AdvancedCopy Manager" prepared for the Storage management server transaction. Do not specify the logical IP address of the transaction in the scalable class.
For Storage management server transaction, on the primary node, execute the following cluster setup command after blocking other users from accessing the shared disk for AdvancedCopy Manager shared data:
# /opt/swstorage/bin/stgclset_safe -k Primary | Pri -m AdvancedCopy-Manager-Shared-Data-Mount-Point -n Logical-Node-Name -s Transaction-Name |
Example
# /opt/swstorage/bin/stgclset_safe -k Primary -m /CTTEST3 -n nodeAGT -s agent_service |
or
# /opt/swstorage/bin/stgclset_safe -k Pri -m /CTTEST3 -n nodeAGT -s agent_service |
Check the setup object.
Information about the logical node specified by the command is displayed. After confirming the displayed information, press the Enter key.
For Storage management server transaction:
# /opt/swstorage/bin/stgclset_safe -k Primary -m /STGMGRDISK -n nodeMGR -s manag
er_service -i 10.10.10.10 -f mgr
AdvancedCopy Manager settings are as follows.
        Cluster system : SynfinityCluster or PRIMECLUSTER
        Node type      : Primary
        IP Address     : 10.10.10.10
        Mount point    : /STGMGRDISK
        Node name      : nodeMGR
        Service        : manager_service
        Function       : Management Server
Do you want to continue with setting of AdvancedCopy Manager cluster? [default:y] |
For Storage server transaction:
# /opt/swstorage/bin/stgclset_safe -k Primary -m /CTTEST3 -n nodeAGT -s agent_se
rvice
AdvancedCopy Manager settings are as follows.
        Cluster system : SynfinityCluster or PRIMECLUSTER
        Node type      : Primary
        Mount point    : /CTTEST3
        Node name      : nodeAGT
        Service        : agent_service
        Function       : Server
Do you want to continue with setting of AdvancedCopy Manager cluster? [default:y] |
When interrupting cluster environmental setting processing, "n" is inputted, when continuing processing, "y" is inputted, or press the Enter key.

If the transaction is the Storage management server transaction, proceed to step 8.
If the transaction is the Storage server transaction, proceed to step 13.
Start the creation of a common environment for Storage management server transactions.
The initial window for setting the common environment opens. Confirm the displayed information, enter "y", and press the Enter key.
  +----------------------------------------------------------------+
  |   A common environment for the AdvancedCopy Manager            |
  |   Storage management server will be created.                   |
  |  [Notes]                                                       |
  |   Prepare the following directories before starting processing.|
  | ============================================================== |
  |                                                                |
  |   1) Directory for the DB file                                 |
  |   2) Directory for the RDB dictionary                          |
  |   3) Directory for the RDB log file                            |
  |   4) Directory for the DB space to store the repository data   |
  |                                                                |
  +----------------------------------------------------------------+

Do you want to continue with processing? [y/n] ==> y |
For Storage management server transaction, specify the DB device.
The window shown below opens. Enter the directory name for the DB file system according to the information in [Note], and press the Enter key.
  -----------------------< DB device setting >----------------------

          Enter the directory name for the DB file.

         [Notes]
           Enter the absolute path name of the directory.

Enter ==> /ACMMnt/DBFile/DBFile |
A similar setting window opens for input of the directory names for the RDB dictionary, RDB log file, and DB space where repository data is stored. Enter a directory name for each item, and press the Enter key after each entry.
After setting up the directory name for DB space where repository data is stored, the setting window for inputting the size of repository data is opened. Enter the size of repository data, and press the Enter key.
For Storage management server transaction, check the DB directory settings.
The four directory names and the size of repository data specified in step 9 are displayed. Confirm the displayed information, enter "y", and press the Enter key.
====================================================================

 Directory name for the DB file ............/ACMMnt/DBFile/DBFile
 Directory name for the RDB dictionary ...../ACMMnt/DBDic/DBDic
 Directory name for the RDB log file ......./ACMMnt/DBLog/DBLog
 Directory name for the DB space
           used to save repository data ..../ACMMnt/DBSpa/DBSpa
 Repository data Size ......................65MB

 ====================================================================

Okay? [y/n] ==> y |
Confirm the continuation of processing.
After the window for confirming the continuation of processing opens, enter "y", and press the Enter key.
  +----------------------------------------------------------------+
  |   Creation of the AdvancedCopy Manager Storage management      |
  |   server environment will start.                               |
  | ============================================================== |
  |                                                                |
  |   Once processing has started, system information is rewritten.|
  |   Make sure that the environment allows execution              |
  |   before proceeding.                                           |
  |                                                                |
  +----------------------------------------------------------------+

Do you want to continue with processing? [y/n] ==> y |
For Storage management server transaction, make the repository access settings.
The window for setting AdvancedCopy Manager repository access opens. Enter a user name and password, and press the Enter key.

For the point of security, it recommends using not a root user but a general user.
          Enter the user name and password for accessing
          the repository of AdvancedCopy Manager.

         [Notes]
          We recommend you to input a general user other than root.

                Username           : acmuser
                Password           :
Password(Re-enter) : |

When you delete a user on OS, perform a re-setup with reference to "Change of deletion/password of the user who specified it as the repository access user", in the "Solaris ETERNUS SF AdvancedCopy Manager Operator's Guide". When you change a password, perform a re-setup with reference to "Change of deletion/password of the user who specified it as the repository access user", in the "Solaris ETERNUS SF AdvancedCopy Manager Operator's Guide".
Finnish the cluster setup command on the primary node.
The window indicating cluster setup command completion opens.
swstf8100 The cluster setup of the primary node has been completed. Next, create the cluster environment of the secondary node. # |
Unmount the shared disks on the primary node.
For Storage management server transaction, unmount the shared disk for AdvancedCopy Manager shared data and that for the AdvancedCopy Manager repository on the primary node.
For Storage server transaction, unmount the shared disk for AdvancedCopy Manager shared data on the primary node.
Mount the shared disks on the secondary node A.
For Storage management server transaction, mount the shared disk for AdvancedCopy Manager shared data and that for the AdvancedCopy Manager repository on the secondary node A.
For Storage server transaction, mount the shared disk for AdvancedCopy Manager shared data on the secondary node A.
Execute the cluster setup command on the secondary node A.
For Storage management server transaction, on the secondary node A, execute the cluster setup command shown below after blocking other users from accessing the shared disk for AdvancedCopy Manager shared data and that for the AdvancedCopy Manager repository. When this command is executed, a repository is created in addition to the cluster being set up. For more information, see the chapter on database creation.
On the secondary node A, execute the following cluster setup command after blocking other users from accessing the shared disk for AdvancedCopy Manager shared data:
# /opt/swstorage/bin/stgclset_safe -k Secondary | Sec -m AdvancedCopy-Manager-Shared-Data-Mount-Point |
Example
# /opt/swstorage/bin/stgclset_safe -k Secondary -m /STGMGRDISK |
or
# /opt/swstorage/bin/stgclset_safe -k Sec -m /STGMGRDISK |

For a Storage management server transaction to be performed, use the locale that is specified when the Storage management server is installed. (If Symfoware is installed in advance, use the locale that is specified when Symfoware is installed.)
Information about the logical node specified by the command is displayed. After confirming the displayed information, press the Enter key.
For Storage management server transaction:
# /opt/swstorage/bin/stgclset_safe -k Secondary -m /STGMGRDISK

AdvancedCopy Manager settings are as follows.
        Cluster system : SynfinityCluster or PRIMECLUSTER
        Node type      : Secondary
        IP Address     : 10.10.10.10
        Mount point    : /STGMGRDISK
        Node name      : nodeMGR
        Service        : manager_service
        Function       : Management Server
Do you want to continue with setting of AdvancedCopy Manager cluster? [default:y] |
For Storage server transaction:
# /opt/swstorage/bin/stgclset_safe -k Secondary -m /CTTEST3
AdvancedCopy Manager settings are as follows.
        Cluster system : SynfinityCluster or PRIMECLUSTER
        Node type      : Secondary
        Mount point    : /CTTEST3
        Node name      : nodeAGT
        Service        : agent_service
        Function       : Server
Do you want to continue with setting of AdvancedCopy Manager cluster? [default:y] |
When interrupting cluster environmental setting processing, "n" is inputted, when continuing processing, "y" is inputted, or press the Enter key.

If the transaction is the Storage management server transaction, proceed to step 18.
If the transaction is the Storage server transaction, proceed to step 19.
For Storage management server transaction, confirm the continuation of processing.
After the window for confirming the continuation of processing opens, enter "y", and press the Enter key.
  +----------------------------------------------------------------+
  |   Creation of the AdvancedCopy Manager Storage management      |
  |   server environment will start.                               |
  | ============================================================== |
  |                                                                |
  |   Once processing has started, system information is rewritten.|
  |   Make sure that the environment allows execution              |
  |   before proceeding.                                           |
  |                                                                |
  +----------------------------------------------------------------+

Do you want to continue with processing? [y/n] ==> y |
Finnish the cluster setup command on the secondary node.
The window indicating cluster setup command completion opens.
swstf8101 The cluster setup of the secondary node has been completed. # |
Unmount the shared disks on the secondary node A.
For Storage management server transaction, unmount the shared disk for AdvancedCopy Manager shared data and that for the AdvancedCopy Manager repository on the secondary node A.
For Storage server transaction, unmount the shared disk for AdvancedCopy Manager share data on the secondary node A.

If the system is the 1:1 standby system, the Mutual standby system and the n:1 standby system, proceed to step 28.
If the system is Cascade topology and the Priority transfer, proceed to step 21.
Mount the shared disks on the secondary node B.
For Storage management server transaction, mount the shared disk for AdvancedCopy Manager shared data and that for the AdvancedCopy Manager repository on the secondary node B.
For Storage server transaction, mount the shared disk for AdvancedCopy Manager shared data on the secondary node B.

When there are two or more secondary nodes B, Step 21 to Step 27 is processed by all the secondary nodes B.
Execute the cluster setup command on the secondary node B.
Execute the cluster setup command on the secondary node B on which the shared disk for AdvancedCopy Manager shared data were mounted in step 21.
For Storage management server transaction, on the secondary node B, execute the cluster setup command shown below after blocking other users from accessing the shared disk for AdvancedCopy Manager shared data and that for the AdvancedCopy Manager repository. When this command is executed, a repository is created in addition to the cluster being set up. For more information, see the chapter on database creation.
For Storage server transaction, on the secondary node B, execute the following cluster setup command after blocking other users from accessing the shared disk for AdvancedCopy Manager shared data:
# /opt/swstorage/bin/stgclset_safe -k Secondary | Sec -m AdvancedCopy-Manager-Shared-Data-Mount-Point |
Example
# /opt/swstorage/bin/stgclset_safe -k Secondary -m /STGMGRDISK |
or
# /opt/swstorage/bin/stgclset_safe -k Sec -m /STGMGRDISK |

For a Storage management server transaction to be performed, use the locale that is specified when the Storage management server is installed. (If Symfoware is installed in advance, use the locale that is specified when Symfoware is installed.)
Check the setup object.
Information about the logical node specified by the command is displayed. After confirming the displayed information, press the Enter key.
For Storage management server transaction:
# /opt/swstorage/bin/stgclset_safe -k Secondary -m /STGMGRDISK

AdvancedCopy Manager settings are as follows.
        Cluster system : SynfinityCluster or PRIMECLUSTER
        Node type      : Secondary
        IP Address     : 10.10.10.10
        Mount point    : /STGMGRDISK
        Node name      : nodeMGR
        Service        : manager_service
        Function       : Management Server
Do you want to continue with setting of AdvancedCopy Manager cluster? [default:y] |
For Storage server transaction:
# /opt/swstorage/bin/stgclset_safe -k Secondary -m /CTTEST3
AdvancedCopy Manager settings are as follows.
        Cluster system : SynfinityCluster or PRIMECLUSTER
        Node type      : Secondary
        Mount point    : /CTTEST3
        Node name      : nodeAGT
        Service        : agent_service
        Function       : Server
Do you want to continue with setting of AdvancedCopy Manager cluster? [default:y] |
When interrupting cluster environmental setting processing, "n" is inputted, when continuing processing, "y" is inputted, or press the Enter key.
Check the addition of a secondary node.
The window for confirming of adding a secondary node is displayed. After confirmation of a cascade, "y" is inputted and the Enter key is pushed.
Secondary node is already setup in another node. The number of secondary nodes : 1 Do you want to setup new secondary node? [default:n] y |
The number of secondary nodes already set up is outputted to "The number of secondary nodes."

The default value is "n." "n" means cancellation of processing.
If the transaction is the Storage management server transaction, proceed to step 25.
If the transaction is the Storage server transaction, proceed to step 26.
Start the creation of a common environment for AdvancedCopy Manager management server transactions.
The initial window for setting the common environment opens. Confirm the displayed information, enter "y", and press the Enter key.
  +----------------------------------------------------------------+
  |   Creation of the AdvancedCopy Manager Storage management      |
  |   server environment will start.                               |
  | ============================================================== |
  |                                                                |
  |   Once processing has started, system information is rewritten.|
  |   Make sure that the environment allows execution              |
  |   before proceeding.                                           |
  |                                                                |
  +----------------------------------------------------------------+

Do you want to continue with processing? [y/n] ==> y |
Finnish the cluster setup command on the secondary node B.
The window indicating cluster setup command completion opens.
swstf8101 The cluster setup of the secondary node has been completed. # |
Unmount the shared disks on the secondary node B.
For Storage management server transaction, unmount the shared disk for AdvancedCopy Manager shared data and that for the AdvancedCopy Manager repository on the secondary node B.
For Storage server transaction, unmount the shared disk for AdvancedCopy Manager share data on the secondary node B.

When the secondary node B (it does not perform from Step 21 to Step 27) remains, perform from Step 21 in the node. When operation from Step 21 to Step 27 is completed by all secondary node B, go to Step 28.
Create resources.
In SynfinityCluster, use the SynfinityCluster management view to create a takeover IP address resource. This operation is not necessary if a takeover IP address resource has already been created by the applicable cluster service.
In PRIMECLUSTER, use the PRIMECLUSTER "userApplication Configuration Wizard" to create the following resources.
Gds resource
For Storage management server transaction, register the class of the shared disk for AdvancedCopy Manager shared data and the class of the shared disk for AdvancedCopy Manager repository.
For Storage server transaction, register the class of the shared disk for AdvancedCopy Manager shared data.
The shared disk must be set as a switching disk.
Fsystem resource
For Storage management server transactions, register the mount point of the shared disk for AdvancedCopy Manager shared data and the mount point of the shared disk with the directory for the AdvancedCopy Manager repository..
For Storage server transaction, register the mount point of the shared disk for AdvancedCopy Manager shared data.
IP address resource
This resource is not necessary if a takeover IP address resource has already been created by the applicable userApplication.
Procedure resource
The state transition procedure name is "SMGRPROC_Logical-Node-Name".

For information on how to create resources with PRIMECLUSTER, see "Creating Resources and userApplications with Solaris-version PRIMECLUSTER".
The cluster setup command (stgclset_safe) has already made the preparatory settings (creating a state transition procedure and storing resources in the resource database) that are defined to set PRIMECLUSTER procedure resources.
Create and register a cluster service
In SynfinityCluster, use the SynfinityCluster management view to create and register a cluster service for AdvancedCopy Manager.
Operation type: Standby
Register the following resources that compose the cluster service:
Takeover IP resource
not required if an existing takeover IP address resource is used.
Shared disk prepared for AdvancedCopy Manager
The shared disk must be set as a switching disk.
State transition procedure
The state transition procedure name is "SMGRPROC_Logical-Node-Name".
In PRIMECLUSTER, use the PRIMECLUSTER "userApplication Configuration Wizard" to create and register a userApplication for AdvancedCopy Manager.
Operation type: Standby
Register the following resources that compose the userApplication:
The resources created in Step 28

Some information must be registered as switchover file system information. This includes the mount point and slice on the shared disk for AdvancedCopy Manager shared data, and the mount point and slice for the shared disk where the AdvancedCopy Manager repository directory is located. Please refer to a SynfinityCluster Installation/Administration Guide about the registration method or a PRIMECLUSTER Installation and Administration Guide about the registration method
The cluster setup command (stgclset_safe) has already made the SynfinityCluster "Setting Up Resources (Application Resources)" (creating a state transition procedure and storing resources in the resource database).
For information on how to create resources with PRIMECLUSTER, refer to "Creating Resources and userApplications with Solaris-version PRIMECLUSTER" in this manual.
For Storage management server transaction, make the WebServer settings.
With reference to "Setting up the Web Server," in the Solaris ETERNUS SFAdvancedCopy Manager Installation Guide, set up the Web Server in all nodes. If WebServer operation requires use of a physical IP address, specify settings so that multiple IP addresses can be used to access WebServer: that is, a physical IP address and a logical IP address. This is necessary because AdvancedCopy Manager in cluster operations accesses WebServer through a logical IP. For the required settings, refer to the applicable WebServer manual.
Start the cluster services (userApplication) and the AdvancedCopy Manager.
Use the SynfinityCluster management view and the RMS main window of PRIMECLLUSTER to start the new cluster service (userApplication) or the cluster service (userApplication) stopped in step 4.
Back up the environment.
In preparation for accidents, back up the following environments.
Database
For Storage management server transaction, refer to "Saving a database," in the "Solaris ETERNUS SF AdvancedCopy Manager Operations Guide," and back up the created database area.
Data on the shared disk for AdvancedCopy Manager shared data
Use the OS command such as cp to back up the following directories on the shared disk for AdvancedCopy Manager shared data:
Mountpoint-of-shared-disk-for-AdvancedCopy-Manager-shared-data/etc
Mountpoint-of-shared-disk-for-AdvancedCopy-Manager-shared-data/var
Create an environment for Storage management server transaction and Storage server transaction.
Use the GUI of AdvancedCopy Manager to create an environment for Storage management server transaction and Storage server transaction.
In using storage server transaction function in storage management server transaction, create an environment for Storage server transaction.

Create an environment for Storage management server transaction and an environment for Storage server transaction with reference to the "Solaris ETERNUS SF AdvancedCopy Manager Operator's Guide."
This chapter explains how to customize Solaris-version VERITAS Cluster Server.
Throughout this chapter, the primary node is the active node in the Service Group that executes Storage management server transaction and Storage server transactions, and the secondary node is the standby node in the same Service Group.
The secondary node A shows the node which creates the environment of Storage management server transactions and Storage server transactions first in the secondary nodes in this cluster service group. The secondary node B shows the remaining secondary nodes in this cluster service group.
The customizing work of primary node and secondary node A is executed at 1:1 standby system, mutual standby system, and n:1 standby system.
The customizing work of primary node, secondary node A and secondary node B is executed at cascade topology system.
Example:
When creating a cascade by three sets of nodes, one set is a primary node, one set is the secondary node A, and one set is the secondary node B. When creating a cascade by four sets of nodes, one set is a primary node, one set is the secondary node A, and two sets are the secondary node B.
This Chapter describes the flow of setup.
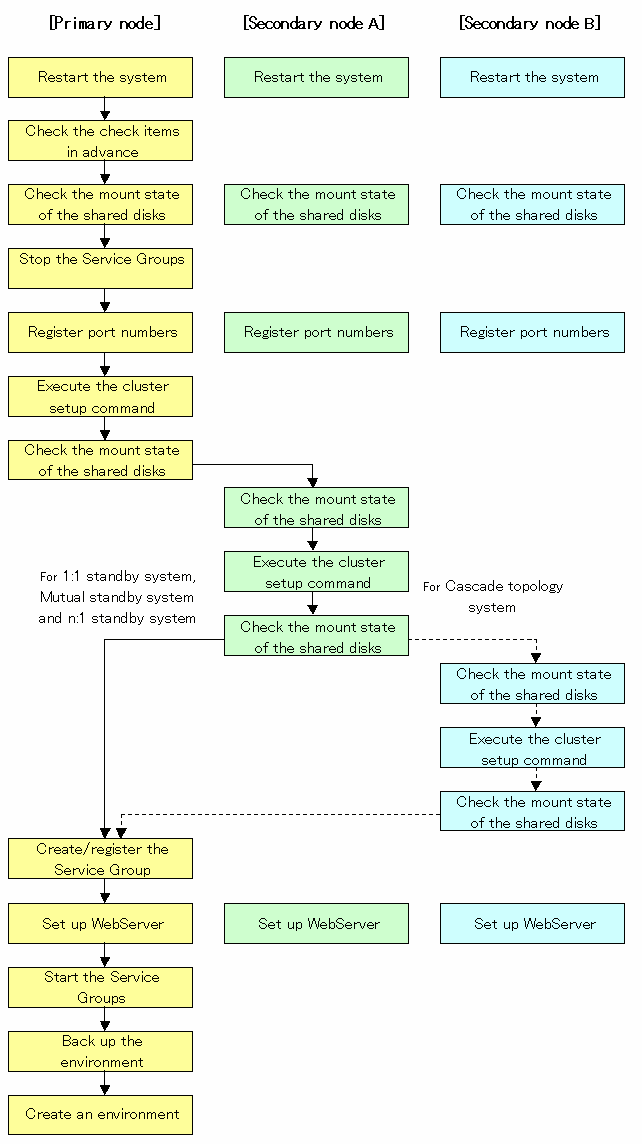
To set up a Storage management server transaction and a Storage server transaction, use the procedure below.
Restart the system.
Restart the primary node and all secondary nodes. If the system is restarted in an extension of the installation process of AdvancedCopy Manager, proceed to step 2.
Check the preparations.
Check each item of "Confirmation of items," for the Service Group to be set up.
Mount the shared disk on the primary node.
For Storage management server transaction, mount the shared disk for AdvancedCopy Manager shared data (one partition). Also mount the shared disk for the AdvancedCopy Manager repository (mount all shared disks where repository directories will be created) on the primary node.
For Storage server transaction, mount the shared disk for AdvancedCopy Manager shared data on the primary node.
Stop the Service Groups.
To add a Storage management server transaction and a Storage server transaction to an existing Service Group by using the VERITAS Cluster Server function, stop the applicable Service Group.
For information on how to stop the user Service Group, see the "VERITAS Cluster Server User's Guide."
# hagrp -offline User-Service-Group -sys system-name |
system-name: The node name by which the user service group is started
Register the port number for the transaction communication in /etc/services. Use the OS command such as vi to register it in /etc/services.
Transaction communication daemon: stgxfws_Logical-Node-Name

Register the same port number on the primary node and all secondary nodes.
Execute the cluster setup command on the primary node.
For Storage management server transaction, on the primary node, execute the cluster setup command shown below after blocking other users from accessing the shared disk for AdvancedCopy Manager shared data and that for the AdvancedCopy Manager repository. When this command is executed, a repository is created in addition to the cluster being set up. For more information, see the chapter on database creation.
# /opt/swstorage/bin/stgclset_vcs -k Primary | Pri -m AdvancedCopy-Manager-Shared-Data-Mount-Point -i IP-Address -n Logical-Node-Name -s Service-Name -f mgr |
Example
# /opt/swstorage/bin/stgclset_vcs -k Primary -m /STGMGRDISK -n nodeMGR -s manager_service -i 10.10.10.10 -f mgr |
or
# /opt/swstorage/bin/stgclset_vcs -k Pri -m /STGMGRDISK -n nodeMGR -s manager_service -i 10.10.10.10 -f mgr |

For a Storage management server transaction to be performed, use the locale that is specified when the Storage management server is installed. (If Symfoware is installed in advance, use the locale that is specified when Symfoware is installed.)
For Storage server transaction, on the primary node, execute the following cluster setup command after blocking other users from accessing the shared disk for AdvancedCopy Manager shared data:
# /opt/swstorage/bin/stgclset_vcs -k Primary | Pri -m AdvancedCopy-Manager-Shared-Data-Mount-Point -n Logical-Node-Name -s Service-Name |
Example
# /opt/swstorage/bin/stgclset_vcs -k Primary -m /STGAGTMNT -n nodeAGT -s agent_service |
or
# /opt/swstorage/bin/stgclset_vcs -k Pri -m /STGAGTMNT -n nodeAGT -s agent_service |
Check the setup object.
Information about the logical node specified by the command is displayed. After confirming the displayed information, press the Enter key.
For Storage management server transaction:
# /opt/swstorage/bin/stgclset_vcs -k Primary -m /STGMGRDISK -n nodeMGR -s manager_service -i 10.10.10.10 -f mgr
AdvancedCopy Manager settings are as follows.
        Cluster system : VERITAS Cluster Server
        Node type      : Primary
        IP Address     : 10.10.10.10
        Mount point    : /STGMGRDISK
        Node name      : nodemgr
        Service        : STGMGRSRV
        Function       : Management Server
Do you want to continue with setting of AdvancedCopy Manager cluster? [default:y] |
For Storage server transaction:
# /opt/swstorage/bin/stgclset_vcs -k Primary -m /STGAGTMNT -n nodeAGT -s agent_se
rvice
AdvancedCopy Manager settings are as follows.
        Cluster system : VERITAS Cluster Server
        Node type      : Primary
        Mount point    : /STGAGTMNT
        Node name      : nodeAGT
        Service        : agent_service
        Function       : Server
Do you want to continue with setting of AdvancedCopy Manager cluster? [default:y] |
When interrupting cluster environmental setting processing, "n" is inputted, when continuing processing, "y" is inputted, or press the Enter key.

If the transaction is the Storage management server transaction, proceed to step 8.
If the transaction is the Storage server transaction, proceed to step 13.
Start the creation of a common environment for Storage management server transactions.
The initial window for setting the common environment opens. Confirm the displayed information, enter "y", and press the Enter key.
  +----------------------------------------------------------------+
  |   A common environment for the AdvancedCopy Manager            |
  |   Storage management server will be created.                   |
  |  [Notes]                                                       |
  |   Prepare the following directories before starting processing.|
  | ============================================================== |
  |                                                                |
  |   1) Directory for the DB file                                 |
  |   2) Directory for the RDB dictionary                          |
  |   3) Directory for the RDB log file                            |
  |   4) Directory for the DB space to store the repository data   |
  |                                                                |
  +----------------------------------------------------------------+

Do you want to continue with processing? [y/n] ==> y |
For Storage management server transaction, specify the DB device.
The window shown below opens. Enter the directory name for the DB file system according to the information in [Note], and press the Enter key.
  -----------------------< DB device setting >----------------------

          Enter the directory name for the DB file.

         [Notes]
           Enter the absolute path name of the directory.

Enter ==> /ACMMnt/DBFile/DBFile |
A similar setting window opens for input of the directory names for the RDB dictionary, RDB log file, and DB space where repository data is stored. Enter a directory name for each item, and press the Enter key after each entry.
After setting up the directory name for DB space where repository data is stored, the setting window for inputting the size of repository data is opened. Enter the size of repository data, and press the Enter key.
For Storage management server transaction, check the DB directory settings.
The four directory names and the size of repository data specified in step 9 are displayed. Confirm the displayed information, enter "y", and press the Enter key.
====================================================================

 Directory name for the DB file ............/ACMMnt/DBFile/DBFile
 Directory name for the RDB dictionary ...../ACMMnt/DBDic/DBDic
 Directory name for the RDB log file ......./ACMMnt/DBLog/DBLog
 Directory name for the DB space
           used to save repository data ..../ACMMnt/DBSpa/DBSpa
 Repository data Size ......................65MB

 ====================================================================

Okay? [y/n] ==> y |
For Storage management server transaction, confirm the continuation of processing.
After the window for confirming the continuation of processing opens, enter "y", and press the Enter key.
  +--------------------------------------------------------------------+
  |   Creation of the AdvancedCopy Manager Storage management          |
  |   server environment will start.                                   |
  | ================================================================== |
  |                                                                    |
  |   Once processing has started, system information is rewritten.    |
  |   Make sure that the environment allows execution                  |
  |   before proceeding.                                               |
  |                                                                    |
  +--------------------------------------------------------------------+

Do you want to continue with processing? [y/n] ==> y |
For Storage management server transaction, make the repository access settings.
The window for setting AdvancedCopy Manager repository access opens. Enter a user name and password, and press the Enter key.

For the point of security, it recommends using not a root user but a general user.
          Enter the user name and password for accessing
          the repository of AdvancedCopy Manager.

         [Notes]
          We recommend you to input a general user other than root.

                Username           : acmuser
                Password           :
Password(Re-enter) : |

When you delete a user on OS, perform a re-setup with reference to "Change of deletion/password of the user who specified it as the repository access user", in the "Solaris ETERNUS SF AdvancedCopy Manager Operator's Guide". When you change a password, perform a re-setup with reference to "Change of deletion/password of the user who specified it as the repository access user", in the "Solaris ETERNUS SF AdvancedCopy Manager Operator's Guide".
Finnish the cluster setup command on the primary node.
The window indicating password registration and cluster setup command completion opens.
swstf8100 The cluster setup of the primary node has been completed. Next, create the cluster environment of the secondary node. # |
Unmount the shared disks on the primary node.
For Storage management server transaction, unmount the shared disk for AdvancedCopy Manager shared data and that for the AdvancedCopy Manager repository on the primary node.
For Storage server transaction, unmount the shared disk for AdvancedCopy Manager shared data on the secondary node.
Mount the shared disks on the secondary node A.
For Storage management server transaction, mount the shared disk for AdvancedCopy Manager shared data and that for the AdvancedCopy Manager repository on the secondary node A.
For Storage server transaction, mount the shared disk for AdvancedCopy Manager shared data on the secondary node A.
Execute the cluster setup command on the secondary node A.
For Storage management server transaction, on the secondary node A, execute the cluster setup command shown below after blocking other users from accessing the shared disk for AdvancedCopy Manager shared data and that for the AdvancedCopy Manager repository. When this command is executed, a repository is created in addition to the cluster being set up. For more information, see the chapter on database creation.
For Storage server transaction, on the secondary node A, execute the following cluster setup command after blocking other users from accessing the shared disk for AdvancedCopy Manager shared data:
# /opt/swstorage/bin/stgclset_vcs -k Secondary | Sec -m AdvancedCopy-Manager-Shared-Data-Mount-Point |
Example
# /opt/swstorage/bin/stgclset_vcs -k Secondary -m /STGMGRDISK |
or
# /opt/swstorage/bin/stgclset_vcs -k Sec -m /STGMGRDISK |

For a Storage management server transaction to be performed, use the locale that is specified when the Storage management server is installed. (If Symfoware is installed in advance, use the locale that is specified when Symfoware is installed.)
Check the setup object.
Information about the logical node specified by the command is displayed. After confirming the displayed information, press the Enter key.
For Storage management server transaction:
# /opt/swstorage/bin/stgclset_vcs -k Secondary -m /STGMGRDISK

AdvancedCopy Manager settings are as follows.
        Cluster system : VERITAS Cluster Server
        Node type      : Secondary
        IP Address     : 10.10.10.10
        Mount point    : /STGMGRDISK
        Node name      : nodemgr
        Service        : STGMGRSRV
        Function       : Management Server
Do you want to continue with setting of AdvancedCopy Manager cluster? [default:y] |
For Storage server transaction:
# /opt/swstorage/bin/stgclset_vcs -k Secondary -m /STGAGTMNT
AdvancedCopy Manager settings are as follows.
        Cluster system : VERITAS Cluster Server
        Node type      : Secondary
        Mount point    : /STGAGTMNT
        Node name      : nodeAGT
        Service        : agent_service
        Function       : Server
Do you want to continue with setting of AdvancedCopy Manager cluster? [default:y] |
When interrupting cluster environmental setting processing, "n" is inputted, when continuing processing, "y" is inputted, or press the Enter key.

If the transaction is the Storage management server transaction, proceed to step 18.
If the transaction is the Storage server transaction, proceed to step 19.
Start the creation of a common environment for AdvancedCopy Manager management server transactions.
The initial window for setting the common environment opens. Confirm the displayed information, enter "y", and press the Enter key.
  +--------------------------------------------------------------------+
  |   Creation of the AdvancedCopy Manager Storage management          |
  |   server environment will start.                                   |
  | ================================================================== |
  |                                                                    |
  |   Once processing has started, system information is rewritten.    |
  |   Make sure that the environment allows execution                  |
  |   before proceeding.                                               |
  |                                                                    |
  +--------------------------------------------------------------------+

Do you want to continue with processing? [y/n] ==> y |
Finnish the cluster setup command on the secondary node A.
The window indicating cluster setup command completion opens.
swstf8101 The cluster setup of the secondary node has been completed. # |
Unmount the shared disks on the secondary node A.
For Storage management server transaction, unmount the shared disk for AdvancedCopy Manager shared data and that for the AdvancedCopy Manager repository on the secondary node A.
For Storage server transaction, unmount the shared disk for AdvancedCopy Manager share data on the secondary node A.

If the system is the 1:1 standby system, the Mutual standby system and the n:1 standby system, proceed to step 28.
If the system is Cascade topology and the Priority transfer, proceed to step 21.
Mount the shared disks on the secondary node B.
For Storage management server transaction, mount the shared disk for AdvancedCopy Manager shared data and that for the AdvancedCopy Manager repository on the secondary node B.
For Storage server transaction, mount the shared disk for AdvancedCopy Manager shared data on the secondary node B.

When there are two or more secondary nodes B, Step 21 to Step 27 is processed by all the secondary nodes B.
Execute the cluster setup command on the secondary node B.
Execute the cluster setup command on the secondary node B on which the shared disk for AdvancedCopy Manager shared data and the shared disk for the AdvancedCopy Manager repository were mounted in step 21.
For Storage management server transaction, on the secondary node B, execute the cluster setup command shown below after blocking other users from accessing the shared disk for AdvancedCopy Manager shared data and that for the AdvancedCopy Manager repository. When this command is executed, a repository is created in addition to the cluster being set up. For more information, see the chapter on database creation.
For Storage server transaction, on the secondary node B, execute the following cluster setup command after blocking other users from accessing the shared disk for AdvancedCopy Manager shared data:
# /opt/swstorage/bin/stgclset_vcs -k Secondary | Sec -m AdvancedCopy-Manager-Shared-Data-Mount-Point |
Example
# /opt/swstorage/bin/stgclset_vcs -k Secondary -m /STGMGRDISK |
or
# /opt/swstorage/bin/stgclset_vcs -k Sec -m /STGMGRDISK |

For a Storage management server transaction to be performed, use the locale that is specified when the Storage management server is installed. (If Symfoware is installed in advance, use the locale that is specified when Symfoware is installed.)
Check the setup object.
Information about the logical node specified by the command is displayed. After confirming the displayed information, press the Enter key.
For Storage management server transaction:
# /opt/swstorage/bin/stgclset_vcs -k Secondary -m /STGMGRDISK
AdvancedCopy Manager settings are as follows.
        Cluster system : VERITAS Cluster Server
        Node type      : Secondary
        IP Address     : 10.10.10.10
        Mount point    : /STGMGRDISK
        Node name      : nodemgr
        Service        : STGMGRSRV
        Function       : Management Server
Do you want to continue with setting of AdvancedCopy Manager cluster? [default:y] |
For Storage server transaction:
# /opt/swstorage/bin/stgclset_vcs -k Secondary -m /STGAGTMNT
AdvancedCopy Manager settings are as follows.
        Cluster system : VERITAS Cluster Server
        Node type      : Secondary
        Mount point    : /STGAGTMNT
        Node name      : nodeAGT
        Service        : agent_service
        Function       : Server
Do you want to continue with setting of AdvancedCopy Manager cluster? [default:y] |
When interrupting cluster environmental setting processing, "n" is inputted, when continuing processing, "y" is inputted, or press the Enter key.
Check the addition of a secondary node.
The window for confirming of adding a secondary node is displayed. After confirmation of a cascade, "y" is inputted and the Enter key is pushed.
Secondary node is already setup in another node. The number of secondary nodes : 1 Do you want to setup new secondary node? [default:n] y |
The number of secondary nodes already set up is outputted to "The number of secondary nodes."

The default value is "n." "n" means cancellation of processing.
If the transaction is the Storage management server transaction, proceed to step 25.
If the transaction is the Storage server transaction, proceed to step 26.
Start the creation of a common environment for AdvancedCopy Manager management server transactions.
After the window for confirming the continuation of processing opens, enter "y", and press the Enter key.
  +--------------------------------------------------------------------+
  |   Creation of the AdvancedCopy Manager Storage management          |
  |   server environment will start.                                   |
  | ================================================================== |
  |                                                                    |
  |   Once processing has started, system information is rewritten.    |
  |   Make sure that the environment allows execution                  |
  |   before proceeding.                                               |
  |                                                                    |
  +--------------------------------------------------------------------+

Do you want to continue with processing? [y/n] ==> y |
Finnish the cluster setup command on the secondary node B.
The window indicating cluster setup command completion opens.
swstf8101 The cluster setup of the secondary node has been completed. # |
Unmount the shared disks on the secondary node B.
For Storage management server transaction, unmount the shared disk for AdvancedCopy Manager shared data and that for the AdvancedCopy Manager repository on the secondary node B.
For Storage server transaction, unmount the shared disk for AdvancedCopy Manager share data on the secondary node B.

When the secondary node B (it does not perform from Step 21 to Step 27) remains, perform from Step 21 in the node. When operation from Step 21 to Step 27 is completed by all secondary node B, go to Step 28.
Create and register a Service Group.
Service of AdvancedCopy Manager create and register at a User Service Group.
Please add the following types as a resource of AdvancedCopy Manager.
Application
Specify a "/opt/FJSVswstf/cluster/clproc/vcsStart_Logical-Node-Name" to be StartProgram.
Specify a "/opt/FJSVswstf/cluster/clproc/vcsStop_Logical-Node-Name" to be StopProgram.
Specify a "/opt/FJSVswstf/cluster/clproc/vcsMoni_Logical-Node-Name" to be MonitorProgram.
MountPoint
For Storage management server transaction, register the shared disk for AdvancedCopy Manager share data, and the shared disk for the AdvancedCopy Manager repository.
For Storage server transaction, register the shared disk for AdvancedCopy Manager share data.
IP
Register the logic IP address for AdvancedCopy Manager. When using the logic IP address already used on business, it is not necessary to register newly.
Application should set up a dependency after MountPoint and IP to become on-line.
Refer to VERITAS Cluster Server User's Guide about a user service group and the creation/registration method of a resource.
The User Service Group by the command of VERITAS Cluster Server and the example of creation/registration of a resource are as follows.
In this example, User Service Group name is set to "STGMGRSRV", active system node name is set to "node1", standby system node name is set to "node2", and resource (application) name is set to "AdvancedCopy_Manager_appl."
VCS config table is saved by another file-name. (It performs by all nodes.)
# mv /etc/VRTSvcs/conf/config/main.cf /etc/VRTSvcs/conf/config/main.cf.bk |
Place VCS into the read-write enabled state.
# haconf -makerw |
Define a list of systems used at occurrence of fail-over.
Already, when set up into the User Service Group, it is not necessary to set up.
The following commands perform a check.
# hagrp -display STGMGRSRV -attribute SystemList # hagrp -display STGMGRSRV -attribute AutoStartList |
A User Service Group is newly created (it is unnecessary when already set up into the User Service Group). As the system priority sequence, active node has priority over standby node.
# hagrp -add STGMGRSRV # hagrp -modify STGMGRSRV SystemList node1 0 node2 1 # hagrp -modify STGMGRSRV AutoStartList node1 node2 |
Register applications.
A resource (application) is registered into a User Service Group.
# hares -add AdvancedCopy_Manager_appl Application STGMGRSRV |
Place resources into the enabled state.
# hares -modify AdvancedCopy_Manager_appl Enabled 1 |
Specify a super-user(root) who starts StartProgram, StopProgram, MonitorProgram.
# hares -modify AdvancedCopy_Manager_appl User root |
Specify a start application.
When a logical node name is nodemgr, the path of the application for starting becomes "/opt/FJSVswstf/cluster/clproc/vcsStart_nodemgr."
# hares -modify AdvancedCopy_Manager_appl StartProgram /opt/FJSVswstf/cluster/clproc/vcsStart_nodemgr |
Specify a stop application.
When a logical node name is nodemgr, the path of the application for a stop becomes "/opt/FJSVswstf/cluster/clproc/vcsStop_nodemgr."
# hares -modify AdvancedCopy_Manager_appl StopProgram /opt/FJSVswstf/cluster/clproc/vcsStop_nodemgr |
Specify a monitor application.
When a logical node name is nodemgr, the path of monitor application becomes "/opt/FJSVswstf/cluster/clproc/vcsMoni_nodemgr."
# hares -modify AdvancedCopy_Manager_appl MonitorProgram /opt/FJSVswstf/cluster/clproc/vcsMoni_nodemgr |
The mount information on the shared disk for AdvancedCopy Manager share data is registered.
In this example, a resource (mount) name is set to "AdvancedCopy_Manager_mount", and the mount point of shared disk for AdvancedCopy Manager share data is set to "/STGMGRDISK".
Register resource into User Service Group.
# hares -add AdvancedCopy_Manager_mount Mount STGMGRSRV |
Place the resource into the enabled state.
# hares -modify AdvancedCopy_Manager_mount Enabled 1 |
A mount pointer is set as a resource.
# hares -modify AdvancedCopy_Manager_mount MountPoint /STGMGRDISK |
Specify a block device to be mounted.
In this example, the block device of a shared disk is set to "/dev/dsk/c2t0d0s4".
# hares -modify AdvancedCopy_Manager_mount BlockDevice /dev/dsk/c2t0d0s4 |
Specify a file system type for the shared disk.
In this example, a file system type is set to vxfs.
# hares -modify AdvancedCopy_Manager_mount FSType vxfs |
For Storage management server transaction, the mount information on AdvancedCopy Manager repository is registered. This operation is not required when the shared disk for AdvancedCopy Manager share data is substituted for the shared disk for the AdvancedCopy Manager repository.
In this example, all repository directories will be created on a single shared disk, and the resource (mount) name for this shared disk will be "AdvancedCopy_Manager_DB". If multiple shared disks have been prepared for repository directories, perform the same operation on all shared disks.
Register resource in User Service Group.
# hares -add AdvancedCopy_Manager_DB Mount STGMGRSRV |
Place the resource into the enabled state.
# hares -modify AdvancedCopy_Manager_DB Enabled 1 |
The mount pointer of a resource is set up.
# hares -modify AdvancedCopy_Manager_DB MountPoint /ACMDB |
Specify a block device to be mounted.
In this example, the block device of a shared disk is set to "/dev/dsk/c2t0d1s4".
# hares -modify AdvancedCopy_Manager_DB BlockDevice /dev/dsk/ c2t0d1s4 |
Specify a file system type for the shared disk.
In this example, a file system type is set to "vxfs".
# hares -modify AdvancedCopy_Manager_DB FSType vxfs |
Register a logical address.
Already, when set up into the User Service Group, it is not necessary to set up.
In this example, a resource (IP address) name is set to "sybase_ip".
A resource is registered into a User Service Group.
# hares -add sybase_ip IP STGMGRSRV |
Place the resource into the enabled state.
# hares -modify Sybase_ip Enabled 1 |
Specify a device.
In this example, a device is set to "hme0".
# hares -modify Sybase_ip Device hme0 |
Specify an address.
In this example, an IP address is set to "10.10.10.10".
# hares -modify sybase_ip Address "10.10.10.10" |
Specify the dependency of a resource.
# hares -link AdvancedCopy_Manager_appl AdvancedCopy_Manager_DB # hares -link AdvancedCopy_Manager_appl AdvancedCopy_Manager_mount # hares -link AdvancedCopy_Manager_appl sybase_ip |
Reflect the VCS setting and set VCS into the read only mode.
# haconf -dump -makero |
For Storage management server transaction, make the WebServer settings.
With reference to "Setting up the Web Server," in the Solaris AdvancedCopy Manager Installation Guide, set up the Web Server in all nodes. If WebServer operation requires use of a physical IP address, specify, specify settings so that multiple IP addresses can be used to access WebServer: that is, a physical IP address and a logical IP address. This is necessary because AdvancedCopy Manager in cluster operations accesses WebServer through a logical IP. For the required settings, refer to the applicable WebServer manual.
Start the AdvancedCopy Manager and Transaction.
Start the new User Service Group or the User Service Group stopped in step 4.
Please refer to VERITAS Cluster Server User's Guide about the starting method of a User Service Group.
The example of starting of the User Service Group by the command of VERITAS Cluster Server is as follows.
In this example, a User Service Group name is set to "STGMGRSRV", and an active system node name is set to "node1".
# hagrp -online STGMGRSRV -sys node1 |
In preparation for accidents, back up the following environments.
Database
For Storage management server transaction, refer to "Saving a database," in the "Solaris ETERNUS SF AdvancedCopy Manager Operations Guide," and back up the created database area.
Data on the shared disk for AdvancedCopy Manager shared data
Use the OS command such as cp to back up the following directories on the shared disk for AdvancedCopy Manager shared data:
Mountpoint-of-shared-disk-for-AdvancedCopy-Manager-shared-data/etc
Mountpoint-of-shared-disk-for-AdvancedCopy-Manager-shared-data/var
Create an environment for Storage management server transaction and Storage server transaction.
Use the GUI of AdvancedCopy Manager to create an environment for Storage management server transaction and Storage server transaction.
In using storage server transaction function in storage management server transaction, create an environment for Storage server transaction.

Create an environment for Storage management server transaction and an environment for Storage server transaction with reference to the "Solaris ETERNUS SF AdvancedCopy Manager Operator's Guide."
This chapter explains how to customize Linux-version PRIMECLSTER.
The primary node is an active node in a userApplication performing Storage management server transactions, and the secondary node is the standby node in the same group.
The secondary node A shows the node which creates the environment of Storage management server transactions and Storage server transactions first in the secondary nodes in this userApplication. The secondary node B shows the remaining standby node and not active node in this userApplication.
The customizing work of primary node and secondary node A is executed at 1:1 standby system, mutual standby system, and n:1 standby system.
The customizing work of primary node, secondary node A and secondary node B is executed at cascade topology system and priority transfer system.
Example:
When creating a cascade by three sets of nodes, one set is a primary node, one set is the secondary node A, and one set is the secondary node B. When creating a cascade by four sets of nodes, one set is a primary node, one set is the secondary node A, and two sets are the secondary node B.
This Chapter describes the flow of setup.
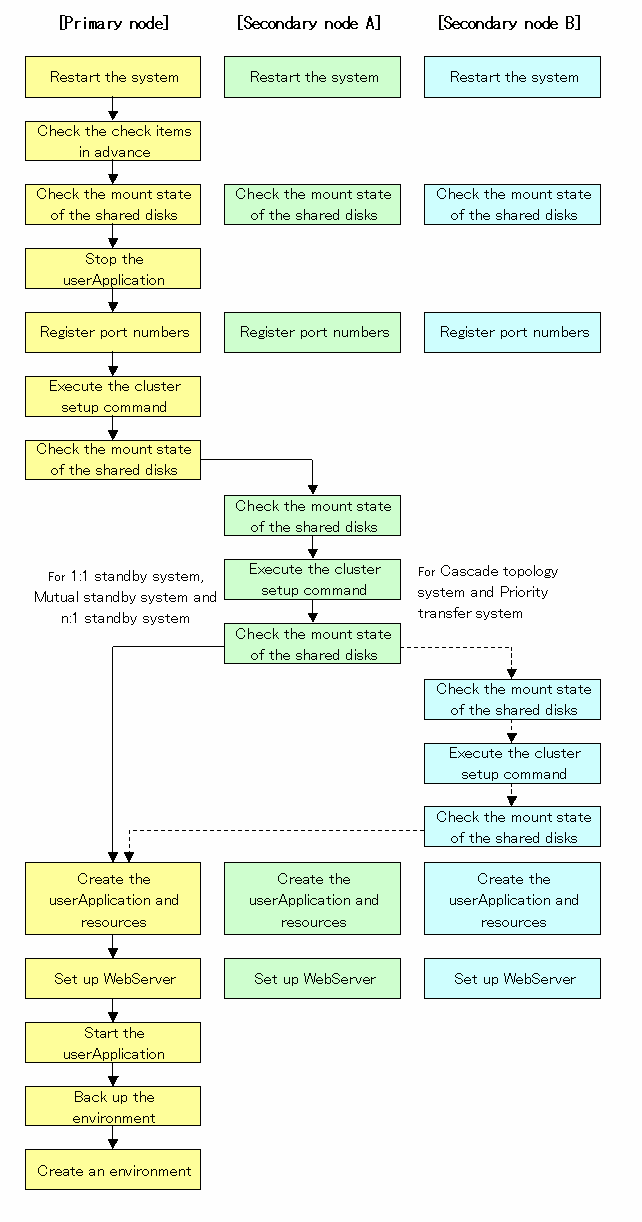
To set up a Storage management server transaction and a Storage server transaction, use the following procedure:
Restart the system.
If the system is restarted in an extension of the installation process of AdvancedCopy Manager, proceed to step 2.
Check the preparations.
Check each item of "Confirmation of items," for the userApplication to be set up.
Mount the shared disk on the primary node.
For Storage management server transaction, mount the shared disk for AdvancedCopy Manager shared data and that for the AdvancedCopy Manager repository on the primary node.
For Storage server transaction, mount the shared disk for AdvancedCopy Manager shared data on the primary node.
To add a Storage management server transaction and a Storage server transaction to an existing userApplication, use the RMS Wizard to stop the applicable userApplication.
Register the port number for the transaction communication in /etc/services. Use the OS command such as vi to register it in /etc/services.
Transaction communication daemon: stgxfws_Logical-Node-Name

Register the same port number on the primary node and the secondary node.
Execute the cluster setup command on the primary node.
For Storage management server transaction, on the primary node, execute the cluster setup command shown below after blocking other users from accessing the shared disk for AdvancedCopy Manager shared data and that for the AdvancedCopy Manager repository. When this command is executed, a repository is created in addition to the cluster being set up. For more information, see the chapter on database creation.
# /opt/swstorage/bin/stgclset_lxprm -k Primary | Pri -m AdvancedCopy-Manager-Shared-Data-Mount-Point -n Logical-Node-Name -s Service-Name -i IP-Address -f mgr |
Example
# /opt/swstorage/bin/stgclset_lxprm -k Primary -m /STGMGRDISK -n nodeMGR -s manager_service -i 10.10.10.10 -f mgr |
or
# /opt/swstorage/bin/stgclset_lxprm -k Pri -m /STGMGRDISK -n nodeMGR -s manager_service -i 10.10.10.10 -f mgr |

For a Storage management server transaction to be performed, use the locale that is specified when the Storage management server is installed. (If Symfoware is installed in advance, use the locale that is specified when Symfoware is installed.)
In combined operation with the scalable class, the IP address for a Storage management server transaction specified with the -i option must be the "takeover IP address for AdvancedCopy Manager" prepared for the Storage management server transaction. Do not specify the logical IP address of the transaction in the scalable class.
For Storage management server transaction, on the primary node, execute the following cluster setup command after blocking other users from accessing the shared disk for AdvancedCopy Manager shared data:
# /opt/swstorage/bin/stgclset_lxprm -k Primary | Pri -m AdvancedCopy-Manager-Shared-Data-Mount-Point -n Logical-Node-Name -s Service-Name |
Example
# /opt/swstorage/bin/stgclset_lxprm -k Primary -m /CTTEST3 -n nodeAGT -s agent_service |
or
# /opt/swstorage/bin/stgclset_lxprm -k Pri -m /CTTEST3 -n nodeAGT -s agent_service |
Check the setup object.
Information about the logical node specified by the command is displayed. After confirming the displayed information, press the Enter key.
For Storage management server transaction:
# /opt/swstorage/bin/stgclset_lxprm -k Primary -m /STGMGRDISK -n nodeMGR -s manager_service -i 10.10.10.10 -f mgr
AdvancedCopy Manager settings are as follows.
        Cluster system : PRIMECLUSTER
        Node type      : Primary
        IP Address     : 10.10.10.10
        Mount point    : /STGMGRDISK
        Node name      : nodeMGR
        Service        : manager_service
        Function       : Management Server
Do you want to continue with setting of AdvancedCopy Manager cluster? [default:y] |
For Storage server transaction:
# /opt/swstorage/bin/stgclset_lxprm -k Primary -m /CTTEST3 -n nodeAGT -s agent_service
AdvancedCopy Manager settings are as follows.
        Cluster system : PRIMECLUSTER
        Node type      : Primary
        Mount point    : /CTTEST3
        Node name      : nodeAGT
        Service        : agent_service
        Function       : Server
Do you want to continue with setting of AdvancedCopy Manager cluster? [default:y] |
When interrupting cluster environmental setting processing, "n" is inputted, when continuing processing, "y" is inputted, or press the Enter key.

If the transaction is the Storage management server transaction, proceed to step 8.
If the transaction is the Storage server transaction, proceed to step 13.
Start the creation of a common environment for Storage management server transactions.
The initial window for setting the common environment opens. Confirm the displayed information, enter "y", and press the Enter key.
  +----------------------------------------------------------------+
  |   A common environment for the AdvancedCopy Manager            |
  |   Storage management server will be created.                   |
  |  [Notes]                                                       |
  |   Prepare the following directories before starting processing.|
  | ============================================================== |
  |                                                                |
  |   1) Directory for the DB file                                 |
  |   2) Directory for the RDB dictionary                          |
  |   3) Directory for the RDB log file                            |
  |   4) Directory for the DB space to store the repository data   |
  |                                                                |
  +----------------------------------------------------------------+

Do you want to continue with processing? [y/n] ==> y |
For Storage management server transaction, specify the DB device.
The window shown below opens. Enter the directory name for the DB file system according to the information in [Note], and press the Enter key.
  -----------------------< DB device setting >----------------------

          Enter the directory name for the DB file.

         [Notes]
           Enter the absolute path name of the directory.

Enter ==> /ACMMnt/DBFile/DBFile |
A similar setting window opens for input of the directory names for the RDB dictionary, RDB log file, and DB space where repository data is stored. Enter a directory name for each item, and press the Enter key after each entry.
After setting up the directory name for DB space where repository data is stored, the setting window for inputting the size of repository data is opened. Enter the size of repository data, and press the Enter key.
For Storage management server transaction, check the DB directory settings.
The four directory names and the size of repository data specified in step 9 are displayed. Confirm the displayed information, enter "y", and press the Enter key.
====================================================================

 Directory name for the DB file ............/ACMMnt/DBFile/DBFile
 Directory name for the RDB dictionary ...../ACMMnt/DBDic/DBDic
 Directory name for the RDB log file ......./ACMMnt/DBLog/DBLog
 Directory name for the DB space
           used to save repository data ..../ACMMnt/DBSpa/DBSpa
 Repository data Size ......................65MB

 ====================================================================

Okay? [y/n] ==> y |
For Storage management server transaction, confirm the continuation of processing.
After the window for confirming the continuation of processing opens, enter "y", and press the Enter key.
  +----------------------------------------------------------------+
  |   Creation of the AdvancedCopy Manager Storage management      |
  |   server environment will start.                               |
  | ============================================================== |
  |                                                                |
  |   Once processing has started, system information is rewritten.|
  |   Make sure that the environment allows execution              |
  |   before proceeding.                                           |
  |                                                                |
  +----------------------------------------------------------------+

Do you want to continue with processing? [y/n] ==> y |
For Storage management server transaction, make the repository access settings.
The window for setting AdvancedCopy Manager repository access opens. Enter a user name and password, and press the Enter key.

For the point of security, it recommends using not a root user but a general user.
          Enter the user name and password for accessing
          the repository of AdvancedCopy Manager.

         [Notes]
          We recommend you to input a general user other than root.

                Username           : acmuser
                Password           :
Password(Re-enter) : |

When you delete a user on OS, perform a re-setup with reference to "Change of deletion/password of the user who specified it as the repository access user", in the "Linux ETERNUS SF AdvancedCopy Manager Operator's Guide". When you change a password, perform a re-setup with reference to "Change of deletion/password of the user who specified it as the repository access user", in the "Linux ETERNUS SF AdvancedCopy Manager Operator's Guide".
Finnish the cluster setup command on the primary node.
The window indicating password registration and cluster setup command completion opens.
swstf8100 The cluster setup of the primary node has been completed. Next, create the cluster environment of the secondary node. # |
Unmount the shared disks on the primary node.
For Storage management server transaction, unmount the shared disk for AdvancedCopy Manager shared data and that for the AdvancedCopy Manager repository on the primary node.
For Storage server transaction, unmount the shared disk for AdvancedCopy Manager shared data on the primary node.
Mount the shared disks on the secondary node A.
For Storage management server transaction, mount the shared disk for AdvancedCopy Manager shared data and that for the AdvancedCopy Manager repository on the secondary node A.
For Storage server transaction, mount the shared disk for AdvancedCopy Manager shared data on the secondary node A.
Execute the cluster setup command on the secondary node A.
For Storage management server transaction, on the secondary node A, execute the cluster setup command shown below after blocking other users from accessing the shared disk for AdvancedCopy Manager shared data and that for the AdvancedCopy Manager repository. When this command is executed, a repository is created in addition to the cluster being set up. For more information, see the chapter on database creation.
For Storage server transaction, on the secondary node A, execute the following cluster setup command after blocking other users from accessing the shared disk for AdvancedCopy Manager shared data:
# /opt/swstorage/bin/stgclset_lxprm -k Secondary | Sec -m AdvancedCopy-Manager-Shared-Data-Mount-Point |
Example
# /opt/swstorage/bin/stgclset_lxprm -k Secondary -m /STGMGRDISK |
or
# /opt/swstorage/bin/stgclset_lxprm -k Sec -m /STGMGRDISK |

For a Storage management server transaction to be performed, use the locale that is specified when the Storage management server is installed. (If Symfoware is installed in advance, use the locale that is specified when Symfoware is installed.)
Check the setup object.
Information about the logical node specified by the command is displayed. After confirming the displayed information, press the Enter key.
For Storage management server transaction:
# /opt/swstorage/bin/stgclset_lxprm -k Secondary -m /STGMGRDISK
AdvancedCopy Manager settings are as follows.
        Cluster system : PRIMECLUSTER
        Node type      : Secondary
        IP Address     : 10.10.10.10
        Mount point    : /STGMGRDISK
        Node name      : nodeMGR
        Service        : manager_service
        Function       : Management Server
Do you want to continue with setting of AdvancedCopy Manager cluster? [default:y] |
For Storage server transaction:
# /opt/swstorage/bin/stgclset_lxprm -k Secondary -m /CTTEST3
AdvancedCopy Manager settings are as follows.
        Cluster system : PRIMECLUSTER
        Node type      : Secondary
        Mount point    : /CTTEST3
        Node name      : nodeAGT
        Service        : agent_service
        Function       : Server
Do you want to continue with setting of AdvancedCopy Manager cluster? [default:y] |
When interrupting cluster environmental setting processing, "n" is inputted, when continuing processing, "y" is inputted, or press the Enter key.

If the transaction is the Storage management server transaction, proceed to step 18.
If the transaction is the Storage server transaction, proceed to step 19.
Start the creation of a common environment for AdvancedCopy Manager management server transactions.
After the window for confirming the continuation of processing opens, enter "y", and press the Enter key.
  +----------------------------------------------------------------+
  |   Creation of the AdvancedCopy Manager Storage management      |
  |   server environment will start.                               |
  | ============================================================== |
  |                                                                |
  |   Once processing has started, system information is rewritten.|
  |   Make sure that the environment allows execution              |
  |   before proceeding.                                           |
  |                                                                |
  +----------------------------------------------------------------+

Do you want to continue with processing? [y/n] ==> y |
Finnish the cluster setup command on the secondary node A.
The window indicating cluster setup command completion opens.
swstf8101 The cluster setup of the secondary node has been completed. # |
Unmount the shared disks on the secondary node A.
For Storage management server transaction, unmount the shared disk for AdvancedCopy Manager shared data and that for the AdvancedCopy Manager repository on the secondary node A.
For Storage server transaction, unmount the shared disk for AdvancedCopy Manager share data on the secondary node A.

If the system is the 1:1 standby system, the Mutual standby system and the n:1 standby system, proceed to step 28.
If the system is Cascade topology and the Priority transfer, proceed to step 21.
Mount the shared disks on the secondary node B.
For Storage management server transaction, mount the shared disk for AdvancedCopy Manager shared data and that for the AdvancedCopy Manager repository on the secondary node B.
For Storage server transaction, mount the shared disk for AdvancedCopy Manager shared data on the secondary node B.

When there are two or more secondary nodes B, Step 21 to Step 27 is processed by all the secondary nodes B.
Execute the cluster setup command on the secondary node B.
For Storage management server transaction, on the secondary node B, execute the cluster setup command shown below after blocking other users from accessing the shared disk for AdvancedCopy Manager shared data and that for the AdvancedCopy Manager repository. When this command is executed, a repository is created in addition to the cluster being set up. For more information, see the chapter on database creation.
For Storage server transaction, on the secondary node B, execute the following cluster setup command after blocking other users from accessing the shared disk for AdvancedCopy Manager shared data:
# /opt/swstorage/bin/stgclset_lxprm -k Secondary | Sec -m AdvancedCopy-Manager-Shared-Data-Mount-Point |
Example
# /opt/swstorage/bin/stgclset_lxprm -k Secondary -m /STGMGRDISK |
or
# /opt/swstorage/bin/stgclset_lxprm -k Sec -m /STGMGRDISK |

For a Storage management server transaction to be performed, use the locale that is specified when the Storage management server is installed. (If Symfoware is installed in advance, use the locale that is specified when Symfoware is installed.)
Check the setup object.
Information about the logical node specified by the command is displayed. After confirming the displayed information, press the Enter key.
For Storage management server transaction:
# /opt/swstorage/bin/stgclset_lxprm -k Secondary -m /STGMGRDISK
AdvancedCopy Manager settings are as follows.
        Cluster system : PRIMECLUSTER
        Node type      : Secondary
        IP Address     : 10.10.10.10
        Mount point    : /STGMGRDISK
        Node name      : nodeMGR
        Service        : manager_service
        Function       : Management Server
Do you want to continue with setting of AdvancedCopy Manager cluster? [default:y] |
For Storage server transaction:
# /opt/swstorage/bin/stgclset_lxprm -k Secondary -m /CTTEST3
AdvancedCopy Manager settings are as follows.
        Cluster system : PRIMECLUSTER
        Node type      : Secondary
        Mount point    : /CTTEST3
        Node name      : nodeAGT
        Service        : agent_service
        Function       : Server
Do you want to continue with setting of AdvancedCopy Manager cluster? [default:y] |
When interrupting cluster environmental setting processing, "n" is inputted, when continuing processing, "y" is inputted, or press the Enter key.
Check the addition of a secondary node.
The window for confirming of adding a secondary node is displayed. After confirmation of a cascade, "y" is inputted and the Enter key is pushed.
Secondary node is already setup in another node. The number of secondary nodes : 1 Do you want to setup new secondary node? [default:n] y |
The number of secondary nodes already set up is outputted to "The number of secondary nodes."

The default value is "n." "n" means cancellation of processing.
If the transaction is the Storage management server transaction, proceed to step 25.
If the transaction is the Storage server transaction, proceed to step 26.
Start the creation of a common environment for AdvancedCopy Manager management server transactions.
The initial window for setting the common environment opens. Confirm the displayed information, enter "y", and press the Enter key.
  +----------------------------------------------------------------+
  |   Creation of the AdvancedCopy Manager Storage management      |
  |   server environment will start.                               |
  | ============================================================== |
  |                                                                |
  |   Once processing has started, system information is rewritten.|
  |   Make sure that the environment allows execution              |
  |   before proceeding.                                           |
  |                                                                |
  +----------------------------------------------------------------+

Do you want to continue with processing? [y/n] ==> y |
Finnish the cluster setup command on the secondary node B.
The window indicating cluster setup command completion opens.
swstf8101 The cluster setup of the secondary node has been completed. # |
Unmount the shared disks on the secondary node B.
For Storage management server transaction, unmount the shared disk for AdvancedCopy Manager shared data and that for the AdvancedCopy Manager repository on the secondary node B.
For Storage server transaction, unmount the shared disk for AdvancedCopy Manager share data on the secondary node B.

When the secondary node B (it does not perform from Step 21 to Step 27) remains, perform from Step 21 in the node. When operation from Step 21 to Step 27 is completed by all secondary node B, go to Step 28.
Create the userApplication and resources.
On both the primary node and the secondary node, set up "logical IP takeover of the NIC switching mode" of GLS. When using the existing GLS, this setup of GLS is unnecessary.
On either the primary node or the secondary node, use the RMS Wizard to create a userApplication and the following resources.
Gds resource
For Storage management server transaction, register the class of the shared disk for AdvancedCopy Manager shared data and the class of the shared disk for AdvancedCopy Manager repository.
For Storage server transaction, register the class of the shared disk for AdvancedCopy Manager shared data.
Fsystem resource
For Storage management server transaction, register the mount point of the shared disk for AdvancedCopy Manager shared data and the mount point of the shared disk with the directory for AdvancedCopy Manager repository.
For Storage server transaction, register the mount point of the shared disk for AdvancedCopy Manager shared data.
Gls resource
This resource is not necessary if a Gls resource has already been created by the applicable userApplication.
Procedure resource
Register "SMGRPROC_Logical-Node-Name" into an Application class.

For information on how to set GLS, refer to the "PRIMECLUSTER Installation and Administration Guide" and "PRIMECLUSTER Global Link Services."
For information on how to create resources and userApplications with PRIMECLUSTER, see "Creating Resources and userApplications with Linux-version PRIMECLUSTER" in this manual.
The cluster setup command (stgclset_lxprm) has already made the preparatory settings (creating a state transition procedure and storing resources in the resource database) that are defined to set PRIMECLUSTER procedure resources.
For Storage management server transaction, make the WebServer settings.
With reference to "Setting up the Web Server," in the Linux ETERNUS SF AdvancedCopy Manager Installation Guide, set up the Web Server in all nodes.
Start the userApplication and the AdvancedCopy Manager.
Use the RMS Wizard to start the new userApplication or the userApplication stopped in step 4.
Back up the environment.
In preparation for accidents, back up the following environments.
Database
For Storage management server transaction, refer to "Saving a database," in the "Linux ETERNUS SF AdvancedCopy Manager Operations Guide," and back up the created database area.
Data on the shared disk for AdvancedCopy Manager shared data
Use the OS command such as cp to back up the following directories on the shared disk for AdvancedCopy Manager shared data:
Mountpoint-of-shared-disk-for-AdvancedCopy-Manager-shared-data/etc
Mountpoint-of-shared-disk-for-AdvancedCopy-Manager-shared-data/var
Create an environment for Storage management server transaction and Storage server transaction.
Use the GUI of AdvancedCopy Manager to create an environment for Storage management server transaction and Storage server transaction.
In the case of Storage management server transaction cum Storage server transaction, also create an environment for Storage server transaction.

Refer to the Linux ETERNUS SF AdvancedCopy Manager Operator's Guide, and create the environment for Storage management server transaction and Storage server transaction.
This chapter explains how to customize Windows-version MSCS.
The primary node is an active node in a cluster service (userApplication) performing Storage management server transactions, and the secondary node is the standby node in the same group.
The secondary node A shows the node which creates the environment of Storage management server transactions and Storage server transactions first in the secondary nodes in this cluster group. The secondary node B shows the remaining secondary nodes in this cluster group.
The customizing work of primary node and secondary node A is executed at 1:1 standby system, mutual standby system, and n:1 standby system.
The customizing work of primary node, secondary node A and secondary node B is executed at cascade topology system.
Example:
When creating a cascade by three sets of nodes, one set is a primary node, one set is the secondary node A, and one set is the secondary node B. When creating a cascade by four sets of nodes, one set is a primary node, one set is the secondary node A, and two sets are the secondary node B.

When you applied Windows Server 2003 Service Pack 1 or Windows Server 2003 R2, set the firewall function with reference to ""Notes in the installation," in the "Windows Installation Guide".
This chapter describes the flow of setup.
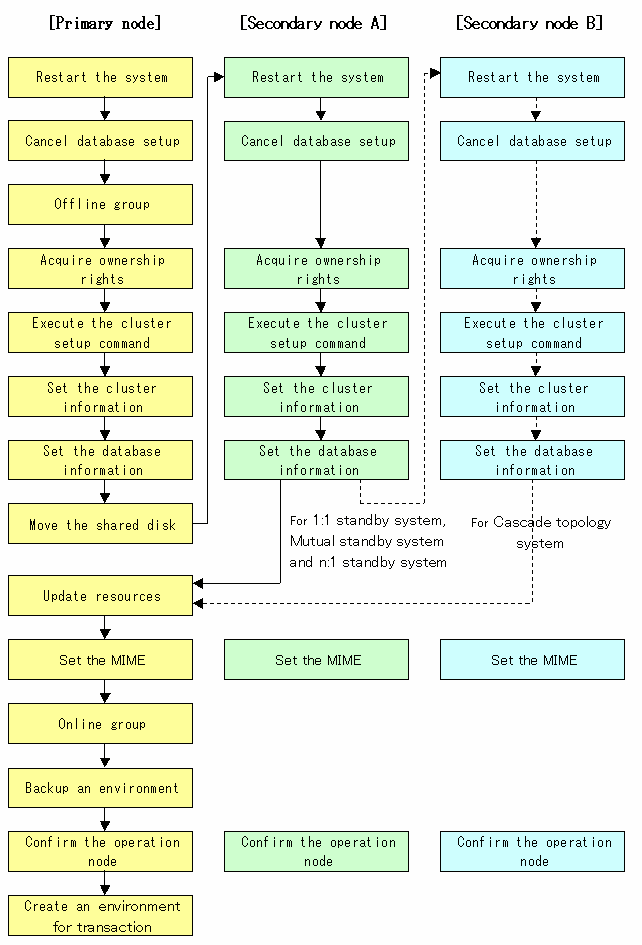
To set up a Storage management server transaction and a Storage server transaction, use the procedure below.

Do not use the following services to perform this processing; otherwise, a problem may occur:
Terminal service (use by remote desktop connection)
Telnet server service
If the Storage management server is the Windows Server 2003, use by making console session connection with terminal service. Refer to the following for the method of console session connection.
http://support.microsoft.com/kb/278845
Reactivate the primary node. If the system has been reactivated as the extension of AdvancedCopy Manager installation, go to the step 2.
For Storage management server transaction, cancel the setting processing of database information.
When the following window is displayed, click the [Cancel] button.
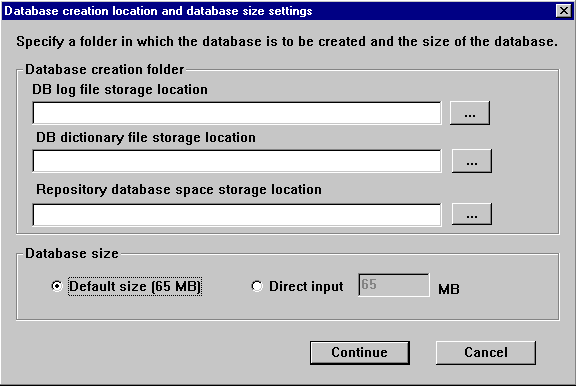
To add the Storage management server transactions and the Storage server transaction to an existing cluster group, offline the cluster group using the cluster administrator. This step is not required if a new cluster group is being created.
For Storage management server transaction, leave the shared disk for AdvancedCopy Manager shared data and the shared disk for AdvancedCopy Manager repository online.
For Storage server transaction, leave the shared disk for AdvancedCopy Manager shared data online.
For information on how to stop the cluster group and how to vary the shared disk online, refer to the Microsoft(R) Cluster Server manuals.
Acquire the ownership rights on Microsoft(R) Cluster Server.
Acquire the ownership rights for the Quorum disk and the shared disk used by AdvancedCopy Manager and the ownership rights for the cluster group on the primary node using the cluster administrator. For information about how to acquire ownership rights, refer to the Microsoft(R) Cluster Server manuals.
Execute the cluster setup command.
Execute the following cluster setup command on the primary node:
|
Program_directory\bin\stgclset_mscs |
Select the node type and shared disk.
The initial window of the cluster setup command is displayed.
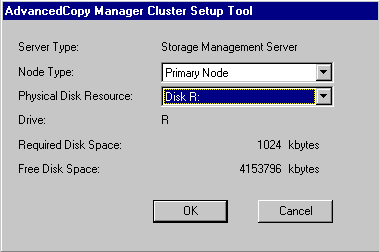
Each item is explained below. Make the required entries and then click the [OK] button.
Server Type
Confirm that the server is "Storage Management Server" or "Storage Server."
Node Type
Select "Primary Node."
Physical Disk Resource
Select the resource for the shared disk used for AdvancedCopy Manager shared data prepared in this manual "Confirmation of items."
Drive
The drive letter corresponding to the physical disk resource is displayed.
Required Disk space
The minimum disk size required for the AdvancedCopy Manager shared data is displayed. Use the calculated shared disk size for the required disk size. Check whether there is enough free space.
Free Disk Space
The amount of free disk space of the specified drive is displayed.
Set the cluster information for the primary node.
The setting window of the cluster setup command is displayed.
For Storage management server transaction:
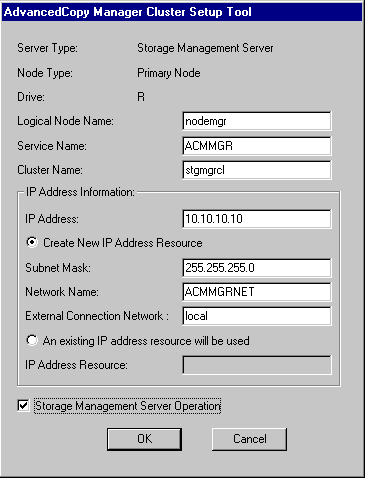
For Storage Server transaction:
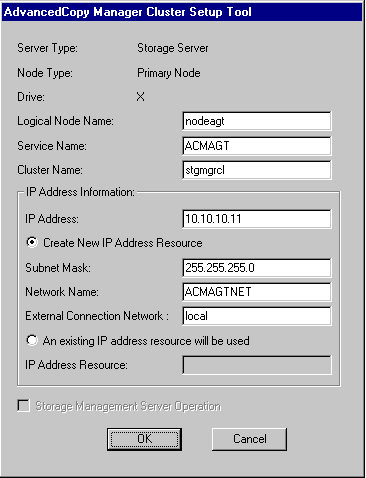
Each item is explained below. Make the required entries and then click the [OK] button.
Server Type
Confirm that the server is "Storage Management Server" or "Storage Server."
Node Type
Confirm that the node is "Primary Node."
Drive
The drive letter corresponding to the physical disk resource is displayed.
Logical Node Name
Enter the logical node name prepared in this manual "Confirmation of items."
Service name
Enter the service name prepared in this manual "Confirmation of items."
Cluster Name
Enter the cluster name confirmed in this manual "Confirmation of items."
IP Address
Enter the logical IP address prepared in this manual "Confirmation of items."
Create New IP Address Resource
If the IP address entered above is a new IP address, select this button. Enter information for the following three items only if this button has been selected.
Subnet Mask
Enter the subnet mask of the IP address entered above.
Network Name
Enter the network name prepared in this manual "Confirmation of items."
External Connection Network
Enter the external connection network name confirmed in this manual "Confirmation of items."
An existing IP address resource will be used
If the IP address entered above is an IP address inherited from an existing cluster group, select this button. Enter information for the following item only if this button has been selected.
IP Address Resource
Enter the IP address resource confirmed in this manual "Confirmation of items."
Storage Management Server Operation
For Storage management server transaction, select this item. If this item is not selected, settings are made for Storage server transactions.
Set the port number and service.
The [Port number setting] window is displayed. If the port number and service has already been set, this window does not display.

Each item is explained below. Make the required entries and then click the [OK] button.
Account Name
The account name entered when AdvancedCopy Manager was installed is displayed.
Password
Enter the password entered when AdvancedCopy Manager was installed.
Communication Service
Enter the port number for the transaction communication service prepared in this manual "Confirmation of items."
The port number and service settings have been completed.
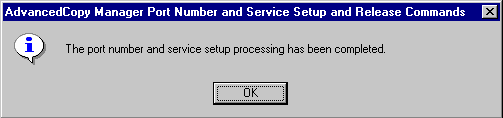
Click the [OK] button.

If the transaction is the Storage management server transaction, proceed to step 10.
If the transaction is the Storage server transaction, proceed to step 16.
For Storage management server transaction, set the database information.
When the [Database creation location and database size settings] window is displayed, change the displayed information as required, and click the [Continue] button. If one shared disk is used for the AdvancedCopy Manager repository and AdvancedCopy Manager shared data, specify the drive selected in item 6 as the database creation folder. And, be sure to create a database on the shared disk.
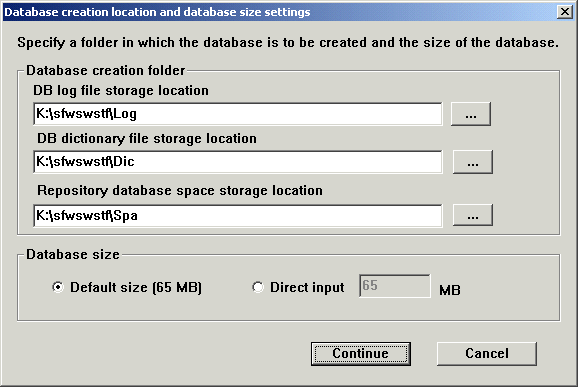
Database creation folder
Enter the folder name where each database will be stored. Specifying the absolute path name including the drive name. The folder name specified here must be a new NTFS folder. If the specified folder has been formatted by any other system or if it is an existing folder, change it to another folder name.
Database size
Specify the database size in MB. Use the value calculated by the, see "Repository" in the "ETERNUS SF AdvancedCopy Manager Installation Guide." If the default value, check the [Default size] button.
For Storage management server transaction, set the database access user.
Enter the user name and password of the user who will access the database. After entering the information, click the [Settings] button. The IP address entered in cluster setup command window is displayed in the IP address field of the Storage management server. This IP address cannot be changed.
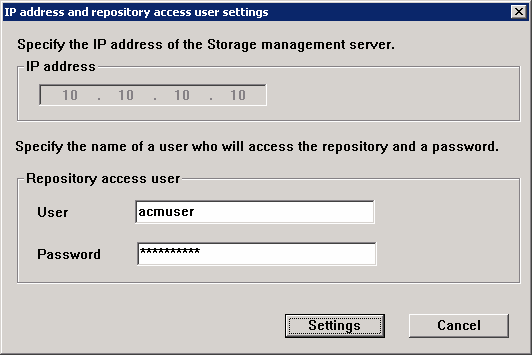
There are the following conditions in specification of User and Password.
User
Do not include the following character.
"/\[]:;|=,+*?<>"
The account constituted only from a blank and a period is not permitted.
Do not exceed 20 characters.
Password
Do not exceed 14 characters.

When you delete a user on OS, perform a re-setup with reference to "Change of deletion/password of the user who specified it as the repository access user" in the "Windows ETERNUS SF AdvancedCopy Manager Operator's Guide". When you change a password, perform a re-setup with reference to "Change of deletion/password of the user who specified it as the repository access user" in the "Windows ETERNUS SF AdvancedCopy Manager Operator's Guide".
For Storage management server transaction, confirm the setting information.
When the setting information for the database is displayed, confirm the displayed information and click the [Start] button.

For Storage management server transaction, the DB Setup processing started.

For Storage management server transaction, the DB Setup processing is completed.
The DB Setup completion window is displayed; click the [Close] button.
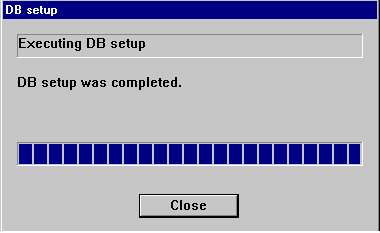
For Storage management server transaction, set the Web server.
The following confirmation dialogs are displayed. In using a Web client, click the [OK] button and set up a Web server (Microsoft Internet Information Server/Microsoft Internet Information Services).
When only a command is used without using a Web client, click the [NO] button.

The following virtual directories are set as a Web server.
|
Virtual directory |
Directory name |
Property of virtual directory |
|
Swstorage |
program-directory\inet\wwwroot |
Addition of "read" |
|
swstorage-j |
program-directory\java |
Addition of "read" |
|
swstorage-cgi |
program-directory\inet\cgi |
Addition of "Execute permissions" (CGI is stored.) |
|
swstorage-d |
shared-disk-for-advancedcopymanager-shared-data: \etc\opt\swstorage\etc\data |
Addition of "read" |

If version 6.0 of Internet Information Service is installed, the following confirmation dialog box is displayed when the Yes button in the Confirmation of Web Server setting dialog box is clicked. To make CGI script executable, click Yes and set up the Web server.

If Windows SharePoint Services have been installed in a Windows Server 2003 R2 environment, SharePoint server management settings and IIS settings must be performed to use the Web client. Refer to A.7 "Running the Software in an Environment where Windows SharePoint Services have been Installed" in the Windows Edition ETERNUS SF Advanced Copy Manager Installation Guide for more information about these settings.
The cluster setup of the primary node has been completed.
When the cluster setup completion window is displayed, click the [OK] button. Continue by setting up the secondary node.

For Storage management server transaction, move the disk resource as required.
If the shared disk for the AdvancedCopy Manager repository and the shared disk for AdvancedCopy Manager shared data are separate, use the cluster administrator to move the disk resource on the shared disk for the AdvancedCopy Manager repository to the cluster group. For information about how to move disk resource, refer to the Microsoft(R) Cluster Server manuals.
Reactivate the secondary node A.
If the system has been reactivated as an extension of the AdvancedCopy Manager installation process, go to the step 19.
For Storage management server transaction, cancel setting processing of the database information.
When the following window is displayed, click the [Cancel] button.
Acquiring cluster group ownership by using the secondary node A
Acquire the ownership rights for cluster group on the secondary node A. For information about how to acquire ownership rights, refer to the Microsoft(R) Cluster Server manuals.
Execute the cluster setup command.
Execute the following cluster setup command on the secondary node:
|
Program_directory \bin\stgclset_mscs |
Select the node type and shared disk.
The initial window of the cluster setup command is displayed.
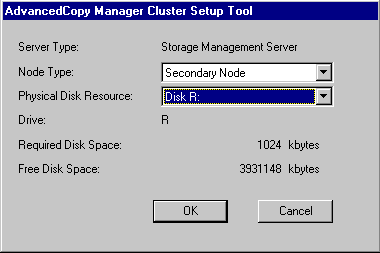
Each item is explained below. Make the required entries and then click the [OK] button.
Server Type
Confirm that the server is "Storage Management Server" or "Storage Server."
Node Type
Select "Secondary Node."
Physical Disk Resource
Select the resource of the shared disk used for AdvancedCopy Manager shared data. Select the same resource as that selected for the primary node.
Drive
The drive letter corresponding to the physical disk resource is displayed.
Required Disk Space
The minimum disk size required for the AdvancedCopy Manager cluster environment is displayed.
Free Disk Space
The amount of free disk space of the specified drive is displayed.
Set the cluster information for the secondary node A.
The values set for the primary node are displayed in the cluster setup command setting window (Only the node type needs to be changed to secondary node.). After confirming each item, click the [OK] button.
For Storage management server transaction:
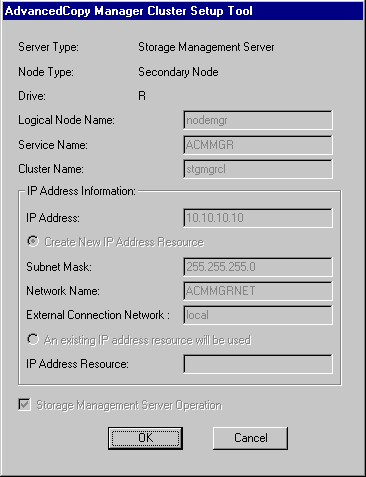
For Storage server transaction:
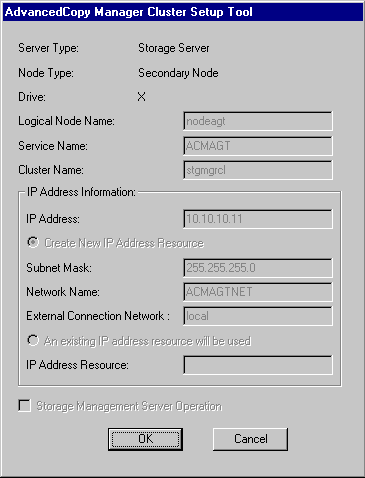
Set the port number and service.
The [Port number setting] window is displayed. If a port number and service has already been set, this window does not display. Except for the password, the same values as those set for the primary node are displayed.
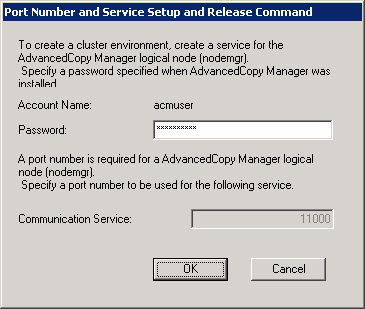
Enter the password entered when AdvancedCopy Manager was installed in the password field. After entering the password, click the [OK] button.
The port number and service settings have been completed.
Click the [OK] button.

If the transaction is the Storage management server transaction, proceed to step 26.
If the transaction is the Storage server transaction, proceed to step 32.
For Storage management server transaction, set the database information.
When the [Database creation location and database size settings] window is displayed, enter the same information as that set for the primary node, and click the [Continue] button.
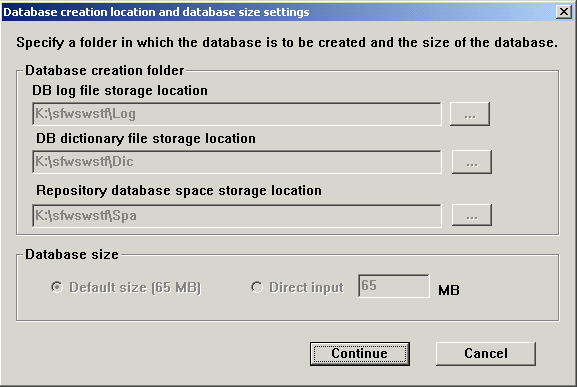
For Storage management server transaction, confirm the database access user.
The values set for the primary node are displayed in the [IP address and repository access user setting] window. Confirm each setting, and click the [Settings] button.
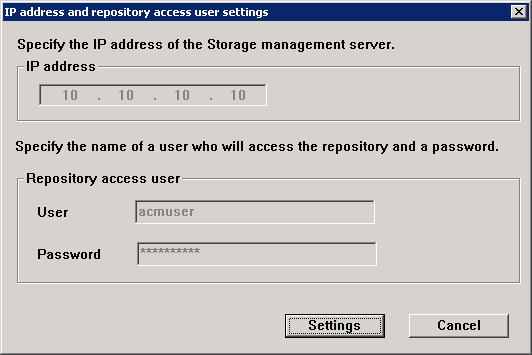
For Storage management server transaction, confirm the setting information.
When the setting information for the database is displayed, confirm the displayed information and click the [Start] button.
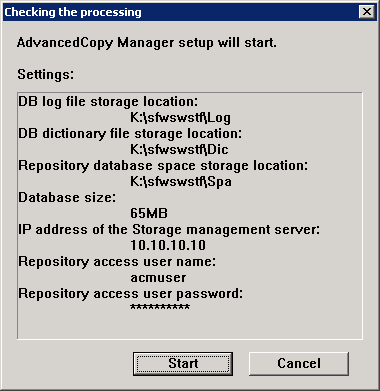
For Storage management server transaction, the DB Setup processing started.
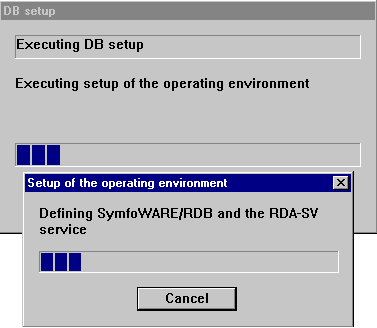
For Storage management server transaction, the DB Setup processing is completed.
The DB Setup completion window is displayed; click the [Close] button.
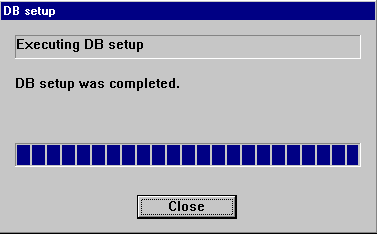
For Storage management server transaction, set the Web server.
The following confirmation dialogs are displayed. In using a Web client, click the [OK] button and set up a Web server (Microsoft Internet Information Server/Microsoft Internet Information Services).
When only a command is used without using a Web client, click the [NO] button.
The following virtual directories are set as a Web server.
|
Virtual directory |
Directory name |
Property of virtual directory |
|
Swstorage |
program-directory\inet\wwwroot |
Addition of "read" |
|
swstorage-j |
program-directory\java |
Addition of "read" |
|
swstorage-cgi |
program-directory\inet\cgi |
Addition of "Execute permissions" (CGI is stored.) |
|
swstorage-d |
shared-disk-for-advancedcopymanager-shared-data: \etc\opt\swstorage\etc\data |
Addition of "read" |

If version 6.0 of Internet Information Service is installed, the following confirmation dialog box is displayed when the Yes button in the Confirmation of Web Server setting dialog box is clicked. To make CGI script executable, click Yes and set up the Web server.
If Windows SharePoint Services have been installed in a Windows Server 2003 R2 environment, SharePoint server management settings and IIS settings must be performed to use the Web client. Refer to A.7 "Running the Software in an Environment where Windows SharePoint Services have been Installed" in the Windows Edition ETERNUS SF Advanced Copy Manager Installation Guide for more information about these settings.
The cluster setup of the secondary node has been completed.
When the cluster setup completion window is displayed, click the [OK] button.


If the system is the 1:1 standby system, the Mutual standby system and the n:1 standby system, proceed to step 49.
If the system is Cascade topology, proceed to step 33.
Reactivate the secondary node B.
If the system has been reactivated as an extension of the AdvancedCopy Manager installation process, go to the step 34.

When the secondary node B consists of two or more nodes, perform from Step33 and Step 48 on all the secondary node B.
For Storage management server transaction, cancel setting processing of the database information.
When the following window is displayed, click the [Cancel] button.
Acquiring cluster group ownership by using the secondary node B
Use the cluster administrator to acquire the ownership rights for cluster group on the secondary node B. For information about how to acquire ownership rights, refer to the Microsoft(R) Cluster Server manuals. For information about how to acquire ownership rights, refer to the Microsoft(R) Cluster Server manuals.
Execute the cluster setup command.
Execute the following cluster setup command on the secondary node B:
|
Program_directory \bin\stgclset_mscs |
Select the node type and shared disk.
The initial window of the cluster setup command is displayed.
Each item is explained below. Make the required entries and then click the [OK] button.
Server Type
Confirm that the server is "Storage Management Server" or "Storage Server."
Node Type
Select "Secondary Node."
Physical Disk Resource
Select the resource of the shared disk used for AdvancedCopy Manager shared data. Select the same resource as that selected for the primary node.
Drive
The drive letter corresponding to the physical disk resource is displayed.
Required Disk Space
The minimum disk size required for the AdvancedCopy Manager cluster environment is displayed.
Free Disk Space
The amount of free disk space of the specified drive is displayed.
Confirm the addition of the secondary node.
A confirmation dialog box for adding a secondary node to a cascade topology is displayed. Confirm that the service is for a cascade topology, and click the [Yes] button.
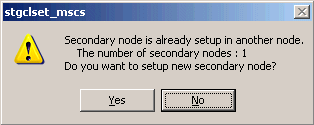
The number of secondary nodes already set up is displayed at "Secondary nodes already set up."

Note that the default is [No] (cancellation of processing).
Set the cluster information for the secondary node B.
The values set for the primary node are displayed in the cluster setup command setting window (Only the node type needs to be changed to secondary node.). After confirming each item, click the [OK] button.
For Storage management server transaction:
For Storage server transaction:
Set the port number and service.
The [Port number setting] window is displayed. If a port number and service has already been set, this window does not display. Except for the password, the same values as those set for the primary node are displayed.
Enter the password entered when AdvancedCopy Manager was installed in the password field. After entering the password, click the [OK] button.
The port number and service settings have been completed.
Click the [OK] button.

If the transaction is the Storage management server transaction, proceed to step 42.
If the transaction is the Storage server transaction, proceed to step 48.
For Storage management server transaction, set the database information.
When the [Database creation location and database size settings] window is displayed, enter the same information as that set for the primary node, and click the [Continue] button.
For Storage management server transaction, confirm the database access user.
The values set for the primary node are displayed in the [IP address and repository access user setting] window. Confirm each setting, and click the [Settings] button.
For Storage management server transaction, confirm the setting information.
When the setting information for the database is displayed, confirm the displayed information and click the [Start] button.
For Storage management server transaction, the DB Setup processing started.
For Storage management server transaction, the DB Setup processing is completed.
The DB Setup completion window is displayed; click the [Close] button.
For Storage management server transaction, set the Web server.
The following confirmation dialogs are displayed. In using a Web client, click the [OK] button and set up a Web server (Microsoft Internet Information Server/Microsoft Internet Information Services).
When only a command is used without using a Web client, click the [NO] button.
The following virtual directories are set as a Web server.
|
Virtual directory |
Directory name |
Property of virtual directory |
|
Swstorage |
program-directory\inet\wwwroot |
Addition of "read" |
|
swstorage-j |
program-directory\java |
Addition of "read" |
|
swstorage-cgi |
program-directory\inet\cgi |
Addition of "Execute permissions" (CGI is stored.) |
|
swstorage-d |
shared-disk-for-advancedcopymanager-shared-data: \etc\opt\swstorage\etc\data |
Addition of "read" |

If version 6.0 of Internet Information Service is installed, the following confirmation dialog box is displayed when the Yes button in the Confirmation of Web Server setting dialog box is clicked. To make CGI script executable, click Yes and set up the Web server.
If Windows SharePoint Services have been installed in a Windows Server 2003 R2 environment, SharePoint server management settings and IIS settings must be performed to use the Web client. Refer to A.7 "Running the Software in an Environment where Windows SharePoint Services have been Installed" in the Windows Edition ETERNUS SF Advanced Copy Manager Installation Guide for more information about these settings.
The cluster setup of the secondary node B has been completed.
When the cluster setup completion window is displayed, click the [OK] button.

When the secondary node B (it does not perform from Step 33 to Step 48) remains, perform from Step 33 in the node. When operation from Step 33 to Step 48 is completed by all secondary node B, go to Step 49.
If necessary, specify the resource dependency and the ownership rights required for execution.
If necessary, specify the resource dependency and the ownership rights required for execution.
For Storage management server transaction, if the shared disk for AdvancedCopy Manager repository and the shared disk for AdvancedCopy Manager shared data are separate, use the cluster administrator to add the shared disk resource for AdvancedCopy Manager repository to the dependency of the following resources. For information on how to add the resource dependency, refer to the Microsoft(R) Cluster Server manuals.
SymfoWARE RDA RDBSWSTF
SymfoWARE RDB RDBSWSTF
Add a business disk resource to the dependence of the following resources by using the cluster administrator when the operation of the backup management etc. is executed (Storage management server transaction, Storage server transaction, and Storage server transaction).
AdvancedCopy COM Service_Logical-Node-Name

When volume is added, or when it deletes, it is necessary to re-set up the above-mentioned dependency. About more information, see "Notes on Cluster Operation" in then "Windows ETERNUS SF AdvancedCopy Manager Operator's Guide".
If the number of cluster group nodes is greater than the number of cluster system nodes (such as in an n:1 standby system), change the ownership rights required for execution.
Using cluster administrator authority, change the property information (ownership rights required for execution) of the AdvancedCopy Manager resources belonging to the cluster group for only the nodes operating in the cluster group. For information on how to change the ownership rights required for execution, refer to the Microsoft(R) Cluster Server manuals.
The property information must be changed for the following AdvancedCopy Manager resources:
AdvancedCopy COM Service_Logical-Node-Name
AdvancedCopy ACL Service (For Storage management server transaction)
AdvancedCopy GUI Service (For Storage management server transaction)
SymfoWARE RDA RDBSWSTF (For Storage management server transaction)
SymfoWARE RDB RDBSWSTF (For Storage management server transaction)
AdvancedCopy IP Address logical node name (if "Create New IP Address Resource" has been selected with the cluster setup command of AdvancedCopy Manager)
AdvancedCopy Network logical node name (if "Create New IP Address Resource" has been selected with the cluster setup command of AdvancedCopy Manager)
Shared disk for AdvancedCopy Manager shared data
Shared disk for AdvancedCopy Manager repository (For Storage management server transaction)
Backup volume or replica volume (for operation for Storage management server transactions, Storage server transactions and Storage server transactions)

For the AdvancedCopy Manager resources that do not belong to the cluster group, check with the system where the resources were created.
For Storage management server transaction, set the Web server to enable MIME use in the primary and secondary nodes.
For use of the Web screen, files may need to be downloaded. When the Yes button has been clicked in steps 15 and 30 to set up the Web server, the following settings are required for downloading of the files.
For information on the settings, see "Step 9 for Details of Storage Management Server Customization (MIME setting of the Web server)," in the Windows ETERNUS SF AdvancedCopy Manager Installation Guide.
Online cluster group on the primary node.
Use the cluster administrator to cause the cluster group whose settings have been completed online to start AdvancedCopy Manager service.
Back up the environment.
Back up the following environment in preparation for a potential accident:
Database
For Storage management server transaction, refer to "Saving a database," in the "Windows ETERNUS SF AdvancedCopy Manager Operations Guide" and back up the created database area.
Data on the shared disk for AdvancedCopy Manager shared data
Using, for example, the copy function of Windows Explorer, back up the following folders on the shared disk for AdvancedCopy Manager shared data.
Drive of the shared disk for AdvancedCopy Manager shared data: \etc
Drive of the shared disk for AdvancedCopy Manager shared data: \var
Verify operation on the node.
Using cluster administrator authority, verify that the cluster group operates on the node.
Create an environment for Storage management server transaction and Storage server transaction.
Use the GUI of AdvancedCopy Manager to create an environment for Storage management server transaction Storage server transaction.
In using storage server transaction function in storage management server transaction, create an environment for Storage server transaction.

Create an environment for Storage management server transaction and an environment for Storage server transaction with reference to the "Windows ETERNUS SF AdvancedCopy Manager Operator's Guide."
This chapter explains how to customize HP-version MC/ServiceGuard.
Throughout this chapter, the primary node is an active node in a cluster service performing Storage server transactions, and the secondary node is the standby node in the same package.
The secondary node A shows the node which first creates the environment of the Storage server transactions in the secondary nodes in this package. The secondary node B shows the remaining secondary nodes in this package.
The primary node and secondary node A are customized in a 1:1 standby system, mutual standby system, and n:1 standby system.
The primary node, secondary node A, and secondary node B are customized in a cascade topology system.
Example:When creating a cascade with three sets of nodes, one set is a primary node, one set is the secondary node A, and one set is the secondary node B. When creating a cascade with four sets of nodes, one set is a primary node, one set is the secondary node A, and two sets are the secondary node B.
This Chapter describes the flow of setup.
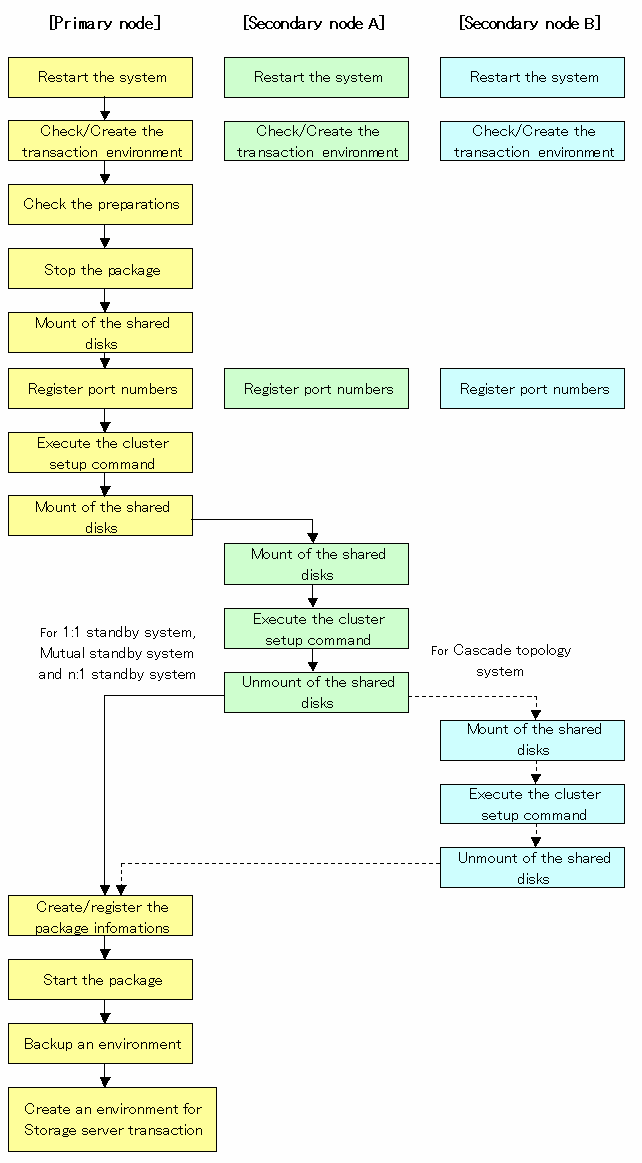
To set up a Storage server transaction, use the procedure below.
Restart the system.
Restart the primary node and secondary node. If the system is restarted in an extension of the installation process of AdvancedCopy Manager, proceed to step 2.
Transaction environment is checked / created by using the MC/ServiceGuard function.
Please refer to the manual of MC/ServiceGuard about the check method of a package, and the creation method.
The Transactions (package) which adds Storage server Transactions is checked. In the case of new Transactions, it checks that a package is created, a package is started and a package can move between nodes.
Check the preparations.
Check each item of "Confirmation of items," the package to be set up.
Stop the transaction by using the MC/ServiceGuard function.
Stop the target transaction (stop a package).
Please refer to the manual of MC/ServiceGuard about the stop method of transaction.
Mount the shared disk on the primary node.
The shared disk for AdvancedCopy Manager share data checks that it is in the state of unmount on the primary node and the secondary node.
Then, Mount the shared disk for AdvancedCopy Manager shared data on the primary node.
Register the port number for the transaction communication daemon in /etc/services. Use the OS command such as vi to register it in /etc/services.
Transaction communication daemon: stgxfws_Logical-Node-Name

Register the same port number on the primary node and the secondary node.
Execute the cluster setup command on the primary node.
On the primary node, execute the following cluster setup command after blocking other users from accessing the shared disk for AdvancedCopy Manager shared data:
# /opt/swstorage/bin/stgclset_mcsg -k Primary | Pri -m AdvancedCopy-Manager-Shared-Data-Mount-Point -s Service-Name -v Volume-Group-Name -i IP-Address -u Subnet |
The example of an input:
# /opt/swstorage/bin/stgclset_mcsg -k Primary -m /stgmount -n nodepr -s serv1 -v vg01 -i 10.10.10.10 -u 10.10.10.0 |
or
# /opt/swstorage/bin/stgclset_mcsg -k Pri -m /stgmount -n nodepr -s serv1 -v vg01 -i 10.10.10.10 -u 10.10.10.0 |
Check the setup object.
Information on the logical node specified by the command is displayed. After the displayed content is confirmed press the Enter key.
AdvancedCopy Manager settings are as follows. Cluster system : MC/ServiceGuard Node type : Primary IP Address : 10.10.10.10 SUBNET : 10.10.10.0 Mount point : /stgmount Device Name : /dev/vg01/lvol1 Volume Group : vg01 Node name : nodepr Service : serv1 Function : Server Do you want to continue with setting of AdvancedCopy Manager cluster? [default:y] y |
It asks whether continue setting processing. When interrupting cluster environmental setting processing, "n" is inputted, when continuing processing, "y" is inputted, or press the Enter key.
Completed the setup command on the primary node.
The completion screen of the cluster setup command is displayed.
swstf8100 The cluster setup of the primary node has been completed. Next, create the cluster environment of the secondary node. # |
Unmount the shared disk on the primary node.
Unmount the shared disk for AdvancedCopy Manager share data on the primary node.
Mount the shared disk on the secondary nodeA.
Mount the shared disk for AdvancedCopy Manager shared data on the secondary node A.
Execute the cluster setup command on the secondary nodeA.
On the secondary nodeA, execute the following cluster setup command after blocking other users from accessing the shared disk for AdvancedCopy Manager shared data:
# /opt/swstorage/bin/stgclset_mcsg -k Secondary | Sec -m AdvancedCopy-Manager-Shared-Data-Mount-Point |
The example of an input:
# /opt/swstorage/bin/stgclset_mcsg -k Secondary -m /stgmount |
or
# /opt/swstorage/bin/stgclset_mcsg -k Sec -m /stgmount |
Check the setup object.
Information on the logical node specified by the command is displayed. After the displayed content is confirmed press the Enter key.
AdvancedCopy Manager settings are as follows. Cluster system : MC/ServiceGuard Node type : Secondary IP Address : 10.10.10.10 SUBNET : 10.10.10.0 Mount point : /stgmount Device Name : /dev/vg01/lvol1 Volume Group : vg01 Node name : nodepr Service : serv1 Function : Server Do you want to continue with setting of AdvancedCopy Manager cluster? [default:y] y |
It asks whether continue setting processing. When interrupting cluster environmental setting processing, "n" is inputted, when continuing processing, "y" is inputted, or press the Enter key.
Completed the setup command on the secondary nodeA.
The completion screen of the cluster setup command is displayed.
swstf8101 The cluster setup of the secondary node has been completed. # |
Unmount the shared disk on the secondary nodeA.
Unmount the shared disk for AdvancedCopy Manager share data on the secondary nodeA.

If the system is a 1:1 standby system, mutual standby system or n:1 standby system, proceed to step 22.
If the system is Cascade topology, proceed to step 16.
Mount the shared disk on the secondary node B where the cluster setup command will be executed.
Mount the shared disk for AdvancedCopy Manager shared data on the secondary node B.

When there are two or more secondary nodes B, Step 16 to Step 21 is processed by all the secondary nodes B.
Execute the cluster setup command on the secondary node B.
Execute the cluster setup command on the secondary node B on which the shared disk for AdvancedCopy Manager was mounted in step 16.
On the secondary node B, execute the following cluster setup command after blocking other users from accessing the shared disk for AdvancedCopy Manager shared data:
# /opt/swstorage/bin/stgclset_mcsg -k Secondary | Sec -m AdvancedCopy-Manager-Shared-Data-Mount-Point |
Example:
# /opt/swstorage/bin/stgclset_mcsg -k Secondary -m /stgmount |
or
# /opt/swstorage/bin/stgclset_mcsg -k Sec -m /stgmount |
Check the setup object.
Information about the logical node specified by the command is displayed. After confirming the displayed information, press the Enter key.
AdvancedCopy Manager settings are as follows. Cluster system : MC/ServiceGuard Node type : Secondary IP Address : 10.10.10.10 SUBNET : 10.10.10.0 Mount point : /stgmount Device Name : /dev/vg01/lvol1 Volume Group : vg01 Node name : nodepr Service : serv1 Function : Server Do you want to continue with setting of AdvancedCopy Manager cluster? [default:y] y |
A message displays, asking whether to continue the setup processing. To interrupt cluster environmental setting processing, type "n", to continue processing, type "y" or press the Enter key.
Check the addition of a secondary node.
The confirmation window for adding a secondary node is displayed. After confirming the cascade, type "y" and press the Enter key.
Secondary node is already setup in another node. The number of secondary nodes : 1 Do you want to setup new secondary node? [default:n] y |
The number of secondary nodes already set up is output to "The number of secondary nodes."

The default value is "n", which indicates cancellation of processing.
Finish the cluster setup command on the secondary node B.
A window displays, indicating that the cluster setup command is complete .
swstf8101 The cluster setup of the secondary node has been completed. # |
Unmount the shared disks on the secondary node B.
Unmount the shared disk for AdvancedCopy Manager share data on the secondary node B.

If there are remaining secondary nodes B for which steps 16 to 21 have not been performed, perform these steps in each node. When steps 16 to 21 have been completed by all secondary nodes B, proceed to Step 22.
Edit and register a package information.
When business is newly created in Procedure 2, the sample control script created by the cluster environmental setting command is copied to the control script of a package.
When resources other than AdvancedCopy Manager are set as the package control script (AdvancedCopy Manager was added to the existing business), with reference to the sample control script created by the cluster environmental setting command, the information on AdvancedCopy Manager is set as the existing control script.
The information on AdvancedCopy Manager in a sample control script can be searched with " AdvancedCopy Manager."
Sample control scripts are /var/opt/swstorage/cluster/samp_Logical-Node-Name.sh.
The timeout value of a daemon stop of AdvancedCopy Manager is 300 seconds. When the timeout value is set up by the package composition file, a timeout value should check or enough.
After replacing / editing a package control script, verification of a package composition file, registration, and a check are carried out.
Refer to the manual of MC/ServiceGuard for the method of verification of a package composition file, registration, and a check.
Start the transaction by using the MC/ServiceGuard function.
Start the transaction stopped in step 4. (A package is made into on-line.)
Please refer to the manual of MC/ServiceGuard about the starting method of transaction.
Back up the environment.
In preparation for accidents, back up the following environments.
Data on the shared disk for AdvancedCopy Manager shared data
Use the OS command such as cp to back up the following directories on the shared disk for AdvancedCopy Manager shared data:
Mountpoint-of-shared-disk-for-AdvancedCopy-Manager-shared-data/etc
Mountpoint-of-shared-disk-for-AdvancedCopy-Manager-shared-data/var
Create an environment for Storage server transaction.
Use the GUI of AdvancedCopy Manager to create an environment for Storage server transaction.

Create an environment for Storage server transaction with reference to the "ETERNUS SF AdvancedCopy Manager Operator's Guide." If the Storage management server runs in Solaris, refer to the "Solaris ETERNUS SF AdvancedCopy Manager Operator's Guide." If it runs in Windows, refer to the "Windows ETERNUS SF AdvancedCopy Manager Operator's Guide." If it runs in Linux, refer to the "Linux ETERNUS SF AdvancedCopy Manager Operator's Guide."
The HP edition of VERITAS Cluster Server has not supported.
The AIX edition of VERITAS Cluster Server has not supported.
This chapter explains how to customize AIX-version High Availability Cluster Multi-Processing.
Throughout this chapter, the primary node is the active node in the Resource Group that executes Storage server transactions, and the secondary node is the standby node in the same Resource Group.
The secondary node A shows the node which creates the environment of Storage server transactions first in the secondary nodes in this cluster resource group. The secondary node B shows the remaining secondary nodes in this cluster resource group.
The customizing work of primary node and secondary node A is executed at 1:1 standby system, mutual standby system, and n:1 standby system.
The customizing work of primary node, secondary node A and secondary node B is executed at cascade topology system.
Example:
When creating a cascade by three sets of nodes, one set is a primary node, one set is the secondary node A, and one set is the secondary node B. When creating a cascade by four sets of nodes, one set is a primary node, one set is the secondary node A, and two sets are the secondary node B.
This Chapter describes the flow of setup.
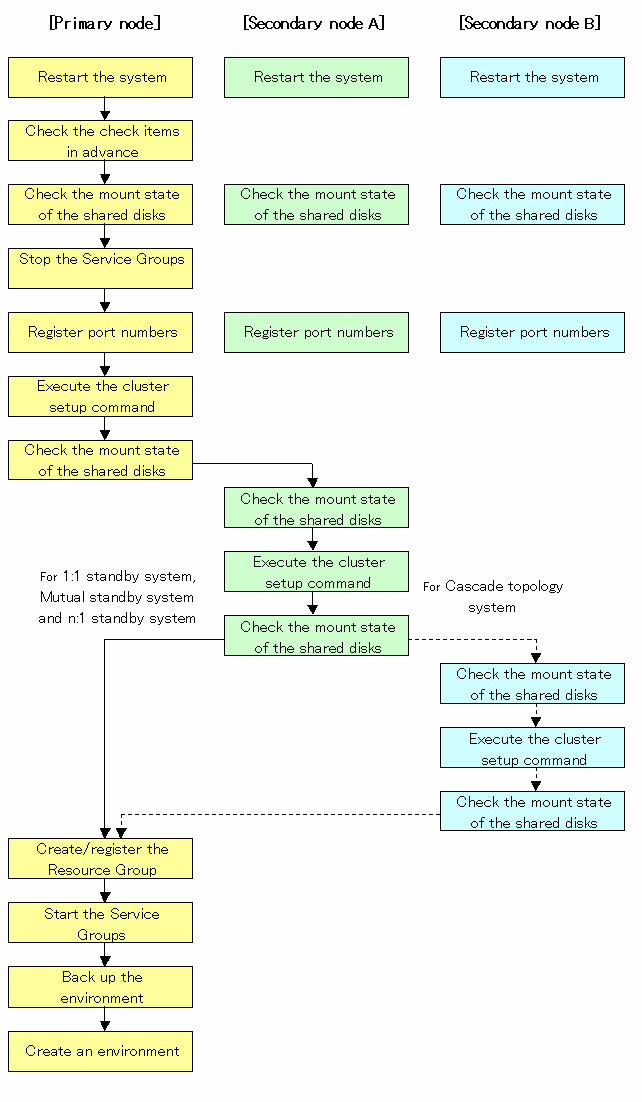
To set up a Storage server transaction, use the procedure below.
Restart the system.
Restart the primary node and all secondary nodes. If the system is restarted in an extension of the installation process of AdvancedCopy Manager, proceed to step 2.
Check the preparations.
Check each item of "Confirmation of items," for the package to be set up.
Mount the shared disk on the primary node.
Mount the shared disk for AdvancedCopy Manager shared data on the primary node.
Stop the Resource Groups.
To add a Storage server transaction to an existing Resource Group by using the High Availability Cluster Multi-Processing function, stop the applicable Resource Group.
For information on how to stop the user Resource Group, see the " High Availability Cluster Multi-Processing User's Guide."
Register port numbers
Register the port number for the transaction communication in /etc/services. Use the OS command such as vi to register it in /etc/services.
Transaction communication daemon: stgxfws_Logical-Node-Name

Register the same port number on the primary node and all secondary nodes.
Execute the cluster setup command on the primary node.
On the primary node, execute the following cluster setup command after blocking other users from accessing the shared disk for AdvancedCopy Manager shared data:
# /opt/swstorage/bin/stgclset_hacmp -k Primary | Pri -m AdvancedCopy-Manager-Shared-Data-Mount-Point -n Logical-Node-Name -s Service-Name |
Example
# /opt/swstorage/bin/stgclset_hacmp -k Primary -m /STGAGTMNT -n nodeAGT -s agent_service |
or
# /opt/swstorage/bin/stgclset_hacmp -k Pri -m /STGAGTMNT -n nodeAGT -s agent_service |
Check the setup object.
Information about the logical node specified by the command is displayed. After confirming the displayed information, press the Enter key.
# /opt/swstorage/bin/stgclset_hacmp -k Primary -m /STGAGTMNT -n nodeAGT -s agent_service
AdvancedCopy Manager settings are as follows.
        Cluster system : High Availability Cluster Multi-Processing
        Node type      : Primary
        Mount point    : /STGAGTMNT
        Node name      : nodeAGT
        Service        : agent_service
        Function       : Server
Do you want to continue with setting of AdvancedCopy Manager cluster? [default:y] |
When interrupting cluster environmental setting processing, "n" is inputted, when continuing processing, "y" is inputted, or press the Enter key.
Finnish the cluster setup command on the primary node.
The window indicating password registration and cluster setup command completion opens.
swstf8100 The cluster setup of the primary node has been completed. Next, create the cluster environment of the secondary node. # |
Unmount the shared disks on the primary node.
Unmount the shared disk for AdvancedCopy Manager shared data on the secondary node.
Mount the shared disks on the secondary node A.
Mount the shared disk for AdvancedCopy Manager shared data on the secondary node A.
Execute the cluster setup command on the secondary node A.
On the secondary node A, execute the following cluster setup command after blocking other users from accessing the shared disk for AdvancedCopy Manager shared data:
# /opt/swstorage/bin/stgclset_hacmp -k Secondary | Sec -m AdvancedCopy-Manager-Shared-Data-Mount-Point |
Example
# /opt/swstorage/bin/stgclset_hacmp -k Secondary -m /STGMGRDISK |
or
# /opt/swstorage/bin/stgclset_hacmp -k Sec -m /STGMGRDISK |
Check the setup object.
Information about the logical node specified by the command is displayed. After confirming the displayed information, press the Enter key.
# /opt/swstorage/bin/stgclset_hacmp -k Secondary -m /STGAGTMNT
AdvancedCopy Manager settings are as follows.
        Cluster system : High Availability Cluster Multi-Processing
        Node type      : Secondary
        Mount point    : /STGAGTMNT
        Node name      : nodeAGT
        Service        : agent_service
        Function       : Server
Do you want to continue with setting of AdvancedCopy Manager cluster? [default:y] |
When interrupting cluster environmental setting processing, "n" is inputted, when continuing processing, "y" is inputted, or press the Enter key.
Finnish the cluster setup command on the secondary node A.
The window indicating cluster setup command completion opens.
swstf8101 The cluster setup of the secondary node has been completed. # |
Unmount the shared disks on the secondary node A.
Unmount the shared disk for AdvancedCopy Manager share data on the secondary node A.

If the system is the 1:1 standby system, the Mutual standby system and the n:1 standby system, proceed to step 21.
If the system is Cascade topology and the Priority transfer, proceed to step 15.
Mount the shared disks on the secondary node B.
Mount the shared disk for AdvancedCopy Manager shared data on the secondary node B.

When there are two or more secondary nodes B, Step 15 to Step 20 is processed by all the secondary nodes B.
Execute the cluster setup command on the secondary node B.
Execute the cluster setup command on the secondary node B on which the shared disk for AdvancedCopy Manager shared data and the shared disk for the AdvancedCopy Manager repository were mounted in step 15.
On the secondary node B, execute the following cluster setup command after blocking other users from accessing the shared disk for AdvancedCopy Manager shared data:
# /opt/swstorage/bin/stgclset_hacmp -k Secondary | Sec -m AdvancedCopy-Manager-Shared-Data-Mount-Point |
Example
# /opt/swstorage/bin/stgclset_hacmp -k Secondary -m /STGMGRDISK |
or
# /opt/swstorage/bin/stgclset_hacmp -k Sec -m /STGMGRDISK |
Check the setup object.
Information about the logical node specified by the command is displayed. After confirming the displayed information, press the Enter key.
# /opt/swstorage/bin/stgclset_hacmp -k Secondary -m /STGAGTMNT
AdvancedCopy Manager settings are as follows.
        Cluster system : High Availability Cluster Multi-Processing
        Node type      : Secondary
        Mount point    : /STGAGTMNT
        Node name      : nodeAGT
        Service        : agent_service
        Function       : Server
Do you want to continue with setting of AdvancedCopy Manager cluster? [default:y] |
When interrupting cluster environmental setting processing, "n" is inputted, when continuing processing, "y" is inputted, or press the Enter key.
Check the addition of a secondary node.
The window for confirming of adding a secondary node is displayed. After confirmation of a cascade, "y" is inputted and the Enter key is pushed.
Secondary node is already setup in another node. The number of secondary nodes : 1 Do you want to setup new secondary node? [default:n] y |
The number of secondary nodes already set up is outputted to "The number of secondary nodes."

The default value is "n." "n" means cancellation of processing.
Finnish the cluster setup command on the secondary node B.
The window indicating cluster setup command completion opens.
swstf8101 The cluster setup of the secondary node has been completed. # |
Unmount the shared disks on the secondary node B.
Unmount the shared disk for AdvancedCopy Manager share data on the secondary node B.

When the secondary node B (it does not perform from Step 21 to Step 27) remains, perform from Step 21 in the node. When operation from Step 21 to Step 27 is completed by all secondary node B, go to Step 28.
Create and register a Resource Group.
Use function of the High Availability Cluster Multi-Processing to create and register a Resource Group for AdvancedCopy Manager.
Please add the following types as a resource of AdvancedCopy Manager.
Application Server
Specify a "/opt/FJSVswstf/cluster/clproc/hacmpStart_Logical-Node-Name" to be Start script.
Specify a "/opt/FJSVswstf/cluster/clproc/hacmpStop_Logical-Node-Name" to be Stop script.
MountPoint
Register the shared disk for AdvancedCopy Manager share data.
IP
Register the logic IP address for AdvancedCopy Manager. When using the logic IP address already used on business, it is not necessary to register newly.
Application should set up a dependency after MountPoint and IP to become on-line.
Refer to High Availability Cluster Multi-Processing User's Guide about a resource group and the creation/registration method of a resource.
Start the AdvancedCopy Manager and Transaction.
Start the new Resource Group or the Resource Group stopped in step 4.
Please refer to High Availability Cluster Multi-Processing User's Guide about the starting method of a Resource Group.
Back up the environment.
In preparation for accidents, back up the following environments.
Data on the shared disk for AdvancedCopy Manager shared data
Use the OS command such as cp to back up the following directories on the shared disk for AdvancedCopy Manager shared data:
Mountpoint-of-shared-disk-for-AdvancedCopy-Manager-shared-data/etc
Mountpoint-of-shared-disk-for-AdvancedCopy-Manager-shared-data/var
Create an environment for Storage server transaction.
Use the GUI of AdvancedCopy Manager to create an environment for Storage server transaction.

Create an environment for Storage management server transaction and an environment for Storage server transaction with reference to the "AIX ETERNUS SF AdvancedCopy Manager Operator's Guide."
|
Contents
Index
|