

| ETERNUS SF AdvancedCopy Manager Operator's Guide for cluster environment 13.0 -Microsoft(R) Windows(R) 2000/Microsoft(R) Windows Sever(TM) 2003-, -Solaris-, -HP-UX-, -Linux-, -AIX- |
Contents
Index
 
|
This chapter explains how to delete the cluster environment of a Storage management server transaction or Storage server transaction.
For Solaris-version SynfinityCluster/PRIMECLUSTER, see "Deleting for Solaris-version SynfinityCluster/PRIMECLUSTER" in this manual.
For Solaris-version VERITAS Cluster Server, see "Deleting for Solaris-version VERITAS Cluster Server" in this manual.
For Linux-version PRIMECLUSTER, see "Deleting for Linux-version PRIMECLUSTER" in this manual.
For Windows-version MSCS, see "Deleting for Windows-version MSCS" in this manual.
For HP-version MC/ServiceGuard, see "Deleting for HP-version MC/ServiceGuard" in this manual.
For HP-version VERITAS Cluster Server, see "Deleting for HP-version VERITAS Cluster Server" in this manual.
For AIX-version VERITAS Cluster Server, see "Deleting for AIX-version VERITAS Cluster Server" in this manual.
For AIX-version High Availability Cluster Multi-Processing, see "Deleting for AIX-version High Availability Cluster Multi-Processing" in this manual.
This chapter explains how to deleting Solaris-version SynfinityCluster/PRIMECLSTER.
The primary node is a node set up as a primary by the AdvancedCopy Manager cluster setup command, and the secondary node is a node set up as a secondary by the AdvancedCopy Manager cluster setup command in the same cluster service (userApplication). The secondary node A shows the node that deletes the environment last in the secondary nodes in this cluster service (userApplication). The secondary node B shows the remaining secondary nodes in this cluster service (userApplication).
The deleting work of primary node and secondary node A is executed at 1:1 standby system, mutual standby system, and n:1 standby system.
The deleting work of primary node, secondary node A and secondary node B is executed at cascade topology system and priority transfer system.
This chapter describes the flow of deleting a Cluster Environment.
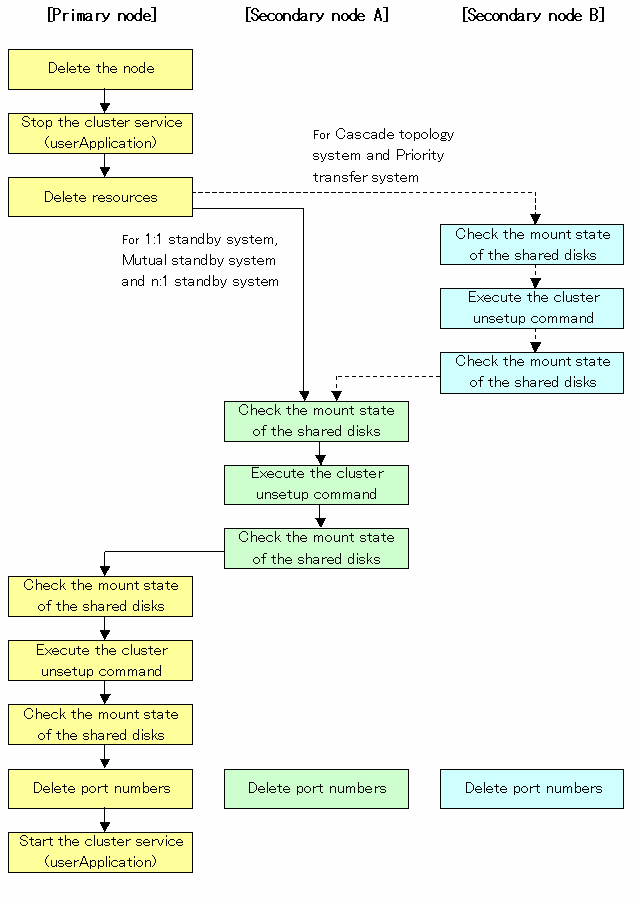
To delete the cluster environment, use the following procedure:
Use the GUI of the AdvancedCopy Manager to delete the node. For a Storage management server transaction, however, this operation is not necessary.
Stop the cluster service (userApplication).
Use the SynfinityCluster management view or the RMS main window of PRIMECLUSTER to stop the transaction to be deleted.
In SynfinityCluster, use the SynfinityCluster management view to delete the AdvancedCopy Manager resources registered for the target transaction. If cluster service has been created using only AdvancedCopy Manager resources, delete the whole cluster service.
In PRIMECLUSTER, use the PRIMECLUSTER "userApplication Configuration Wizard" to delete the AdvancedCopy Manager resources registered for the target transaction. If userApplication has been created using only AdvancedCopy Manager resources, delete the whole userApplication.

If the system is the 1:1 standby system, the Mutual standby system and the n:1 standby system, proceed to step 10.
If the system is Cascade topology and the Priority transfer, proceed to step 4.
Mount the shared disk on the secondary node B.
Mount the shared disk for AdvancedCopy Manager shared data on the secondary node B.
For a Storage management server transaction, also mount the shared disk for repository in the secondary node B.

When there are two or more secondary nodes B, Step 4 to Step 9 is processed by all the secondary nodes B.
Execute the cluster unsetup command on the secondary node B.
On the secondary node B, execute the following command after blocking other users from accessing the shared disk for AdvancedCopy Manager shared data:
# /opt/swstorage/bin/stgclunset_safe -n Logical-Node-Name |

For a Storage management server transaction to be performed, use the locale that is specified when the Storage management server is installed. (If Symfoware is installed in advance, use the locale that is specified when Symfoware is installed.)
Check the objects to be deleted.
Information about the logical node specified by the command is displayed. Confirm the displayed information, and press the Enter key.
# /opt/swstorage/bin/stgclunset_safe -n nodeMGR

AdvancedCopy Manager settings were as follows.
        Cluster system : SynfinityCluster or PRIMECLUSTER
        Node type      : Secondary
        IP Address     : 10.10.10.10  (In the case of Storage server transaction, it is not displayed.)
        Mount point    : /STGMGRDISK
        Node name      : nodeMGR
        Service        : manager_service
        Function       : Management Server (In the case of Storage server transaction, it is displayed as Server.)
        Number         : 3
        MODE           : Normal
Do you want to continue with un-setting of AdvancedCopy Manager cluster? [default:y] |
When interrupting cluster environmental unsetup processing, "n" is inputted, when continuing processing, "y" is inputted, or press the Enter key.

The number of nodes which is not carrying out cluster unsetup command is outputted to "Number". In a secondary node B, it is sure to become three or more.
For a Storage management server transaction, delete the database.
A window for confirming database deletion opens. Confirm the displayed information, enter "y", and press the Enter key. The window is not displayed in the case of a Storage server transaction.
  +----------------------------------------------------------------+
  |                                                                |
  |   All of database environments of AdvancedCopy Manager         |
  |   will be deleted.                                             |
  |                                                                |
  |  [Notes]                                                       |
  |    Once processing has started, all stored data is discarded.  |
  |    Make sure that the environment allows execution             |
  |    before proceeding.                                          |
  |                                                                |
  +----------------------------------------------------------------+

Do you want to continue with processing? [y/n] ==> y |
The cluster unsetup command is executed on the secondary node B.
The window indicating cluster unsetup command completion opens.
swstf8143 The cluster deletion of the secondary node has been completed. Next, delete the cluster environment of the another secondary node. # |

In secondary node B, a completion message is swstf8143.
Unmount the shared disk on the secondary node B.
Unmount the shared disk for AdvancedCopy Manager share data on the secondary node B.
For a Storage management server transaction, also unmount the shared disk for repository on the secondary node B.

When the secondary node B (it does not perform from Step 4 to Step 9) remains, perform from Step 4 in the node.
When operation from Step 4 to Step 9 is completed by all secondary node B, go to Step 10.
Mount the shared disk on the secondary node A.
Mount the shared disk for AdvancedCopy Manager shared data on the secondary node A.
For a Storage management server transaction, also mount the shared disk for repository in the secondary node A.
Execute the cluster unsetup command on the secondary node A.
On the secondary node A, execute the following command after blocking other users from accessing the shared disk for AdvancedCopy Manager shared data:
# /opt/swstorage/bin/stgclunset_safe -n Logical-Node-Name |

For a Storage management server transaction to be performed, use the locale that is specified when the Storage management server is installed. (If Symfoware is installed in advance, use the locale that is specified when Symfoware is installed.)
Check the objects to be deleted.
Information about the logical node specified by the command is displayed. Confirm the displayed information, and press the Enter key.
# /opt/swstorage/bin/stgclunset_safe -n nodeMGR

AdvancedCopy Manager settings were as follows.
        Cluster system : SynfinityCluster or PRIMECLUSTER
        Node type      : Secondary
        IP Address     : 10.10.10.10  (In the case of Storage server transaction, it is not displayed.)
        Mount point    : /STGMGRDISK
        Node name      : nodeMGR
        Service        : manager_service
        Function       : Management Server (In the case of Storage server transaction, it is displayed as Server.)
        Number         : 2
        MODE           : Normal
Do you want to continue with un-setting of AdvancedCopy Manager cluster? [default:y] |
When interrupting cluster environmental unsetup processing, "n" is inputted, when continuing processing, "y" is inputted, or press the Enter key.

The number of nodes which is not carrying out cluster unsetup command is outputted to "Number". In a secondary node, it is surely set to 2.
For a Storage management server transaction, delete the database.
A window for confirming database deletion opens. Confirm the displayed information, enter "y", and press the Enter key. The window is not displayed in the case of a Storage server transaction.
  +----------------------------------------------------------------+
  |                                                                |
  |   All of database environments of AdvancedCopy Manager         |
  |   will be deleted.                                             |
  |                                                                |
  |  [Notes]                                                       |
  |    Once processing has started, all stored data is discarded.  |
  |    Make sure that the environment allows execution             |
  |    before proceeding.                                          |
  |                                                                |
  +----------------------------------------------------------------+

Do you want to continue with processing? [y/n] ==> y |
The cluster unsetup command is executed on the secondary node A.
The window indicating cluster unsetup command completion opens.
swstf8103 The cluster deletion of the secondary node has been completed. Next, delete the cluster environment of the primary node. # |
Unmount the shared disk on the secondary node A.
Unmount the shared disk for AdvancedCopy Manager share data on the secondary node A.
For a Storage management server transaction, also unmount the shared disk for repository on the secondary node A.
Mount the shared disk on the primary node.
Mount the shared disk for AdvancedCopy Manager shared data on the primary node.
For a Storage management server transaction, also mount the shared disk for repository on the primary node.
Execute the cluster unsetup command on the primary node.
On the primary node, execute the following command after blocking other users from accessing the shared disk for AdvancedCopy Manager shared data:
# /opt/swstorage/bin/stgclunset_safe -n Logical-Node-Name |

For a Storage management server transaction to be performed, use the locale that is specified when the Storage management server is installed. (If Symfoware is installed in advance, use the locale that is specified when Symfoware is installed.)
Check the objects to be deleted.
Information about the logical node specified by the command is displayed. Confirm the displayed information, and press the Enter key.
# /opt/swstorage/bin/stgclunset_safe -n nodeMGR

AdvancedCopy Manager settings were as follows.
        Cluster system : SynfinityCluster or PRIMECLUSTER
        Node type      : Primary
        IP Address     : 10.10.10.10  (In the case of Storage server transaction, it is not displayed.)
        Mount point    : /STGMGRDISK
        Node name      : nodeMGR
        Service        : manager_service
        Function       : Management Server  (In the case of Storage server transaction, it is displayed as Server.)
        Number         : 1
        MODE           : Normal
Do you want to continue with un-setting of AdvancedCopy Manager cluster? [default:y] |
When interrupting cluster environmental unsetup processing, "n" is inputted, when continuing processing, "y" is inputted, or press the Enter key.

The number of nodes which is not carrying out cluster unsetup command is outputted to "Number". In a primary node, it is surely set to 1.
For a Storage management server transaction, delete the database.
A window for confirming database deletion opens. Confirm the displayed information, enter "y", and press the Enter key. The window is not displayed in the case of a Storage server transaction.
  +----------------------------------------------------------------+
  |                                                                |
  |   All of database environments of AdvancedCopy Manager         |
  |   will be deleted.                                             |
  |                                                                |
  |  [Notes]                                                       |
  |    Once processing has started, all stored data is discarded.  |
  |    Make sure that the environment allows execution             |
  |    before proceeding.                                          |
  |                                                                |
  +----------------------------------------------------------------+

Do you want to continue with processing? [y/n] ==> y |
The cluster unsetup command is executed on the primary node.
The window indicating cluster unsetup command completion opens.
swstf8102 The cluster deletion of the primary node has been completed. # |
Unmount the shared disk on the primary node.
Unmount the shared disk for AdvancedCopy Manager share data on the primary node.
For a Storage management server transaction, also unmount the shared disk for repository on the primary node.
Delete the following services defined in /etc/services during cluster setup. Delete the services on the primary node and the secondary node. Use the OS command such as vi to delete the service from /etc/services.
Communication daemon for transactions: stgxfws_Logical-Node-Name
Start the cluster service (userApplication).
Use the SynfinityCluster management view or the RMS main window of PRIMECLUSTER to start the transaction stopped in step 2. This operation is not necessary if the cluster service (userApplication) was deleted in step 3.

In SynfinityCluster, please check that there is no state transition procedure for AdvancedCopy Manager (SMGRPROC_Logical-Node-Name) in the service which deleted the cluster environment of AdvancedCopy Manager with the SynfinityCluster management view. When you exist, please delete manually.
This chapter explains how to deleting Solaris-version VERITAS Cluster Server.
The service group is a node set up as a primary by the AdvancedCopy Manager cluster setup command, and the secondary node is a node set up as a secondary by the AdvancedCopy Manager cluster setup command in the same service group. The secondary node A shows the node which deletes the environment last in the secondary nodes in this service group. The secondary node B shows the remaining secondary nodes in this service group.
The deleting work of primary node and secondary node A is executed at 1:1 standby system, mutual standby system, and n:1 standby system.
The deleting work of primary node, secondary node A and secondary node B is executed at cascade topology system.
This chapter describes the flow of deleting a Cluster Environment.
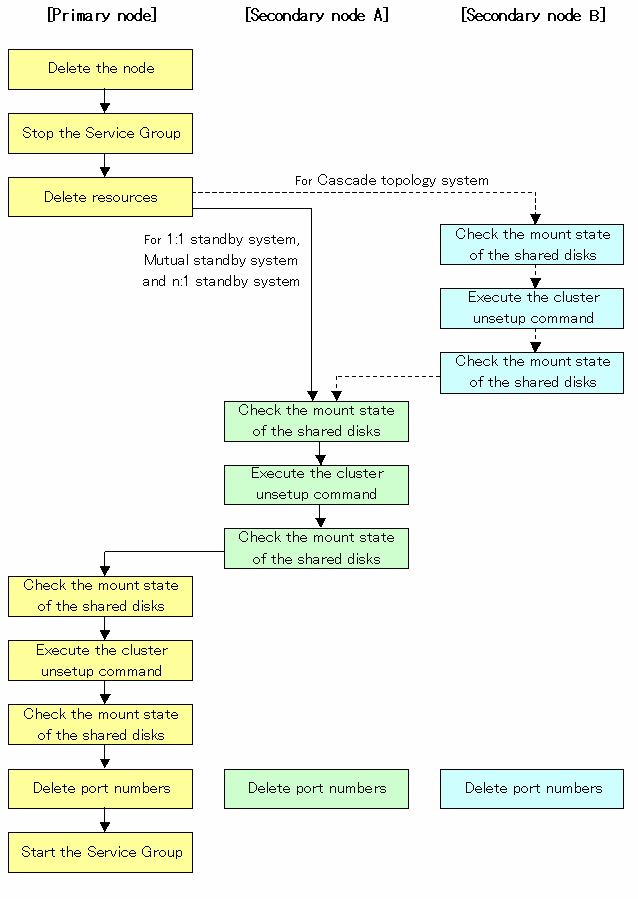
To delete the cluster environment, use the following procedure:
Use the GUI of the AdvancedCopy Manager to delete the node. For a Storage management server transaction, however, this operation is not necessary.
Stop the transaction to be deleted by using the VERITAS Cluster Server function.
Please refer to VERITAS Cluster Server User's Guide about the stop method of a user service group.
The example of a stop of the user service group by the command of VERITAS Cluster Server is as follows.
In this example, a User Service Group name is set to "STGMGRSRV", and an active system node name is set to "node1".
# hagrp -offline STGMGRSRV -sys node1 |
Use the VERITAS Cluster Server function to delete the AdvancedCopy Manager resources registered for the target transaction. If Service Groups have been created using only AdvancedCopy Manager resources, delete the whole Service Group.
Please refer to VERITAS Cluster Server User's Guide about the deletion method of a user service group and a resource.
The user service group by the command of VERITAS Cluster Server and the example of deletion of a resource are as follows.
In this example, a user service group name is set to "STGMGRSRV".
Moreover, each resource name is carried out as follows.
Resource name (Application): AdvancedCopy_Manager_appl
Resource name (MountPoint of the shared disk for AdvancedCopy Manager share data): AdvancedCopy_Manager_mount
Resource name (MountPoint for AdvancedCopy Manager RIPOJITORI): AdvancedCopy_Manager_DB
The resource concerned exists only on Storage management server business.
Resource (name IP):sybase_ip
VCS config table is saved by another file-name.
# mv /etc/VRTSvcs/conf/config/main.cf /etc/VRTSvcs/conf/config/main.cf.bk |
Place VCS into the read-write enabled state.
# haconf -makerw |
Delete a resource (Application, MountPoint).
# hares -delete AdvancedCopy_Manager_appl # hares -delete AdvancedCopy_Manager_mount # hares -delete AdvancedCopy_Manager_DB |
A resource (IP) is deleted when not using it on transaction.
# hares -delete sybase_ip |
When deleting transaction, a user service group is deleted.
# hagrp -delete STGMGRSRV |
Reflect the VCS setting and set VCS into the read only mode.
# haconf -dump -makero |

If the system is the 1:1 standby system, the Mutual standby system and the n:1 standby system, proceed to step 10.
If the system is Cascade topology and the Priority transfer, proceed to step 4.
Mount the shared disk on the secondary node B.
Mount the shared disk for AdvancedCopy Manager shared data on the secondary node B.
For a Storage management server transaction, also mount the repository shared disk in the secondary node B.

When there are two or more secondary nodes B, Step 4 to Step 9 is processed by all the secondary nodes B.
Execute the cluster unsetup command on the secondary node B.
On the secondary node B, execute the following command after blocking other users from accessing the shared disk for AdvancedCopy Manager shared data:
# /opt/swstorage/bin/stgclunset_vcs -n Logical-Node-Name |

For a Storage management server transaction to be performed, use the locale that is specified when the Storage management server is installed. (If Symfoware is installed in advance, use the locale that is specified when Symfoware is installed.)
Check the objects to be deleted.
Information about the logical node specified by the command is displayed. Confirm the displayed information, and press the Enter key.
# /opt/swstorage/bin/stgclunset_vcs -n nodeMGR

AdvancedCopy Manager settings were as follows.
        Cluster system : VERITAS Cluster Server
        Node type      : Secondary
        IP Address     : 10.10.10.10    (In the case of Storage server transaction, it is not displayed.)
        Mount point    : /STGMGRDISK
        Node name      : nodeMGR
        Service        : STGMGRSRV
        Function       : Management Server  (In the case of Storage server transaction, it is displayed as Server.)
        Number         : 3
        MODE           : Normal
Do you want to continue with un-setting of AdvancedCopy Manager cluster? [default:y] |
When interrupting cluster environmental unsetup processing, "n" is inputted, when continuing processing, "y" is inputted, or press the Enter key.

The number of nodes which is not carrying out cluster unsetup command is outputted to "Number". In a secondary node B, it is sure to become three or more.
For a Storage management server transaction, delete the database.
A window for confirming database deletion opens. Confirm the displayed information, enter "y", and press the Enter key. The window is not displayed in the case of a Storage server transaction.
  +--------------------------------------------------------------------+
  |                                                                    |
  |   All of database environments of AdvancedCopy Manager             |
  |   will be deleted.                                                 |
  |                                                                    |
  |  [Notes]                                                           |
  |    Once processing has started, all stored data is discarded.      |
  |    Make sure that the environment allows execution                 |
  |    before proceeding.                                              |
  |                                                                    |
  +--------------------------------------------------------------------+

Do you want to continue with processing? [y/n] ==> y |
The cluster unsetup command is executed on the secondary node B.
The window indicating cluster unsetup command completion opens.
swstf8143 The cluster deletion of the secondary node has been completed. Next, delete the cluster environment of the another secondary node. # |

In secondary node B, a completion message is swstf8143.
Unmount the shared disk on the secondary node B.
Unmount the shared disk for AdvancedCopy Manager share data on the secondary node B.
For a Storage management server transaction, also unmount the repository shared disk on the secondary node B.

When the secondary node B (it does not perform from Step 4 to Step 9) remains, perform from Step 4 in the node. When operation from Step 4 to Step 9 is completed by all secondary node B, go to Step 10.
Mount the shared disk on the secondary node A.
Mount the shared disk for AdvancedCopy Manager shared data on the secondary node A.
For a Storage management server transaction, also mount the repository shared disk in the secondary node A.
Execute the cluster unsetup command on the secondary node A.
On the secondary node A, execute the following command after blocking other users from accessing the shared disk for AdvancedCopy Manager shared data:
# /opt/swstorage/bin/stgclunset_vcs -n Logical-Node-Name |

For a Storage management server transaction to be performed, use the locale that is specified when the Storage management server is installed. (If Symfoware is installed in advance, use the locale that is specified when Symfoware is installed.)
Check the objects to be deleted.
Information about the logical node specified by the command is displayed. Confirm the displayed information, and press the Enter key.
# /opt/swstorage/bin/stgclunset_vcs -n nodeMGR

AdvancedCopy Manager settings were as follows.
        Cluster system : VERITAS Cluster Server
        Node type      : Secondary
        IP Address     : 10.10.10.10    (In the case of Storage server transaction, it is not displayed.)
        Mount point    : /STGMGRDISK
        Node name      : nodeMGR
        Service        : STGMGRSRV
        Function       : Management Server  (In the case of Storage server transaction, it is displayed as Server.)
        Number         : 2
        MODE           : Normal
Do you want to continue with un-setting of AdvancedCopy Manager cluster? [default:y] |
When interrupting cluster environmental unsetup processing, "n" is inputted, when continuing processing, "y" is inputted, or press the Enter key.

The number of nodes which is not carrying out cluster unsetup command is outputted to "Number". In a secondary node, it is surely set to 2.
For a Storage management server transaction, delete the database.
A window for confirming database deletion opens. Confirm the displayed information, enter "y", and press the Enter key. The window is not displayed in the case of a Storage server transaction.
  +--------------------------------------------------------------------+
  |                                                                    |
  |   All of database environments of AdvancedCopy Manager             |
  |   will be deleted.                                                 |
  |                                                                    |
  |  [Notes]                                                           |
  |    Once processing has started, all stored data is discarded.      |
  |    Make sure that the environment allows execution                 |
  |    before proceeding.                                              |
  |                                                                    |
  +--------------------------------------------------------------------+

Do you want to continue with processing? [y/n] ==> y |
The cluster unsetup command is executed on the secondary node.
The window indicating cluster unsetup command completion opens.
swstf8103 The cluster deletion of the secondary node has been completed. Next, delete the cluster environment of the primary node. # |
Unmount the shared disk on the secondary node A.
Unmount the shared disk for AdvancedCopy Manager share data on the secondary node A.
For a Storage management server transaction, also unmount the repository shared disk on the secondary node A.
Mount the shared disk on the primary node.
Mount the shared disk for AdvancedCopy Manager shared data on the primary node.
For a Storage management server transaction, also mount the repository shared disk on the primary node.
Execute the cluster unsetup command on the primary node.
On the primary node, execute the following command after blocking other users from accessing the shared disk for AdvancedCopy Manager shared data:
# /opt/swstorage/bin/stgclunset_vcs -n Logical-Node-Name |

For a Storage management server transaction to be performed, use the locale that is specified when the Storage management server is installed. (If Symfoware is installed in advance, use the locale that is specified when Symfoware is installed.)
Check the objects to be deleted.
Information about the logical node specified by the command is displayed. Confirm the displayed information, and press the Enter key.
# /opt/swstorage/bin/stgclunset_vcs -n nodeMGR

AdvancedCopy Manager settings were as follows.
        Cluster system : VERITAS Cluster Server
        Node type      : Primary
        IP Address     : 10.10.10.10    (In the case of Storage server transaction, it is not displayed.)
        Mount point    : /STGMGRDISK
        Node name      : nodeMGR
        Service        : STGMGRSRV
        Function       : Management Server  (In the case of Storage server transaction, it is displayed as Server.)
        Number         : 1
        MODE           : Normal
Do you want to continue with un-setting of AdvancedCopy Manager cluster? [default:y] |
When interrupting cluster environmental unsetup processing, "n" is inputted, when continuing processing, "y" is inputted, or press the Enter key.

The number of nodes which is not carrying out cluster unsetup command is outputted to "Number". In a secondary node, it is surely set to 1.
For a Storage management server transaction, delete the database.
A window for confirming database deletion opens. Confirm the displayed information, enter "y", and press the Enter key. The window is not displayed in the case of a Storage server transaction.
  +--------------------------------------------------------------------+
  |                                                                    |
  |   All of database environments of AdvancedCopy Manager             |
  |   will be deleted.                                                 |
  |                                                                    |
  |  [Notes]                                                           |
  |    Once processing has started, all stored data is discarded.      |
  |    Make sure that the environment allows execution                 |
  |    before proceeding.                                              |
  |                                                                    |
  +--------------------------------------------------------------------+

Do you want to continue with processing? [y/n] ==> y |
The cluster unsetup command is executed on the primary node.
The window indicating cluster unsetup command completion opens.
swstf8102 The cluster deletion of the primary node has been completed. # |
Unmount the shared disk on the primary node.
Unmount the shared disk for AdvancedCopy Manager share data on the primary node.
For a Storage management server transaction, also unmount the repository shared disk on the primary node.
Delete port numbers.
Delete the following services defined in /etc/services during cluster setup. Delete the services on the primary node and the secondary node. Use the OS command such as vi to delete the service from /etc/services.
Communication daemon for transactions: stgxfws_Logical-Node-Name
Start the Service Group.
The function of VERITAS Cluster Server is used, and start the transaction stopped in step 2. This operation is not necessary if the Service Group was deleted in step 3.
Please refer to VERITAS Cluster Server User's Guide about the start method of a user service group.
# hagrp -online User-Service-Group -sys system-name |
system-name: The node name which wants to start a user service group
This chapter explains how to deleting Linux-version PRIMECLSTER.
The primary node is a node set up as a primary by the AdvancedCopy Manager cluster setup command, and the secondary node is a node set up as a secondary by the AdvancedCopy Manager cluster setup command in the same userApplication. The secondary node A shows the node which deletes the environment last in the secondary nodes in this userApplication. The secondary node B shows the remaining secondary nodes in this userApplication.
The deleting work of primary node and secondary node A is executed at 1:1 standby system, mutual standby system, and n:1 standby system.
The deleting work of primary node, secondary node A and secondary node B is executed at cascade topology system and priority transfer system.
This chapter describes the flow of deleting a Cluster Environment.
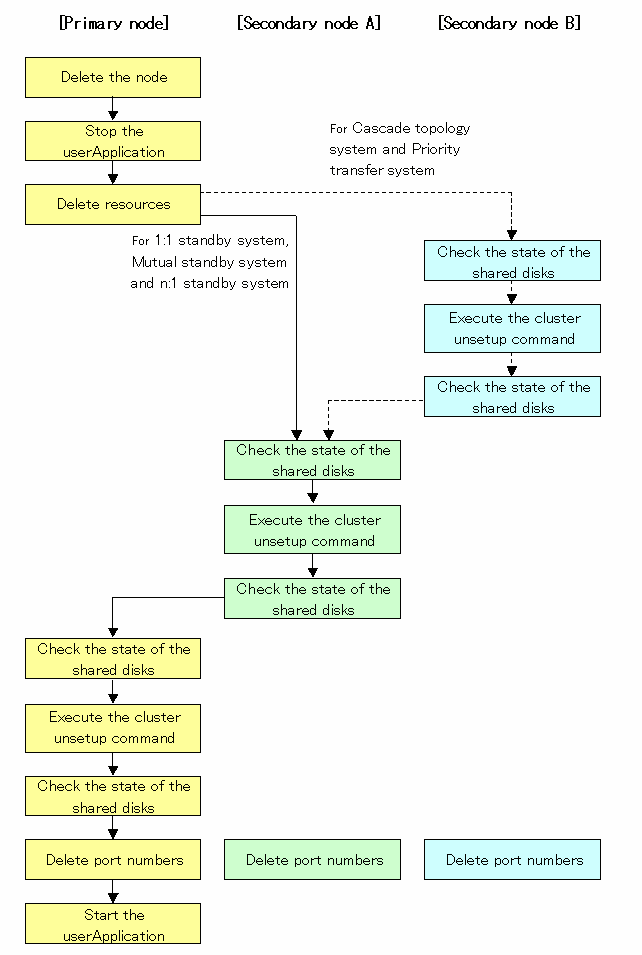
To delete the cluster environment, use the following procedure:
Delete the node.
Use the GUI of the AdvancedCopy Manager to delete the node. For a Storage management server transaction, however, this operation is not necessary.
Stop the userApplication.
Use the RMS main window of PRIMECLUSTER to stop the transaction to be deleted.
Delete resources.
Use the RMS Wizard to delete the AdvancedCopy Manager resources registered for the target transaction. If the userApplication has been created using only AdvancedCopy Manager resources, delete the whole userApplication.

For information on how to deleting the userApplication and resources, see the "PRIMECLUSTER Installation and Administration Guide."

If the system is the 1:1 standby system, the Mutual standby system and the n:1 standby system, proceed to step 10.
If the system is Cascade topology and the Priority transfer, proceed to step 4.
Mount the shared disk on the secondary node B.
Mount the shared disk for AdvancedCopy Manager shared data on the secondary node B.
For a Storage management server transaction, also mount the shared disk for repository in the secondary node B.

When there are two or more secondary nodes B, Step 4 to Step 9 is processed by all the secondary nodes B.
Execute the cluster unsetup command on the secondary node B.
On the secondary node B, execute the following command after blocking other users from accessing the shared disk for AdvancedCopy Manager shared data:
# /opt/swstorage/bin/stgclunset_lxprm -n Logical-Node-Name |

For a Storage management server transaction to be performed, use the locale that is specified when the Storage management server is installed. (If Symfoware is installed in advance, use the locale that is specified when Symfoware is installed.)
Check the objects to be deleted.
Information about the logical node specified by the command is displayed. Confirm the displayed information, and press the Enter key.
# /opt/swstorage/bin/stgclunset_lxprm -n nodeMGR
AdvancedCopy Manager settings were as follows.
        Cluster system : PRIMECLUSTER
        Node type      : Secondary
        IP Address     : 10.10.10.10    (In the case of Storage server transaction, it is not displayed.)
        Mount point    : /STGMGRDISK
        Node name      : nodeMGR
        Service        : manager_service
        Function       : Management Server (In the case of Storage server transaction, it is displayed as Server.)
        Number         : 3
        MODE           : Normal
Do you want to continue with un-setting of AdvancedCopy Manager cluster? [default:y] |
When interrupting cluster environmental unsetup processing, "n" is inputted, when continuing processing, "y" is inputted, or press the Enter key.

The number of nodes which is not carrying out cluster unsetup command is outputted to "NUMBER". In a secondary node B, it is sure to become three or more.
For a Storage management server transaction, delete the database.
A window for confirming database deletion opens. Confirm the displayed information, enter "y", and press the Enter key. The window is not displayed in the case of a Storage server transaction.
  +----------------------------------------------------------------+
  |                                                                |
  |   All of database environments of AdvancedCopy Manager         |
  |   will be deleted.                                             |
  |                                                                |
  |  [Notes]                                                       |
  |    Once processing has started, all stored data is discarded.  |
  |    Make sure that the environment allows execution             |
  |    before proceeding.                                          |
  |                                                                |
  +----------------------------------------------------------------+

Do you want to continue with processing? [y/n] ==> y |
The cluster unsetup command is executed on the secondary node B.
The window indicating cluster unsetup command completion opens.
swstf8143 The cluster deletion of the secondary node has been completed. Next, delete the cluster environment of the another secondary node. # |

In secondary node B, a completion message is swstf8143.
Unmount the shared disk on the secondary node B.
Unmount the shared disk for AdvancedCopy Manager share data on the secondary node B.
For a Storage management server transaction, also unmount the shared disk for repository on the secondary node B.

When the secondary node B (it does not perform from Step 4 to Step 9) remains, perform from Step 4 in the node.
When operation from Step 4 to Step 9 is completed by all secondary node B, go to Step 10.
Mount the shared disk on the secondary node A.
Mount the shared disk for AdvancedCopy Manager shared data on the secondary node A.
For a Storage management server transaction, also mount the shared disk for repository in the secondary node A.
Execute the cluster unsetup command on the secondary node A.
On the secondary node A, execute the following command after blocking other users from accessing the shared disk for AdvancedCopy Manager shared data:
# /opt/swstorage/bin/stgclunset_lxprm -n Logical-Node-Name |

For a Storage management server transaction to be performed, use the locale that is specified when the Storage management server is installed. (If Symfoware is installed in advance, use the locale that is specified when Symfoware is installed.)
Check the objects to be deleted.
Information about the logical node specified by the command is displayed. Confirm the displayed information, and press the Enter key.
# /opt/swstorage/bin/stgclunset_lxprm -n nodeMGR
AdvancedCopy Manager settings were as follows.
        Cluster system : PRIMECLUSTER
        Node type      : Secondary
        IP Address     : 10.10.10.10    (In the case of Storage server transaction, it is not displayed.)
        Mount point    : /STGMGRDISK
        Node name      : nodeMGR
        Service        : manager_service
        Function       : Management Server (In the case of Storage server transaction, it is displayed as Server.)
        Number         : 2
        MODE           : Normal
Do you want to continue with un-setting of AdvancedCopy Manager cluster? [default:y] |
When interrupting cluster environmental unsetup processing, "n" is inputted, when continuing processing, "y" is inputted, or press the Enter key.

The number of nodes which is not carrying out cluster unsetup command is outputted to "NUMBER". In a secondary node, it is surely set to 2.
For a Storage management server transaction, delete the database.
A window for confirming database deletion opens. Confirm the displayed information, enter "y", and press the Enter key. The window is not displayed in the case of a Storage server transaction.
  +----------------------------------------------------------------+
  |                                                                |
  |   All of database environments of AdvancedCopy Manager         |
  |   will be deleted.                                             |
  |                                                                |
  |  [Notes]                                                       |
  |    Once processing has started, all stored data is discarded.  |
  |    Make sure that the environment allows execution             |
  |    before proceeding.                                          |
  |                                                                |
  +----------------------------------------------------------------+

Do you want to continue with processing? [y/n] ==> y |
The cluster unsetup command is executed on the secondary node A.
The window indicating cluster unsetup command completion opens.
swstf8103 The cluster deletion of the secondary node has been completed. Next, delete the cluster environment of the primary node. # |
Unmount the shared disk on the secondary node A.
Unmount the shared disk for AdvancedCopy Manager share data on the secondary node A.
For a Storage management server transaction, also unmount the shared disk for repository on the secondary node A.
Mount the shared disk on the primary node.
Mount the shared disk for AdvancedCopy Manager shared data on the primary node.
For a Storage management server transaction, also mount the shared disk for repository on the primary node.
Execute the cluster unsetup command on the primary node.
On the primary node, execute the following command after blocking other users from accessing the shared disk for AdvancedCopy Manager shared data:
# /opt/swstorage/bin/stgclunset_lxprm -n Logical-Node-Name |

For a Storage management server transaction to be performed, use the locale that is specified when the Storage management server is installed. (If Symfoware is installed in advance, use the locale that is specified when Symfoware is installed.)
Check the objects to be deleted.
Information about the logical node specified by the command is displayed. Confirm the displayed information, and press the Enter key.
# /opt/swstorage/bin/stgclunset_lxprm -n nodeMGR
AdvancedCopy Manager settings were as follows.
        Cluster system : PRIMECLUSTER
        Node type      : Primary
        IP Address     : 10.10.10.10  (In the case of Storage server transaction, it is not displayed.)
        Mount point    : /STGMGRDISK
        Node name      : nodeMGR
        Service        : manager_service
        Function       : Management Server  (In the case of Storage server transaction, it is displayed as Server.)
        Number         : 1
        MODE           : Normal
Do you want to continue with un-setting of AdvancedCopy Manager cluster? [default:y] |
When interrupting cluster environmental unsetup processing, "n" is inputted, when continuing processing, "y" is inputted, or press the Enter key.

The number of nodes which is not carrying out cluster unsetup command is outputted to "NUMBER". In a primary node, it is surely set to 1.
For a Storage management server transaction, delete the database.
A window for confirming database deletion opens. Confirm the displayed information, enter "y", and press the Enter key. The window is not displayed in the case of a Storage server transaction.
  +----------------------------------------------------------------+
  |                                                                |
  |   All of database environments of AdvancedCopy Manager         |
  |   will be deleted.                                             |
  |                                                                |
  |  [Notes]                                                       |
  |    Once processing has started, all stored data is discarded.  |
  |    Make sure that the environment allows execution             |
  |    before proceeding.                                          |
  |                                                                |
  +----------------------------------------------------------------+

Do you want to continue with processing? [y/n] ==> y |
The cluster unsetup command is executed on the primary node.
The window indicating cluster unsetup command completion opens.
swstf8102 The cluster deletion of the primary node has been completed. # |
Unmount the shared disk on the primary node.
Unmount the shared disk for AdvancedCopy Manager share data on the primary node.
For a Storage management server transaction, also unmount the shared disk for repository on the primary node.
Delete port numbers.
Delete the following services defined in /etc/services during cluster setup. Delete the services on the primary node and the secondary node. Use the OS command such as vi to delete the service from /etc/services.
Communication daemon for transactions: stgxfws_Logical-Node-Name
Start the userApplication.
Use the RMS main window of PRIMECLUSTER to start the transaction stopped in step 2. This operation is not necessary if the userApplication was deleted in step 3.
This chapter explains how to deleting Windows-version MSCS.
Throughout this chapter, the primary node is a node set up as a primary by the AdvancedCopy Manager cluster setup command, and the secondary node is a node set up as a secondary by the AdvancedCopy Manager cluster setup command in the same cluster group. The secondary node A shows the node which deletes the environment of Storage management server transactions or Storage server transactions last in the secondary nodes in this cluster group. The secondary node B shows the remaining secondary nodes in this cluster group.
The deleting work of primary node and secondary node A is executed at 1:1 standby system, mutual standby system, and n:1 standby system.
The deleting work of primary node, secondary node A and secondary node B is executed at cascade topology system.
This chapter describes the flow of deleting a Cluster Environment.
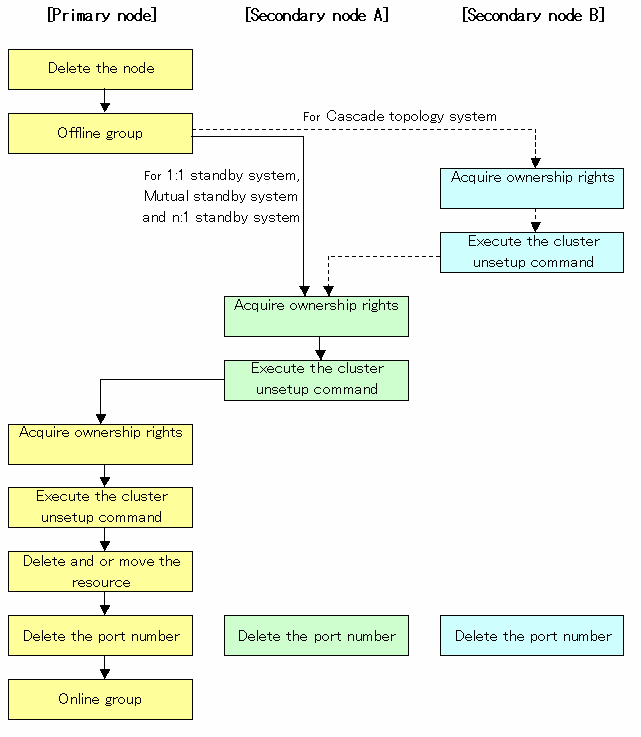
To delete the cluster environment, use the following procedure:

Do not use the following services to perform this processing; otherwise, a problem may occur:
Terminal service (use by remote desktop connection)
Telnet server service
If the Storage management server is the Windows Server 2003, use by making console session connection with terminal service. Refer to the following for the method of console session connection.
http://support.microsoft.com/kb/278845
If the object to be deleted is a Storage server, use the GUI of the AdvancedCopy Manager to delete the logical server to which the applicable Storage server transaction belongs. If the object to be deleted is a Storage management server, this step is not required.
Use the cluster administrator to offline the cluster group to which the applicable AdvancedCopy Manager belongs. However, leave the shared disk for AdvancedCopy Manager shared data online. Moreover, in the case of Storage management server transaction, leave the shared disk for AdvancedCopy Manager repository online. For information about how to offline the cluster group, refer to the Microsoft(R) Cluster Server manuals.

If the system is the 1:1 standby system, the Mutual standby system and the n:1 standby system, proceed to step 5.
If the system is Cascade topology and the Priority transfer, proceed to step 3.
On the secondary node B, use the cluster administrator to acquire the ownership right to the cluster group to which the applicable AdvancedCopy Manager belongs. For information about how to acquire ownership rights, refer to the Microsoft(R) Cluster Server manuals.

When the secondary node B consists of two or more nodes, perform from Step 3 and Step 4 on all the secondary node B.
On the secondary node B, execute the cluster unsetup command. The procedure for executing the command is as follows.
Execute the following command from the command prompt window on the secondary node B:
Program-directory\bin\stgclunset_mscs |
The cluster unsetup command window is displayed.
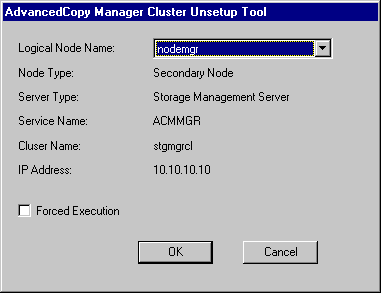
Select the logical node name of the AdvancedCopy Manager transaction to be deleted. For unsetup after node failure, select the Forced Execution field. After confirming each field, click the [OK] button.
If the AdvancedCopy Manager transaction to be deleted is a Storage management server transaction, the start window for deleting the environment (database) of the Storage management server transaction is displayed.
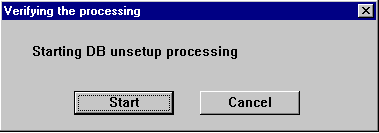
Click the [Start] button.
If the AdvancedCopy Manager transaction to be deleted is a Storage management server transaction, the deletion complete window of the environment (database) of the Storage management server transaction is displayed.
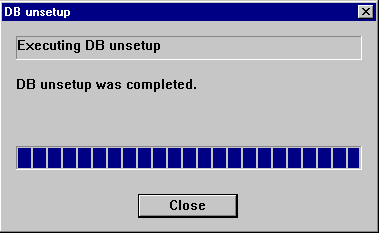
Click the [Close] button.
The start window of the port number and service setting/release command is displayed.

Click the [OK] button.
The completion window of the port number and service setting/release command is displayed.

Click the [OK] button.
Complete the cluster unsetup of the secondary node.
When the completion window of cluster unsetup is displayed, click the [OK] button.

When the secondary node B, the swstf8143 message is displayed.
When the secondary node B (it does not perform from Step 3 to Step 4) remains, perform from Step 3 in the node. When operation from Step 3 and Step 4 is completed by all secondary node B, go to Step 5.
On the secondary node A, use the cluster administrator to acquire the ownership right to the cluster group to which the applicable AdvancedCopy Manager belongs. For information about how to acquire ownership rights, refer to the Microsoft(R) Cluster Server manuals.
On the secondary node A, execute the cluster unsetup command. The procedure for executing the command is as follows.
Execute the following command from the command prompt window on the secondary node A:
Program-directory\bin\stgclunset_mscs |
The cluster unsetup command window is displayed.

Select the logical node name of the AdvancedCopy Manager transaction to be deleted. For unsetup after node failure, select the Forced Execution field. After confirming each field, click the [OK] button.
If the AdvancedCopy Manager transaction to be deleted is a Storage management server transaction, the start window for deleting the environment (database) of the Storage management server transaction is displayed.

Click the [Start] button.
If the AdvancedCopy Manager transaction to be deleted is a Storage management server transaction, the deletion complete window of the environment (database) of the Storage management server transaction is displayed.

Click the [Close] button.
The start window of the port number and service setting/release command is displayed.

Click the [OK] button.
The completion window of the port number and service setting/release command is displayed.

Click the [OK] button.
Complete the cluster unsetup of the secondary node.
When the completion window of cluster unsetup is displayed, click the [OK] button. Next, execute unsetup for the primary node.

On the primary node, use the cluster administrator to acquire the ownership right to the cluster group to which the applicable AdvancedCopy Manager belongs. For information about how to acquire ownership rights, refer to the Microsoft(R) Cluster Server manuals.
On the primary node, execute the cluster unsetup command. The procedure for executing the command is as follows.
Execute the following command from the command prompt window on the primary node:
Program-directory\bin\stgclunset_mscs |
The cluster unsetup command window is displayed.
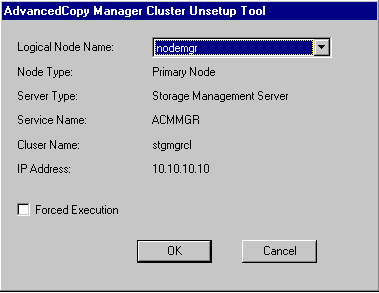
Select the logical node name selected in the cluster unsetup window on the secondary node. For unsetup after node failure, select the Forced Execution field. After confirming each field, click the [OK] button.
If the AdvancedCopy Manager transaction to be deleted is a Storage management server transaction, the start window for deleting the environment (database) of the Storage management server transaction is displayed.

Click the [Start] button.
If the AdvancedCopy Manager transaction to be deleted is a Storage management server transaction, the deletion complete window of the environment (database) of the Storage management server transaction is displayed.

Click the [Close] button.
The start window of the port number and service setting/release command is displayed.

Click the [OK] button.
The completion window of the port number and service setting/release command is displayed.

Click the [OK] button.
Complete cluster unsetup of the primary node.
When the completion window of cluster unsetup is displayed, click the [OK] button.

Delete and or move the resource of AdvancedCopy Manager used for cluster group.
If the shared disk for AdvancedCopy Manager shared data is not being used for cluster group, use the cluster administrator to move them to another group. Moreover, in the case of Storage management server transaction, if the shared disk for AdvancedCopy Manager repository is not being used for cluster group, use the cluster administrator to move them to another group.
If the following resource is not being used, use the cluster administrator to detetes them. The following resources exist, when "Create New IP Address Resource" had been selected with the cluster setup command of AdvancedCopy Manager.
AdvancedCopy IP Address_Logical-Node-Name
AdvancedCopy Network_Logical-Node-Name
For information about how to move disk resource, refer to the Microsoft(R) Cluster Server manuals.
Delete the port number of AdvancedCopy Manager set as transaction use.
Delete the port number set for the Storage server transaction or the Storage management server transaction from windows-install-directory\system32\drivers\etc\services. Delete the port number on the primary node and the secondary node. The service name in services is as follows:
stgxfws_Logical-Node-Name
Use the cluster administrator to online the cluster group. For information about how to online the cluster group, refer to the Microsoft(R) Cluster Server manuals.
This chapter explains how to deleting HP-version MC/ServiceGuard.
The primary node is a node set up as a primary by the AdvancedCopy Manager cluster setup command, and the secondary node is a node set up as a secondary by the AdvancedCopy Manager cluster setup command in the same package.
The secondary node B shows the remaining secondary nodes in this package.
The processing required to customize the primary node and secondary node A is executed on a 1:1 standby system, mutual standby system, and n:1 standby system.
The primary node, secondary node A, and secondary node B are deleted on a cascade topology system and priority transfer system.
This chapter describes the flow of deleting a Cluster Environment.
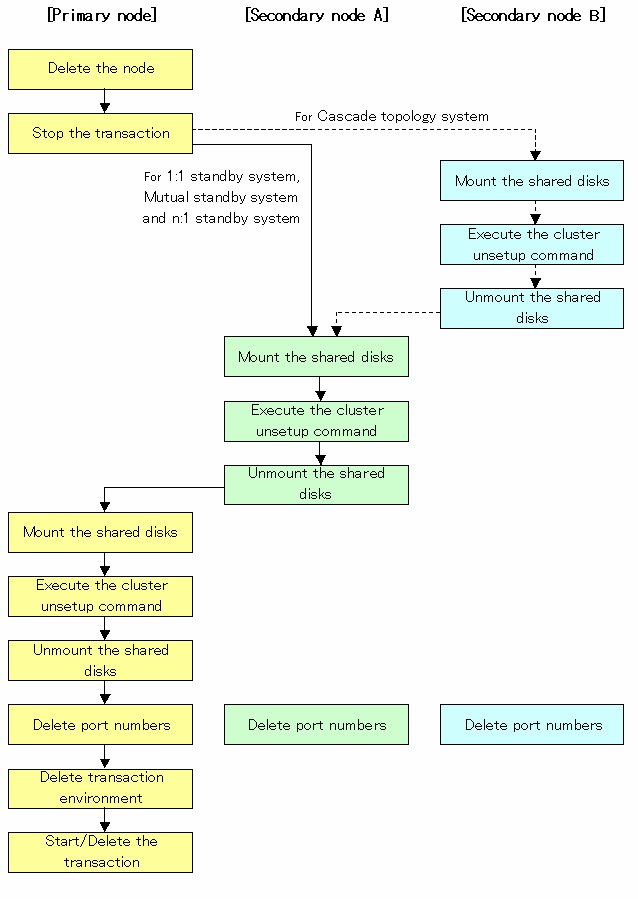
To delete the cluster environment, use the following procedure:
Use the GUI of the AdvancedCopy Manager to delete the node.
The function of MC/ServiceGuard is used, and stop the transaction.
Stop the transaction (package) to be deleted.
Refer to the manual of MC/ServiceGuard about the stop method of transaction.

If the system is a 1:1 standby system, mutual standby system or n:1 standby system, proceed to step 8.
If the system is a Cascade topology, proceed to step 3.
Mount the shared disk on the secondary node B.
The shared disk for AdvancedCopy Manager share data checks that it is in the state of unmount on the primary node and all the secondary node.
Then, Mount the shared disk for AdvancedCopy Manager shared data on the secondary node B.

When there are two or more secondary nodes B, steps 3 to 7 are executed by all of these nodes.
Execute the cluster unsetup command on the secondary node.
On the secondary node, execute the following command after blocking other users from accessing the shared disk for AdvancedCopy Manager shared data:
# /opt/swstorage/bin/stgclunset_mcsg -n Logical-Node-Name |
The example of an input:
# /opt/swstorage/bin/stgclunset_mcsg -n nodepr |
Check the objects to be deleted.
Information about the logical node specified by the command is displayed. Confirm the displayed information, and press the Enter key.
AdvancedCopy Manager settings were as follows. Cluster system : MC/ServiceGuard Node type : Secondary IP Address : 10.10.10.10 SUBNET : 10.10.10.0 Mount point : /stgmount Device Name : /dev/vg01/lvol1 Volume Group : vg01 Node name : nodepr Service : serv1 Function : Server Number : 3 MODE : Normal Do you want to continue with un-setting of AdvancedCopy Manager cluster? [default:y] y |
When interrupting cluster environmental unsetup processing, "n" is inputted, when continuing processing, "y" is inputted, or press the Enter key.

The number of nodes which are not executing the cluster unsetup command is output to "Number". In a secondary node B, this value is likely to be at least three.
The cluster unsetup command is executed on the secondary nodeB.
The window indicating cluster unsetup command completion opens.
swstf8143 The cluster deletion of the secondary node has been completed. Next, delete the cluster environment of the another secondary node. # |

In secondary node B, the completion message is swstf8143.
Unmount the shared disks on the secondary node B.
Unmount the shared disk for AdvancedCopy Manager shared data on the secondary node B.

If there are remaining secondary nodes B for which steps 3 to 7 have not been performed perform these steps in each node. When steps 3 to 7 have been completed by all secondary nodes B, proceed to Step 8.
Mount the shared disk on the secondary node A.
Mount the shared disk for AdvancedCopy Manager shared data on the secondary node A.
Execute the cluster unsetup command on the secondary node A.
On the secondary node A, execute the following command after preventing other users from accessing the shared disk for AdvancedCopy Manager shared data:
# /opt/swstorage/bin/stgclunset_mcsg -n Logical-Node-Name |
Example
# /opt/swstorage/bin/stgclunset_mcsg -n nodepr |
Check the objects to be deleted.
Information about the logical node specified by the command is displayed. Confirm the displayed information, and press the Enter key.
AdvancedCopy Manager settings were as follows. Cluster system : MC/ServiceGuard Node type : Secondary IP Address : 10.10.10.10 SUBNET : 10.10.10.0 Mount point : /stgmount Device Name : /dev/vg01/lvol1 Volume Group : vg01 Node name : nodepr Service : serv1 Function : Server Number : 2 MODE : Normal Do you want to continue with un-setting of AdvancedCopy Manager cluster? [default:y] y |
To interrupt cluster environmental unsetup processing, type "n. To continue processing, type "y" or press the Enter key.

The number of nodes which are not executing the cluster unsetup command is output to "Number". In a secondary node A, this value is likely to be 2.
Finish the cluster unsetup command on the secondary node A.
A window opens, indicating the completion of the cluster unsetup command .
swstf8103 The cluster deletion of the secondary node has been completed. Next, delete the cluster environment of the primary node. # |
Unmount the shared disk on the secondary node A.
Mount the shared disk for AdvancedCopy Manager shared data on the secondary node A.
Mount the shared disk on the primary node.
Mount the shared disk for AdvancedCopy Manager shared data on the primary node.
Execute the cluster unsetup command on the primary node.
On the primary node, execute the following command after blocking other users from accessing the shared disk for AdvancedCopy Manager shared data:
# /opt/swstorage/bin/stgclunset_mcsg -n Logical-Node-Name |
The example of an input:
# /opt/swstorage/bin/stgclunset_mcsg -n nodepr |
Check the objects to be deleted.
Information about the logical node specified by the command is displayed. Confirm the displayed information, and press the Enter key.
AdvancedCopy Manager settings were as follows. Cluster system : MC/ServiceGuard Node type : Primary IP Address : 10.10.10.10 SUBNET : 10.10.10.0 Mount point : /stgmount Device Name : /dev/vg01/lvol1 Volume Group : vg01 Node name : nodepr Service : serv1 Function : Server Number : 1 MODE : Normal Do you want to continue with un-setting of AdvancedCopy Manager cluster? [default:y] y |
When interrupting cluster environmental unsetup processing, "n" is inputted, when continuing processing, "y" is inputted, or press the Enter key.

The number of nodes which are not executing the cluster unsetup command is output to "Number". In a primary node, this value is likely to be 1.
The cluster unsetup command is executed on the primary node.
The window indicating cluster unsetup command completion opens.
swstf8102 The cluster deletion of the primary node has been completed. # |
Unmount the shared disk on the primary node.
Unmount the shared disk for AdvancedCopy Manager share data on the primary node.
Delete port numbers.
On the primary node and the secondary node, delete the following services defined in /etc/services during cluster setup. Use the OS command such as vi to delete the service from /etc/services.
Communication daemon for transactions: stgxfws_Logical-Node-Name
Delete transaction environment.
The starting stop command of Storage server transaction is deleted from the CUSTOMER DEFINE FUNCTIONS section of the package control script of object transaction.
The following commands (the start option is included) are deleted from the section at the time of starting.
/opt/FJSVswstf/cluster/clproc/SmgrMCSG_Logical-Node-Name start
The following commands (the stop option is included) are deleted from the section at the time of a stop.
/opt/FJSVswstf/cluster/clproc/SmgrMCSG_Logical-Node-Name stop
When not using on transaction the shared disk prepared for AdvancedCopy Manager, the information on a shared disk is also deleted. Moreover, transaction (package) is deleted when transaction will not be used from now on.
Refer to the manual of MC/ServiceGuard about the edit method of a control script, the reflection method to other nodes, and the deletion method of a package.
Object transaction (package) is started by using the MC/ServiceGuard function.
It carries out this operation and is not required when transaction is deleted in Procedure 19.
Refer to the manual of MC/ServiceGuard about the starting method of transaction.
The HP edition of VERITAS Cluster Server has not supported.
The AIX edition of VERITAS Cluster Server has not supported.
This chapter explains how to deleting AIX-version High Availability Cluster Multi-Processing.
The resource group is a node set up as a primary by the AdvancedCopy Manager cluster setup command, and the secondary node is a node set up as a secondary by the AdvancedCopy Manager cluster setup command in the same resource group. The secondary node A shows the node which deletes the environment last in the secondary nodes in this resource group. The secondary node B shows the remaining secondary nodes in this resource group.
The deleting work of primary node and secondary node A is executed at 1:1 standby system, mutual standby system, and n:1 standby system.
The deleting work of primary node, secondary node A and secondary node B is executed at cascade topology system.
This chapter describes the flow of deleting a Cluster Environment.
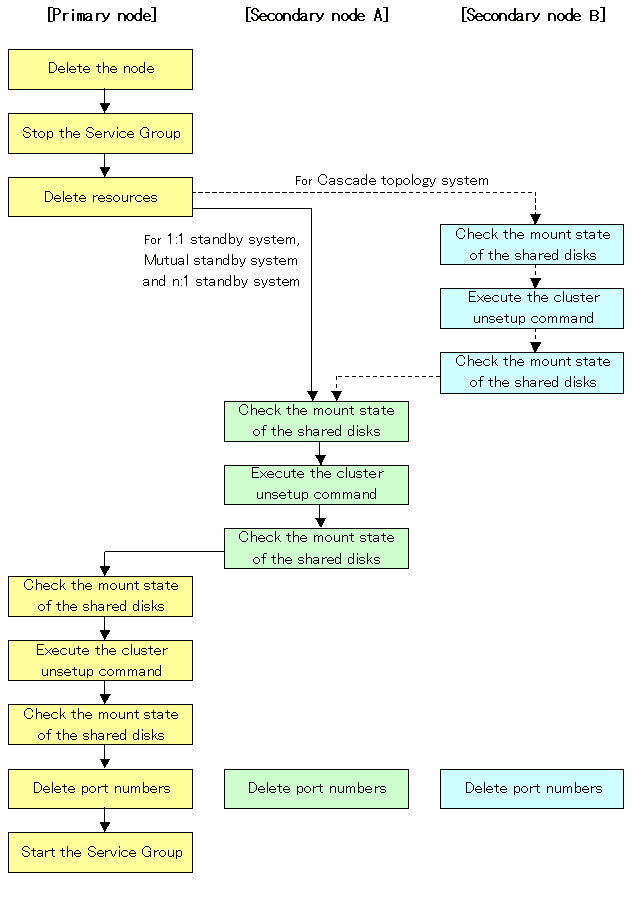
To delete the cluster environment, use the following procedure:
Delete the node.
Use the GUI of the AdvancedCopy Manager to delete the node.
Stop the Resource Group.
Stop the transaction to be deleted by using the High Availability Cluster Multi-Processing function.
Please refer to High Availability Cluster Multi-Processing User's Guide about the stop method of a resource group.
Delete resources.
Use the High Availability Cluster Multi-Processing function to delete the AdvancedCopy Manager resources registered for the target transaction. If Resource Groups have been created using only AdvancedCopy Manager resources, delete the whole Resource Group.
Please refer to High Availability Cluster Multi-Processing User's Guide about the deletion method of a user resource group and a resource.

If the system is the 1:1 standby system, the Mutual standby system and the n:1 standby system, proceed to step 9.
If the system is Cascade topology and the Priority transfer, proceed to step 4.
Mount the shared disk on the secondary node B.
Mount the shared disk for AdvancedCopy Manager shared data on the secondary node B.

When there are two or more secondary nodes B, Step 4 to Step 8 is processed by all the secondary nodes B.
Execute the cluster unsetup command on the secondary node B.
On the secondary node B, execute the following command after blocking other users from accessing the shared disk for AdvancedCopy Manager shared data:
# /opt/swstorage/bin/stgclunset_hacmp -n Logical-Node-Name |
Check the objects to be deleted.
Information about the logical node specified by the command is displayed. Confirm the displayed information, and press the Enter key.
# /opt/swstorage/bin/stgclunset_hacmp -n nodeagt

AdvancedCopy Manager settings were as follows.
        Cluster system : High Availability Cluster Multi-Processing
        Node type      : Secondary
        Mount point    : /STGMGRDISK
        Node name      : nodeagt
        Service        : STGMGRSRV
        Function       : Server
        Number         : 3
        MODE           : Normal
Do you want to continue with un-setting of AdvancedCopy Manager cluster? [default:y] |
When interrupting cluster environmental unsetup processing, "n" is inputted, when continuing processing, "y" is inputted, or press the Enter key.

The number of nodes which is not carrying out cluster unsetup command is outputted to "Number". In a secondary node B, it is sure to become three or more.
The cluster unsetup command is executed on the secondary node B.
The window indicating cluster unsetup command completion opens.
swstf8143 The cluster deletion of the secondary node has been completed. Next, delete the cluster environment of the another secondary node. # |

In secondary node B, a completion message is swstf8143.
Unmount the shared disk on the secondary node B.
Unmount the shared disk for AdvancedCopy Manager share data on the secondary node B.

When the secondary node B (it does not perform from Step 4 to Step 8) remains, perform from Step 4 in the node. When operation from Step 4 to Step 8 is completed by all secondary node B, go to Step 9.
Mount the shared disk on the secondary node A.
Mount the shared disk for AdvancedCopy Manager shared data on the secondary node A.
Execute the cluster unsetup command on the secondary node A.
On the secondary node A, execute the following command after blocking other users from accessing the shared disk for AdvancedCopy Manager shared data:
# /opt/swstorage/bin/stgclunset_hacmp -n Logical-Node-Name |
Check the objects to be deleted.
Information about the logical node specified by the command is displayed. Confirm the displayed information, and press the Enter key.
# /opt/swstorage/bin/stgclunset_hacmp -n nodeMGR

AdvancedCopy Manager settings were as follows.
        Cluster system : High Availability Cluster Multi-Processing
        Node type      : Secondary
        Mount point    : /STGMGRDISK
        Node name      : nodeagt
        Service        : STGMGRSRV
        Function       : Server
        Number         : 2
        MODE           : Normal
Do you want to continue with un-setting of AdvancedCopy Manager cluster? [default:y] |
When interrupting cluster environmental unsetup processing, "n" is inputted, when continuing processing, "y" is inputted, or press the Enter key.

The number of nodes which is not carrying out cluster unsetup command is outputted to "Number". In a secondary node, it is surely set to 2.
The cluster unsetup command is executed on the secondary node.
The window indicating cluster unsetup command completion opens.
swstf8103 The cluster deletion of the secondary node has been completed. Next, delete the cluster environment of the primary node. # |
Unmount the shared disk on the secondary node A.
Unmount the shared disk for AdvancedCopy Manager share data on the secondary node A.
Mount the shared disk on the primary node.
Mount the shared disk for AdvancedCopy Manager shared data on the primary node.
Execute the cluster unsetup command on the primary node.
On the primary node, execute the following command after blocking other users from accessing the shared disk for AdvancedCopy Manager shared data:
# /opt/swstorage/bin/stgclunset_hacmp -n Logical-Node-Name |
Check the objects to be deleted.
Information about the logical node specified by the command is displayed. Confirm the displayed information, and press the Enter key.
# /opt/swstorage/bin/stgclunset_hacmp -n nodeagt

AdvancedCopy Manager settings were as follows.
        Cluster system : High Availability Cluster Multi-Processing
        Node type      : Primary
        Mount point    : /STGMGRDISK
        Node name      : nodeagt
        Service        : STGMGRSRV
        Function       : Server
        Number         : 1
        MODE           : Normal
Do you want to continue with un-setting of AdvancedCopy Manager cluster? [default:y] |
When interrupting cluster environmental unsetup processing, "n" is inputted, when continuing processing, "y" is inputted, or press the Enter key.

The number of nodes which is not carrying out cluster unsetup command is outputted to "Number". In a secondary node, it is surely set to 1.
The cluster unsetup command is executed on the primary node.
The window indicating cluster unsetup command completion opens.
swstf8102 The cluster deletion of the primary node has been completed. # |
Unmount the shared disk on the primary node.
Unmount the shared disk for AdvancedCopy Manager share data on the primary node.
Delete port numbers.
Delete the following services defined in /etc/services during cluster setup. Delete the services on the primary node and the secondary node. Use the OS command such as vi to delete the service from /etc/services.
Communication daemon for transactions: stgxfws_Logical-Node-Name
Start the Resource Group.
The function of High Availability Cluster Multi-Processing is used, and start the transaction stopped in step 2. This operation is not necessary if the Resource Group was deleted in step 3.
Please refer to High Availability Cluster Multi-Processing User's Guide about the start method of a resource group.
Contents
Index
 
|