Machine Administration Guide 2.6
Contents Index PreviousNext

Appendix B Disk Drive Replacement> B.2 Flow of Fault Replacement> B.2.2 Replacing disk drives

B.2.2.1 Hot swap

To perform hot swap, execute the menu item "The Faulty Hard Disk Drive Replacement (Hot Swap)".

The menu item for faulty hard disk drive replacement differs depending on the disk unmount mode as follows.
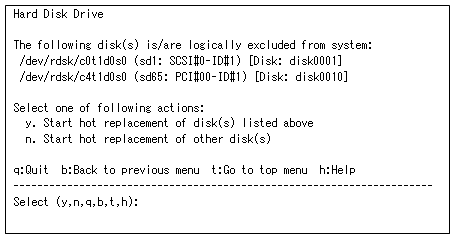
  1. When you select the menu item "The Faulty Hard Disk Drive Replacement (Hot Swap)", the following menu opens:

    This menu lists the disk drives that have been automatically unmounted by GDS and can now be replaced.
    Each disk name is displayed in the following format:

    <logical device name> (<instance name>: <unit name>) [Disk: <SDX disk name>]

    Logical device name

    :

    Represents the logical device name of the applicable disk.

    Instance name

    :

    Represents the instance name of the sd driver.

    Unit name

    :

    Represents the unit name used in "Chapter 5 Messages" in the "Machine Administration Guide" (this manual).

    SDX disk name

    :

    Represents the SynfinityDisk/GDS disk name.

  2. Enter "y" if you are going to replace the disk that has automatically been unmounted by GDS.

    Enter "n" if any disk has been unmounted in another unmount mode and you are going to replace that disk first.
    For an explanation on replacement in this case, see 2, "Other unmount modes."
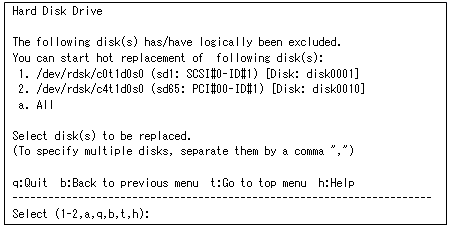
  3. When you enter "y", a menu for selecting the disk to be replaced opens.

    If you are going to replace all the disks that have been automatically unmounted by GDS, enter "a".
    If you are going to replace only a specific disk, select that disk.
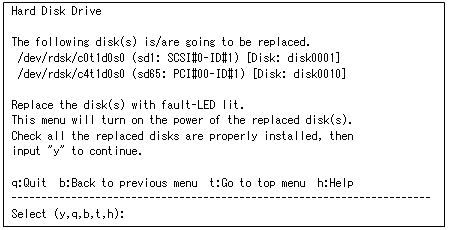
  4. When you select the disk to be replaced, the following screen opens.

    The Fault-LED (amber) on the relevant disk lights.
    Physically replace the disk.

  5. After replacement is complete, enter "y". Disk power-on processing is performed and the result is displayed as follows:

  6. Check the result and enter "y". The screen for selecting the operation for mounting disks in GDS opens.

    The subsequent procedure is explained in Section B.2.3, "Mounting disks."
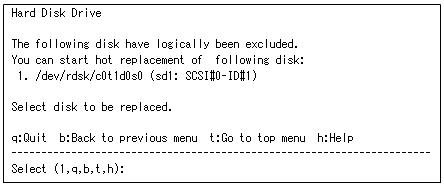
  1. If you are going to replace a disk that has been unmounted in a mode other than automatic unmounting by GDS, the following menu opens when you select the menu item "The Faulty Hard Disk Drive Replacement (Hot Swap)".

  2. The disks reported as swappable to Machine Administration are listed.
    Select the disk you are going to replace. The following confirmation message appears.

  3. If the displayed disk is the target disk, enter "y". Electrical disconnection of the disk is performed and the following message appears:

  4. Replace the disk for which the Fault-LED (amber) lights.
  5. After replacement is complete, enter "1". The subsequent procedure for mounting disks is explained in Section B.2.3.3, "Mounting a disk that has been hot-swapped after unmounting by means other than GDS."

Contents Index PreviousNext

All Rights Reserved, Copyright(C) FUJITSU LIMITED 2001-2005
All Rights Reserved, Copyright (C) PFU LIMITED 2001-2005